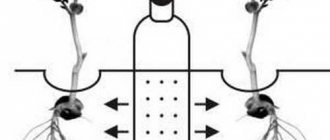
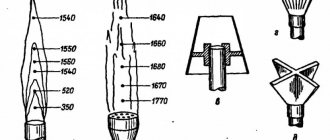
Components of flint cartridges
The first “sleeves” were tubes made of wood or reeds (less often completely silver), the height of which was about 10 cm. Of course, they were hollow inside.
After “loading” the measure of gunpowder, the holes were plugged with either a rag or wool. The tops of the gazyrs were trimmed with caps, which just “stuck out” from the pockets of the Circassian coat, decorating the clothes. It was these caps that made the “sleeves” popular. And even though today the gazyr is just a wooden stick - an imitation of an ancient cartridge, its decoration - the cap - deserves a separate discussion.
Thimble cap
Depending on the financial situation of the owner of the Circassian coat, the caps that are attached to the gazyrs are made from:
- Walrus or ivory bones.
- Buffalo or aurochs horns.
- Metal - iron, copper or silver.
But even inexpensive material is subjected to additional processing and engraving, giving it special meaning. It would seem that a small element, only 2.5 - 3 cm high and about 1.5 cm in diameter, nevertheless plays a major role in the finishing of clothing.
Take a look at a real highlander - his Circassian coat is decorated with about 20 gazyrs. Their caps are made in the same style and are sure to be combined with other elements of the “uniform”. The miraculous inlay covers almost the entire chest of a man and even today serves as cover from blows with cold weapons, in this their function is similar to a Cossack papakha. Now it is clear how versatile gazyrs are; their purpose is not limited to decoration.
How to make gasyri at home
How to make gazyri with your own hands? It would seem that an imitation of the “ancient” gazyr is within the capabilities of someone who likes to make something with their own hands. Find smooth cylindrical sticks, sand them, and paint the ends with contrasting paint. By the way, this is exactly what some highlanders did, and the ends of one stick were painted in different colors, for example, black and white. Thus, the same “cartridge” was worn on different Circassians - black clothes were decorated with white, and white – with black tips. And yet, only real masters know how to make gazyri according to all the rules. Look at items handcrafted by the best professionals and you will see that this finish is worthy of respect.
The easiest way to make metal gazyri at home is by chasing. To work, you will need to purchase embossing - special tools with which various patterns are extruded onto metal. You can master the basics of this craft in just a few days, but it will take a lot of time to turn it into an art.
They begin the process by creating the “thimble” itself - they make it themselves from thin sheet metal or order the caps from a craftsman, and then they themselves deal with their finishing.
The minting itself includes several stages of work:
- Transfer the pattern from paper to metal. Cover it with gouache and soap, and then carefully apply the pattern through copying so that it is the same on all caps.
- Place the workpiece on a pre-made stand and heat it well so that the metal becomes more pliable. It is the metal stand that needs to be heated so that it transfers heat to the workpiece.
- Select the desired embossings and apply a pattern along the contours of the design.
- Correct the product using a wooden chisel.
- Grind the finished gas.
- Repeat the process with all the blanks.
Since the gas caps are small, the appropriate tools are also needed. Working with them will be quite delicate, painstaking, requiring good vision and a steady hand. In addition to embossing, you can cover gazyrs with engraving, blackening, and apply patterns with paints and colored varnish. Moreover, it is quite possible to combine different finishing methods, which is what Caucasian jewelers often do.
When the caps are ready, the “cartridge” itself is made, and since now it performs purely decorative functions and does not need to be hollow, simply cut it out of wood. The only thing that is required is high-quality and beautiful wood without knots, which can be varnished or simply polished so that the wood becomes smooth, pleasant to the touch and shows its structure in all its glory.
Gas burner design
Hardware stores sell a large number of different models of gas burners for safe use. For example, the popular propane design can be of various modifications, even the size of a regular jewelry pen. The advantages of factory models include a high degree of safety and product certification. But on the other hand, the design is not complicated, and making such an instrument at home will not be difficult. And since any product in the store is not cheap, especially a burner, novice craftsmen can and should learn to make it themselves.
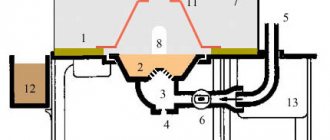
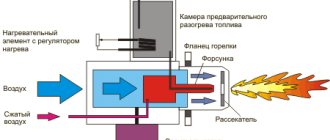
The gas burner device includes the following elements:
- metal body;
- nozzle;
- gearbox;
- fuel supply regulator;
- unit for securing the cylinder;
- head.
The metal body is also equipped with a special glass, with the help of which the fire in the burner will not be blown out. The design includes a metal handle. As an alternative, other materials can be used for it. Its dimensions should not exceed 100 centimeters. A wooden holder is installed on the handle, and then the hose is pulled on. There is also a gearbox with a valve. They can regulate the amount of gas burned, its length and, accordingly, its supply. A similar design is also equipped with a nozzle for igniting gas.
A gas burner is also called a propane burner. This indicates that propane gas or a mixture of propane and butane is used as fuel. A special container or cylinder, which is located behind the burner, is filled with this substance.
Many people are interested in how to make a burner with their own hands. As can be seen from the list, the design of a gas hand burner is not complicated, but on the contrary, it is even very simple for independent production. It does not have complex elements that require a lot of money and time. Its production will require a little time and labor. And if you necessarily study all the diagrams and drawings from professionals, and also treat the work responsibly, you will end up with a convenient and safe device.
In practice, a person who has never made similar structures, after half an hour or an hour, understands how to make a burner on his own, and does it.
If we talk about the use of such a burner, it can be different. For example, there is a burner for a boiler, a gas-air design, a homemade design from a burner for heating with household gas, etc. They even manage to make a burner from a lighter. This design, of course, is not suitable for performing the functions of a gas cutter, but for some purposes it can be used. There are also burners for copper melting with a built-in nozzle.
Advantages of a DIY tourist gas burner
- It's not difficult to do it yourself
- Does not have large sizes
- No need to light a fire
- The flame is almost invisible
- Enough heat for cooking
- Works in all weather conditions
- Fuel is available for purchase
- Economical burner
So, you need a tourist gas burner with your own hands, we offer you several ways, even without the use of plumbing tools.
Self-assembly of the product
Assembling a propane gas burner with your own hands is the most interesting and exciting stage of the work. For beginners and inexperienced craftsmen, it is necessary to study it as accurately as possible to obtain a quality product. It is necessary to take into account all the nuances and advice.
First, you should think about the most interesting thing - the handle of the product. To create it, you can use any material. As an option, a handle from an old soldering iron or other device is perfect. The supply tube must be made of steel only. Other materials will not work at all.
It is very important at the initial stages to pay attention to the dimensions of all structural elements. For example, the diameter of the supply tube should not be more than 1 centimeter, and the thickness of the steel should be 2-3 millimeters. Such an element must be fixed to the handle using glue or another substance to fasten such parts.
Burner body
The basis of the burner is its body. It is also made of steel, oddly enough. For such purposes, it is better to use a brass rod with a diameter of 2 centimeters. To make a divider, you may also need similar material. After this, several holes should be made so that air can circulate freely inside the product. This is done for a well-known reason - fire cannot burn without oxygen. As a rule, five or six such holes are required, and their diameter should be one millimeter. They are done in the structure divider itself.
Next you need to mount (push) the divider into the burner body. This will require quite a lot of force. In contrast to the divider, the internal flange should be installed with a small gap of approximately half a centimeter, thereby in the future the huge flow of gas that enters the igniter will be slowed down.
Nozzle device
For a homemade propane gas lamp, you also need to make a jet. With the help of such a part, fuel supply is ensured. The fuel is propane, which is in a cylinder. For manufacturing, you should use a metal rod. You need to make a blind hole in it. To do this you need to have a 2 mm drill. The jumper needs to be made with a 4 mm drill. Such holes must be tapped with a hammer and sanded.
Next, a hose from the gearbox is mounted on the end of the tube. It must be made of a special rubber and fabric mixture. Fastening occurs by fixing the hose with a clamp. After the hose is securely fastened, it is necessary to correctly set the pressure in the cylinder and supply gas to it. With the help of such actions, air is completely expelled from the system. If everything is done correctly, then the length of the fire should be at least 40-50 millimeters.
A homemade design is a very good tool and a unique tool that will always help a young master in any household situation. And since it is very easy to produce it yourself, the popularity of such a tool is growing every day.
Advantages of the device
As mentioned earlier, a DIY gasoline burner can be useful anywhere: when camping, in the country, in the garage, in places without electricity, and so on. The device can also be useful in places where lighting a fire is prohibited or not recommended .
Thanks to the small and efficient flame that our burner will produce, it can be used in any reasonable place. By the way, it should be noted that any gasoline burner can withstand any weather conditions, up to a drop in external air temperature to 35-40 degrees Celsius.
And here are the advantages that a gasoline burner can boast over its analogues:
- very easy to use;
- economical;
- compact;
- cheap fuel.
I would like to say that the last point is the most significant, since the fuel for our device, as you might have guessed, is gasoline, which can easily be purchased at any gas station, or drained from your car’s fuel tank. Also, in a gasoline burner, fuel is consumed quite slowly, which adds greater efficiency to the product.
Which gas to choose
A gas burner for do-it-yourself soldering is made exclusively using fuel such as:
- natural gas;
- propane;
- butane;
- propane-butane mixtures.
In other words, on hydrocarbon mixtures with atmospheric air. If you use fuel consisting of 100 percent isobutane, you can get a combustion temperature of 2000 degrees Celsius.
Acetylene is a substance that allows you to get temperatures up to 3000 degrees. But such a device is currently not popular for several reasons: the need for constant oxygen, a high level of danger, the need to use expensive calcium carbide for work and other reasons.
It is more than possible to obtain hydrogen at home, and such a device is capable of producing a temperature of 2500 degrees. But the starting materials for producing this substance are also very expensive (the main mixture for production is hydrocyanic acid). Besides, they are unsafe. Another disadvantage of hydrogen is that it can be smelled.
A substance such as methane is not used in household burners for obvious reasons. In addition, the gas is very poisonous. If we talk about methane fumes, they do not produce a large flame when burned, and the average temperature of the structure is 1100 degrees.
How to achieve safety
Those who are interested in the question of how to make a burner at home need to first understand all the safety measures. In order for a homemade design to be effective in operation, it is necessary to constantly follow the prototype drawings and there is no need to make your own changes there.
Very often a situation arises when the flame burns unevenly and smokes heavily. To get rid of this effect, turn the body on the nozzle thread towards you. This should be done until the gas gives a good and desired shade, as well as a stream of fire. If the nozzle thread moves very freely, it must be sealed with tape.
In order for a small mini-gas burner or other home-made structure to be safe to use, it must be checked for leaks before the first start and subsequently from time to time. Particular attention should be paid to solder joints, places where connectors, sleeves and other important points are combined. After this, you need to wait, opening the valve a little. You should wait until the flame starts. All stages occur automatically, so there is no need to take additional actions. After this, you just need to adjust the flame level and you can start working.
Thus, a torch is a necessary tool in the home for beginners and experienced craftsmen.
>Gasoline torches for soldering and everything connected with them
Making a mini burner
Miniature torch
If you need to work with small parts or circuit boards, then such a large torch will not suit you at all. In this case, you can make a small burner from improvised materials that will produce temperatures up to 1000ºC. You will need:
- Regular dropper – 2 pcs.
- Needle for inflating balls.
- Needle for a medical syringe.
- Soldering iron.
- File.
- Copper wire.
- Pliers.
- Grinding stone.
- Flux for soldering.
- Thermal gun.
Making a homemade mini-burner
Armed with all the tools, you can get to work. For convenience, we divide the process into the following stages:
- The first step is to make a cut in the ball needle with a file. It should be a little further than the middle. There are needles that already have such a hole, this is even better.
- Then take the syringe needle and bend it about 45˚ in the middle.
- Since the tip of the needle is cut at an angle, it must be ground down on a grinding stone so that an even, straight cut is formed.
- Insert a thin needle into the ball needle hole. Its tip should protrude 1–2 mm.
- Secure the needle by wrapping thin copper wire around the joint.
- Fixing the needle
Lubricate the wire with flux and solder the joint to make everything airtight. - Take out the IVs and connect them to the bases of the two needles.
- Move the clamp-regulators towards the needles; they will serve as a handle and regulators for the supply of air and gas.
- Connect them together with a heat gun.
- That's all, now all that remains is to connect the gas source (lighter or gas canister) and a compressed air cylinder.
Gas will flow through the thick tube, and compressed air through the thin (medical) tube. You can change the pressure of gas and compressed air thanks to the dropper regulators. This small burner will be useful for use at home.
A gas burner is a useful tool in capable hands. In order to have it, you don’t have to go to the store and spend money to buy it. You can do everything yourself. The main thing is to prepare all the materials and tools, as well as research the technology for manufacturing the burner. Before starting work, we recommend that you familiarize yourself with the structure of the tool and the principle of its operation. Then it will be much easier for you to do everything yourself.
Do-it-yourself gasoline torch for soldering
Purchasing a ready-made gas burner is not always possible (for various reasons). In this case, it will be useful to know that you can make a gasoline torch for soldering yourself. Note that homemade gasoline devices are no worse than purchased ones. A DIY device is just as effective.
If you bring a lit match to the spout of a gasoline burner, you will be able to see a fire instantly flare up. Steady combustion of gasoline will continue for five minutes (+/-2 minutes). The flame temperature at its tip will reach more than 1000° C.
Note that with such a burner you can easily melt hard solders, heat treat small tools, melt various metals, solders, and even soften glass.
There is no need to make many parts of a homemade gas burner, since they can be borrowed from other things. For example, homemade parts such as a rubber bulb can be made from a spray bottle.
The homemade burner device contains:
- Frame;
- Sleeve with hook;
- A tube;
- Emphasis;
- Pen;
- Rubber ring;
- Balloon;
- Pen;
- Rubber bulb;
- Filler.
Manufacturing:
- The burner body can be turned on a lathe. Any grade of steel can be used as a material for the manufacture of this important part. It is worth paying attention to the fact that the body of the part is composite (one end is open, and the other is closed with a plug). There is a hole in the plug, the diameter of which is 0.1 millimeters larger than the outer diameter of the tube. With this quality, the body can move along the tube quite tightly, while maintaining a tight seal.
- A ring made of metal mesh and slag wool must be installed inside the housing.
- Next, you need to make a sleeve with a hook and a stop. You can use a steel sheet for this.
- The burner handle, which is essential for a gasoline device, is carved from beech or oak.
- The holes for the tubes (2 pcs.) are drilled very carefully. Thus, the axes of the holes should be strictly parallel. The finished handle is sanded and then coated with several layers of colorless varnish.
- Next, it is necessary that the end of the tube, which is passed inside the body, forms a nozzle. If you have PMTs-54 hard solder (adheres well to steel), try to solder the end of the tube with it, and then drill a 0.2 millimeter (diameter) hole along the axis of the tube. You can make your own solder. It must be said that solder consists of copper and zinc. In order to get zinc, you can use cups from an old electric battery. You need to empty the glass of its contents and then heat it over the fire. Next, you need to lower it into cold water, and then into a weak solution of hydrochloric acid. A clean glass is cut into pieces with scissors. Thus, we obtain zinc. Now it's up to copper. To do this, do the following: take copper wire; anneal it on fire; Finely cut the wire using scissors. Now you can pour pieces of copper and zinc into the crucible, maintaining equal proportions, after which you need to sprinkle with borax. Metals can be fused using a burner. After this, you will need to cool the resulting block and secure it in a vice. Then use a hog file to file it on all sides. The resulting sawdust must be mixed with borax.
Homemade gasoline burners like these will work great if done correctly. Please note: if you do not have enough experience in working with flammable materials, it is advisable to use commercial gasoline burners.
DIY methods for making a burner
As mentioned earlier, making a gasoline burner with your own hands simply cannot be very difficult. However, if you are new to this matter, then it is best to use the first method, which is the easiest.
First way
By the way, many people who have never even been interested in the question of this product have heard about this method of creating a gasoline burner. And yet we will need: two aluminum cans .
Naturally, they must be empty. You can use cans of beer, condensed milk, Coca-Cola, and so on. So, once you've completely rinsed and dried your jars, it's time to get started. Approximately in the center of the bottom of the first jar, you need to make 4 punctures using a nail . Exactly the same holes must be made around the perimeter of the rim of the can. So we made a blank, it is from it that the flame will burst out.
Now we need to cut off the part we made a little earlier from the rest of the can. The length of its side (side part) should be about 3-4 centimeters . You can cut using regular scissors. If they do not fit, you can use a knife or other sharp object.
The next step is to move on to the second can, from which you just need to cut off the bottom , and you should try to do this with the utmost care, without causing nicks. If nicks still cannot be avoided, you need to grind them off with sandpaper.
In conclusion, you just need to connect the two parts that we got. By the way, this is also not such a simple matter, since the cans have the same diameter. To avoid difficulties at this stage, you can simply make a small cut in the side of one of the cans. In this case, after this you need to create a tightness of the structure by wrapping its side surface with aluminum tape.
In order to give life to our DIY gasoline burner, you need to pour gasoline into it, then
heat its area with a lighter and set it on fire from above .
It is recommended to heat the burner for about 5–10 seconds, since immediately it will not be able to maintain the flame on its own. As you can see, making a high-quality gasoline burner with your own hands turned out to be a very easy task, which can take about 20 minutes.
Second way
If you haven’t forgotten yet, there is a second way to create a gasoline burner with your own hands. However, it is several times more complex than its predecessor. Naturally, it boasts a high level of reliability, strength and durability. Therefore, if you decide to create an excellent high-quality device for yourself that you will use for a long time, and you also do not mind the effort and time to make it, then this method is just for you.
So, to make such a burner we will need:
- Compressor . Here you can use an old car inner tube, which will need to be constantly inflated, or a standard compressor from an old refrigerator, if you have one.
- Receiver . An ordinary plastic canister with a volume of about 10 liters will do here. A dense and translucent cork is also required.
- Fuel tank . A two-liter ordinary metal barrel will be quite enough here. It is necessary to solder two tubes into its lid, the long one should be lowered to the bottom of the tank.
- Burner - can be purchased at the store or made yourself.
Once you have purchased all the necessary “ingredients”, you can begin making a gasoline burner.
To begin, fill the fuel tank described in the third paragraph with regular gasoline to about half the tank's entire capacity. Install a standard filter at the compressor inlet . It is made from a funnel and unnecessary stockings/tights.
Everything else is connected according to a standard and intuitive principle, which does not require a detailed description of the actions,
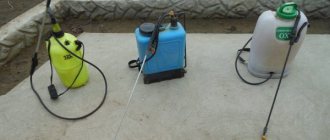
The best tourist gas burners
When traveling with tents or on a hike or rafting, cooking is a special ritual for which one prepares at the stage of preparation for the holiday, in particular, they think over a way to heat water and food. A fire is not always convenient, and it is not allowed to light a fire everywhere. A portable gas camping burner does not have these disadvantages.
Kovea Alpine Pot Wide KB-0703W
The rating opens with a gas burner for tourists of the South Korean assembly Kovea KB-0703W Alpine Pot Wide, created as an alternative to the famous Jetboil PCS system, which includes the flame output device itself and a liter pan. The main feature of Kovea is the presence of a heat exchanger at the base of the pan, which transfers the thermal energy of the flame to the maximum extent; thanks to it, a liter of water reaches a boil in no more than 3 minutes, saving gas up to two times compared to conventional similar devices. The low power in the presence of a heat exchange unit facilitates the efficient operation of the device in cold weather and rain; in addition, the gas is not wasted due to its presence inside the structure, and even strong winds do not threaten it.
The tourist burner is controlled by a remote control unit, switching the flame power and shutting off the gas is convenient even with splashing boiling water. In addition, the effective insulation of the thermal circuit with a neoprene cover allows you to hold the device while it is working, and for the convenience of pouring liquid, there is a handle on the body of the saucepan, by which, by the way, Kovea Alpine Pot Wide can be hung on any vertical surface, including in a tent and machine - the burner device with the attached cylinder is securely fixed at the base of the pan. Some tourists use such a device for preparing food and drinks even without stopping for a rest or in a boat while fishing.
It is convenient to store the device: when not needed, the components of the gas burner are placed in a saucepan. The Kovea Alpine Pot Wide system is compatible with KFG-230, KGF-450, KGF-110 cylinders, as well as collet cylinders with a Cobra hose adapter.
The cost of a gas burner starts from 9,800 rubles.
Advantages
- A universal device for use in a tent, outdoors or in a car;
- Conveniently folds;
- Low gas consumption 75 g/h;
- Does not harm hands when boiling when using a cover;
- Possibility of use all year round in any weather;
- Rich equipment (pan with lid, burner, mug, cover, burner, heat exchanger plug);
Flaws
- High price, but competitive compared to the Jetboil PCS prototype;
- The pan is primarily suitable for boiling water and heating liquid foods; you cannot cook or fry anything in it.
Fire-Maple Family FMS-108
The second place is occupied by the classic gas burner for tourism Fire-Maple Family made of stainless steel with the largest burner in the group that maintains a uniform wide flame - it’s convenient to boil a kettle and put a pan on. The size of the dishes can be any - the device has holders that fold out into a working plane with a diameter of up to 285 mm, and the supports are very stable to support the weight of a filled pan.
The Fire-Maple Family gas burner is equipped with piezo ignition and a convenient flame controller, and a screen around the perimeter helps protect the flow from the wind. To prevent gas from leaking when the cartridge is not accurately connected and disconnected, the design provides a protective nipple. Any threaded cartridges and cylinders with an FMS-701 adapter can be used as a gas source.
It is convenient to transport and store the Fire-Maple Family - its supports fold down, and the device takes on a flat shape that can be conveniently placed in a travel backpack.
The intensity of the flame allows you to boil a liter of liquid quickly - just over three minutes, while the gas consumption is slightly higher compared to the top burner - about 220 g. in one hour (to varying degrees depending on the type of cartridge).
You can purchase Fire-Maple Family FMS-108 from 5,500 rubles.
- Suitable for dishes with a bottom diameter up to 30 cm;
- Gas leak protection.
- Convenient to use in strong winds;
- There is piezo ignition;
- Sustainability;
- Relatively high gas consumption;
- The location of the can is lower, it is inconvenient to install with a large cartridge without a hose.
Pathfinder "Talking Fire"
Third place was taken by the Pathfinder “Talking Fire” burner with a remote canister, equipped with piezo ignition. It can be used with any cookware with a diameter of up to 250 mm, but you need to be careful when balancing - the burner only has 3 rays. For easy installation of the device on smooth and many surfaces, the legs are provided with a rubber coating. It is convenient to store the device in the special included case.
Compared to the previously discussed burners, the Pathfinder does not have wind protection; in order to use it in windy weather without reducing the efficiency of the flame, the device will have to be made from improvised means or purchased separately.
To operate the tourist burner, you will need a cylinder with a threaded valve PF-FG-230 (230 g) and PF-FG-450 (450 g) or a pressure valve with a collet chuck PF-FG-220 (220 g) with adapters PF-GSA-01 or PF-GSA-03, which will also have to be purchased additionally. Gas consumption is optimal - about 140 g/h.
The cost of the Pathfinder “Talking Fire” gas burner is about 2,000 rubles.
- Compact model;
- Low price;
- Suitable for dishes up to 250 mm in diameter;
- Low gas consumption;
- There is piezo ignition;
- Piezo ignition often malfunctions (it is better to have matches with you);
- There is no wind protection.
Kovea Backpackers Stove TKB-9209
The rating in the category of tourist burners is completed by a simple device Kovea Backpackers Stove TKB-9209, equipped with a flame regulator. The device is an attachment to a gas cylinder or cartridge that produces a powerful, wind-resistant flame, but there is no piezo ignition and you will have to use a lighter or matches. When not needed, the legs fold on their sides, the burner takes a flat position and is conveniently transported and stored in the pouch supplied by the manufacturer. Can be used with any standard threaded type cylinder or Cobra adapter.
The gas consumption of the South Korean-assembled tourist burner Kovea Backpackers Stove TKB-9209 is approximately 145-150 g/h, and the cost of the device itself is about 1,600 rubles.
- Compact device;
- Low price;
- Powerful flame, resistant to wind;
- Non-adjustable burner;
- Unstable design.
DIY gas burner
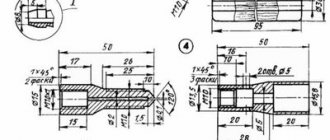
So, let's look at how to make gas burners for heating boilers with your own hands. A homemade gas burner for a solid fuel boiler can be assembled based on a valve from an oxygen cylinder, for example, VK-74. Its outlet pipe should be equipped with a homemade fitting, which can be connected to the gearbox using a rubber-fabric hose.
On the inlet pipe intended for screwing into the cylinder, you need to install a cap with a hole for connecting the nozzle. The latter can be borrowed from a gas stove or blowtorch.
It is necessary to weld a nozzle to the cap - a piece of steel pipe 100 mm long, the wall thickness of which is 2 mm.
There should be a gap of 15 mm between the cap and the nozzle, through which air will be drawn in, so first you need to weld three pieces of thick wire to the cap, and then a nozzle pipe to them.
The homemade burner is ignited in three steps:
- We open the tap on the gas supply line or on the cylinder (in the case of using liquefied gas).
- We bring a match, a lighter or a burning paper wick to the nozzle.
- Open the valve.
The power of this device can be adjusted by closing or opening the valve. The green-blue part of the flame is the hottest.
The nozzle setting is to position the torch in its center. To do this, the wire holders are slightly bent.
If the burner is needed for operation, a tip bent at an angle of 45 degrees should be welded to its nozzle.
A steel cylinder valve can also serve as the basis for a homemade gas burner. A plug with a hole made in it for the nozzle is screwed onto its pipe. In this case, the “donor” of the jet is a blowtorch, the nozzle of which has a diameter of 0.8 mm. The nozzle of the burner itself should have a diameter of 30 mm. By changing its length using attachments, you can adjust the size of the torch. A valve can play the role of a regulator.
The best soldering torch with piezo ignition
For soldering small-sized parts, mini-welding is used in the form of a gas torch, the main working component of which is a directed jet of high-temperature flame. Almost all devices are equipped with piezo ignition. Such devices are used in electromechanics, electronics, jewelry and medicine - wherever work with thin parts and circuit boards is necessary.
Virax MAPP PRO
The first among Virax MAPP PRO soldering torches is a French-assembled device with a melting point of 24000C. The burner is a small oblong can with a curved metal tip, at the base of which a piezo ignition is installed. Light weight and convenient shape allow you to work with soldering in any position, overhang or on a surface, in any environmental conditions. The volume of the can is 788 ml, which is enough for 2.5 hours of continuous operation. True, the weight of the device is 1.18 kg - a little heavy for unaccustomed fingers.
The Virax MAPP PRO gas torch can be used for hard soldering up to 18 mm in diameter, and soft soldering up to 54 mm. The cost of the device is over 10,000 rubles.
- Ability to work in any temperature and weather conditions;
- Optimal possible soldering diameters;
- High flame temperature;
- Long-term operation from one can;
- Relatively large volume for a hand torch;
- There is a cylinder included;
- High price.
KEMPER 1064 E
The KEMPER 1064 E soldering torch for universal use is an attachment for a gas cartridge for soldering copper, bronze and brass pipes of different diameters. A convenient handle with a piezo button with flame fixation and regulation allows you to use the device like a regular handle, working in any plane with a directed jet of temperature 24000C with a flow rate of only 205 g/hour, which is less than the leader in the category rating (315 g/hour).
The KEMPER 1064 E gas burner is equipped with interchangeable nozzles, one of which creates a swirling flame, the other a thin jet for performing delicate work. There is no gas canister included, you must purchase one with an EU(7/16) threaded connection.
The cost of the KEMPER 1064 E burner nozzle is about 5,800 rubles.
- There is preheating of the flame to maintain its stability in any operating position;
- Low gas consumption;
- 2 flame nozzles included;
- There is piezo ignition and flame regulator;
- No gas cylinder included.
ROFIRE Piezo 1950°C
In third place in the ranking is a gas burner for soldering with a lower flame temperature - up to 1950 degrees. This is sufficient for working with soft solder in electronics and jewelry.
The valve at the back of the handle is responsible for regulating the jet - it’s not the most convenient, but it doesn’t get confused during operation. For comfort, there is a support bracket on the burner head. ROFIRE Piezo 1950°C is used not only for soft soldering up to 22 mm and hard soldering up to 15 mm, but also for singeing paints and fire stripping.
The canister is not included in the delivery package; you must purchase a propane-butane or other mixture in a canister with an EU(7/16) threaded connection.
The cost of a gas burner is not the highest - about 5,300 rubles.
- Comfortable burner handle;
- Suitable for singeing, stripping, soldering soft solders;
- Precise flame regulator and support bracket;
- No cylinder included;
- It is inconvenient to regulate the jet strength.
FOXWELD MT-55
The classical type gas burner FOXWELD MT-55 is designed for soldering and heating metal parts; it is actively used for heating frozen pipes, for melting soft and hard metals in household, jewelry and industrial work. It is useful in the absence of the ability to connect the welding machine to the electrical network, but it is necessary to take into account the relatively large volume of gas consumption, for example, for thawing pipes. It is also found in restaurant kitchens, where it is used for searing creme brulee and thawing meat.
The FOXWELD MT-55 device works together with a gas cartridge with a collet clamp, charged with propane-butane, isobutane). The design of the device is dismountable from durable plastic with a refractory mouthpiece.
The cost of the FOXWELD MT-55 device starts from 336 rubles.
- Universal use;
- Connects to all cylinders with a collet clamp;
- There is a piezo and flame power regulator;
- Suitable for high-melting and soft-melting metals;
- Not the strongest design;
- There is no cylinder included;
- The body is damaged;