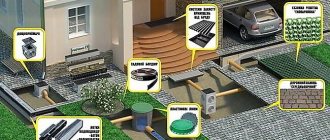
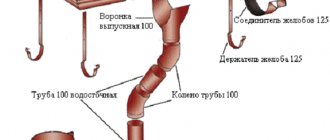
Many summer residents think about what drainage can be made from when they find out the cost of modern building materials. The question is reasonable, because in addition to the use of numerous specialized devices for draining excess water from the site, there are other methods, often very ancient and undeservedly forgotten. True, their implementation will require a little more labor and patience than with modern construction methods, but they are practically cost-free. On the other hand, an important factor is the emergence of new, technologically advanced materials, inexpensive and practical. In this article we will look at how to drain drainage from a site without extra costs.
Even construction waste can be used as drainage material
Several simple ways to organize watering
Several options for drip irrigation through bottles have been developed, which are successfully used in practice. All of them work quite effectively and allow you to forget about the problem of plant moisture for 2-3 days.
Underground root irrigation
To organize watering using this method, you will need a plastic container with a volume of 1.5–2 liters. You need to make several holes in it with an awl or a gypsy needle at a distance of 3–4 cm from the bottom. The number of holes depends on the type of soil, for example, for sandy soil two will be enough, but for loamy soil you will have to make at least four holes. To water moisture-loving plants, small holes are pierced across the entire surface of the bottle.
Dig the container between the plants upside down to a depth of approximately 10–12 cm, with the neck remaining above the ground. Pour water through it using a watering can and screw on the lid, in which you have previously made a hole for air to escape.
This is how plants are watered
Another option is to bury the bottle in the ground, neck down, after making several holes in it and screwing the cap tightly. The bottom of the container is cut off in such a way as to form a kind of lid that will prevent water evaporation. This method of irrigation is more convenient, since the tank is filled with water through a fairly wide hole.
If necessary, the drip irrigation time can be extended. To do this, use larger containers - five-liter plastic bottles. In this case, holes are pierced on one side of the container, and the lid is cut on the other. The bottle is placed in the ground horizontally with the holes down.
Surface irrigation scheme
Surface watering of plants
The containers do not need to be buried; they can simply be hung above the plants. To organize drip irrigation from plastic bottles using a surface method, you need to build strong supports above the bushes and attach containers to them. The bottle is hung with the lid down, having first pierced one or two holes in it, or vice versa, they make holes in the bottom and secure it with the neck up.
This method of irrigation is more convenient and of high quality, since the plants receive warm water heated by the sun.
In addition, the direction of the drops can be accurately determined; it is important that they fall only into the soil, without affecting the leaves of the plants. If you notice that the fertile layer of soil is being washed away, move the container to another location
You can see how to make drip irrigation from plastic bottles in the video.
An improved way to moisten the soil
To organize more effective drip irrigation, in addition to the bottle, you will need an empty ballpoint pen. You need to cut off the writing part from it and rinse it well. In the resulting tube, one end must be closed with a toothpick or a sharpened match, then, stepping back about 2 cm from the closed edge, pierce a small hole with a needle.
Now you need to make a hole for the rod in the bottle. If you install the container with the neck down, then pierce a hole at the level of the bottle hanger. If there is a bottom at the bottom, then make a hole, 10–15 cm away from it. Insert the rod with the closed end outward and compact it well with plasticine. Pour water into the container and place it near the plant as shown in the photo.
1 – water bottle, 2 – rod, 3 – closed end of the tube
With this method of drip irrigation, moisture goes directly to the roots of the plants. The watering speed is controlled by the width of the hole in the rod. Practice shows that when using two-liter containers, the soil will remain moist for five days, but provided that no more than 10 drops of water are poured out within five minutes.
Drip irrigation using plastic bottles is a realistic and inexpensive way to organize an effective irrigation system for garden plants. This is an ideal option for areas that do not have a constant water supply, and for summer residents who, when leaving for several days, can be sure that the planted crops will not die from lack of moisture.
Website about the dacha
12/09/2018 admin Comments No comments
Drip irrigation is considered the most effective method of artificial soil irrigation. All water goes directly to the roots of the plants, without stagnating on the surface and without washing out the fertile layer. You can organize soil moistening in this way using ready-made systems, but their price is quite high and not everyone can afford it. There is a worthy alternative - using improvised means, you can make drip irrigation from plastic bottles with your own hands completely free of charge.
Foam drainage
If you plan to arrange drainage from scrap materials, use polystyrene foam. You can assemble it, or you can buy it at a hardware store at a reasonable price. The material has long been known for its versatility. It is used to protect equipment from damage and to provide a drainage layer for indoor plants. Sometimes polystyrene foam is used to construct drainage systems in small areas.
Foam drainage
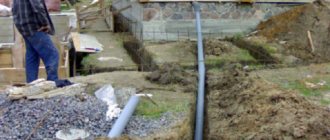
Work should begin with earthworks. Trenches are dug at a slope towards the location of a collection well, collector or artificial reservoir. A cushion of sand and crushed stone is placed in the dug trenches, then a layer of pre-crushed foam. The last step is laying the soil. To increase the efficiency of the drainage system, geotextiles can be placed in the ditches.
If the area is heavily flooded, groundwater is located high, which from time to time accumulates in the basement, it is quite difficult to solve the problem using improvised materials. In small areas with slightly elevated humidity levels, available materials perform their functions efficiently.
What else can you assemble tubular drainage from?
If there are pipes left after laying the sewer system, you can safely use them to create a drainage system with your own hands. Using a drill, holes are made in them. Next you should proceed as when laying the drainage of the area with plastic pipes.
You can also make drainage with your own hands from another available material - asbestos cement. These pipes also need to be perforated. The holes are made at a distance of 10-20 cm, the cutting width is 3-7 mm. They are arranged in a checkerboard pattern. The laying mechanism is the same as with plastic pipes.
Asbestos cement pipes are connected with cylindrical pipes of the same material. The ends of the pipes are cut straight, strictly perpendicular to the longitudinal axis of the pipe. The coupling should be 6-8 mm larger than the outer diameter of the pipe.
At the turns of the tubular drainage structure and on large flat sections, inspection wells are installed. They are needed to monitor the operation of the system.
Application of modern technical textile materials
Modern technological fabric materials make it possible to independently manufacture soft drainage. Its design is based on the special membrane properties of tecton, which allows moisture to pass through only one direction and does not allow it to escape outside. Geotextiles will also be required, which will form a filter layer that prevents debris, silt and soil from entering the drainage system. Soft drainage is constructed as follows:
- A drainage ditch is dug with a slope towards water drainage.
- A tecton is laid on the bottom, forming a U-shaped profile in cross section.
- Geotextiles are laid on top of the tecton, extending 40 cm to the edges of the pit on both sides.
- The matter is covered with crushed stone or other small stone;
- Crushed stone is wrapped in geotextile.
- The drainage ditch is filled with sand.
This drainage system is easy to manufacture, inexpensive, effective and durable. However, the last advantages of all other methods discussed in the article, and some difficulties in manufacturing, are compensated by the low cost of materials. All you have to do is choose a more suitable method - each of them will be able to cope with the task of removing excess moisture.
Types of drainage systems
Open drainage
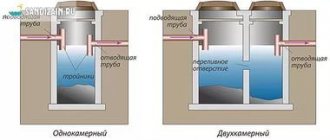
There are two types of drainage system:
- Open
- Closed
The first type is used to remove surface water that forms after snow melts or rainfall. Typically, open drainage looks like this: grooves 0.7 m deep and 0.5 m wide are dug throughout the area with a certain slope. Often plastic or concrete trays are placed in the recesses, covered with a grid on top. A layer of sand about 10 cm thick is poured onto the bottom of the ditches and compacted thoroughly.
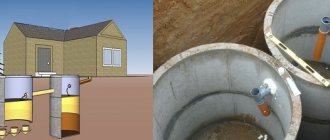
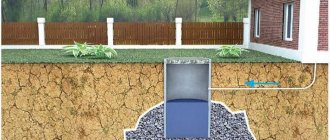
The second type of drainage, closed, is used to drain groundwater. Below the freezing level of the soil, ditches are dug with a slope, at the bottom of which pipes are laid to drain water into a drainage well.
In addition to using piping in a closed drainage system, backfill material can be used using broken stone or brick placed inside the trench. This method is inexpensive, but ineffective, since it quickly leads to silting of ditches. An alternative and effective way to create a drainage system from the soil is drainage with crushed stone without pipes, or so-called soft drainage.
Installation nuances
After all the preparations have been made, let’s take a closer look at how to equip a drainage system with your own hands. Installation of brackets is carried out with the obligatory creation of a slope towards the funnels, when, taking into account the linear meter, a vertical displacement of 5 mm is assumed. If there is a need to accelerate the flow of water, this slope can be increased to 10 mm.
If the length of the pediment does not exceed 10 m, a slope is made to one side. A larger value involves the installation of an additional funnel installed in the middle with a drain pipe connected to it to form a drain. But you can also make two slopes of the gutter going from the middle of the gable.
To install gutters you need:
- fix the first bracket at the point of maximum height of the sewerage system;
- fix the second one, taking into account the fact that it will be lower than the first one, thereby creating the required slope;
- Stretch twine between the installed brackets, which serves as a guide for marking the attachment points for other supporting parts of this type.
The described process of installing storm sewers looks quite simple from the point of view of its implementation, but there are certain nuances. To create a slope, they mainly focus on the horizontal, which is the front board, known as the wind board.
But is it always installed with strict horizontality? It is advisable to verify this, for example, using a hydraulic level or level. You can also use a simple option in the form of a bubble device, but only if its length is 1 m or more.
Site drainage methods
You can choose a complex buried system, you can choose a closed but shallow one, you can limit yourself to an open system, or you can creatively approach the problem and build drainage from available items - it all depends on your desire and skill. Moreover, there are a huge number of types of drainage, and in different classification reference books they are often even called differently. Here we present the simplest and most accessible types for creating with your own hands.
You should always remember: the simpler the drainage system, the fewer components it has, and the longer it can exist without control and repair, the more reliable it is.
Surface drainage
The simplest type of drainage is surface. It is used for local collection and removal of water coming from above: rain, snow, car washing, watering paths with a hose. Therefore, such systems are always installed in the foundation area, on paths and paved areas, in and around garages. There are two types of surface drainage: point and linear.
Small square, rectangular or round water collectors (rain inlets) are point-installed in the required places: under drainpipes, water taps, on platforms, paths, near garages, and so on. As a rule, they are connected to storm sewers. Catchment grates are usually made of plastic, but where special loads are expected, steel, aluminum or cast iron are used.
Surface linear drainage
Surface drainage is done to remove water from a large area. The system consists of trays installed in compliance with the slope and supplemented with gratings and sand traps. Trays can be made from polyethylene, polypropylene, polyvinyl chloride, concrete, polymer concrete, and composite materials. Grates, as for point drainage, can be plastic, metal or cast iron.
Sand traps
Often, point and linear storm inlets are equipped with a sand trap to prevent the pipes from becoming clogged: then the drainage efficiency will drop to zero. A sand trap is a body made of plastic, or sometimes concrete or composite material. A plastic basket is inserted into it, which makes cleaning easier. Water comes from above and leaves through a side outlet located above the bottom of the basket. Sand and soil particles settle to the bottom, and clean water enters the system.
Sand traps are installed at the junction of surface drainage gutters and sewer systems. They come in different sizes and have different trapping abilities. Therefore, their number and parameters must be selected based on the characteristics of the site: average precipitation, the nature of the soil (clayey, sandy) and topography. Typically, the manufacturer describes the options for using a sand trap on the packaging.
It is absolutely clear: in everyday life, point and surface drainage must be combined. And the optimal system is always an even more expanded complex: it often contains deep elements.
Deep drainage
It is clear that surface drainage alone is not enough for all situations. We do not take into account soil water and the rainwater that seeped in through the soil in places where rainwater inlets are not installed.
Where it is necessary to reduce the level of soil water or simply drain the area, drains are laid with a slope towards the collectors (or to pits and reservoirs on the site or outside the site). This type of drainage is called deep.
If drains are placed around the foundation of a house or fence, then this is done below the base of the foundation.
This is a serious job that requires large excavations, significant costs and careful preliminary calculations.
Deep drainage is divided into three types:
- Vertical. Deep perforated tubular wells are used, from which groundwater is pumped out with a pump.
- Horizontal. It consists of a network of drains located on a slope.
- Combined. This variety is the most common.
Drainage around the perimeter of the site
Drainage around the perimeter can drain the area well. It is convenient in that it can be built after the construction of the house is completed and the territory has been improved, if the need suddenly arises: it does not affect the central places where there are already plantings or buildings.
- Open - ditches or trenches are dug and not filled.
- Backfill - ditches are filled to the top with drainage crushed stone.
- Closed - drains are laid in trenches or ditches to a depth of 0.5 to 1.5 meters, wrapped in hydrotextile and covered with crushed stone. The top is backfilled with earth and landscaping is carried out.
Soft drainage
Soft drainage means that no pipe is used for drainage. Trenches of sufficient width are dug, a waterproofing layer is laid on the bottom, then geotextiles are placed, crushed stone is poured onto it, which is then covered with the edges of the sheet. Such drainage is usually done under paved paths and platforms so that the load does not damage the rigid pipe. Although you can pour soil on top and plant plants. But this type of drainage must be connected either to collectors and a well, or to a reservoir to remove water.
Drainage without pipes
Often, to remove small volumes of water, you can get by with a simple drainage system without the use of pipes. Such drainage can be closed - soft, as described above, and open - in the form of a ditch filled or lined with drainage material with slopes of 300 so that the edges do not crumble.
Drainage of a site with a slope
If the ground is very swampy, then drains are laid throughout the area. The interval between them is usually two to three meters, they are arranged in a herringbone pattern and, together with the central trunk, must have a slope towards the well. When planning to cover a site with drains, you need to correctly assess the terrain and dig wells in the lowest place of the site in order to maintain the required slope. If there is a natural slope, then the task is greatly simplified.
A sufficient slope has been empirically derived: for clays and loams - 2 centimeters per 1 meter of drainage, for sands - 3 centimeters. Of course, with a smaller slope than the above, the water will also flow away. But this will happen more slowly, and the drains will silt and become clogged. In addition, it is terribly difficult to accurately maintain a slope of, say, 1 centimeter per meter. Therefore, it is much easier, if possible, to make it 5 centimeters per meter. This will ensure high water flow rates and greater system durability.
But if the area is flat, like a table, then the task is more complicated: the slope must be created using different depths in the trenches. And if there is a lot of land, then the required difference will be so large that you will have to design and build several drainage collectors.
Site drainage at high groundwater levels
A high groundwater level is a distance of half a meter from the surface of the earth. This happens often, especially if the soil is clay or loam, which not only does not allow water to pass deeper, but is also plastic, pushing it upward.
The ideal option in this situation is deep drainage, and trenches for it are dug below the freezing point of the soil.
Drainage of a site on clay
Clay and loam are very unpleasant soils for owners of suburban areas. Not only is it infertile, it is difficult for plants to grow roots and they lack oxygen. But it also retains melt and rain water, turning into liquid mud and drying out poorly. The greenery rots and the waterproofing of buildings is damaged. It is impossible to bring and pour fertile soil on top - it will mix with clay and there will be no effect. The only way is a good drainage system throughout the entire area. Open drainage is often sufficient, but a combination of open and closed types will give the best effect. The same rules apply: the correct slope and pitch between pipes or ditches are calculated. And literally in a year the situation will improve, it will be possible to safely add fertile soil.
Installation of PVC drain
There is nothing complicated in installing this design, but it is necessary to take into account some nuances:
- Determining the depth of the sewerage system depending on the roof area.
- Choosing one installation method or another.
- Marking the location of the drain:
- indicate how the system will be placed, taking into account the fact that it should receive the entire volume of precipitation collected from the roof;
- determine the location of funnels and corners;
- install the first bracket at the highest point in relation to the cone-shaped device;
- using twine and a level, determine a horizontal line passing through the point where the bracket is installed, and, starting from it, set the slope;
- install the last support part and connect it to the first using twine;
- install other brackets in 40 cm increments, adhering to the marked slope line.
- Gutter installation:
- prepare a narrow channel by making sections of it of the required length;
- connect the drainage components using appropriate elements or glue;
- install the gutter on the brackets, using the latches and avoiding the joints of both the channels themselves and the funnels falling on these supporting elements;
- install plugs.
- Installation of a sewerage system:
- connect the pipe to the gutter by diverting the drain;
- align the vertical of the cylindrical structure using a plumb line and a square;
- fix the pipes forming the sediment drainage structure in order to determine the installation locations of the clamps in 1 m increments, but with the obligatory location of the upper part on the line of the first joint;
- fix the connecting elements on the wall, taking into account that the sewer pipe after installation will be 2 cm away from the side structure of the house;
- mount the drain bell on the hatch, but without rigid fixation, so that you can control the drainage.
We tried to touch on all the nuances of installing rainwater drainage. Some work is quite difficult to do alone, so it is recommended to use a partner.
Video of arrangement of drainage from plastic bottles
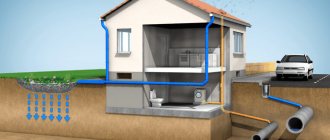
If you want to develop an area where groundwater is located too close, as a result of which the soil is excessively moist, you need to install a drainage system. Then the plants will bear fruit and be pleasing to the eye, and the buildings will not collapse.
In essence, the drainage system consists of specially equipped channels. Their task is to collect moisture and remove it outside the site. There are several types of drainage systems, differing in the method of arrangement: closed, backfill and open. Tubular drainage is found in the last two varieties. You can do it yourself.
Tubular drainage is made from perforated or slotted pipes.
Website about the dacha
12/09/2018 admin Comments No comments
Drip irrigation is considered the most effective method of artificial soil irrigation. All water goes directly to the roots of the plants, without stagnating on the surface and without washing out the fertile layer. You can organize soil moistening in this way using ready-made systems, but their price is quite high and not everyone can afford it. There is a worthy alternative - using improvised means, you can make drip irrigation from plastic bottles with your own hands completely free of charge.
Drainage systems
The design of the drain requires the presence of special gutters for removing precipitation, which are installed along the perimeter of the roof using brackets. Due to the fact that the storm drain repeats the configuration of the upper element of the building along its base, there are both external and internal corners. In this case, all elements of the system are connected to each other with sufficient tightness, which is ensured by rubber seals.
Many consider such elements to be superfluous, since the option of laying gutters overlapping is available, when one part overlaps the other by at least 30 cm, and their connection is carried out using self-tapping screws.
To ensure the removal of sediment, holes are made in certain places in the gutter necessary for the installation of funnels. After that, sewer pipes are connected to the installed cone-shaped devices, that is, they are integrated into the overall system.
When the roof has a large overhang, a curved cylindrical product is used, which is possible with the help of additional elements in the form of elbows and special rings. The drainpipe is mounted on the wall of the house using clamps.
The result of such an assembly is the creation of a system of the required configuration. To arrange a storm drain yourself, you will need a house plan with its exact dimensions. This will allow you to understand what elements will need to be purchased for the future design, as well as determine their quantity.
System options
I will tell you how to organize drainage in your dacha in two different ways. Despite the fact that they are different, they are united by two factors: extreme low cost of implementation and the ability to carry out the work on their own, since everything is simple and clear. You just need to read the information and choose the option that is better suited to your conditions and will be more convenient to use.
Open system
Let's figure out how to make an open drainage system on the site. This option is good for those who suffer from precipitation and decide to make a system for quick and effective water drainage.
You can do the job without using any materials, but to improve the result and make our drainage more reliable, you can use the following:
- Crushed stone, broken brick or concrete may be needed to reinforce the bottom of our drains. Your communications will not be washed out even during heavy rainfalls, which is important in areas with frequent and heavy rainfall;
- If you want to make the system even more reliable, the easiest way is to line its walls with geotextile, this is the name of a special material that strengthens the walls of the channels and at the same time allows moisture to pass through . With its help, you can protect the walls from sliding on weak soils, and also prevent the system from eroding over time. As for the cost, it ranges from 15 rubles per square meter.
By and large, the only tool we need is a shovel, and we will use it to make the entire system. For convenience, I would advise you to get a level so that when digging trenches you don’t get distracted by the slope and don’t make it too large, this is also not very good.
Let's move on to consider the workflow itself, it is performed in the following sequence:
- First of all, you need to make a sketch of the site on paper, just draw a rectangle or a figure of a different shape if you have a piece of land of a different configuration. After this, you must figure out in which places water constantly accumulates and whether there is a natural slope of the level in one direction or another, this is very important, because if you figure everything out correctly, the work process will be greatly simplified;
- If you have a sewage ditch running along the perimeter, this also needs to be applied. Sometimes it can pass from one or both sides, then you will have to make communications so that they go in a certain direction ;
- Next, we need to take measurements with a tape measure in order to accurately mark low spots and problem areas on our plan. There is no point in doing this by eye, since we will not be able to make an exact design, and in the process of work it will turn out that the system we conceived cannot be made due to certain interferences;
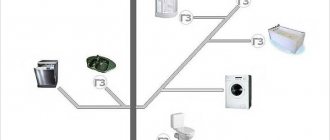
- Based on all the information, the design of our drainage channels is made; they should consist of main highways and junctions, which for greatest efficiency are adjacent at an acute angle. As a result, the system resembles a Christmas tree and should be directed towards draining water from the boundaries of the site. Below is shown a variant of a rather complex drainage from an irregularly shaped area; usually you can get by with a simpler configuration;
- If the drainage ditch or ditches are clogged, then they must be deepened and cleaned; if the water has nowhere to go, then drainage will be of little use . Therefore, always start work from this part of the system, if necessary, strengthen its bottom with crushed stone, and the walls can be covered with old slate. Slate can also be used for channels on the site, if you have one;
- Next, you need to move on to digging the axial elements of the system; they should have a depth of up to 50 centimeters; it is better to make the walls flat so that they do not collapse during the wet period of the year. The work is simple, but will take a lot of effort. It is important to remember that a slope of approximately 2-3 centimeters per meter must be maintained so that water leaves your area by gravity;
- Next, all the branches are dug, and I recommend doing them from the main channel so that you can immediately make the desired slope . This is much easier than starting from the end and trying to get to the main line with the correct slope. It may turn out that the level difference will be large due to the significant length of the branch, there is nothing wrong with that, the main thing is that there is a drain, and it does not matter that at the end the hole will be very shallow;
To check the slopes, you can pour water into the trench from a hose; it should go where it is needed.
- As I wrote above, to make the channel walls more reliable, they can be reinforced with geotextiles. Here the work is very simple: the material is laid out along all the channels so that it lies on the surface, where it is better to press it with bricks or stones. I recommend pouring a thin layer of crushed stone onto the bottom, then the material will be securely fixed and will not bunch up at the joints;
Of course, this option is very cheap and simple, but not everyone wants to have an extensive network of canals on their site, and moving between them without building masonry is not easy. Therefore, the second type of system is more rational and convenient.
Closed system
Draining a summer cottage without open channels requires the construction of pipelines, but I will tell you about a cheaper solution, and first we will figure out what materials are required for this.
| Material | Description |
| Plastic bottles | The main element of our design, you will need a lot of them, so you can stock them up in advance rather than throw them away. An important aspect is that the bottles must be closed; they can have different sizes and shapes, but they must have caps in any case. The quantity depends on the length of communications |
| Old roofing felt or film | If you have any waterproof material, then that can also be used. If there is nothing, then you can do without it |
The only tool we need is a shovel, so there is no point in dwelling on this aspect.
Instructions on how to arrange closed drainage in a dacha are as follows:
- First of all, as in the first case, you need to make a plan of the site on a real scale; it will also not be superfluous to take measurements so that you can see exactly where the water needs to be drained from and to;
- Next, you should make a sketch of future communications, taking into account all the factors described above. Since the system will be closed, it can pass under paths and lawns, the main thing is to carefully disassemble and then assemble all the structures;
- The next stage is digging trenches. They can have smooth walls, and their depth is usually from 25 to 50 cm, it all depends on the site and the groundwater level on it. When digging, do not forget about the slope, the water will move where the drain is directed, and if you forget about this factor, then there will be little benefit from the system;
Personally, when working, I throw a level into the trench from time to time to see if I'm doing everything as it should.
- Next, the bottom of the channel is compacted, if you have crushed stone or gravel, you can fill it with a thin layer, if you have nothing, then you can do just that. Bottles with screwed caps are stacked in two rows close to each other along the entire length of the trench from beginning to end. If there is a film or roofing felt, then the bottles are covered on top, if not, then they are left as is;
Do not place bottles in one row; this is ineffective, as practice has shown. There is much more space between the two rows, and moisture is removed much better.
- Lastly, the soil is poured in a thin layer, compacted, then backfilled to the very top and finally leveled. Do not press too hard so as not to damage the bottles; when tamping, they are slightly deformed, but there is still a space between them through which the water flows out .
The price of this design is zero rubles, but the benefits from it are enormous, many have already tried the simple solution with bottles, and I have heard only good reviews. Therefore, if you want to get rid of water and do not want to spend a lot of money, then this option is for you.
If you need point drainage in the areas of drainpipes, then you can take the same plastic bottle, cut off the bottom and stick the neck between the bottles in the drainage channel, the moisture will be removed very well.
Plastic can lie in the ground for up to 50 years; it does not release harmful substances into the soil. Which is also an important factor.
Advantages of plastic pipes
Laying tubular drainage is based on three pillars: the strength of the material from which the pipes are made; installation depth and interaction with the aggressive environment of groundwater. Plastic perforated pipes will cope with these tasks perfectly. Their advantages are that they:
- are characterized by high strength;
- not subject to corrosion;
- sediment does not linger on the smooth inner walls;
- the presence of filters prevents them from clogging from the outside;
- light weight makes installation easy, you can do it yourself;
- extended period of use;
- low price with good quality.
Benefits of bottle watering
Any drip irrigation system requires a water supply system, a well, a well, or, in extreme cases, a tank with a volume of at least 250 liters. At the same time, in many gardening communities water is supplied no more than 2-3 times a week, which does not allow organizing regular watering on the site.
In such conditions, drip irrigation using plastic bottles is the only possible way to organize constant hydration of plants, since its arrangement does not require a source of water supply and a minimum amount of water is consumed.
To make drip irrigation from plastic bottles, you do not have to buy and lay a main pipeline throughout the area, connect hoses, install taps and water filters. Installation of the system is very simple and quick, and the material for its manufacture - used plastic one and a half or two liter containers - is available at any site.
Drip irrigation ensures constant soil moisture
How to lay drainage from plastic bottles
It’s easy to assemble such a drain with your own hands. There are two methods: mesh, natural drainage. The first method is suitable for small areas with low humidity. Installation is done like this: cut off the bottom of the bottle, tightly insert the neck of the next one into it. The mechanism can be assembled directly in the trench, which greatly simplifies the work. Be sure to thoroughly fill the bottles with sand, and then cover them with a layer of earth and turf to prevent the drainage from freezing.
With the second method, there is no need to cut the bottles. They are tightly closed with lids and stacked sequentially. Then everything is repeated as in the first method.
How to make a gutter with your own hands
bend metal
The most difficult thing is to bend metal (iron) without a special device (clamp, bending rod). But you can make and bend a gutter or drain with your own hands. Be smart, stand with your feet on a corner or weld the device yourself. If this is not possible, find a construction company, a roofing team that has a tinsmith. Give us your dimensions, bring the hardware and they will do everything for you.
You choose the iron yourself. The average thickness of iron is 0.5 - 0.7 mm, no thicker is needed, it's extra weight for the roof.
The length of the roof varies. When marking the gutter, fold the iron blanks (sheets) overlapping each other, 50 mm is enough. By placing iron on top of each other, the length changes and becomes smaller, do not forget to take this into account. Layer the iron as the water flows from one to the other. When you bend the gutters, the drains will fit more accurately into each other. If the roof length is large, do not forget to number the workpiece (sheet).
Markings are indicated in blue. Shown here is the approximate size ratio in mm (millimeters). You can have your own, at your discretion.
Attention! A gutter or drain can be made without a slope at your discretion
Holder
Making a bracket or holder for gutters, make drains from strip, stronger and more reliable. When attaching to the sheathing, do not forget to position the holders with a slope.
Paper sketch
Make a sketch in a reduced form, out of paper, before starting work. There will be less time spent in the future. Measure and compare all the work, because paper will endure everything.
Remember, it's better to ruin paper than metal.
The drainage system involves the collection and disposal of precipitation, as well as melt water, but the capabilities of such systems do not end there, since with their help it is possible to direct liquid directly into the storm drain. As a result, precipitation does not fall on the walls, while ensuring the safety of the blind area. In addition, the accumulation of water near the foundation and in basements is eliminated, which guarantees an extension of the life of the building.
In this article we will look at some types of rainwater drains, and also learn how to make them yourself.
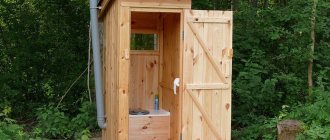
Do-it-yourself washbasin for your dacha. Making a simple and convenient drain
Here we will talk about the outdoor version of a country washbasin, because such a thing is simply necessary on the street in the summer. It’s not every time you have to run home, for example, to wash your hands after gardening. And in general, besides gardening, there are still a lot of things to do at the dacha when your hands (and sometimes even your face) will not remain clean. The washbasin at the dacha can be left simple, that is, an ordinary washstand, which has been tested not only for years, but, probably, for centuries. But the water that will flow out of such a washbasin needs to be drained somehow. The easiest option is to put an ordinary bucket, or just pour water directly onto the ground. But the bucket fills up quickly and needs to be taken out, and pouring water on the ground is also not the best solution. No one needs dirt underfoot either. Is there another solution to this problem?
Outdoor washbasin for a summer residence. Making drainage from plastic bottles
It turns out that a solution can be found, quite simple, but very effective. Here plastic bottles will come to our aid again. We have already used them to make a mole repeller and even a mosquito trap. Now we’ll make a simple drain for an outdoor washbasin.
What do we need?
For such a drain we will need 4 two and a half liter plastic bottles (you can take more, but then you will need to dig deeper). For three bottles you will need to cut off the neck and bottom, and for one of these bottles (a little later we will have it as the upper part of the drainage system), we cut off only the neck. The two bottles that we will later have below the rest will need to be well perforated, that is, many holes made in them in a circle. These holes will help us drain water in the future. You will need to make a hole in the topmost bottle, where we will insert the hose next. In principle, everything is quite simple. From the drawing, I think everything can be understood without difficulty.
The simplest drainage on the site
You can arrange surface drainage with your own hands. It's easy to do:
- we dig a trench 50 cm wide, 60 – 70 cm deep;
- we make the walls of the structure at an angle;
- we line them up according to the rainwater drainage pattern;
- water from the trench is collected in a special sump or in an artificial reservoir.
Trenches can be improved by lining them with beautiful pebbles. The number of ditches is calculated as follows: 1 m of drain per 10-20 m2 of allotment area. The order of the drains is as follows: first the main one is laid, then the secondary ones are brought at an angle to it. The distance between the secondary ones is determined depending on the quality of the soil. For clayey and loamy soils – 4-12 m; for sandy ones - 20-30 m.
Many plot owners are faced with high groundwater levels in their gardens. This creates corresponding difficulties with the cultivation of most crops - both vegetables and ornamental ones.
When we bought our garden plot (in the Leningrad region, near the Beloostrov station), it looked like a swamp with a large puddle in the middle. It became clear that the garden needed to ensure that excess water drained into side drainage ditches that led to the main wide drainage ditch.
The result of our work on installing a drainage system in the garden did not take long to wait. After the first heavy rain, the garden soil quickly dried out, which made us very happy!
A huge difference became visible between the condition of the soil surface in the garden “before” and “after” the installation of drainage, especially with an abundance of rainfall during the gardening season. And during the process of snow melting in the spring, melt water is now quickly drained using the drainage system into the main and boundary ditches.
Our drainage system has been tested for years; 5 years have passed since its installation. During its creation, the surface of the soil in the garden was leveled. There is an opportunity to beautifully arrange the site and grow any plants here. In the photo in the article: the soil of our site in May and July last year (2010).
In the spring, our site dries out quickly, since all the water (melt, groundwater and rain) successfully drains into the ditches.
My husband Alexander and I are pleased with the results of our work and advise you to follow our example if you have a similar problem with draining excess water in your garden. With such a drainage system, your garden will become more suitable for plant life.
This is also important for your own pleasure.
I wish all gardeners success, strength and desire to make their garden even more convenient and attractive!
Nadezhda Semenovna Dunaeva (St. Petersburg)
To the site on the site site
Weekly Free Site Digest website
Every week, for 10 years, for our 100,000 subscribers, an excellent selection of relevant materials about flowers and gardens, as well as other useful information.
Subscribe and receive!
Popular drainage schemes ↑
Drainage layouts on the site may be different. Most often, two structures are used to protect the territory from waterlogging: ring and fir-tree.
Ring design ↑
The ring scheme is used to protect building foundations from surface water. To prevent water from accumulating near the house after rainfall or melting snow, a trench is dug along the perimeter of the property in which drainage from bottles is installed.
The distance from the trench to the building depends on the size of the blind area and, as a rule, is about 1 m. The depth of the trench should not be too large. Firstly, plastic containers can become deformed under soil pressure, and secondly, to quickly remove precipitation, the drainage must be as close to the surface as possible.
Important. To protect the building from the action of groundwater, drainage is located 30-50 cm below the foundation. For such purposes, you should use a specialized drainage pipe made of PVC or HDPE that can withstand heavy loads.
Foundation ring drainage
Christmas tree design ↑
In its shape, the structure resembles a Christmas tree (hence the name) or a river system with a main channel and several branches. The number of outlets depends on the area of the drained area. In this case, their slope should be directed towards the main highway, which in turn has a slope towards the drainage basin - a drainage well, ditch or pool.
This scheme is ideal for swampy areas, allowing you to drain a large area. Of course, in this case, a larger length of pipeline will be required, but if you make drainage from plastic bottles, the costs will be minimal.
Advice. The trenches in which the drainage system is located can be sprinkled with fertilizers. Thus, before entering the reservoir, the water will be saturated with useful substances and will be suitable for fertilizing the garden plot.
Drainage of the area using a Christmas tree drainage structure
The method of constructing drainage from plastic bottles is very popular due to its accessibility. In many situations, this option will remove excess water from the surface of the site and make the area more suitable for plant life and construction projects. However, it is not advisable to use PET containers for the construction of a deep drainage system designed to protect the site from the action of groundwater. In this case, it is better to seek help from specialists who will develop an optimal pipeline layout and carry out installation using modern drainage structures.
Video of arrangement of drainage from plastic bottles
If a drainage system is required on the site, but there is no money to purchase materials, you can try an alternative option - to arrange the drainage of the site using improvised means.
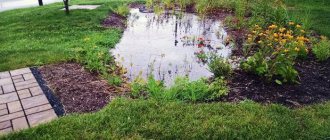
The problem of flooding of the territory during the period of melting snow or heavy precipitation is familiar to many. If it is not resolved in a timely manner, there is a risk of facing very unpleasant consequences. The fact is that moisture undermines the foundation of a house and outbuildings and has a detrimental effect on the root systems of plants and urban crops.
Drainage made of polyethylene film
If you are wondering what material can be used for drainage, the answer is clear - one that allows water to pass through. Most often, the following materials are used to create a drainage system:
- plastic bottles;
- Styrofoam;
- branches;
- fascines;
- car wheel;
- construction garbage;
- stones;
- old things.
Benefits of bottle watering
Any drip irrigation system requires a water supply system, a well, a well, or, in extreme cases, a tank with a volume of at least 250 liters. At the same time, in many gardening communities water is supplied no more than 2-3 times a week, which does not allow organizing regular watering on the site.
In such conditions, drip irrigation using plastic bottles is the only possible way to organize constant hydration of plants, since its arrangement does not require a source of water supply and a minimum amount of water is consumed.
To make drip irrigation from plastic bottles, you do not have to buy and lay a main pipeline throughout the area, connect hoses, install taps and water filters. Installation of the system is very simple and quick, and the material for its manufacture - used plastic one and a half or two liter containers - is available at any site.
Drip irrigation ensures constant soil moisture
How and from what to make cheap drainage
Many summer residents think about how to make drainage when they are faced with the high cost of modern materials. The question is correct, which means, first of all, you can buy affordable surface drainage from us, in the company. It is also possible to use materials that are simply lying underfoot. And they are waiting for drainage to be made from them. In this article we will look at modern kamp-eu drainage systems, which are not expensive and can drain up to 5 l/s and withstand loads of up to 25 tons. And also what materials a drainage system can be made from, practically for nothing. Using only your own labor.
Using plastic bottles to create a drainage system.
To create holes and ditches for drainage, a variety of items themselves are useful; they are often mistaken for garbage, but can find their new life in drainage systems.
For example:
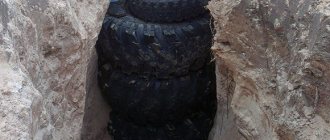
- old tire use
- plastic bottles
- branches
- stone, crushed stone
- broken brick
- debris from construction debris remaining after construction (or repair)
The main rules that a person should follow when thinking about a drainage system project are the correct configuration of the drainage and its throughput.
Is it possible to build drainage from used plastic bottles?
- It is necessary to determine the lowest places on the site.
- It is impossible to make water flow upward without using energy. Let it flow downwards, we will help it.
- Ideal drainage has the structure of a river. Actually the main channel, and streams flow into it. It would be nice if the same thing happened in our area.
- Marking on the ground. You can lay it out with crushed stone and pull ropes. And then you can start digging the ground. If grass is planted, use PET film to avoid weeds. Or pick up used stretch film from large supermarkets.
The sequence of work on arranging a plastic drainage system is as follows:
- PET with closed plugs is placed at the bottom.
- PET must be laid out on the ground in such a way that it is buried to half its depth.
- A drainage layer is laid on top of the soil layer.
- Compact with feet or a tamping machine.
- Fill up a layer of soil
Plastic drainage, oddly enough, is made using this method and is durable. PET bottles take centuries to decompose, so this system will work for many years. And the land on top can be used, built or planted whatever.
Proven ways to finish the drainage system.
Let us once again raise the question of what else can be used to arrange drainage. Plastic bottles are not the only material that comes in handy in this situation.
There are a very large number of materials that can replace crushed stone when arranging the installation. You can use, for example, a stone.
We will need crushed stone, large.
We put the big one on the bottom, and the small ones we put on the walls of the trench (depth 1 m.)
The use of modern geofabrics. When using modern fabric materials, you can independently make soft drainage. The basis of its design is based on the special membrane properties of Tekton, which is capable of passing moisture only in one direction, and does not allow it to go out into the street. It will also be necessary geotextiles, which will form a filter layer, prevent debris, silt and soil from entering the drainage system.
Such drainage is arranged as follows:
- A drainage ditch is dug with a slope to the side into which water is drained.
- A geofabric is laid at the bottom, which is placed in a U shape.
- On top of the geofabric it is enclosed in a geotextile fabric with a spade on the edges of the pit, up to 40 cm on all sides.
- Then the fabric is covered with gravel.
- The crushed stone is wrapped in geotextile.
- The drainage pit is filled with sand.
www.kamp-eu.com
Soft drainage without crushed stone
Drainage without the use of pipes can also be carried out without the use of crushed stone, since, depending on the depth of the trenches, its quantity is sometimes very large and expensive. One of these methods is fascine drainage: birch, coniferous, or oak brushwood, tied in bundles 30 cm long, is laid at the bottom of the trenches. Crossed pegs are laid along the entire length of the trench, and brushwood (fascine) is placed underneath them. Sand is poured on top.
A closed method of soil drainage involves using backfill material - pieces of brick, small stones, concrete fragments. The entire trench is filled with these materials, but without the use of geotextiles such a ditch very quickly silts up.
Using ordinary plastic bottles is an alternative to crushed stone and fascines, a simple and budget option. To implement such a drainage system, bottles with screwed caps are placed along the trench at the bottom. Turf is laid on top and sprinkled with earth. Drainage occurs in the space between the bottles.
Another alternative method involves the use of poles. Long branches are laid at the bottom of the trench on spacers made of wooden sticks. The poles must be made of coniferous wood, previously cleared of bark.
The last two described methods of site drainage are unpredictable in terms of service life and operational efficiency, but they are the best options when there are not enough funds for laying drainage from pipes or crushed stone.
stroypomochnik.ru
Dehumidification using modern textile materials
Production of soft drainage from technological fabric materials. The modern design of the tecton is based on membrane properties, the essence is that moisture passes only in one direction, moisture does not pass in the opposite direction.
Geotextiles will be required for implementation. It forms a filtration layer that will prevent debris, soil and silt from entering the tide system. Such a drainage system is carried out as follows:
- A ditch is dug, the slope of which coincides with the direction of water drainage.
- It is necessary to lay the tecton on the bottom so that a U-shaped appearance is formed when viewed from across.
- Next is a layer of geotextile with a gap of 40 cm on both edges.
- The matter is filled with small stones or rubble.
- The edges of the geotextile are rolled up.
- The entire soft drainage structure is covered with sand.
The article discusses various methods of do-it-yourself drainage; you are left to choose the appropriate method of drainage system yourself.
If a drainage system is required on the site, but there is no money to purchase materials, you can try an alternative option - to arrange the drainage of the site using improvised means.
The problem of flooding of the territory during the period of melting snow or heavy precipitation is familiar to many. If it is not resolved in a timely manner, there is a risk of facing very unpleasant consequences. The fact is that moisture undermines the foundation of a house and outbuildings and has a detrimental effect on the root systems of plants and urban crops.
Drainage made of polyethylene film
If you are wondering what material can be used for drainage, the answer is clear - one that allows water to pass through. Most often, the following materials are used to create a drainage system:
- plastic bottles;
- Styrofoam;
- branches;
- fascines;
- car wheel;
- construction garbage;
- stones;
- old things.
Kinds
Drainage systems may differ in the method of installation and the material used. In the first case, the water drainage structure is classified as home-made and industrial, and in the second - as plastic and metal.
Homemade drain
Solving the issue of installing rainwater drainage on your own has certain advantages. Such a system can turn out not only beautiful, but also original. You can realize almost any fantasy in terms of creating a structure to protect your home from water. It is worth considering some nuances.
A homemade system requires significant costs and regular maintenance, since its arrangement is usually carried out using galvanization, which begins to rot quite quickly
In addition, it is necessary to take into account the certain complexity of joining some elements
We have tried to take into account the common mistakes of craftsmen and have provided installation rules below.
Factory drain
Purchasing a factory-made rainwater drainage system will save you from many problems of non-compliance with standards and parameters. By purchasing certain gutter elements from one manufacturer, you don’t have to worry that they won’t fit with each other, since the factory is distinguished by the production of standardized products.
Plastic drain
Plastic-based systems can be adhesive, which involves installing storm drains using glue, or glueless, assembled using sealing rubber bands. Regardless of the choice of installation method, plastic gutters have the following advantages:
- UV resistance;
- no corrosion;
- strength;
- light weight;
- wide operating temperature range – from -40 °C to +70 °C;
- the ability to create a drain of any configuration, which is determined by a rich assortment of components;
- no need for regular care;
- ease of installation;
- variety of color solutions.
However, plastic also has a certain number of disadvantages, including the following:
- poor resistance to mechanical stress, which excludes the possibility of installing plastic structures on high-rise buildings;
- regular replacement of rubber seals, which can only be carried out by disassembling the problem area and reassembling it after eliminating the malfunction;
- the inability to restore one or another destroyed instrument, which characterizes such systems as insufficiently repairable;
- significant linear expansion of plastic elements.
Metal drain
Storm sewers made of metal differ from each other in that they can be galvanized, copper, or with a zinc layer supplemented with a polymer coating. The choice of a specific type of design is based on characteristics such as price and service life. In any case, metal gutters are good because they:
- durable;
- reliable;
- resistant to environmental influences, for example, loads caused by the accumulation of large amounts of snow;
- are not affected by high temperatures, the source of which may be combustion;
- retain dimensions during operation;
- are able to provide their functionality at temperatures from -60 °C to +130 °C.
The disadvantages of such systems include:
- significant weight of the drainage structure as a whole;
- a small number of components, which makes it difficult to install such systems on roofs with angles other than 90 degrees;
- installation complexity;
- high price;
- small selection of colors;
- susceptibility to corrosion (except for copper systems);
Determining which drain is better is quite difficult, since much depends on various factors, for example, operating conditions. At the same time, it is necessary to understand that the main importance is not the cost of the design, but its compliance with quality parameters.
Why is drainage needed and what is it?
Drainage is the removal of excess moisture both from the surface of the soil and from its deep layers.
Drainage system
The drainage structure is a serious technical structure, which can be done without quite rarely - for example, when the site is so dry that growing plants requires forced watering throughout the season. But much more often the opposite happens.
The need for a drainage system is recorded in the bible of all professional and non-professional builders on personal plots - SNiPs (Building Norms and Rules). In particular, in SNiP 2.06. 15–85 “Engineering protection of the territory from flooding and flooding.”
The creation of a site drainage system is necessary for lands with high moisture content and heavy rainfall, leading to soaking.
SNiP 2.06. 15–85 “Engineering protection of the territory from flooding and flooding”
https://docs.cntd.ru/document/5200022
In what cases is drainage absolutely necessary?
- With abundant groundwater and/or its close occurrence (especially if its level is closer than one meter from the surface). In this case, a drainage system is not only necessary, but must also be thought out especially carefully.
- If your garden plot is absolutely flat and horizontal, then with a large amount of precipitation or melted snow, moisture cannot drain anywhere, and it will regularly and deeply saturate the fertile soil, which will lead to waterlogging of the area.
- If your hacienda is located in a low area. All the moisture from the surrounding hills will be yours, and the picture will be similar to that described above.
- If your plot has a strong slope, then the fertile layer may simply be washed away.
- If your soil is clay or loam, dense soil that prevents the penetration of moisture, then after rain or snow the unabsorbed moisture will bloom and form swamps.
Advantages of using drainage systems on site
- If the soil is clayey, then the “extra” water accumulated in the area of the foundation will cause soil movement and the foundation may float. When freezing, wet and frozen soil can swell and squeeze individual sections of the foundation out of the ground. All this will inevitably cause subsidence and cracking of the house. Drainage removes moisture from inside and around the foundation and facilitates the operation of the storm drain system, eliminating rainwater from seeping under the foundation.
- If there is an excess of moisture in the area, then even good waterproofing cannot help: water seeps through the capillaries of building structures, and fungi and mold develop in the basement. Soil salts, reacting with water and forming aggressive chemicals, will destroy the materials from which your home is built. Proper drainage helps waterproofing do its job.
- If you do not have a central sewer system (and most often this is the case) and a system of septic tanks or absorption/cesspools has been created, then if the groundwater level is high, there is always a danger that they will squeeze the septic tank to the surface. Drainage eliminates this problem and ensures the longevity of your septic tank.
- If you have not done proper drainage, excess moisture will prevent plants from developing normally, create wetlands and encourage the accumulation of mosquitoes and other harmful insects. In addition, an abundance of moisture in the soil will lead to the leaching of necessary salts, disruption of the oxygen supply to the roots and their rotting, so you can only dream of good growth of flowers and vegetables and getting rid of mosquitoes.
- If your site has a slope, then when water naturally drains after heavy rainfall, fertile soil layers are washed away (erosion). The drainage system carefully removes excess moisture, drying the soil and preventing it from being washed away.
- If you have built a beautiful permanent fence with a foundation, then perhaps you have “sealed” your site with this foundation, preventing the natural removal of moisture. Proper drainage around the perimeter of the site eliminates “excess” water in the intake area.
- If you have a lot of beautiful tiled or stone paths and terraces, then puddles may form on them - both due to rain and due to waterlogging of the area with an excessive amount of soil water. Drainage grids help to cope with this problem.
- The same considerations apply to the foundation area.
- Often the path itself is part of the drainage system, and this has a great advantage from a landscape design point of view: the drainage structures are not visible.
General drainage arrangement
The drainage consists of a geotextile base in the form of mesh and fabric and a drainage bedding made of sand and crushed stone. The structure of the system does not depend on its type and depth.
- If surface drainage is performed (we’ll talk about the classification of drainage systems below), then trays, sand traps and gratings are added.
- If the drainage is deep, a complex branched structure of perforated pipes, called drains, is added. Drains are made of polyethylene, polypropylene, polyvinyl chloride. Sometimes our “Kulibins” make drains themselves from asbestos and ceramic pipes, drilling holes in them.
- If the drain system has branches (this happens most often), its individual parts are connected with special fittings.
- The drainage system often includes inspection and collection wells (collectors), usually located around the perimeter of the site.
- The entire system is connected to the main well, which can be an absorption well: it is drained either forcibly or due to the natural drainage of water outside the site.
Video: simple drainage of the area around the house
Which pipe to choose
In order for the drainage system to last a long time and solve the problem effectively, it is necessary to find out which soil predominates on the site: sandy, clayey, crushed stone, loamy (mixed). Having decided on the soil, you can choose pipes.
For sandy soil, you need to make drainage with pipes equipped with a filter made of non-woven fabric. For crushed stone, a filter is not needed. If the soil is clayey, you can do without a filter, but you need to sprinkle crushed stone around the pipe. Pipes equipped with geofabric filters are suitable for loam.
When laying drainage, structures made of various materials are used. These are plastic, asbestos cement, ceramics and pottery analogues. But now preference is given to plastic analogues from various derivatives:
- low-density polyethylene (HDPE);
- polypropylene (PP);
- polyvinyl chloride (PVC);
- high density polyethylene (HDPE).
Depending on the amount of groundwater, the diameter of the pipes is determined.
DIY drainage around the house without pipes
Filling the drainage with crushed stone
Do-it-yourself drainage around the house has certain features. Depending on the height of the foundation of the house, a ditch is dug to a depth that exceeds the base of the foundation of the house by 30-50 cm. In this case, you should pay attention to the fact that you cannot dig a drainage trench around all the walls at once - this poses a certain danger to the stability of the foundation, so trenches are dug near the walls one by one. The angle of inclination of the trench should be 1 cm per 1 linear meter.
The bottom, maintaining a certain slope, is carefully compacted. This can be done using compacted clay or concreting. The foundation near the wall is waterproofed. Next, a layer of crushed stone of a coarse fraction is laid to a depth of 1/3 of the ditch, a layer of crushed stone of a finer fraction is laid on top of it, and fine drainage is laid on top of them to level it with the surface of the earth.