The quality of the grown products, its productivity, and, ultimately, the return on financial and physical investments depend on the timely and high-quality use of special means
Every gardener wants to please himself and his loved ones with a harvest grown with his own hands, which can be preserved and increased in the future.
A garden sprayer is an important and highly effective tool in the competent organization of work in the garden, allowing you to protect the plant, fertilize it on time, carry out preventive maintenance, while using a minimum of harmful substances, acting selectively and accurately.
How does a garden sprayer work?
Any sprayer works on the principle of the difference in pressure between ambient air and working fluid (chemicals or fertilizers) located in a sealed container. Zhuk, manual pump, Stanley, petrol backpack and garden sprayers work on the same principle.
Due to high pressure, the liquid tends to escape out and when the valve is opened, it passes through a flexible hose and a hollow telescopic “fishing rod” with sprayers and nozzles, spraying in the form of a cloud, a fan, a stream, or a combination.
The working fluid pressure is created in various ways, depending on the device and purpose of the sprayer. This can be a powerful motorized device for spraying trees 5-10 m tall or a simple manual sprayer for plants in a flower bed.
For more information about garden sprayers, watch the video below:
What types of sprayers are there?
- Manual type. A reservoir with a capacity of no more than 2 liters is connected to a sprinkler, which, when pressed on a lever, sprays the solution onto the plants. The product is intended for caring for indoor plants.
- Pump type. The solution is drawn into the pump reservoir and supplied to the spray nozzle under piston pressure. Effective for use in small garden plots.
- Pneumatic (pump) type with a solution capacity from 1.5 l to 20 l in a wearable or backpack version. Using a hand pump combined with the body of the product, a pressure of up to 5 atmospheres is created in the container. When the supply tap is opened, liquid under excess pressure enters the spray nozzle, treating the plants. One pumping of the container is enough for 30 minutes. work.
- The products are supplied with a long boom and a corresponding length of hose, which allows them to be used as sprayers for tall trees and hard-to-reach areas of crowns. Pump devices are effective on plots of up to 30 acres.
Classification according to the method of creating working fluid pressure
Motorized sprayers
The most powerful garden sprayers are motorized sprayers; atomization occurs under the pressure of a stream of air created by a diaphragm-type pump driven by a small engine, usually a gasoline engine.
Membrane type
A membrane-type pump (diaphragm, diaphragm pump) is a volumetric pump, where the working body is a flexible plate fixed at the edges. Under the influence of some mechanism or force, the plate bends, performing the function of a piston pushing the working fluid.
Electric backpack
A slightly less powerful class is the electric backpack garden sprayer. The diaphragm type pump receives energy from a 12 volt battery.
Due to its optimal power and size, this sprayer has received wide recognition and is often used not only for its intended purpose; and, for example, for washing windows or as a sprayer during construction and renovation. You can also make a foam generator for washing with your own hands. The working fluid is located in a backpack container behind the operator’s back.
Garden backpack
A manual garden backpack sprayer is the simplest, most convenient and versatile option. The pressure in it is created by manually moving a special lever that controls the pump pump. Increased pressure is created in a special pump chamber, from where the liquid is supplied to the spraying system.
Pump-action
A pump pump is a cylinder with a piston that moves inside it ; at the end of the housing there is a valve to admit pumped air into the working area and to prevent it from leaving, thereby pumping up increased pressure of the working fluid.
Backpack manual
There are also manual backpack sprayers with pump pump pumping pressure directly into a container with working fluid. Their disadvantage is that the design of the seams of the working container is not always strong; as a result, the seams can separate, which can lead to burns for the operator.
Video about how to choose the right sprayer.
Be careful when choosing these models.
Pump-action on a belt
The next class is a belt-mounted pump sprayer. The fluid pressure in the system is created by forcing atmospheric air directly into a cylinder with working fluid using a manual pump pump. Quite a durable and reliable device due to the high strength properties of the cylinders.
Manual for open containers
A simple hand-held sprayer for open containers. Structurally, it is not much different from a regular bicycle pump. The hose is lowered into an open container with working fluid and, due to the pressure difference during operating and idle running of the pump, the jet is sucked in and thrown out through the spray head.
Manual in plastic container
Well, and finally, a hand sprayer in a plastic container. Small containers are used , in the lid of which a pump pump is mounted. When you manually pump up the required pressure and press the button on the handle, the liquid is sprayed.
Let's also look at the “gentleman's” set of any sprayer, which necessarily includes:
- container for working fluid or mixture;
- valve to relieve excess pressure for increased safety;
- nozzle for spraying working fluid (with a set of nozzles);
- filter for removing foreign particles from the working fluid;
- pneumatic pump handle (for “manual” models);
- rods for pumping pressure manually (in “manual” models);
- extensions to change the length and shape of the hose;
- fastening parts that ensure tightness and easy assembly and disassembly of the sprayer.
Device Description
The main task of a garden sprayer is to effectively spray liquid (chemicals, fertilizers, stimulants, etc.) onto plants. The liquid applied in this way adheres perfectly to the plantings and exhibits its protective properties for a long time. Spraying is a necessary measure to protect bushes and fruit trees from diseases and pests (caterpillars, aphids, mites, etc.). In order for the processing process to proceed correctly, it is worth using special equipment - a garden sprayer.
All devices for this purpose can be divided into groups according to the principle of operation (from basic manual to self-propelled). The following types are distinguished:
- A hand sprayer, which is a plastic tank with a lid with a built-in pump pump. The pump creates the required pressure in the tank, then you can spray the liquid by pressing the lever located on the handle. Units of this type are produced with a tank volume of 0.5 to 2 liters. It is perfect for spraying seedlings and other small-scale plantings.
- A pump sprayer is designed to spray a large number of plants. The tank volume is 3-12 liters. It must be worn on the shoulder on a special belt. There is also a pump on the lid, and from the body there is a hose (1-1.5 meters) with a special handle, a rod and a nozzle. Today, pump-type garden sprayers are among the most popular. This is an excellent option for processing areas up to 30 acres.
- A manual backpack sprayer - here the pressure is built up in the pump. Devices of this type are convenient because they can be worn on your back like a backpack. When treating plantings with this unit, you need to apply pressure with one hand and hold the rod with the sprayer with the other, which is not very convenient and quite tiring.
- The battery-powered backpack sprayer is an improved model of the previous one. Its main advantage is that the pressure is generated by electric drive from the battery. This mechanism greatly facilitates the processing of plants and speeds up the process. Due to their efficiency and productivity, electric garden sprayers are suitable for small private gardens and vegetable gardens, and for mini-farms.
- It is advisable to use a gasoline motor sprayer for work on large areas. The volume of the liquid container here varies in the range of 12-20 liters. Sprayers of this type are divided into two types: backpack type, which are worn on the back; wheeled, which can be freely moved around the garden.
All of the above units can be easily purchased at markets or specialized stores, or ordered online. But you can do it on your own by making the device yourself from available materials. Perhaps this method will be the most correct, since a self-made garden sprayer can easily be adjusted to your needs and not worry about repairs in case of any breakdown.
How to make it yourself?
Garden from a centrifugal (well) pump
If there is an unnecessary centrifugal pump lying around on the farm, it can be turned into a sprayer with characteristics that are not inferior to expensive models, and, importantly, without spending almost no money on parts.
Let's first consider the comparative characteristics of a standard type sprayer.
Battery garden backpack sprayer " COMFORT ":
- liquid flow: from 0.7 to 1.7 l/min;
- maximum pressure – 6 atm, adjustable from 0 to 6 atm;
- the ejection range of the output nozzle in the form of a jet is up to 7 m upward, up to 15 m horizontally.
:
- nominal water supply: 20 l/min;
- maximum pressure – 2 atm.
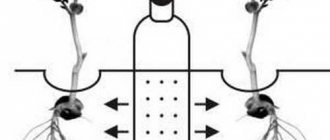
As can be seen from the figures, the fluid flow reserve of the Aquarius pump varies upward by almost an order of magnitude, and this can be turned into very good indicators.
The passport for the Aquarius pump states that the volumetric supply of water passing through the pump should not be less than 360 l/hour , otherwise this will lead to overheating of the pump and its shutdown.
To solve this problem, at the outlet of the pump, 50-100 cm from its outlet, you need to install a tee on the hose to connect a washing machine with a shut-off valve on the outlet arm, and use this valve as a regulator of the fluid pressure in the system.
The liquid passing through the outlet arm is directed through the hose back into the container, thereby forming a “small circuit” of circulation. This ensures the volume of liquid circulation necessary to cool the pump even when the spray system trigger is locked.
At the same time, by reducing the flow of liquid in a small circuit when closing the tap, the liquid rushes into the sprayer system with increased pressure.
This makes it possible to regulate the pressure in the sprayer system and ensure the necessary fluid circulation for normal pump operation.
How to make a garden sprayer with your own hands
The simplest design that you can assemble with your own hands is a backpack-type garden sprayer. The device is adjusted manually. This is a universal option for working on your site. The operating principle of the unit is based on the supply of liquid under pressure created by the control lever of a pump pump device.
Water or working solution enters the hose under pressure. From the hose, the liquid rushes into the chamber, from which it exits into the installed spray nozzles. Pressure in a pump pump is created by pumping air, which displaces liquid. The discharge is created by manual control by acting on the pump.
Working components of a homemade sprayer:
- tank for filling with water or working solution;
- valve to reduce the pressure level in the filling tank;
- filter element for solution;
- nozzle with nozzles for supplying working fluid to the outside;
- manual pump adjustment lever;
- centrifugal type pumping device;
- piston mechanism control handle;
- hoses;
- fasteners.
It is also necessary to prepare material for laying between the fastening parts and assemblies in order to create a tight system.
Choosing a sprayer for the garden
Quite often, enterprising gardeners assemble sprayers themselves. In fact, making a high-quality sprayer on your own is not such a difficult task. By making a good homemade device, you can save yourself from regular sprayer repairs and provide effective care for your green spaces. Which option is more rational - buying a good sprayer or making it yourself? Let's figure it out together.
As you might guess, the main function of sprayers is to spray special chemical compounds (stimulating, fertilizing, etc.) on plants in an appropriate manner. Preparations applied in this way adhere perfectly to bushes and trees, and can exhibit their beneficial properties for a long time. Fruit trees and some types of bushes should be sprayed without fail, this is the only way to provide them with effective protection from various pests and diseases (mites, aphids, worms and others).
About types of devices
In order to carry out the spraying procedure as efficiently as possible, it is necessary to use a garden sprayer. All types of sprayers are divided into several categories depending on the operating principle of the devices.
So, in this case we are talking about:
- hand sprayers. Most of them come in the form of plastic containers with lids. A pump pump is built into the container. Thanks to the operation of the pump, pressure is built up inside the container. After this, spraying is done by pressing a special lever. Hand-held devices are most often two-liter or half-liter. They are perfect for spraying seedlings or other low plantings;
- pump sprayers. This type of unit is designed for spraying large volumes of chemicals. The tank volume of pump sprayers is from 3 to 15 liters. The device is usually hung on the shoulder using a special belt. Pumps are attached to the tank covers of the devices, and hoses with a number of special devices (nozzles, rods, handles) are attached to the housings. Currently, varieties of pump sprayers are among the most popular. If the area of your plot is no more than 30 acres, this option is suitable for you;
- backpack hand sprayers. The convenience of this device is that it can be worn on the back like a backpack. In order to spray with such a sprayer, you will have to use both hands at the same time: one holds the boom with the sprayer, and the other applies pressure through the pump. For the sake of objectivity, let's say that this is not a very comfortable activity;
- backpack battery sprayers. This type of device is, in fact, an improved modification of a backpack hand-held unit. The main advantage of this option is that an electric drive (powered by a battery) is used to inject pressure. This approach seriously optimizes and speeds up the spraying process. Various types of electric backpack sprayers are perfect for plots and mini-farms with a small area;
- Gasoline motorized sprayers are usually used for spraying large areas. The volume of the spray tank in this case is 10-20 liters. Units of this type can be divided into two categories – wheeled (free movement throughout the entire territory) and backpack-mounted.
All types of sprayers listed can be easily purchased at a specialty store or ordered online. However, you can make a sprayer yourself using available materials. Many gardeners consider this option the most reliable. A homemade sprayer can be “customized” to suit your own goals and scale. If the device suddenly breaks down, in this case it will be much easier to repair it yourself.
About homemade sprayers
Many summer residents use homemade sprayers to treat their “possessions”. In order to make a homemade sprayer, you don’t need to be Kulibin or Edison, you just need a little ingenuity and basic building materials. The most primitive, economical option is to spray with a broom. However, this is not very practical; with this approach, unnecessary waste of fertilizers cannot be avoided.
An interesting and rational option is to make sprayers from windshield wiper containers (this unit is suitable for seedlings and small shrubs). Before you start processing the area, the tank must be thoroughly rinsed (unwanted elements may remain on the walls).
If you are planning to make a fairly modern garden sprayer, for example, an electrically driven unit, you cannot do without some rather complex parts. So, you will have to stock up on a multi-core cable, a switch with a button, a spray bar, a reinforced hose, a pump, a container, etc.
In principle, it is possible to assemble even a wheeled unit for spraying on your own, but this will require complex technical devices.
So, let’s take a closer look at the manufacturing process of a battery-powered atomizer. For this we need a container. As an option, we suggest using some parts of an old pump sprayer, which cannot be repaired. An important point: the container must be sealed, and the air valve and rod must be fully operational. To assemble the unit, we will also use a car compressor and a battery (12V). We drill a hole in the tank and insert the car nipple. Then we connect the nipple to the compressor. To ensure that the hole is sealed, we use sealant or a rubber gasket. Now you can connect the compressor to the battery. Due to the high level of pressure in the container, the spraying process will be carried out in small droplets.
The indisputable advantage of a homemade electric sprayer is the absence of problems with replacing and repairing any of the components of the device.
When spraying fertilizers, do not forget about safety precautions. Hats, mittens, protective suits and, of course, respirators will not be superfluous. After the work is completed, it is necessary to disassemble the device and thoroughly wash it. Then the sprayer parts are dried and the device is reassembled.
Video: Do-it-yourself electric sprayer for the garden.
The future harvest depends on proper care of the plants grown. Moreover, caring means not only watering and weeding, but also fertilizing crops and fighting pests.
You can spray various solutions manually with an ordinary broom. However, in this case, the liquid is distributed unevenly over the surface of the plant, and this task is quite labor-intensive. It is better to use a sprayer. It can be purchased at a specialized store or constructed as a personal device. Moreover, a homemade sprayer for the garden is not so difficult to make - you just have to want it!
How to make a sprayer with your own hands
Gardeners who grow various types of plant crops in their gardens agree: without proper and timely care of your plants, you won’t get far. One of the effective tools for such care is undoubtedly a garden sprayer.
Choosing a sprayer for the garden
Quite often, enterprising gardeners assemble sprayers themselves. In fact, making a high-quality sprayer on your own is not such a difficult task.
By making a good homemade device, you can save yourself from regular sprayer repairs and provide effective care for your green spaces.
Which option is more rational - buying a good sprayer or making it yourself? Let's figure it out together.
As you might guess, the main function of sprayers is to spray special chemical compounds (stimulating, fertilizing, etc.) on plants in an appropriate manner.
Preparations applied in this way adhere perfectly to bushes and trees, and can exhibit their beneficial properties for a long time.
Fruit trees and some types of bushes should be sprayed without fail, this is the only way to provide them with effective protection from various pests and diseases (mites, aphids, worms and others).
About types of devices
In order to carry out the spraying procedure as efficiently as possible, it is necessary to use a garden sprayer. All types of sprayers are divided into several categories depending on the operating principle of the devices.
So, in this case we are talking about:
- hand sprayers. Most of them come in the form of plastic containers with lids. A pump pump is built into the container. Thanks to the operation of the pump, pressure is built up inside the container. After this, spraying is done by pressing a special lever. Hand-held devices are most often two-liter or half-liter. They are perfect for spraying seedlings or other low plantings;
- pump sprayers. This type of unit is designed for spraying large volumes of chemicals. The tank volume of pump sprayers is from 3 to 15 liters. The device is usually hung on the shoulder using a special belt. Pumps are attached to the tank covers of the devices, and hoses with a number of special devices (nozzles, rods, handles) are attached to the housings. Currently, varieties of pump sprayers are among the most popular. If the area of your plot is no more than 30 acres, this option is suitable for you;
- backpack hand sprayers. The convenience of this device is that it can be worn on the back like a backpack. In order to spray with such a sprayer, you will have to use both hands at the same time: one holds the boom with the sprayer, and the other applies pressure through the pump. For the sake of objectivity, let's say that this is not a very comfortable activity;
- backpack battery sprayers. This type of device is, in fact, an improved modification of a backpack hand-held unit. The main advantage of this option is that an electric drive (powered by a battery) is used to inject pressure. This approach seriously optimizes and speeds up the spraying process. Various types of electric backpack sprayers are perfect for plots and mini-farms with a small area;
- Gasoline motorized sprayers are usually used for spraying large areas. The volume of the spray tank in this case is 10-20 liters. Units of this type can be divided into two categories – wheeled (free movement throughout the entire territory) and backpack-mounted.
All types of sprayers listed can be easily purchased at a specialty store or ordered online. However, you can make a sprayer yourself using available materials.
Many gardeners consider this option the most reliable. A homemade sprayer can be “customized” to suit your own goals and scale. If the device suddenly breaks down, in this case it will be much easier to repair it yourself.
About homemade sprayers
Many summer residents use homemade sprayers to treat their “possessions”.
In order to make a homemade sprayer, you don’t need to be Kulibin or Edison, you just need a little ingenuity and basic building materials.
The most primitive, economical option is to spray with a broom. However, this is not very practical; with this approach, unnecessary waste of fertilizers cannot be avoided.
An interesting and rational option is to make sprayers from windshield wiper containers (this unit is suitable for seedlings and small shrubs). Before you start processing the area, the tank must be thoroughly rinsed (unwanted elements may remain on the walls).
If you are planning to make a fairly modern garden sprayer, for example, an electrically driven unit, you cannot do without some rather complex parts. So, you will have to stock up on a multi-core cable, a switch with a button, a spray bar, a reinforced hose, a pump, a container, etc.
In principle, it is possible to assemble even a wheeled unit for spraying on your own, but this will require complex technical devices.
So, let’s take a closer look at the manufacturing process of a battery-powered atomizer. For this we need a container. As an option, we suggest using some parts of an old pump sprayer, which cannot be repaired.
An important point: the container must be sealed, and the air valve and rod must be fully operational. To assemble the unit, we will also use a car compressor and a battery (12V). We drill a hole in the tank and insert the car nipple.
Then we connect the nipple to the compressor. To ensure that the hole is sealed, we use sealant or a rubber gasket. Now you can connect the compressor to the battery.
Due to the high level of pressure in the container, the spraying process will be carried out in small droplets.
The indisputable advantage of a homemade electric sprayer is the absence of problems with replacing and repairing any of the components of the device.
When spraying fertilizers, do not forget about safety precautions. Hats, mittens, protective suits and, of course, respirators will not be superfluous. After the work is completed, it is necessary to disassemble the device and thoroughly wash it. Then the sprayer parts are dried and the device is reassembled.
: Do-it-yourself electric sprayer for the garden
Read the same with this material:
How to prune fruit trees yourself
How to spray fruit trees correctly
How to choose impregnation for wooden surfaces
Source: https://sami-stroim.ru/stroitelstvo/landshaftnyj-dizajn/340-kak-sdelat-opryskivatel
Why is it needed?
A device called a sprayer is necessary to evenly distribute the liquid over the surface of the treated plants. Only under this condition will solutions be able to act over the entire area of application: protect against harmful insects and organisms or saturate the plant with necessary substances.
According to the principle of operation, spraying devices can be manual, battery-powered or gasoline-powered. All varieties are found on store shelves, but you can make a sprayer yourself. In this case, the device will suit the needs of the summer resident, and you will not have to wonder how to repair it in the event of a breakdown.
To spray small bushes and seedlings, it is not necessary to build a very complex structure. You can take an empty container of glass cleaning fluid with a sprayer built into the lid. Wash all parts well and reassemble. The resulting structure is filled with the required solution, which is used to treat the surface of the plants.
To process large areas, a more serious apparatus is designed.
DIY battery sprayer
To create a battery sprayer with your own hands you will need:
- sealed container: a tank from an old sprayer or a plastic tank with a lid is suitable for this purpose;
- battery (12 V);
- air valve;
- spraying boom;
- Automobile compressor.
- Drill a hole in the tank where you can insert the car nipple.
- Place a rubber gasket under the washers where the nipple is attached to close all possible gaps. You can use a sealant for this purpose.
- Connect the compressor to the nipple.
- Make a hole and fix the rod in it. If the container is taken from a non-working spraying structure, then this step can be skipped, since it contains both the boom and the sprayer.
- Connect the compressor to the battery.
How to do it yourself
Let's look at how you can design a battery sprayer. To make it, you need to take a tank - an old pump sprayer with a broken pump that cannot be repaired is perfect. It is extremely important that there is a sealed tank, working rod and air valve.
You will also need a battery (12 V) and a car compressor. You need to drill a hole in the container and insert a car nipple to which the compressor is connected. To seal the hole under the washers, you can lay a rubber gasket or blow it with sealant. Then the compressor must be connected to the battery.
Thanks to the high pressure in the tank, the spray is very fine. The required pressure is pumped up, and the excess is released through the valve. The undeniable advantage of a self-designed battery sprayer is the ability to repair and replace any element. When working with any sprayer, you should remember to follow safety rules: protective clothing, use gloves, a respirator, and a hat. At the end of work, the device should be disassembled and thoroughly washed with water, then dried and reassembled.
Sprayer from a canister
To make a device for spraying small areas, you will need:
- A metal canister is better, as it is more durable and resistant to rust and chemical influences. The optimal volume is 10-12 liters, to make it easier to attach straps to the container for carrying over the shoulders.
- Electric car window washer pump.
- Rubber gasket from the washer reservoir for mounting the motor.
- PVA wire with a cross-section of 0.75 - about 2 m.
- Spray tip from an old hand sprayer.
- Liquid supply hose (about a meter).
- Control button.
- The energy unit is a 12 V battery (can be taken from a screwdriver).
- Drill a hole in the bottom of the canister with a drill.
- Insert the rubber gasket into the hole.
- Install the electric pump.
- Connect power, control button and fluid supply hose.
- Secure the battery to the canister using electrical tape.
Using the device is very simple. Hanging it from the trimmer or taking it in your hand, move along the treated areas. The advantage is the use of an electric pump, which allows you to maintain optimal pressure, which contributes to more uniform spraying.
How to make a sprayer from a fire extinguisher
A convenient device can be built from a foam fire extinguisher that has served its useful life. Convenience lies in optimal capacity and simple alteration.
To make a sprayer from a fire extinguisher, you need to perform a number of steps:
- Remove the powder by unscrewing the lid and observing all safety precautions.
- Remove the lever from the lid and weld the resulting hole.
- Install a rubber gasket inside the cover.
- Unscrew the nozzle.
- In its place, fix the valve from a tubeless car tire, under which put rubber washers. Before this, the outer washer must be bent along the radius of the fire extinguisher shell.
- Approximately 1.5 cm from the bottom of the cylinder, make a hole along the inner diameter of the pipe. Its outer diameter should not exceed 1 cm, since you will have to take a hose with a larger diameter, which will help reduce the pressure inside the structure.
- Weld or screw a pipe about 6 cm long to the drilled area. It is better to place it on the side of the valve so that it does not interfere with when carrying the device.
- Connect a rubber hose to the outer edge of the nozzle, at the end of which fix a spray tube at least a meter long. This will not only allow you to spray tall trees, but will also prevent the solution from getting on your skin and clothes.
- In the place where the spray tube is fixed, attach a handle and a faucet to the hose, and at the opposite end - a spray head. For greater convenience, bend the free end slightly.
To make it convenient to carry the structure, belts are attached to it. Before work, pour 5 liters of liquid into the cylinder with the tap on the hose closed and screw the cap tightly. Then a pump hose is attached to the valve and about 80 strokes are made. If air only comes out through the nozzle when the tap is open, then the pressure is enough to produce the collected liquid. If at the end of spraying there is liquid remaining, then the air is pumped in again.
After finishing the work, the air is released, the lid is unscrewed little by little, the remaining solution is poured out, and the entire structure is washed.
Do-it-yourself sprayer for the garden
The future harvest depends on proper care of the plants grown. Moreover, caring means not only watering and weeding, but also fertilizing crops and fighting pests.
You can spray various solutions manually with an ordinary broom. However, in this case, the liquid is distributed unevenly over the surface of the plant, and this task is quite labor-intensive.
It is better to use a sprayer. It can be purchased at a specialized store or constructed as a personal device.
Moreover, a homemade sprayer for the garden is not so difficult to make - you just have to want it!
A device called a sprayer is necessary to evenly distribute the liquid over the surface of the treated plants. Only under this condition will solutions be able to act over the entire area of application: protect against harmful insects and organisms or saturate the plant with necessary substances.
According to the principle of operation, spraying devices can be manual, battery-powered or gasoline-powered. All varieties are found on store shelves, but you can make a sprayer yourself. In this case, the device will suit the needs of the summer resident, and you will not have to wonder how to repair it in the event of a breakdown.
To spray small bushes and seedlings, it is not necessary to build a very complex structure. You can take an empty container of glass cleaning fluid with a sprayer built into the lid. Wash all parts well and reassemble. The resulting structure is filled with the required solution, which is used to treat the surface of the plants.
To process large areas, a more serious apparatus is designed.
DIY battery sprayer
To create a battery sprayer with your own hands you will need:
- sealed container: a tank from an old sprayer or a plastic tank with a lid is suitable for this purpose;
- battery (12 V);
- air valve;
- spraying boom;
- Automobile compressor.
How to do:
- Drill a hole in the tank where you can insert the car nipple.
- Place a rubber gasket under the washers where the nipple is attached to close all possible gaps. You can use a sealant for this purpose.
- Connect the compressor to the nipple.
- Make a hole and fix the rod in it. If the container is taken from a non-working spraying structure, then this step can be skipped, since it contains both the boom and the sprayer.
- Connect the compressor to the battery.
The pressure in the tank is high, which contributes to finer spray. After the required level of pressure has been built up, the excess is released through the air valve.
Sprayer from a canister
To make a device for spraying small areas, you will need:
- A metal canister is better, as it is more durable and resistant to rust and chemical influences. The optimal volume is 10-12 liters, to make it easier to attach straps to the container for carrying over the shoulders.
- Electric car window washer pump.
- Rubber gasket from the washer reservoir for mounting the motor.
- PVA wire with a cross-section of 0.75 - about 2 m.
- Spray tip from an old hand sprayer.
- Liquid supply hose (about a meter).
- Control button.
- The energy unit is a 12 V battery (can be taken from a screwdriver).
How to do:
- Drill a hole in the bottom of the canister with a drill.
- Insert the rubber gasket into the hole.
- Install the electric pump.
- Connect power, control button and fluid supply hose.
- Secure the battery to the canister using electrical tape.
Using the device is very simple. Hanging it from the trimmer or taking it in your hand, move along the treated areas. The advantage is the use of an electric pump, which allows you to maintain optimal pressure, which contributes to more uniform spraying.
How to make a sprayer from a fire extinguisher
A convenient device can be built from a foam fire extinguisher that has served its useful life. Convenience lies in optimal capacity and simple alteration.
To make a sprayer from a fire extinguisher, you need to perform a number of steps:
- Remove the powder by unscrewing the lid and observing all safety precautions.
- Remove the lever from the lid and weld the resulting hole.
- Install a rubber gasket inside the cover.
- Unscrew the nozzle.
- In its place, fix the valve from a tubeless car tire, under which put rubber washers. Before this, the outer washer must be bent along the radius of the fire extinguisher shell.
- Approximately 1.5 cm from the bottom of the cylinder, make a hole along the inner diameter of the pipe. Its outer diameter should not exceed 1 cm, since you will have to take a hose with a larger diameter, which will help reduce the pressure inside the structure.
- Weld or screw a pipe about 6 cm long to the drilled area. It is better to place it on the side of the valve so that it does not interfere with when carrying the device.
- Connect a rubber hose to the outer edge of the nozzle, at the end of which fix a spray tube at least a meter long. This will not only allow you to spray tall trees, but will also prevent the solution from getting on your skin and clothes.
- In the place where the spray tube is fixed, attach a handle and a faucet to the hose, and at the opposite end - a spray head. For greater convenience, bend the free end slightly.
To make it convenient to carry the structure, belts are attached to it. Before work, pour 5 liters of liquid into the cylinder with the tap on the hose closed and screw the cap tightly.
Then a pump hose is attached to the valve and about 80 strokes are made. If air only comes out through the nozzle when the tap is open, then the pressure is enough to produce the collected liquid.
If at the end of spraying there is liquid remaining, then the air is pumped in again.
After finishing the work, the air is released, the lid is unscrewed little by little, the remaining solution is poured out, and the entire structure is washed.
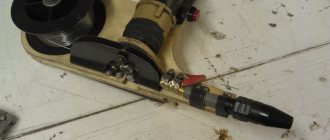
Car battery powered sprayer
Car owners change the battery when the electrolyte density drops to a critical level. In this case, it can no longer properly support the vehicle's electrical system. However, it can generate energy for a less powerful motor. Based on it, a battery-powered electric sprayer is made:
- metal grips are attached to the battery;
- connect a two-core soft-braided electrical cable and a cigarette lighter, observing the polarity;
- a motor is installed inside the tank, functioning as a pump;
- install the hose and sprayer.
Source: https://doma-v-sadu.ru/svoimi-rukami/samodelnyj-opryskivatel.html
Car battery powered sprayer
Car owners change the battery when the electrolyte density drops to a critical level. In this case, it can no longer properly support the vehicle's electrical system. However, it can generate energy for a less powerful motor. Based on it, a battery-powered electric sprayer is made:
- metal grips are attached to the battery;
- connect a two-core soft-braided electrical cable and a cigarette lighter, observing the polarity;
- a motor is installed inside the tank, functioning as a pump;
- install the hose and sprayer.
Now you can start processing low plants. The disadvantage of a self-built electric sprayer is the small area of the treated area: it is limited by the length of the cable. Charges with a regular battery charger.
For processing large areas
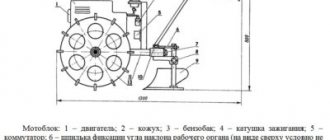
To spray gardens, fields, and vineyards, you can assemble a more powerful sprayer on a walk-behind tractor. One of the positive aspects of using such a sprayer is the ability to attach the pump to the traction device using a belt drive. In addition, this device has a pressure adjustment, which will allow you to increase or decrease the pressure level if necessary.
What you will need to construct the unit:
- Tank. When selecting, pay attention not only to the material from which it is made, but also to its volume. It is important to remember that 2-5 liters of solution are consumed per hundred square meters, depending on the spray intensity and the number of nozzles.
- NSh pump, you can take pumps from battery sprayers.
- Place for battery and control button.
- Rods: vertical or horizontal with a width of up to 4 m. If you are creating a garden sprayer with your own hands, then it is better to give preference to telescopic rods, which will allow you to process trees of different sizes.
- Injectors. The length and number of nozzles for a home-made sprayer are selected depending on the width of the beds and the dosage of liquid for each hundred square meters. It is optimal to place them at a distance of about half a meter, then the solution will be sprayed evenly from all holes.
How to assemble the structure:
- Install the tank.
- Assemble the device in the same way as previous types of sprayers. In this case, it is necessary to provide a valve to release excess pressure.
- Connect the pump and connect it. It is important that its model matches the walk-behind tractor.
- Hang up and put into operation the booms with installed nozzles. If a tree sprayer is being made, the booms are placed in a vertical position. If for processing fields - in horizontal. The best option would be to install a rod with a removable position.
Based on centrifugal pump
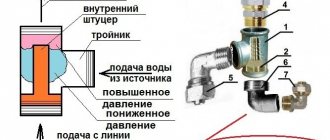
It is usually installed in wells or wells, and when it has served its life, it can be used to create a sprayer. In addition to this, you will need a pressure regulator (a tee with a shut-off valve for connecting a washing machine is suitable for this), which is attached to the outlet arm.
The apparatus is assembled according to the general scheme. Prepare and pour the solution into the tank. After this, the pump is immersed and irrigation begins. One of the disadvantages of this design is its stationary nature, but this can be compensated for by a fairly long hose.
You can purchase a ready-made unit in a store and put it in a far corner after the first breakdown. Repairing a garden sprayer designed by yourself will be easy and simple. After all, every detail was selected and installed independently. Accordingly, the service life of such a device will be longer than that of its factory counterpart.