What kind of equipment is this?
A roof burner is a metal container equipped with a nozzle and a wooden handle.
The handle is attached to the body. The glass on the burner is made in such a way as to avoid the flame from dying out from the wind during operation. Gas is supplied to the glass through a tube. Propane gas is used. It is under pressure in the cylinder. The burner has a valve, which allows you to easily supply the required amount of gas for combustion. You can also directly adjust the flame length. To ensure that the fuel consumption in the gas burner is balanced, a reducer is installed on the device. It allows you to regulate gas flow. Each gas burner is equipped in such a way that additional air is sucked in from the environment. To start the device, you need to open the gas and light it with matches and or a lighter.
Each gas burner has a device for adjusting modes. Most burners have a standby mode. This means that during pauses in operation, the burner goes into economy mode and saves gas.
The roofing gas burner is made from the most durable and high-quality materials, since during operation it heats up to high temperatures. The length of the handle itself is about 1 meter. This ensures convenient operation of the device. The weight of the burner itself reaches one and a half kilograms.
The design of such burners is slightly different. They run on fuel oil or diesel fuel. In such burners, fuel is supplied under pressure to a chamber, after which it turns into an atomized substance. The fuel burns with an even flame. It can also be ignited with matches or a lighter. The advantage of a diesel device is that, unlike a gas burner, it can be used in cold weather conditions.
When laying roofing felt to cover a roof, it is impossible to do without a device such as a roofing torch. This is how modern welding materials are laid.
So, all the work is divided into several stages.
First, prepare the base for laying any material. The covering is cleared of excess debris and, if necessary, leveled with a concrete screed. The area is covered with rolled material. In this case, adjacent sheets should overlap each other. The width of the overlap should be 9 centimeters minimum. Then you need to mark and roll the rolls back, first securing them at the base of the roof using a torch.
The burner is used to heat the bottom of the roll and slowly roll it over the coating. It is necessary to press the material to the base of the surface.
Press down the material using a hand roller
It is important not to leave air under the roofing felt layer. No folds allowed
In the end, all seams are heated with a roofing burner. After that, the seams are rolled again.
You need to know that you can work using a gas burner outdoors only when the air temperature is not below 15 degrees below zero. If the temperature is below 15 degrees, then a burner is used that runs on diesel fuel or fuel oil. It is worth noting that both gas burners and those running on diesel fuel are perfectly adapted to work in less than favorable climatic conditions.
The highest quality burner allows you to lay up to 600 meters of roofing material in one working day. At the same time, the quality of work will be quite high. Such good equipment should allow the burner to operate even in strong winds without blowing out. All work is carried out outdoors.
User manual
Description of the main components
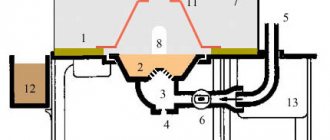
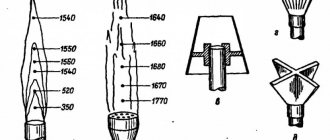
Liquid fuel is atomized in GMG burners using a steam-mechanical quick-release nozzle (Fig. 2). Quick removal and installation of the nozzle is carried out due to a special detachable connection on one side of the flange attached to the burner, on the other - the nozzle body (the fuel and steam channels of the flange are connected to the channels of the same name in the body and directly to the nozzle, spray head). The tightness of the connection is ensured by bracket 14 and screw 12.
Liquid fuel is supplied to the fuel fitting 1, fixed flange 16, from where, through a connection and a channel in the housing, it enters the inner pipe of the barrel 2 and then to the spray head 3. In the spray head (Fig. 2), fuel oil enters through the distribution washer 4 into the annular channel fuel swirler 5 and then through tangential channels enters the swirl chamber, acquiring a translational-rotational motion. Coming out of the nozzle, the liquid fuel scatters in the form of small droplets, forming a spray cone.
A wide range of nozzle regulation is achieved through the use of a steam stage. Steam is supplied to the steam fitting of the flange (Fig. 2, item 6), and just like fuel, it enters the outer pipe of the barrel 7 and beyond through its own channel. onto the sawing head (Fig. 2).
In the sawing head, steam through the gap formed between the sleeve 8 and the union nut 9 enters the channels of the steam swirler 10 and, exiting in a swirling flow through the nozzle of the steam swirler, takes part in the process of spraying fuel oil. The working parts of the head are sealed by the tightness of the union nut 9 (Fig. 2) due to the high cleanliness of the adjacent surfaces of parts 4, 5, 10, as well as through the use of gasket 11.
Atomizing parts: fuel swirler, steam swirler and distribution washer are made of XB1 steel with subsequent heat treatment to maintain the characteristics of the nozzle during service life and reduce wear. Drawings of the spray head parts are shown in Fig. 4, 5, 6, 7 and 8.
The clamping screw 12 (Fig. 2) serves to ensure tight connections between the fuel fitting 1, the steam fitting 6 and the housing 13 through the bracket 14 and the axis 15.
Attaching flange 16 to the burner using bolts 17 allows you to adjust the insertion depth of the nozzle head relative to the swirler and orient (change the angle) of the latter relative to the axis of the burner or furnace during commissioning. In this case, the ends of the pipelines supplying fuel and steam to the burner fittings must have loose, free sections of at least 1.5 meters in length, or flexible reinforced high-pressure hoses.
The gas part 2 (Fig. 1) includes a two-zone air guide device with primary and secondary air zones and a gas distribution device.
The primary air zone includes the supply part and the blade swirler of the primary air 5 and 6 (Fig. 1), which serves to supply part of the air in the form of a swirling flow to the root of the torch.
The secondary (main) air zone is a pipeline elbow with an angle of 90°, at the end of which there is a secondary air swirl blade; performed in the right and left directions of rotation (twisting) of air. In this case, the swirl of primary and secondary air in the burner is carried out in one direction.
The gas distribution device consists of two nozzles (Fig. 3): a washer nozzle (1), which supplies gas in the axial direction to the primary air, and a ring nozzle (2), which supplies gas in the radial direction to the secondary air. Gas is supplied through the gas connection (see Fig. 1).
Fuel recommendations
Gas-oil burners GMG are designed for burning liquid fuels: heating oil and naval fuel oil in accordance with GOST 10585-75, as well as natural gas.
It is permissible to use burners for burning lighter grades of liquid fuel.
When burning these types of liquid fuel, the same nozzle is used, but its flow characteristics will depend on the specific gravity and viscosity of the fuel.
Combustible gas with a calorific value different from QρН = 35400 ± 3540 kJ/kg may be burned after recalculation and reconstruction of the burner gas distribution nozzles.
The performance of a gas burner will depend on the heat of combustion QρН and the specific gravity of the gas at operating temperature.
Industrial boiler burners are designed to operate on air and natural gas at a temperature of 30°C. Sometimes, due to operating conditions, the temperature of the air and gas supplied to the burners may change. Therefore, it is necessary to constantly monitor the air temperature, gas temperature, calorific value of combustible gas and adjust the operating schedule.
In some cases, it is advisable to have seasonal schedules. Recalculation of operating schedules is carried out according to generally accepted methods. When calculating, it should be borne in mind that the resistance coefficient of the air part of the burner at the average flow rate is 3.
Installation
Before starting installation, check that there are no external mechanical damages. Particular attention should be paid to the blade swirlers of the primary and secondary air and the steam-mechanical nozzles.
Install the nozzles in the GMG burner in such a way that the end of the nozzle head extends beyond the pinch of the primary air swirl blade to a distance l2 (Fig. 3.).
Attach mounting plate 3 ( Fig. 1) of the burner to the front sheet or firebox frame. Connect the appropriate pipelines to the gas, primary and secondary air supply flanges.
If necessary, the primary air pipe can be rotated to a position different from that shown in Fig. 1. To do this, the pipe to which the nozzle is welded is tacked to the burner. After installing the nozzle in the desired position, the pipe should be welded to the burner with a continuous seam. The secondary air supply pipeline to the burner must have a cross-section 1.5-2 times larger than the cross-section of the burner secondary branch pipe. To regulate pressure and air deflection, install regulating dampers on the air ducts in front of the burner. The axis of the secondary air control valve must be parallel to the axis of the burner mouth. The gas pipeline should be equipped with fittings in accordance with current regulations.
Weld the corresponding pipelines to the steam and fuel fittings of the nozzle and install the fittings. Install instruments for determining pressure and temperature on gas, primary and secondary air pipelines, as well as on liquid fuel and steam pipelines.
Operating principle of the burner
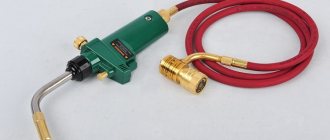
Regardless of the specific type, all burners operate on the same principle. Gas is supplied from the cylinder through an oil-resistant reinforced rubber hose. Constant pressure values are provided by a reducer; if desired, the parameters can be adjusted with a special bolt on the top cover of the device. The volume of fuel is regulated by a tap. The rubber hose is placed on the metal tube of the burner and screwed tightly with a clamp. The burner has special holes around the entire perimeter, through which air enters to mix with gas.
Gas burner for roofing work
The flame is ignited and directed by a metal nozzle to the desired area. Older models of heating pads are manually ignited with matches or lighters; modern models have piezoelectric elements for remote and safe ignition.
The design of the burner ensures a stable flow of flame; it is not blown out even by very strong gusts of wind. Such burners are used not only during roofing work. Sealing of metal pipelines, some road works, etc. cannot be done without them.
Roof burner application
What are the advantages of a modern industrial burner?
- Small mass. The weight of the device does not exceed 1.5 kg, which greatly facilitates the work. The roofer's hand does not get tired; he has the ability to heat up the bitumen at the same speed. The optimal temperature of the entire area is achieved, the quality of the roof covering is improved, and productivity increases.
- The gas supply valve and reducer allow you to smoothly regulate the intensity of the flame. The torch changes without stopping the operation of the device; the master makes a decision during installation, taking into account the actual state of the old flat roof surface.
- The most modern models have special devices that prevent direct contact of the heated burner with rolled materials or the base. Touching a very hot burner to the membranes can cause a complete breakdown of their tightness, which is considered a defect. Such areas need to be repaired, and this takes time and money.
Types of industrial gas burners
The technical parameters of devices depend on their purpose; you need to choose the one that is best suited for a specific job.
| Type of gas burner | Purpose and brief description |
| GG-2 | It belongs to the small class, has a small length and nozzle diameter. It is used to facilitate the fusing of flexible roofing in hard-to-reach places. Consumes a small amount of gas. |
| GG-2S | An upgraded device with improved combustion parameters. To expand the scope of use, it is equipped with spare burners of various diameters and lengths. The master has the ability to change them as necessary to achieve the required bitumen heating temperatures. |
| GGK1 | Durable housing, used by professionals. Can withstand long cycles and is not afraid of overheating. A reinforced burner has increased weight - this is one of the disadvantages of the device. |
| GGS1-1.7 | The nozzle is located at a great distance from the control handle - making work easier, you can take the most comfortable body position. The gas supply control valve is made of wear-resistant materials, the seals completely eliminate gas leaks, which significantly increases the safety of roofing work. |
| GW | Models GV-900 and GV-550 are produced. They differ in length, the first model has dimensions of 90 cm, the second 55 cm. During fusing of the roof, you can change the units taking into account the distance to the base. |
Gas-air injection burner GG-2u
If a gas burner is manufactured by a licensed company, then it fully complies with existing safety regulations. It is strongly recommended not to purchase cheap fakes; ignition of the units during work causes very severe burns.
Gas trigger burner GGK1 ULTRATurbo
Popular types of welding torches
Types of torches that are popular among welders.
Welding torch for semi-automatic machine
The main criteria for the operation of a gas torch for semi-automatic welding are the type of connector for inclusion in the welding machine, the rated welding current and the cooling system.
Cooling the device itself is especially important in this case. These types of models are especially often used for working in hard-to-reach areas.
Semi-automatic welding without the use of gas involves the formation of a weld pool at the point of fusion of metals of two joined workpieces and is not accompanied by protection from inert gases.
Semi-automatic welding.
The semi-automatic model has three components:
- the burner itself;
- her train;
- contact connection.
The essence of her work is a physical connection with the welding process. The metal filler wire is supplied to the liquid from the cooling system along the burner loop. The same path applies to welding current, shielding gas or flux instead.
The contact connection as a torch element is necessary to connect the welding source and the welding torch.
The important part is the handle of the device. It is usually made from cast material with good insulation. As for tips or mouthpieces, they are made of bronze, various copper alloys or non-melting tungsten. The highest quality are copper and tungsten mouthpieces: they are the most durable and have a long service life.
Torch for argon arc welding
There is no need to confirm the demand for argon welding - it was and is extremely popular. For the most part, it is used to join workpieces made of metals such as silver, cast iron and, most importantly, aluminum. The technology has many advantages, but the main thing is an excellent and durable seam.
The argon burner has some nuances: it works according to its own principle. The fact is that it combines the principles of argon and arc welding.
The power source is an ordinary electrical discharge, and argon or other inert gas acts as a powerful protection against the penetration and exposure of oxygen. Because argon weighs more than oxygen. Electrodes with this method are tungsten, non-consumable.
Torch for argon arc welding.
A welding torch for argon arc welding can differ in several parameters:
- combustion power;
- type of burner cooling system;
- type of flame control and other indicators;
- length of electrical cable;
- type of connection to the welding machine.
The type of cooling in such devices is of two types: air or water. The type of control is also divided into three options: valve, using buttons or universal.
The design of the device is simple: a special hose for inert gas, a power core and a specialized composite handle. The water-cooled model is equipped with an additional hose for water or other liquid.
The handle of an argon burner is designed as follows: a nozzle made of ceramic materials, a collet, its body and a mouthguard of one of two types - long or short.
TIG welding torch
A device of this type serves as an electrode holder. Shielding gas is also used here. Unlike other types of torches, there is no special channel for feeding filler wire, which is fed manually.
Torch device for TIG welding.
The components of a TIG torch are as follows:
- electrode;
- frame;
- bushing for sealing;
- the body of this bushing;
During the welding process, the electrode is placed in the torch body shield through a sleeve that secures it well. The electrode shield must be rotated to secure it. During operation, the burner should be held at an angle of no more than 40° relative to the vertical.
This technology is especially widely used in body work and special repair activities in auto repair shops of a high professional level and with a wide range of services. It is also good for various types of construction and installation work.
Safety rules when working with gas burners for roofing
The roofing propane gas burner must be operated in strict accordance with safety regulations.
Roofing work on the roof can only be carried out in special clothing and shoes with non-slip soles. In addition, it is necessary to use various additional devices - walking bridges, a belt, etc. Before starting work, you should inspect the burners and make sure that all cylinders and hoses are in good condition, check the tightness of the connection between the hose, cylinder and reducer. When carrying out the work itself, it is necessary to keep in mind that there should be only one gas cylinder at the work site.
Overheating of deposited materials must not be allowed.
It is important to ensure that only the bottom layer of material is subjected to melting, while preventing softening of its main fabric. The burner must not be ignited from random sources of fire.
For these purposes, only a lighter or matches are used. When lighting a gas (propane) burner, you must first open the gas supply valve halfway. After a few seconds of purging the system, you can ignite the mixture. The field of this valve regulates the height of the flame.
When the burner is on, it is prohibited to leave the work area or climb scaffolding.
Extinguishing the burner is carried out in two stages. First, the gas supply valve is tightened, then the locking lever is lowered. During breaks in work, the burner must be extinguished, and if it is long, the gas supply is also cut off.
If the inlet channels and mouthpieces of the burner are clogged, it is prohibited to begin work. Such clogging is fraught with the occurrence of backlashes or pops. If the burner overheats or backfire begins to be felt, then work with the equipment must be stopped immediately. In this case, the gas supply is shut off, and the burner itself is cooled in a container with ordinary water.
Roof repair using a gas burner, watch the video:
The use of gas burners for soldering pipes and other types of work
To perform pipe soldering, you need several tools, including a gas burner, which must be selected according to the diameter of the pipes being processed and the purpose of the pipeline. Using a burner, the pipe is heated along its entire length and circumference. The tool provides uniform and controlled heating of the metal for high-temperature soldering. As a result, the seams performed are characterized by high tightness and quality.
The versatility and functionality of this tool allows it to be used for cutting metal, defrosting small sections of pipeline, heat treatment and other types of work that require heating of products.
A propane torch allows you to perform various types of work independently and is convenient for use in windy weather. However, it is very important to follow safety precautions when using this tool by wearing personal protective equipment and not working near flammable substances.
conclusions
This type of equipment, such as a gas or liquid fuel burner, can significantly increase the productivity of work when laying a built-up roof (detailed article: “Fused roofing: laying technology, choice of material”). But due to the fact that such equipment is a source of increased danger, work with it should be started only after a detailed study of the instructions and safety precautions. You need to work especially carefully if you are using a roofing gas burner that you assembled yourself. Taking the necessary measures is the key to high-quality roofing work without any incidents or shortcomings in the resulting roofing cake.
Safety regulations
- When working with fire tools, sparks are very often generated, which can hit the cornea of the eye and lead to loss of vision. To avoid this danger, work should be carried out in special dark safety glasses;
- At the beginning of work, the control valves should be opened only halfway, or even a quarter, and only then ignite the burner mixture;
- After ignition, be sure to adjust the pressure and power of the flame for each specific case;
- It is forbidden to ignite from a large open fire or a burning object: the flame can spread to nearby flammable objects or employee clothing;
- The ignition process is carried out with sulfur matches or a small lighter, with direct regulation of the flame;
- At the end of the work, the supply of the combustible mixture is shut off by shut-off valves, which leads to the extinguishing of the burner flame. It is prohibited to extinguish it in any other way;
- After the burner has stopped operating, you should carefully check the fuel supply regulator: it should be completely closed and covered with a protective cap.
After this, the device is put away in a special place until next time.
Design and principles of operation of a gas burner
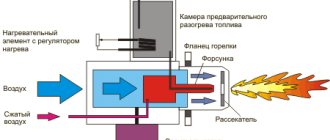
A gas burner is a device that allows you to burn gaseous fuel in a controlled manner, mixing it with air, and at the same time forming a fiery torch.
The burner operates on the principle of supplying gas fuel under pressure to a mixer, where it is mixed with oxygen. After which the resulting mixture is ignited at the outlet of the diffuser, forming a fiery torch.
The design of the gas burner consists of the following parts:
- A metal glass with round holes on the sides.
- Gas spray nozzle.
- Plastic or wooden holder.
- Rubber hose for supplying gas to the burner body.
- Valve for adjusting the supplied gas and flame length.
Depending on the burner model, they have the following differences:
- Fuel supply is injection and non-injector.
- Power and gas consumption.
- The amount of flame supplied. There are single-flame and multi-flame.
- The method of using the device is manual and mechanized.
The length of the burner, depending on its design, ranges from 0.8 to 1 meter and weighs about 1.5 kilograms. Also, depending on the model, gas burners can be equipped with various fuel saving modes.
Models of gas burners for roofing
For roofing work, a certain type of device of the following models is used:
- GG-2 propane torch for preparing and carrying out waterproofing work. Well suited for small-scale roofing work. Recommended for use by beginners. Mostly low cost.
- GG-2U, an analogue of the previous model, differs in a shortened gas line. Preferably used in hard-to-reach places on the roof.
- GG-2S is a professional burner and also runs on propane. It has two valves for precise adjustment of the operating mode and the ability to operate in very windy weather.
- GGS1-1.7 is light in weight and the size is universal. It is used for drying and fusing materials onto the roof. Allows you to heat the surface up to 400 degrees.
- GGK-1 air-propane burner is equipped with a heavy glass and a gas supply lever. Used for removing paint by burning on wooden surfaces and waterproofing roofs.
- GGS1-1.0 is light weight and small in size. which makes it possible to use it for waterproofing roofs with a large slope.
- GGS1-0.5 is mainly used for minor roof repairs and is economical in terms of gas consumption.
- GGS4-1.0 has four flame supply cups. It is economical and allows one person to process a large area of the roof in a short period of time.
- GV-3 is used preferably for heating metals for welding or soldering.
- GV-111R is used for fusing bitumen roll materials onto the roof. Also used for burning old paint on various surfaces.
- GV-550, GV-900 are convenient and easy to use, they differ in the length of the torch.
- I use GV-500 for fusing bitumen materials. Allows you to heat the heated surface up to 300 degrees.
- GV-850 has an injection type of fuel supply. The burner is equipped with a valve for precise adjustment of the gas supply and a lever for adjusting the length of the torch.
When buying a gas burner, you should pay attention to such indicators as:
- Fuel consumption.
- Length of the fire torch.
- Thermal power.
- Burner length and weight.
The pricing of gas burners depends on the brand of the manufacturer and the materials from which they are made.
Application of roof burners
For repairs and roofing with bituminous materials, it is preferable to use a gas burner. With a high-quality burner, about 600 square meters of weldable material can be laid in 8 hours of working time.
Work on installation and repair of any type of roof using a gas burner must be carried out in accordance with all fire safety rules.
For work on laying various roof areas using a gas burner, there are certain restrictions such as:
- It is allowed to lay no more than 500 square meters at a time.
- When laying more than 500 square meters, fire hoses with water are required.
- Access to fire hydrants must be on four sides of the roof to be covered.
- The water supply through the fire hose must reach any point on the surface being laid.
In addition to roofing work, gas burners are used for domestic and industrial purposes.
Burners with forced air supply without preliminary preparation of the gas-air mixture
In burners of this type, the mixing of gas with air occurs outside the burner simultaneously with the combustion of the gas, and the length of the torch practically determines the path on which this mixing ends. In turn, the mixing path depends on the burner design and the ratio of gas and air exit rates. If it is necessary to lengthen the torch, the gas and air flows leaving the burner mouth are directed parallel to each other, and the gas and air pressures are taken as close as possible. To shorten the torch, gas is supplied in the form of streams directed at an angle to the air flow, the air is twisted, the difference in pressure between gas and air is increased, etc.
According to the method of preparing the mixture and the combustion process, these burners are diffusion, and flame penetration is impossible for them. In relation to separation, the torch is more stable than that of other burners, which allows you to regulate the thermal power over a wide range. If the technological process requires a long torch of adjustable length and a uniform temperature distribution throughout the volume of the furnace (for example, a kiln for firing cement clinker), then this is achieved by using diffusion burners. In furnaces with particularly high temperature conditions (open hearth, glass melting, etc.), where the air has to be heated to 800-1000 ° C or more, diffusion burners are also mainly used: preliminary mixing of gas with air heated to these temperatures will lead to ignition of the mixture into the burners before exiting into the furnace.
In boilers, diffusion burners with forced air supply have also found application: when converting boilers from solid to gas fuel, to ensure uniform distribution of heat flows - bottom burners, if it is necessary to preserve reserve solid fuel - vertical slot burners, etc.
Device and design
The basis of the tool is a handle, a gas supply tube and a metal head in the form of a glass. The working gas is supplied through a hose connected directly to the connector in the handle. After pressing the handle handle, the valve will open and the gas mixture will flow into the glass through the tube. The fuel supply can be regulated by a reducer for the roof burner, on which a special valve is located. As a rule, glasses are cylindrical in shape. This makes it possible to use heating modes more flexibly. In particular, modern burners make it possible to provide intensive heating, drying and melting of materials at different temperatures
When choosing a model based on its design, it is important to consider how the instrument will be supplied with oxygen. This can be either pumping from the atmosphere or taking air from a special cylinder
The choice of one concept or another is determined by the operating conditions of the device.
How to lay roofing felt using a gas burner?
Clean the base of the roof from debris. Roll out the rolls of roofing felt with an overlap of 85 cm, glue the ends to the base of the roof on one side, then roll the rolls back. Heat the base of the roof and the inner side of the slowly rolled out roofing material, press the roofing material tightly to the base of the roof with a roller, trying to avoid the formation of air bubbles and folds.
In a home workshop or garage, there is often a need to use a gas burner. It has the widest range of applications – from soldering to roof repairs. Not to mention the need to heat up the metal part for processing.
When doing metalworking work on metal, a gas torch can be used to heat the workpiece for the purpose of subsequent hardening. If you are engaged in electric welding, when working with some metals it is necessary to warm up the area of the future weld.
Tool stores sell a variety of tools for working safely with fire. A propane burner can be of any size and any configuration. The size of a ballpoint pen for jewelry soldering.
Or a multi- nozzle ramp for heating bitumen on the roof
The advantage of industrial options is the safety certificate. However, there is nothing in the design that cannot be replicated at home. Since any product in the store costs a lot of money, we will tell you how to make a gas burner with your own hands.
Important! Homemade devices for working with fire carry potential dangers. Therefore, a propane torch manufactured without technical expertise is operated at your own peril and risk.
Do-it-yourself propane burner manufacturing technology
Except for the handle, all components of the propane torch are made on a lathe. The preferred material is brass. The adjustment needle is made from a knitting needle. The sealing gland for the thread is made of fluoroplastic. Having the indicated materials, it is quite possible to make a propane burner.
Tools and materials
Manufacturing begins with the selection of tools and parts for the job. The body is made in the form of a steel cup; this design provides protection against torch separation. A handle is attached to the body, which is made of any material with a length ranging from 70.0 to 80.0 cm. A gas hose is installed in the holder, which gives the device rigidity. The length of the torch is regulated in 2 ways - gear and valve.
Standard Propane Torch Package:
- Metal body.
- Gearbox, purchase a ready-made device.
- Nozzle for creating a gas torch.
- Fuel supply regulator.
- Nozzle (nozzle) for performing various tasks.
Necessary tools for making a burner with your own hands:
- Hacksaw for metal.
- Electric drill with a set of drills.
- Pliers, needle files, screwdrivers of various configurations.
- A set of keys, dies and taps.
- Bench vice.
Blueprints
A large selection of different designs for soldering metals allows you to find a suitable option for the user’s tasks. To do this, you don’t need to contact a retail chain at all. If the performer has all the necessary materials and tools and is familiar with the manufacturing technology, then the propane burner can be assembled with your own hands, saving on assembly costs.
Gas burner diagram
Having a detailed drawing, creating a propane burner is not so difficult. You can find a proven drawing on the Internet or use a simple version of the VK-74 model. To ensure reliable operation and ensure fire safety, it is recommended to use material approved for use in domestic gas supply systems.
Propane gas burner diagram
Is it possible to make a gas burner yourself?
Now let's discuss the possibility of making a propane torch yourself. Of course, this is all possible, but due to the requirements for sealing all parts, as well as the high precision of their manufacture, doing this in practice becomes very difficult. And if you take into account the low cost of factory-made devices, then this makes no sense.
The most important part of the assembly work is the manufacture of the fuel supply and mixing unit, so spare parts from other devices are often used for such work. Let's try to describe the self-assembly process
Scheme of the structure of a propane burner
The diagram above shows the approximate structure of a propane burner - we have already discussed the main structural elements. When assembling, we will not make everything, and we will use spare parts from other equipment that you may have in stock. We will need:
- valve made of steel - you can take it from any cylinder designed for storing liquefied gas;
- plug - it is usually used when transporting gas cylinders;
- We will borrow a jet from a blowtorch, the nozzle of which should be 0.8 mm;
- You will also need a metal pipe - its internal diameter should be 10 mm, and the wall thickness should be at least 2 mm;
- wooden handle – you can make this part yourself.
The second most important thing is a glass. DIY propane torch.
Now let's look at our steps at work:
- We fix the steel pipe, which we will use as a supply tube, in the handle. This can be done using glue;
- We make the body and divider from a brass rod with a diameter of 20 mm. In the body you need to drill two radial holes with a diameter of 5 mm, 4 holes are made in the divider rod (diameter - 1 mm);
- assembly is carried out - the divider is pressed into the body with great interference. A flange is installed inside the housing with a gap so that the internal diameter of the housing is 0.6 mm larger. The gap thus obtained will inhibit the gas flow supplied to the igniter holes;
- a nozzle must be machined from a steel rod;
DIY compact gas burner
- a supply hose is put on the rear end of the tube and secured with a metal clamp;
- the operating pressure is set on the reducer and gas is supplied;
- wait until all the air comes out of the hose, then ignite the gas, bringing it into the flame of the gas burner;
- After this you need to sand the end. The flame on the burner should be 5 cm long;
- the housing with the divider is put on the external thread of the nozzle. The burner should produce an even flame without soot - to achieve this effect, you need to slowly rotate the body along the threads on the nozzle;
- the loose threaded connection is sealed with FUM tape.
Regardless of whether a factory gas burner is used or a homemade one, fire safety requirements must be strictly observed.
That's all. We hope the material was clear and useful for you.