Design and principle of operation of a soldering torch
The soldering torch is designed to connect metal parts using liquid metal. Soldering can be carried out by two types of solders: low-melting solders, which are hard solders, and refractory, which are hard solders.
To perform soldering with low-melting metals, various types of soldering irons are used. To work with refractory solders, high temperatures are required, which can be achieved with a soldering torch.
There are several different types of this device. All of them operate on different types of fuel, allowing them to achieve high temperatures.
The most common are soldering torches that run on gas and a gasoline-air mixture.
The principle of operation of a gas burner
An ejection-type gas burner is designed for high-temperature types of soldering. Its operation is carried out from a gas cylinder containing liquefied gas. This type of burner is quite economical, which affects the cost of soldering metal parts. The burner design allows you to regulate the volume of gas passing through the ejector.
The operating principle of a gas-powered burner designed for soldering work is quite simple.
From the reducer, located near the cylinder containing a liquefied propane-butane mixture, gas flows through a hose to the incoming fitting, which is built into the base of the device.
The needle is controlled using a special holder installed on the body of the flame formation device. The incoming gas passes through the nozzle at high speed and is expelled from its opening. By increasing the flow rate of the gas flow, the air required for combustion is sucked in through a special device - an air spool.
After passing the nozzle, the gas moves through a special channel to the divider, which divides it into the main and auxiliary. The main thread is central. The auxiliary flow powers the peripheral holes in the divider. An auxiliary flow is required to maintain the temperature of the flame in the soldering area.
Using a special spool sleeve, which can be rotated, you can easily dose the volume of air oxygen consumed, and the volume of gas is regulated by a needle. The ability to adjust the gas mixture allows you to obtain flames of various qualities and sizes.
Types of burners
As previously noted, there are simply a huge number of different versions of the device. For example, a gas burner for soldering copper pipes may be structurally different from other devices. Classification is carried out according to the following criteria:
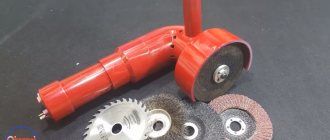
- By the type of nozzle. Gas is supplied through a nozzle, which is shaped like a spear. In addition, there are rotating and replaceable types of nozzles. The choice is made depending on the specific work for which the device is purchased.
- By scope. Multifunctional devices are more popular. They can be used to perform various jobs, but in some cases they may not be applicable. In addition, narrow focus devices are available for sale. For example, there are gas torches for jewelry work: they are more accurate and small in size.
- The power control method is also important. There are designs with piezo ignition and power control function.
Soldering a copper pipe with a torch
The following types of devices are also distinguished:
- The mini gas burner is suitable for fine work. Such a device is characterized by its small size, as well as the ability to accurately regulate power.
- A gas burner with a hose is characterized by the fact that it has a separate cylinder, often installed on a special trolley. This design is large, the cylinders are installed away from the work site, and the gas is supplied through hoses.
- Recently, designs with disposable cylinders have been encountered. Such design options are characterized by high practicality. However, it is worth considering that the design with disposable cylinders is more expensive to use.
- The hand torch is characterized by its small size and ease of use. A similar device is found quite often.
Step-by-step manufacturing process
The following is the sequence of operations for manufacturing a gas-air burner:
- The body is made on a lathe or milling machine; on one side it must be open, on the other it must be closed with a plug.
- A hole is drilled in the plug. Its diameter should exceed the outer diameter of the nozzle by fractions of a millimeter. It should fit tightly.
- A ring of fine wire mesh is placed inside the housing.
- A limiter and a bushing with a hook are cut out of a sheet of metal.
- The handle is made from dense wood.
- The tube is passed through a hole in the housing so that its end becomes the burner nozzle.
- The end of the tube is sealed with refractory solder.
- a 0.2 mm hole is drilled in the solder. You can solder a ready-made jet of suitable diameter into the end of the tube.
Do-it-yourself gasoline burner assembly
You can make refractory solder yourself from finely chopped pieces of copper and zinc. Zinc is taken from the battery glass, crushed and poured with weak hydrochloric acid. Then copper and borax are added. The resulting mixture is calcined in a crucible.
Making a gas burner from scrap materials: step by step
List of materials and tools:
• drill;• grinder;• hammer;• sandpaper;• brass blanks for the divider nozzle;• thin brass tube with a diameter of 15 mm;• wooden blocks;• vice;• silicone seal or FUM tape;• hoses for connection;• valve for adjustment.
How to make a nozzle and handle
First of all, we take a brass tube and attach a handle to it - for example, from an old burner, or from a wooden block, having processed it beforehand. We drill a hole in the block for a brass tube with the appropriate diameter. Having inserted the tube into the timber, we secure it with silicone or epoxy resin.
Next, we proceed to a more labor-intensive and time-consuming stage of work - manufacturing the nozzle. The hole size should preferably be 0.1 mm.
You can use a drill to make a slightly larger hole, and then adjust the edges to 0.1 mm. The hole must have the correct shape so that the flame is even.
After this, we fix the workpiece in a vice, take a hammer and carefully, in a vertical plane with a “pull” towards the middle of the workpiece, strike the future nozzle. We rotate the product evenly to form an ideal hole.
Then we take fine-grit sandpaper and sand the nozzle head. To connect to the tube, a thread is applied to the back of the product; the elements can also be simply soldered - but in the future, repairing the parts will be more difficult.
Now we connect the device to the gas cylinder and set it on fire - the do-it-yourself burner is ready for use. However, here you can see that to regulate the gas flow, you can only open and close the valve of the gas cylinder, and thus it is very difficult to obtain the desired flame. What we can do?
How to improve flame control
For the normal operation of our homemade unit, we will install a divider and a tap on it. It is better to mount the tap near the handle, at a distance of about 2–4 cm, but it can also be attached to the supply pipe. As an option, take a burner tap from an old autogen or another similar tap that is attached with a thread. To seal the connection, take FUM tape.
The divider is installed on a pipe with a nozzle; it is made of brass, diameter 15 mm. The best option is a cylindrical part with a hole for a tube with a nozzle. If there is none, we do this:
1. Take a brass pipe with a diameter of 35 mm and cut a piece of 100–150 mm.2. Take a marker, step back from the end and mark 3-5 points, with an equal distance between them.3. We drill 8–10 mm holes in the pipe, take a grinder and make straight cuts to them.4. We bend everything to the center and weld it to the burner pipe.
Gasoline burner: advantages and disadvantages. DIY tips:
A gasoline burner is a device whose operation is based on combining liquid fuel vapor with oxygen to produce stable combustion. When traveling, it is extremely convenient to use ready-made, factory-assembled devices. However, if desired, you can make the burner yourself.
An autonomous device is useful in places where it is prohibited to make fires or there is no firewood. A gasoline burner produces a flame level that is almost invisible. However, its temperature is quite sufficient for quick cooking.
Advantages
A petrol tourist burner is becoming the choice of climbers, ice fishing enthusiasts, as well as travelers who go on long winter hikes. Liquid fuel devices can operate efficiently even in arctic cold.
Among other advantages of gasoline burners, it is worth noting:
- Possibility of ignition at extreme heights.
- Availability of fuel, use of alternative solutions in the form of kerosene or alcohol.
- Low cost of refueling compared to gas models.
- Low tare weight.
- Particularly simple design.
Flaws
A gasoline burner has some obvious disadvantages. The need to use high-purity fuel comes first. Clogging of the narrow throttle opening for gasoline flow to the steam generator can become a real problem when you need to quickly ignite the burner. Cleaning the system can resolve the problem. However, this takes time.
The gasoline burner requires careful handling. When pouring fuel into a container, fuel often gets onto the body of the device. This may subsequently cause unwanted combustion.
A gasoline burner produces uneven flames. Therefore, it is recommended to use such devices inside tents only as a last resort. To this is added an unpleasant effect in the form of the spread of a specific odor and black soot.
Advantages of the device
As mentioned earlier, a DIY gasoline burner can be useful anywhere: when camping, in the country, in the garage, in places without electricity, and so on. The device can also be useful in places where lighting a fire is prohibited or not recommended .
Thanks to the small and efficient flame that our burner will produce, it can be used in any reasonable place. By the way, it should be noted that any gasoline burner can withstand any weather conditions, up to a drop in external air temperature to 35-40 degrees Celsius.
And here are the advantages that a gasoline burner can boast over its analogues:
- very easy to use;
- economical;
- compact;
- cheap fuel.
I would like to say that the last point is the most significant, since the fuel for our device, as you might have guessed, is gasoline, which can easily be purchased at any gas station, or drained from your car’s fuel tank. Also, in a gasoline burner, fuel is consumed quite slowly, which adds greater efficiency to the product.
What to look for when choosing a gasoline burner in a store
Try to choose those models that have a detachable connection between the burner and the pump
This will make it easier to disassemble the device for cleaning if necessary. Estimate the time it takes to boil a liter of water under relatively normal atmospheric conditions. Estimate gasoline consumption over a certain period of burning time. Knowing the weight of the burner and its dimensions will allow you to evaluate what kind of dishes can be heated on it and how convenient it will be to carry the burner with you. It is important to have spare parts for possible repairs. A positive circumstance when choosing this device would be the presence of wind protection. The use of gasoline burners is often more convenient compared to their other types
However, we must not forget that they require care and, if possible, gasoline of normal quality. Of course, they work in almost any conditions, but proper operation and regular cleaning will allow you to use them comfortably for a long time.
Using gasoline burners is often more convenient than other types. However, we must not forget that they require care and, if possible, gasoline of normal quality. Of course, they work in almost any conditions, but proper operation and regular cleaning will allow you to use them comfortably for a long time.
Read Zander bite
Multi-fuel burners on the go
In previous articles, I have already conducted a general overview of modern devices for cooking without a fire, focusing in more detail on gas burners, as the most common. Integrated cooking systems were awarded a separate article as the most innovative.
Now the topic of multi-fuel burners requires independent consideration. To begin with, I propose to clarify the term. “Multi-fuel” is the broadest concept, which combines both devices operating on gas and liquid fuel, as well as purely liquid fuel burners. Here we will also include those designs that the manufacturer positions as mono-fuel (usually gasoline), since, under certain circumstances, they can often be put on a “new diet” - the fuel that is available.
Why do you need a gasoline burner when fishing?
- Why do you need to carry extra weight with you? You can cook food on a fire, keep warm and dry clothes after bad weather. Fishing situations can arise in a variety of ways. Let's imagine how to light a fire after heavy rain. The branches are wet through. It is not at all clear how in such a situation one can light a fire or maintain it for the required time. On the other hand, if you have this device, then you can light it in any weather. Also, with its help it is not difficult to cook food or warm a tent before going to bed.
- Let's imagine a different situation. Fishing continued until late at night. Everyone is very tired and will need to get up early tomorrow. Does it make sense to bother with lighting a fire? At the same time, you can use a gasoline burner without any special preparations.
- Also, if you stay in one place for a long time in cold and wet weather, it will be convenient to use such a device to make tea or coffee even in the most difficult conditions.
Homemade gas burners
The main components in the manufacture of powerful gas burners are industrial valves. They may be new, but for a homemade device it is enough to use used ones if there is no gas leak. They are designed to work in tandem with a 50-liter propane gas cylinder, which has an angle valve and a reducer.
Burner with valve VK-74
The structure of this burner is shown in Fig. 1. The oxygen cylinder valve VK-74 is used as a basis. A fitting-handle machined on a lathe is installed at the outlet end, to the corrugated part of which the hose from the cylinder is connected. A cap with a prepared hole with a thread for the nozzle is screwed onto the part of the valve with a conical thread K3/4˝, with which it was connected to the gas cylinder. You can use a ready-made blowtorch or gas stove.
The nozzle is made from a piece of 1/4˝ steel pipe 100 mm long and welded to the cap on two pieces of ∅5 mm wire. A distance of 15 mm should be left between the cap and the nozzle to allow air to enter the combustion zone. The position of the nozzle is adjusted by bending the wire holders to achieve a central flame position.
Sequence of actions to ignite the burner:
- Open the cylinder valve;
- Place a lit match near the nozzle and slowly open the burner valve;
- Control gas ignition;
- Adjust the flame using the burner valve
A homemade gas burner of this design has one drawback associated with the location of the valve. The gas flow is directed in the opposite direction to the normal position. Stuffing box seals experience constant gas pressure (including when the valve is closed), so it is necessary to constantly monitor the tightness of the seals.
Burner converted from acetylene gas cutter
If you have an acetylene torch with a faulty oxygen supply valve, do not rush to throw it away. It is also suitable for making a burner (Fig. 2). Gas mini burner
Mini gas burners are more suitable for working with small parts. The mini burner is based on a needle for inflating balls. It is necessary to make a cut in it, a little further than the middle of the needle. Some needles already have a similar hole, which significantly speeds up the work process. Next, you need to take the syringe needle and bend it about 45 degrees in the middle.
It is best to sharpen the pointed end of a syringe needle so that it is straight. After this, it needs to be inserted into the ball needle so that one end comes out through the hole, and the other protrudes from the large needle by several mm. The resulting mini structure should be fixed using soldering. After this, droppers must be attached to the bases of the two needles. Clamps - dropper regulators need to be moved as close to the needles as possible. In the resulting burner they will act as gas and air supply regulators. They also need to be fastened together, and this is best done using a heat gun. All that remains is to connect a source of compressed gas to the finished device, the burner is ready for use. This homemade gas burner can heat objects up to 1000 degrees
You should work with it carefully, observing safety precautions
How to do it yourself?
You can not only buy gasoline burners, but also make them yourself. A similar model usually consists of a compressor from a refrigerator, an acetylene tank, a cutter and copper elements. Today, there are many ways to assemble such a device with your own hands. One of the simplest is to use tin cans, cotton wool, fuel and screws.
Here is the sequence of manufacturing a gasoline burner.
- First of all, you need to thoroughly wash the jars and clean them of dirt. Now we take an ordinary drink can and cut off its top part, leaving only a third of the bottom. We make four holes using a screw.
- We also remove the top of the second can and install it bottom up. We put cotton wool in the middle and cover it with the first jar on top.
- Through the hole created on the top can, cotton wool is soaked in gasoline, and the torch begins to burn.
Thus, a gasoline burner, even a homemade one, has a huge number of advantages, among which it is worth noting mobility, power and efficiency
During use, it is imperative to pay attention to safety precautions. In the selection process, you need to pay attention to the presence of a nozzle, how the device works, and also study the drawing to understand how to light or ignite the burner
In addition, if desired, you can assemble a gasoline-air and acetylene mini-burner with your own hands.
For more information about gasoline burners, see the video below.
Materials and tools for work
Tools for work
To make a regular burner, you will need the following parts and tools:
- drill;
- Bulgarian;
- hammer;
- sandpaper;
- brass blanks for nozzle and divider;
- thin brass tube Ø15 mm;
- wooden bars;
- vice;
- FUM tape or silicone seal;
- connecting hoses;
- control valve.
The advantage of a gasoline burner over a gas burner
- If you have to use air transport services, you won’t be able to transport a gas cylinder. This is prohibited by the rules. On the other hand, fuel for a gasoline burner is not difficult to obtain locally. Gasoline fuel is much more affordable than purchasing gas cylinders.
- As the gas reserve in the cylinder is consumed, the operation of the gas burner deteriorates. This does not happen with gasoline.
- If you find yourself far from civilization, then it is possible to get gasoline, but purchasing a gas cylinder is very unlikely.
- Gasoline burners are characterized by relative compactness and low weight. This allows you to conveniently carry them in a backpack.
Ability to work at low temperatures
Where there is rarefied air or at low temperatures, a gasoline burner works flawlessly, while a gas burner will either work poorly or not at all.
Scope of application
Such gas and gasoline miniature torches are excellent for jewelers to create the most accurate soldering when making various jewelry products. This technique allows you to carry out work in such a way that the joints of individual parts are not noticeable.
Some types of burners can be used simultaneously in jewelry making, industry, electronics, technical modeling and electrical engineering.
Gasoline blow torch
A gasoline burner is designed for the process of high-quality fastening (soldering) together of metal components of a single structure using molten metal. The solder used for soldering has a solid physical state and can be either low-melting or refractory.
Design and principle of operation
When purchasing a gas torch for metalworking by soldering and welding, you should not assume that the kit contains all the elements necessary to organize the work. Since each gas-air burner apparatus has individual drawings, and there are no clearly defined design standards, we will consider the basic (simplified) set of working elements:
- tank for storing gasoline (fuel);
- air compressor;
- gasoline blow torch;
- gas-resistant hoses providing fuel supply,
- stand.
A gasoline burner is a heating device in which the combustion process of gasoline converts it into a gaseous state. Combustion occurs in the evaporator, where oxygen is supplied from the air by a nozzle. As a result, a gasoline-air flammable cocktail is formed, a mixture of the combustion product of gasoline and air, which is involved in the soldering process. The rotary tap located on the handle functions as a regulator of the direction and power of the flame.
Benefits and safety of work
Heating devices for soldering, the initial fuel of which is gasoline, have become widespread in various fields due to their ease of use and thermal performance.
A positive characteristic of the heating device is the ability to operate without preheating.
Advantages of gas burners:
- relatively small weight and dimensions of the device;
- portability and ease of use (compared to its gas counterpart);
- high-quality soldering and welding of metals.
The disadvantage of using the device is the presence of the smell of gasoline in insufficiently ventilated areas. When working with a gas burner, it is prohibited:
- operate the device as intended if a gasoline leak is detected;
- use substances not specified in the instructions as fuel;
- allow the fuel tank to heat up to 500C;
- refuel while soldering or open the container when the evaporator is not cooled down;
- Use in closed or unventilated areas.
Application area
Hard-melting solders and various metals and alloys (brass, bronze, etc.) can easily be soldered with a gas torch. The unit carries out heat treatment (hardening) of small tools, is used in the artistic processing of wood, and even softens glass.
A separate group is represented by tourist burners (primus), they come in gasoline, gas and multi-fuel types.
Burner classification
The design features of the burners depend on what type of fuel is used. For example:
- There are burners that operate exclusively on gasoline and no other fuel.
- There are designs that, in addition to gasoline, also use kerosene.
- The operation of any type of burner requires a special device capable of maintaining pressure on a constant basis. Due to this factor, these devices are classified according to this method.
- There are designs in which there is no pump, while other devices are equipped with a pump.
- Burners are also classified according to the method of fastening the fuel container.
- Some types of burners are designed so that the fuel container is located separately from the burner and the fuel is supplied to the burner through a hose. There are burners where the fuel container and the burner form a single structure.
How to use?
Before you start using the burner, you must carefully read the instructions and recommendations of the manufacturer. A distinctive feature of such equipment is that it can be used exclusively in open areas.
If you need to operate a gasoline burner in an unventilated area, you can turn it on for a short period of time, and then thoroughly ventilate it.
In order to ensure maximum safety when using the device, you must strictly follow the operating instructions. Otherwise, a fire or explosion may occur.
Read The largest catfish in the world - TOP 10
Let's look at the process of using a gasoline burner.
First of all, it is necessary to refuel the equipment with the appropriate fuel. It is best to use high-quality gasoline so that the device does not fail and there are no problems. Under no circumstances should the tank be filled completely; filling 3/4 full will be sufficient. The remaining space is necessary to create pressure during operation. Creating pressure using a special pressure pump, which is usually included with the device. For this, 10 pumpings will be enough. After the necessary pressure has been created, you will need to pour fuel into the tray. Alcohol is considered the ideal option, as it does not produce much soot. After ignition, the burner will heat up the evaporator. The needle valve can now be opened
At this stage, be sure to pay attention to the fuel, which must be gaseous. Be careful that there are no drops here.
If they are detected, the heating process will need to be carried out again. During the work, it is imperative to monitor the torch, increasing or decreasing its power, using a shut-off valve for this. If the operation of the burner cannot boast of stability, or attenuation is constantly observed, then the nozzles should be cleaned with a special needle. After finishing the work, you need to extinguish the torch. To do this, simply close the valve.
In order to ensure the maximum level of safety during operation of the equipment, it is worth adhering to safety regulations.
- Under no circumstances should you continue to use a gasoline burner if a fuel leak is detected.
- It is not recommended to use fuel whose quality properties differ from those recommended by the manufacturer.
- Do not use the burner for a long time. This may cause the cylinder to become very hot and cause it to explode.
- Before starting operation, it is worth checking the integrity of the safety valve each time. If problems are detected, it is better not to turn on the equipment.
- It is better to refrain from using a gasoline burner in an unventilated area.
Work to improve flame control
Burners with adjustable flame power
To ensure normal operation of our burner, it is necessary to equip it with a divider and a tap. A suitable place to mount the tap is near the handle, 2–4 cm higher. But it can also be installed on the supply pipe. A faucet from a burner from an old autogenous engine or its other analogue will do. It is permanently fixed to the tube with a threaded connection. To seal the connection, use FUM tape.
The divider will be installed on the pipe with the nozzle. It also needs to be made of brass Ø 15 mm. The best option is a cylindrical part with a hole for a tube with a nozzle. If there is none, do the following:
- Take a brass pipe Ø 35 mm and cut a piece of 100–150 mm.
- Stepping back from the end, use a marker to mark 3-5 points exactly distant from each other.
- Drill 8–10 mm holes in it with a drill and use a grinder to make even cuts to them.
- Now you can bend everything to the center and weld it to the burner tube.
Burner nozzle device
To properly secure the divider, it must be placed so that the nozzle protrudes 2-3 mm from the connection point. Thanks to this device, two goals can be achieved: to protect the flame from strong winds and to provide it with a flow of oxygen, which is necessary for a more stable and strong flame.
All welding points can be smoothed using a grinder. Then your homemade burner will look more solid. That's all. Now all that remains is to supply gas and use the burner for its intended purpose.
Gasoline torches for soldering and everything connected with them
The gasoline soldering (smelting) apparatus is designed to form a gasoline-air combustible mixture. A gasoline torch for soldering and melting metal runs on a gasoline mixture. These burners offer convenient flame adjustment using a rotary tap located on the handle.
Advantages of the device
Advantages:
- The device is portable;
- Low weight of the device;
- Ease of use;
- High-quality result upon completion of soldering (melting).
Gas burner device
Components:
- Gasoline tank;
- Air compressor;
- Gasoline hoses;
- Burner.
Please note that torches and hoses, as a rule, are not included in the kit for gasoline soldering. In this regard, the purchase of these elements is made separately
Do-it-yourself gasoline torch for soldering
Purchasing a ready-made gas burner is not always possible (for various reasons). In this case, it will be useful to know that you can make a gasoline torch for soldering yourself. Note that homemade gasoline devices are no worse than purchased ones. A DIY device is just as effective.
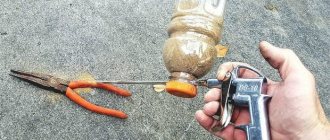
If you bring a lit match to the spout of a gasoline burner, you will be able to see a fire instantly flare up. Steady combustion of gasoline will continue for five minutes (+/-2 minutes). The flame temperature at its tip will reach more than 1000° C.
Note that with such a burner you can easily melt hard solders, heat treat small tools, melt various metals, solders, and even soften glass.
There is no need to make many parts of a homemade gas burner, since they can be borrowed from other things. For example, homemade parts such as a rubber bulb can be made from a spray bottle.
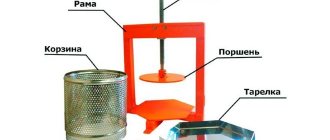
The homemade burner device contains:
- Frame;
- Sleeve with hook;
- A tube;
- Emphasis;
- Pen;
- Rubber ring;
- Balloon;
- Pen;
- Rubber bulb;
- Filler.
Manufacturing:
The burner body can be turned on a lathe
Steel of any grade can be used as a material for the manufacture of this important part. It is worth paying attention to the fact that the body of the part is composite (one end is open and the other is closed with a plug). There is a hole in the plug, the diameter of which is 0.1 millimeters larger than the outer diameter of the tube. Using this quality, the body can move along the tube quite tightly, while maintaining tightness. A ring made of metal mesh and slag wool must be installed inside the housing. Next you need to make a sleeve with a hook and a stop
You can use a steel sheet for this. The burner handle, which is essential for a gasoline device, is carved from beech or oak. The holes for the tubes (2 pcs.) are drilled very carefully. Thus, the axes of the holes should be strictly parallel. The finished handle is sanded and then coated with several layers of colorless varnish. Next, it is necessary that the end of the tube, which is passed inside the body, forms a nozzle. If you have PMTs-54 hard solder (adheres well to steel), try to solder the end of the tube with it, and then drill a 0.2 millimeter (diameter) hole along the axis of the tube. You can make your own solder. It must be said that solder consists of copper and zinc. In order to get zinc, you can use cups from an old electric battery. You need to empty the glass of its contents and then heat it over the fire. Next, you need to lower it into cold water, and then into a weak solution of hydrochloric acid. A clean glass is cut into pieces with scissors. Thus, we obtain zinc. Now it's up to copper. To do this, do the following: take copper wire; anneal it on fire; Finely cut the wire using scissors. Now you can pour pieces of copper and zinc into the crucible, maintaining equal proportions, after which you need to sprinkle with borax. Metals can be fused using a burner. After this, you will need to cool the resulting block and secure it in a vice. Then use a hog file to file it on all sides. The resulting sawdust must be mixed with borax.
Homemade gasoline burners like these will work great if done correctly.
Please note: if you do not have enough experience working with flammable materials, it is advisable to use commercial gasoline burners
Use of torches for hard soldering and brass soldering
Soldering allows you to make a permanent, hermetically sealed connection of two metal parts by a kind of “gluing” of them with some molten material - solder. The latter must exhibit high adhesion to the metals being joined, that is, be very “sticky”, and have sufficient strength after hardening.
The melting point of the solder must be higher than the operating temperature at which the soldered product is operated; and at the same time lower than the melting point of the base material.
A gas burner is precisely what is needed to heat the solder and thus make it sufficiently viscous.
Manufacturing of burners
A gasoline burner is made in several ways, but a beginner in this business should choose the simplest one, which does not require plumbing tools.
Read What carp bite well on
First way
Making a burner
Take two empty tin cans of any drink, condensed milk or beer, after cleaning and rinsing with water. After this, you need to wait for the jar to dry thoroughly. In the center of the bottom of the first jar we make 4 punctures using a nail, then the same holes will need to be made along the entire perimeter of the rim of the jar. This will be our blank for the future burner, from which a flame will burst out during operation. This part should be cut off from the can so that the length of the side is 3 centimeters. Household scissors are quite suitable for this, since the thin tin used for such cans can be easily cut with any sharp object.
The bottom of the second can should also be cut off, but this must be done carefully so that nicks do not form, otherwise you will have to use sandpaper or a file.
A piece of cotton wool, previously soaked in gasoline, should be placed at the bottom of the burner, and then covered with the upper part so that it acts as a sealed lid. If the parts do not touch tightly, then strips of tin that remain from the cut can can be inserted into the cracks.
Using the burner is as follows: pour gasoline onto the top of the burner, where 4 holes were made, so that it gets onto the rim, which also has holes, and set it on fire. The thin sheet will instantly heat up, transfer heat to the cotton wool soaked in gasoline, vapors will begin to emit from it and will support the flame.
The last step is to make the supports on which the cooking pot will be located. To do this, you can use two steel rods, which are bent in a U shape and dug into the ground parallel to each other. When preparing food, you must ensure that the pot is stable so that it does not tip over.
A gasoline burner made using this method will be a disposable device, since tin cans are unlikely to be useful for the next time.
Second way
Gasoline burner with gearbox
To make it yourself, you will need:
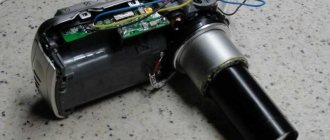
- Compressor - you can use a car inner tube from a truck, which will need to be inflated from time to time, or a compressor from an old refrigerator.
- Receiver - a plastic canister with a volume of up to 10 liters, with a tight stopper, preferably translucent, is suitable for it.
- Fuel tank - use a 2-liter metal tank, into the lid of which two tubes should be soldered - a short and a long one, the latter should be lowered to the bottom of the tank.
- Burner - you can make it yourself or buy a ready-made one at a hardware store.
The DIY manufacturing process is as follows:
- Fill the fuel tank with purified gasoline, no more than half the capacity.
- Place the simplest filter at the compressor inlet. It can be made from a funnel onto which a piece of nylon stocking or tights is stretched.
The operation of the burner is carried out by pumping air by a compressor, entering it under pressure into the receiver, in which pulsations of air pressure are smoothed out. After this, the air is sent to the fuel tank, where it is mixed with gasoline vapors. The resulting gas mixture enters the burner. The intensity of the flame can be adjusted using a special screw, which, as a rule, is always present on the burner.
Third way
Homemade camping burner
To create this type of gasoline burner with your own hands, you will need:
- A flat metal jar - this can be a container for cream or canned food.
- Pumice.
- Petrol.
The mechanism of such a burner is simple and does not require much effort. To create it, you need to place pumice in the container as tightly as possible, and then pour a small amount of fuel on top. This must be done very carefully so that the liquid is absorbed into the pumice and does not splash out of the jar. Due to the presence of pumice in the jar, the flame will burn for about 15 minutes, since due to its porous structure it will act as a fuel distributor.
This design will help not only in cooking, but also for heating a small room, for example, a garage, camping tent or shed. To heat food, you should additionally build a stand for dishes; this can be done from wire, stones or other material. The main thing is that the dishes are stable.
Two-needle burner
A very small, one might say micro-burner, connected to a can for charging lighters, can be made from a very modest set:
- needle for inflating the ball;
- syringe needle;
- two IV systems;
- air compressor for aquarium.
In addition, you will need copper wire, a set of tools and materials for soldering, as well as glue.
Is it possible to make a blowtorch work during mining?
The principle of operation of a conventional blowtorch is to ignite gasoline vapors, which are pushed out under the action of compressed air.
This effect is achieved by forcing air into the burner fuel tank. What happens if you pour used oil into a blowtorch?
Oil itself, even under pressure, does not evaporate well - it needs to be heated. Due to poor atomization, the flame will be uneven and it will be difficult to ignite the burner. The oil burns with the formation of a large amount of soot and soot, so the jet will quickly coke, its cross-section will decrease, and the lamp will fail. Increasing the cross-section of the nozzle will also not give the expected effect - the oil will be sprayed in large drops, which will not allow obtaining a uniform flame of the torch.
In addition, used oil often contains impurities: diesel fuel, gasoline, antifreeze and even water, which can lead to flashes inside the lamp. To use waste as fuel for a blowtorch, you will have to install a filtration system, which will further complicate the task.
Considering all the difficulties, using a gasoline blowtorch as a burner during mining is difficult and unsafe. Therefore, it is necessary to modify or completely change its design.
DIY instructions
Next, we will talk about several options for homemade propane burners that you can make with your own hands. In order to build a simple burner, you won’t need a lot of effort and skill, but creating the other two options will require you to work harder.
Option 1 - the simplest burner made from a piece of pipe
Building such a burner will require very little time and effort. But the process of creating a homemade product must be approached with all responsibility, because you will have to work with an explosive substance and any error in the design of the device can lead to dire consequences.
Using such a device, you can heat metal blanks for forging or warm them up before welding, and you can also repair bitumen roofing. The owner of a private house will definitely not find such a homemade product superfluous.
To make a homemade gas burner you will need the following tools and materials:
- two pieces of pipe of different diameters;
- union;
- gas hose;
- gearbox;
- propane tank;
- welding machine;
- Bulgarian.
Having prepared all the tools and materials, you can begin assembling the propane burner. But before that, we recommend that you familiarize yourself with the rules for safe work with an angle grinder.
Are they really different? Types of burners
Despite the fact that such an essential item as a burner is quite primitive, it also has the right to various variations in design. Even the primacy of the invention is claimed by several scientists: the Germans R. Lieben and R. Bunsen, the brilliant Englishman G. Galsworthy and the Swede W. Lindquist, from the name of whose company the entire post-revolutionary space became familiar with the name “Primus”. It’s difficult to say which of them is the “founding father,” but we’ll figure out the different types of burners, very easily. A primus was a burner that operated using liquid fuel. There are many signs of burner classification and everything should be taken into account.
See the entire range of burners at the link
When choosing a burner, pay attention to the following points.
Fuel
Fuel for burners is important. Its main capabilities mainly depend on it.
There are 3 types:
These burners are used at low temperatures, during winter fishing, hunting or high in the mountains. The name itself suggests that these models are universal and can operate on both liquefied gas and liquid and solid fuel. Their design will not be easy and the cost of the burners will be much higher.
Such models have many advantages:
- liquid fuel is more accessible;
- on gasoline, the burner power remains unchanged, even at sub-zero temperatures; if the pressure begins to drop, you only need to bleed the pump (that’s why they are used when rising more than 4000 meters above sea level);
- fuel consumption is very low and its costs pay for the considerable cost of the burner itself;
- When buying a camping stove, you have the opportunity to use different fuels.
To ensure flawless burner operation, take the choice of fuel very seriously. Otherwise, it will begin to smoke, and scale and scale will form inside. Without regular cleaning, damage is guaranteed. Therefore, they use highly purified gasoline, or its automobile grades: AI 92, AI 80.
It is strictly undesirable to use diesel fuel or kerosene.
These burners can only operate on one type of fuel. Their nature of operation is no different from multi-fuel burners.
They operate exclusively on a mixture of liquefied gas from propane, butane and isobutane. Previously, two-component mixtures were used, but practice has shown that the most optimal option is a three-component composition. Reviews about gas burners are excellent - they are simple, understandable and accessible to a larger number of consumers. The gas is contained in cylinders of various capacities.
Do you prefer sealed cylinders that are easy to transport and, when burned, do not produce soot or unpleasant odor? Then you should purchase a gas burner. It does not require preheating and resembles a home stove when turned on. If the weather is not favorable, a tourist gas stove is used in a tent or vestibule. It is safer, since the nature of the flame does not form a “torch” and does not contribute to the ignition of a tent or clothing. And insects fly to such a “light” with little desire.
The disadvantage, and a very significant one, of gas options is, oddly enough, the cylinder. During the combustion of gas, it tends to cool, thereby reducing the pressure and power of the burner itself. This is especially noticeable at low temperatures. Therefore, it is more appropriate to use them in the summer, when the temperature does not drop too much and large gas consumption is not needed. And after use, the cylinder cannot simply be disposed of. In order not to pollute nature, you will have to carry it with you to the nearest trash can.
With the help of such burners it is easy to heat water for tea or coffee, or you can cook food in a small frying pan or saucepan. Dry alcohol or pellet fuel is usually used as fuel.
design
Knowledge about fuel gives more understanding when the question arises of which burner to choose. But the design of the device also matters. To choose something, you need to have an idea of what it looks like.
The most common models are gas. Such a camp stove looks like a regular divider, to which gas is suitable. The gas power is regulated by a valve that is screwed directly onto the cylinder. From the divider there are “petals” - small supports in the form of rays on which the dishes are placed. When transporting, they fold up like a flower bud. The length of the “petals” indicates the diameter of the burner for which a particular volume is designed. More often, the volume is up to 2 liters, but there are also more “serious” options.