Tips for choosing a paper cutter
A cutter is an indispensable attribute for offices, printing houses and needlewomen. The cutter allows you to cut paper to the required format, cut brochures, and badges. The main advantages of the device are fast and smooth cutting. There are a wide variety of knives and scissors on the market, but why should you choose a paper cutter? This is what is discussed in detail below.
– Reciprocating cutters are considered universal and the most powerful, the maximum cutting batch reaches 50 sheets, most often 20-30 sheets. They are used for cutting medium-sized paper runs in copy centers and offices. They cope with cutting a wide range of materials, such as: paper, foil, cardboard, tracing paper, leather. According to the principle of operation, a reciprocating cutter resembles scissors. A sharp knife is attached to one edge, and a handle is located to the other edge. To avoid injuries, manufacturers added a protective casing to the design; for greater efficiency, many models were equipped with a counter knife. Despite the sharpness of the knife, the cutting accuracy of reciprocating cutters is less than that of disc cutters. The larger the cutting batch, the lower the accuracy. This can be corrected by reducing the cutting run, but labor costs will increase accordingly. For cutting large batches of business cards or small-format printed products, this type of cutting is impractical.
A significant disadvantage of a reciprocating cutter is the difficulty of sharpening the knife. The saber knife has an ellipsoidal shape, so simple sharpening will not work. Sharpening knives of this shape requires expensive equipment, which is why the price of new knives is not low.
Despite all the shortcomings, the type of reciprocating cutting is very popular and widespread due to its compactness and low cost of the device.
– Roller (disc) cutters . Used in offices, photo studios, advertising agencies. They allow you to cut batches of up to 20 sheets evenly (without displacement), a suitable option for cutting small runs of printed materials and trimming. The principle of operation is to move the cutting element along the guide. The cutting element is located in a protective casing, which moves along the rod. A counter knife (metal plate) is installed on the work table; when cutting, the cutting line is located between the cutting element and the counter knife. This method allows you to cut small volumes of paper without significant deviations in accuracy. The disadvantage is the deflection of the rod (the longer it is, the faster the deflection will appear) and the formation of gaps between the disc and the counter knife. The advantage of disc cutters is the ability to work with large paper formats, up to A0 format. The disc design allows you to combine several useful functions in one device: cutting, running, curly edge. The cutting element (disk) wears out quickly, so manufacturers produce a wide range of components for both straight and shaped cutting at a relatively low cost. Replacing the cutting tool is not difficult. It is because of their ease of maintenance and low cost that roller cutters are popular in small printing houses and offices.
– Guillotine cutters are designed for printing houses and offices with high turnover. The device takes up a lot of space and has an impressive weight. The heavy knife and reliable design allow you to cut a run of 200 sheets. The operating principle of a guillotine cutter is not entirely similar to the well-known guillotine. In addition to the straight cut, manufacturers have modified modern models and introduced the possibility of an oblique cut. The advanced design adds efficiency to the device and allows it to handle large volumes of paper. Important advantages include high cutting accuracy, which reciprocating cutters cannot boast of. Modern models are equipped with an illuminated cutting line, optical rulers and a vernier. Manufacturers took the issue of safety very seriously; as far as is known from history, the guillotine is a rather traumatic (to put it mildly) device. For this reason, most of the models presented are equipped with light-sensitive sensors that immediately stop the operation of the knife if foreign objects enter the cutting line. Small desktop models are equipped with a protective casing.
The advantage of the design is ease of maintenance and reasonable costs for replacing parts (knives). Guillotine cutters allow the knife to be removed and re-sharpened in workshops. Large and heavy knives are less susceptible to wear, deformation, and chipping. After several “handicraft” knife sharpenings, it is recommended to purchase a new one.
In addition to the knife, it is necessary to monitor the condition of the marzan - a strip located on the working surface along the cutting line. Typically, the marzan is made of plastic or wood and serves to soften the blow of the guillotine, preventing damage and rapid dulling of the blade. Marzan is the same consumable item as a knife, it is commercially available and can be easily replaced.
Another advantage of the guillotine cutter is its noiselessness; none of the previous types can boast of such a feature. On an industrial scale, when cutting occurs all day, the noise should not be discounted.
However, it is not practical to buy guillotine cutters for small businesses and offices; using such a cutter on stacks of 20 sheets is not profitable.
Maximum format and work surface
Manufacturers indicate the maximum cutting format in cutters; the device will cut any smaller format. All existing formats are specified in ISO 216.
A0 and A1 - posters, drawings.
A3 and A2 - newspapers, drawings, posters.
A4 is the most common paper size, on which everything from documents to leaflets and magazines is printed.
A5 - postcards, leaflets, booklets.
In addition to the supported format, you need to pay attention to the layout of the desktop; the more centerlines on the surface, the easier it is to orient and align the stack of paper. The presence of markings in degrees is a convenient addition to vertical and horizontal landmarks. It is also worth considering the material used to make the work surface; there are models made of plastic or metal. Small mobile models are equipped with a plastic surface; the design made of modern plastics is light and durable. However, metal is considered a more wear-resistant option and makes the cutter much heavier, which is why it is more often used on stationary devices.
Paper cutter - rating of the best models, how to use it and make it yourself?
Currently, the process of simultaneously cutting a large number of sheets is no longer something unrealistic. This is possible thanks to a device such as a paper cutter. Today there are a variety of designs and models on the market, so it is important to choose the right option.
Types of paper cutters
Devices are divided according to many characteristics. Depending on the design, paper cutters can be:
- roller;
- saber;
- curly;
- guillotine.
According to the drive method, the cutter is:
- mechanical
- a manual paper cutter is activated by pressing the lever; - electric
- operation is carried out by pressing a button.
According to the area of use, a paper cutter can be:
- office;
- specialized;
- professional.
Guillotine paper cutter
The most powerful type of product can cut a stack of paper up to 800 sheets. On sale you can find a manual, semi-automatic or automatic guillotine paper cutter.
The structure is activated using a power lever, but there is no need to apply a lot of physical force.
Due to the high cost, it is advisable to use such options on an industrial scale. The advantages include:
- obtaining an ideal cutting line;
- you can sharpen the blade;
- the ability to simultaneously cut a large stack of sheets;
- the cutting mechanism is protected;
- The most durable paper cutter ever.
Among the disadvantages are:
- inability to create decorative cuts;
- Do not make holes in the center of the sheet;
- high cost.
Roller paper cutter
A type of cutting machine that easily cuts up to 15 sheets at once. You can find mechanical or electrical models on the market. The device has a wooden base with markings and a screwed ruler.
There is a roller blade on one side. Place paper under the bar and clamp it. The knife has the ability to move in two directions.
Due to the large size of the working surface, such devices are often used in printing companies and photo salons.
Disc paper cutters allow you to accurately and accurately cut edges even less than 1 mm wide. In addition, it is possible to carefully control the cutting line. Among the advantages are:
- you can observe the cutting line;
- there are replaceable knives;
- you can cut a piece of sheet from 0.5 mm.
The disadvantages include:
- Over time, an error of up to 2 mm appears;
- you can't make a slot.
Reciprocating paper cutter
A powerful type of device that can cut up to 50 sheets.
A desktop paper cutter is equipped with a sharpened knife, which is fixed on one side, and on the other has a plastic handle that a person holds on to.
Their low cost makes them accessible even to small firms. In order for the cutting line to be as accurate as possible, it is important to always keep the knives sharp. Among the advantages of this option are:
- you can cut cardboard up to 4 mm thick;
- pressing sheets with a fixing device;
- with proper use, the knife remains sharp for a long time;
- some models have backlighting;
- presence of markings on the surface of the base.
The disadvantages include:
- when cutting a large stack of sheets, an error of up to 2 mm is possible;
- difficulty in sharpening blades;
- rapid dulling of knives when cutting thick paper;
- presence of noise during operation.
Trying to make a manual guillotine with your own hands
Metalworking machines are expensive and complex equipment that not every workshop, let alone an individual, is able to buy. But many of the machines can be made independently. For example, a manual guillotine for cutting metal with your own hands is not such an unattainable goal. All you need is the ability to work with welding and some plumbing tools.
Naturally, it is impossible to do without financial investments. For example, there is no way to make knives yourself. This is a complex factory-produced part that requires special steel and machines to process it. But you can easily buy guillotine knives on the market, on the Internet or in specialized stores.
If they offer guillotine knives that have worked for several years at a large factory, you can buy them, but be mindful of what kind of metal you are going to cut on your machine. If roofing steel or corrugated sheeting, then buy without fear. After sharpening, they will cope with such a task without difficulty. But for cutting reinforcement, corners or sheets thicker than 1.5 mm, new knives will be required, without “work experience”. They are relatively inexpensive, and you can choose them by length, sharpening angle and height.
A knife made from a spring will never have the capabilities of a factory one.
Many craftsmen use various metal machine parts for knives, for example springs made of steel of sufficient hardness. But such scissors will be useful only for rough cutting of thin-sheet steel - achieving ideal straightness of the blade without lateral deviations at home is difficult, almost impossible. It is better to stop at buying factory-made knives. The peculiarities of the interaction between the knife and the steel sheet require special strength of the cutting edge.
DIY paper guillotine – Homemade paper cutter – Crafts Fair
alexxlab | 03/14/2019 | 0 | Questions and answers
Homemade paper cutter – Crafts Fair
In this article we will consider only straight cuts of one sheet of paper.
Everyone who works with paper and cardboard has faced the need to cut this very paper or cardboard. Let's look at the main methods.
- The simplest way is cutting with scissors. This option is suitable for short cutting lengths and small volumes of work. If the length of the cutting line is large, then it is quite difficult to cut the paper with scissors.
Advantages: low cost of tools, ease of use
Disadvantages: difficulty in obtaining a high-quality cutting line of great length.
- The next method is cutting with a knife and ruler. With these tools you can get a high-quality cut of long-length paper or cardboard. At the same time, it is quite easy to obtain a short cut. And skill is required to cut large sheets of paper using long rulers.
General recommendations for this method:
– The knife must be sharp so as not to crush or tear the paper being cut. A stationery knife or a knife for construction work with retractable blades is quite suitable (as the tip of the blade wears, the blade of the knife should be broken off using pliers). It is better if the blade in such a knife is fixed without play - the risk of the knife “swinging” away from the guide line is reduced.
– Ruler, preferably steel. The knife will “burrow” into wooden and plastic rulers, and the cutting quality will decrease.
– Cutting must be done on a substrate. This could be a self-healing mat, cardboard, old magazines or a sheet of glass. For thin paper or tracing paper, glass, in my opinion, allows for the best cutting quality. For thick binding cardboard, it is better to use cardboard or paper as a backing.
Advantages: low cost of instruments, relative ease of use, ability to obtain high-quality cuts of long length.
Disadvantages: difficulty in fixing a long ruler, increased risk of injury.
- A more “advanced” method is cutting using a factory-made cutter.
There are a great variety of such cutters. They differ in type (roller, saber, guillotine), in the size of paper sheets - from A4 to A1, in price, etc.
Relatively inexpensive small cutters allow you to successfully solve the problems that a hand maker faces when working with sheets of paper of small size and density.
But as the paper size increases, the price of the cutter will increase rapidly.
Ultimately, a high-quality paper cutter measuring 70x100 cm (the standard size of a sheet of designer cardboard or paper) will only pay for itself on an “industrial” scale of production.
Advantages: ease of use, high productivity and cut quality (with appropriate quality of the cutter itself)
Disadvantages: high price (especially for cutters with long cutting lengths).
- A good option is a combined cutting method. To cut large sheets of paper into blanks, you can use methods No. 1 or No. 2, and to accurately trim the resulting blanks, use a small “branded” cutter (method No. 3).
Unfortunately, this method, along with its advantages, also inherits the disadvantages of “combined” methods.
- Another way is cutting with a homemade cutter.
The most common reason for creating and using homemade cutters is the inappropriateness (impossibility) of purchasing a “branded” cutter. This reason prompted me to create my own homemade paper cutter.
When making photo albums, I use binding cardboard, designer cardboard, designer paper, and tracing paper. The dimensions of sheets of all these materials, in most cases, are 70x100 cm. To cut sheets of paper of this size (after analyzing the advantages and disadvantages of the above cutting methods), method No. 5 was chosen.
Now it was necessary to choose the design of a homemade cutter. The cutter had to meet the following requirements:
– the ability to cut paper of various densities measuring 70x100 cm.
– simplicity of design and absence of expensive components.
– acceptable cut quality.
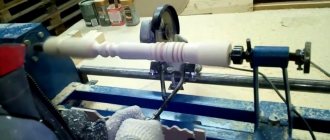
Having surfed the Internet, I found an interesting version of a cutter made from two metal rulers by Evgeniy Kuznetsov.
More information about this design can be found online. After testing this cutter, I found it to be quite suitable for medium weight paper. But for tracing paper or thick paper, this option is not very good. Also, when cutting, the knife can bend (press) the edge of the paper being cut.
I was inspired to create a more complex cutter by another tool. Unfortunately, I didn’t remember the author of this device, and now I can’t find it on the Internet.
As a basis, I took an old drawing board that had spent many years in oblivion in the open air. The edges that had become unusable had to be sawed off.
A steel ruler 100 cm long was taken as a guide for the knife. It was shortened to 80 cm. To add rigidity, a duralumin rule for construction work was purchased. I also shortened it to the required size.
To secure the steel ruler to the duralumin rule, the choice of fastening method arose. Due to varying degrees of expansion with temperature changes, as well as constant mechanical stress, the adhesive connection method was rejected. The most reliable method under these conditions is mechanical.
Since the steel ruler is quite thin, it would be quite difficult to “sink” the heads of the screws or bolts that secure the ruler to the rule flush (as well as to grind them down later). A work colleague gave me a dozen duralumin rivets that he had left over from the Soviet Union. With their help, it was possible to securely fasten the ruler to the rule.
To make it easier to fix the ruler, guides were made from bolts. It is better to drill the holes for the bolts with a slightly smaller diameter than the bolts themselves, so that they are screwed into the board and do not fit freely. The bolts are additionally secured with nuts with special bushings that prevent spontaneous unscrewing.
The ruler is secured at the top with wing nuts, which are easy to tighten by hand. Springs are bolted under the ruler. When we unscrew the thumbs, the ruler rises on springs and our hands are freed up to work with paper.
I will make a reservation that with a given length of the cutting line, even a rule with a thickness of 2 cm. After clamping the wing screws, it bends a little and to fix the sheet of paper it is necessary to press the ruler with your hand in the central part.
For convenience when positioning a sheet of paper perpendicular to the ruler, I attached an aluminum corner purchased at a building materials store.
For the same convenience, on the part of the corner fixed on the side of the working part of the ruler, I decided to place an aluminum square with stops for a sheet of paper. By securing this “stop” to the corner with a clamp, you can position the sheet of paper with greater speed before fixing it with a ruler.
Having tried different options for substrate for cutting paper, I settled on the old proven method of cutting on glass.
Glass from a furniture wall was used as a glass substrate (it is better to order glass of the required dimensions with a processed edge from a glass workshop).
To maintain the quality of the cut line, it is necessary to monitor the condition of the cutting edge of the knife and regularly sharpen it or break off segments of the knife blade with a dull edge.
On the cutter board on the side of the working part of the ruler, I glued fiberboard sheets to level the “height difference” with the glass substrate.
To cut thick binding cardboard, I use corrugated cardboard sheets as a backing; fortunately, the length of the guide bolts allows me to fix a fairly large “sandwich” with a ruler.
The disadvantage of this cutter is a small play in the rules on the guide bolts. This play must be taken into account when tightening the thumbscrews to secure the sheet of paper. The backlash appeared due to a discrepancy between the diameter of the bolts and the diameter of the mounting holes for the bolts in the rule and is, rather, a design flaw than a flaw in the manufacturing technology.
Conclusion.
We have a homemade paper cutter that is essentially an upgraded paper cutter #2 mentioned above. It inherits all the advantages and avoids the disadvantages of this method.
This device can be used as a stand-alone cutter or in combination with a small-format factory-made cutter (for the most precise adjustment of sheet sizes).
I hope this article will be useful to “cutters” of sheet materials.
PS Most of the information was gleaned by the author from various sources on the Internet.
www.livemaster.ru
Do-it-yourself manual guillotine for cutting metal
The presented guillotine, made by hand, works on the principle of lever shears and is designed for cutting sheet metal with a thickness of no more than 3 mm.
It is made from improvised materials, in particular from an old file and scraps of metal structures.
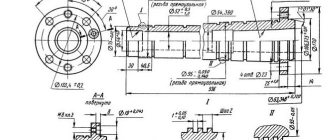
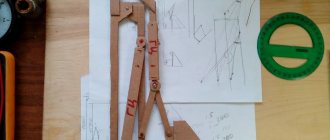
Manufacturing a guillotine consists of several stages. First, it is necessary to carry out drawing work in order to accurately determine the dimensions of the product. The applied scale is 1:1.
It is also recommended to draw a kinematic diagram, with the help of which it will be possible to determine the dynamic parameters of moving parts without taking into account the acting forces.
Drawings of parts drawn on paper are printed on a printer and then cut out. The machine model is assembled from the cut out parts.
This is done in order to verify the correctness of the calculations made and the exact correspondence of the dimensions of each individual component in the context of the functioning of the entire mechanism as a whole.
It is very important to determine the cut level indicator. It will be located at the intersection of the movable blade with the base, which is conventionally indicated by a line drawn in pencil.
The next step is to select pieces of scrap metal of suitable size, followed by template drawing of the contours of future components on them.
It is at this moment that the paper scraps from under the animation turn into an important stencil.
In this case, the blanks were scraps of a corner and a sheet piece of iron lying around. And as a result of intensive work with a grinder or a gas cutter, the main parts of the metal scissors were obtained. These are two ears, a handle, a body holder and the body itself.
Possibilities of a homemade guillotine
A homemade guillotine can work like a factory machine. This has been proven by the designs of homemade craftsmen who are able to cut metal no worse than industrial machines. The most common types of guillotines are those with a straight movement of the upper knife and those with an angular rotation. The first type of machine more accurately corresponds to the name - the guillotine, and allows you to cut metal very accurately. But the features of the second type make it possible to cut not only sheets, but also fittings and corners of quite large sizes.
Size restrictions are set on do-it-yourself metal cutting installations for purely natural reasons. Unlike industrial ones, which have a hydraulic, electric or pneumatic drive, homemade ones are equipped only with a mechanical lever or pedal, and the thickness of the metal being cut depends on the physical strength of the operator.
An electromechanical drive can be installed in a DIY workshop, but hydraulics and pneumatics are very difficult to install. This is available only to highly qualified masters.
A do-it-yourself guillotine can cut:
- sheet black and galvanized steel up to 1.5 mm thick;
- aluminum;
- stainless steel up to 0.6 mm;
- plastic;
- cardboard.
The design of a homemade machine must take into account the features of already working structures. A description of one of the guillotine options is given below.
How to make a sandpaper cutter
Translated by SaorY for mozgochiny.ru
Greetings, brain crafters ! I offer you a guide to creating with your own hands that will help you cut sheets of sandpaper clearly and evenly.
Owners of sanding machines are faced with the problem of cutting sheets for them: scissors become dull, a regular knife does not give an even cut, etc. You can, of course, buy ready-made sets of sheets for sanding machines, but this is more expensive than cutting them yourself from large sheets of sandpaper. So let's start solving this problem!
Step 1: Materials and Tools
• plywood (or MDF, chipboard) 2 cm thick • hacksaw blade 25 cm long • screws with a large head (press washer) • laser cutter (optional) • saw • sander • drill • screwdriver
Step 2: Layout
We measure the dimensions of the sheets for the sander and the dimensions of a large sheet of sandpaper, based on them we create a homemade , focusing on the photo.
If you have a laser cutter, transfer the layout to your computer and create a file with data for this cutter. Maybe my cutter_sandpaper files will be useful to you.
Step 3: Drawing Lines
We install the plywood sheet into the laser cutter and burn approximate lines. And in the absence of such a brain machine , we simply use a pencil or pen to draw out the plywood sheet according to the given dimensions.
Step 4: Sawing
Using any available method, we cut out the homemade product from a sheet of plywood, and then process the sawed edges, and the entire contour, with a sander. And also, use a thin drill to drill holes for the screws.
Step 5: Fastening the canvas
We attach the canvas to the craft , leaving space for the sanding sheet to pass under it.
Step 6: Testing
The brain craft is ready, let's start testing and then full use.
We simply place a sheet of sandpaper of the required size under the blade and pull it up with a little effort, which results in an even and accurate cut with ideal sheet dimensions.
Good luck with your creativity!
(Az Source)
SHARE WITH YOUR FRIENDS!
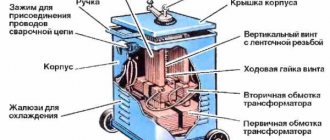
Main parts of guillotine shears
A do-it-yourself metal guillotine consists of the following main parts:
- beds;
- desktop;
- vertical guides;
- gear racks;
- gearbox;
- lever (pedal);
- rulers.
Desktop
The base is a metal table made of a plate with a thickness of at least 10 mm. It is not advisable to use a wooden shield, even of great thickness. Wood is springy and can warp due to changes in humidity, and for cutting metal it is important that the machine is in a strictly defined position.
Reciprocating scissors
A type of metal shears that works on the guillotine principle is a machine in which the upper knife moves not along guides, but in an arc around a rotary axis on which one of the ends of the knife is fixed. Its design is reminiscent of a photo cutter, which was once used to crop photographs.
The second end of the knife is connected directly to the lever handle. The knife acts on the sheet of metal not simultaneously throughout the entire cut, but gradually, which allows you to cut metal of considerable thickness without too much effort. By adjusting the gap between the knives, you can achieve fairly decent results in terms of cutting accuracy and the absence of lateral deformations in the working area.
As a rule, the upper knife is placed on a bearing and frictional forces do not increase the operator effort required for cutting.
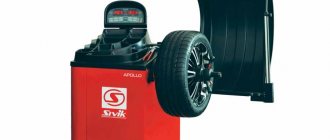
Which paper cutter is best?
The choice in one direction or another depends on how the device will be used. For home use, it is enough to have a roller cutter; for the office you can purchase a reciprocating cutter, with which you can cut up to 20 sheets of A4 format. For printing houses or enterprises with a large document flow, it is better to choose a guillotine model. When figuring out how to choose a paper cutter, it is worth noting the following important points:
Paper cutter rating
Among the entire range offered on the market by manufacturers, the following models are distinguished:
Guillotine cutter. Need help with manufacturing.
Moderator: res-book
Guillotine cutter. Need help with manufacturing.
golden hands » 27.11.2011 21:06:27
Re: Guillotine cutter. Need help with manufacturing.
kudryavtsev » 28.11.2011 02:21:52
Re: Guillotine cutter. Need help with manufacturing.
Odessa » 28.11.2011 09:42:52
Re: Guillotine cutter. Need help with manufacturing.
golden hands » 28.11.2011 12:27:45
Re: Guillotine cutter. Need help with manufacturing.
Odessa » 29.11.2011 13:15:55
Re: Guillotine cutter. Need help with manufacturing.
golden hands » 29.11.2011 16:39:02
It’s too easy to buy something ready-made and you lose all the zest.. I like to create things with my own hands.. For example, I made a kitchen set for my home. I dug through a bunch of literature, conducted a lot of experiments and spent a lot of money to achieve exactly the result that I wanted. The question is why? The stores are full of furniture for every taste, and they can also make it to order in a short time.. But this is not the same. I get an indescribable thrill from the knowledge that this thing was made with my own hands.
I didn’t really like working with tapestry, the probability of defects is quite high.. I wanted to minimize defects as much as possible.. No, still, a guillotine with a good knife cuts perfectly.
Re: Guillotine cutter. Need help with manufacturing.
Odessa » 29.11.2011 22:55:27
Precision tapestries based on guides for digital machines have appeared in the states. I saw a photo of the simplest thing - there is room for a reversal of thoughts
But if you like to reinvent the wheel, then why look at finished products, come up with something of your own. True, then why bother with bindings, it might be better to design.
Re: Guillotine cutter. Need help with manufacturing.
golden hands » 29.11.2011 23:15:43
Re: Guillotine cutter. Need help with manufacturing.
Odessa » 30.11.2011 00:32:21
Can you tell me from what equipment I can get unipolar stepper motors with 5 leads?
Re: Guillotine cutter. Need help with manufacturing.
golden hands » 30.11.2011 12:22:49
Thank you very much for the photo.
What power do you need? The main donor of steppers are old dot matrix printers, they have more powerful motors and guides. If you find a Pobotron matrix box (I think that’s what it’s called) then you’ll be very lucky. The engines there are brutal. It’s not even worth looking into modern printers, there are no steppers. There are now commutator motors with an optocoupler. And if you are interested, contact me, let's talk. I will help as much as I can.
DIY laser cutter for cutting plywood, wood, metal: assembly tips
The possibility of making something useful out of unused or worn-out equipment attracts many home craftsmen.
One such useful device is a laser cutter.
Having such a device at your disposal (some even make it from an ordinary laser pointer), you can decorate products from various materials.
With a homemade laser cutter you can cut thin wooden parts or engrave glass
What materials and mechanisms will be required
To make a simple laser cutter with your own hands, you will need the following materials and technical devices:
- laser pointer;
- a regular flashlight equipped with rechargeable batteries;
- an old burner drive (CD/DVD-RW) equipped with a laser drive (it is not at all necessary that such a drive be in working condition);
- soldering iron;
- set of locksmith tools.
The higher the write speed of the drive, the more powerful the laser cutter will be.
Thus, you can make a simple laser cutting device using materials that are easy to find in your home workshop or garage.
The process of making a simple laser cutter
The main working element of a homemade cutter of the proposed design is the laser element of a computer disk drive.
You should choose a writing drive model because the laser in such devices has a higher power, which allows you to burn tracks on the surface of the disk installed in them.
The design of the read-type disk drive also contains a laser emitter, but its power, used only to illuminate the disk, is low.
Removing the laser module from the drive will require care
The laser emitter, which is equipped with a recordable disk drive, is placed on a special carriage that can move in two directions.
To remove the emitter from the carriage, it is necessary to free it from a large number of fasteners and detachable devices. They should be removed very carefully so as not to damage the laser element.
In addition to the usual tools, to remove the red laser diode (and this is what you need to equip a homemade laser cutter), you will need a soldering iron to carefully release the diode from the existing solder joints.
When removing the emitter from its seat, you should be careful and careful not to expose it to strong mechanical stress, which could cause its failure.
The cutter requires a red LED
The emitter, removed from the writing computer drive, must be installed instead of the LED that was originally equipped with the laser pointer. To perform this procedure, the laser pointer must be disassembled, dividing its body into two parts.
In the top of them there is an LED, which should be removed and replaced with a laser emitter from a computer disk drive.
When fixing such an emitter in the body of the pointer, you can use glue (it is only important to ensure that the eye of the emitter is located strictly in the center of the hole intended for the beam to exit).
To control power you need to assemble a simple electrical circuit, otherwise the LED may fail
The voltage generated by the power supplies in a laser pointer is not enough to ensure the efficiency of using a laser cutter, so it is not advisable to use them to equip such a device.
For the simplest laser cutter, rechargeable batteries used in a regular electric flashlight are suitable.
Thus, by combining the lower part of the flashlight, which houses its batteries, with the upper part of the laser pointer, where the emitter from the writing computer drive is already located, you can get a fully functional laser cutter. When performing such a combination, it is very important to maintain the polarity of the batteries that will power the emitter.
Scheme of a cutter based on a laser pointer
Before assembling a homemade hand-held laser cutter of the proposed design, it is necessary to remove the glass installed in it from the tip of the pointer, which will impede the passage of the laser beam.
In addition, you need to once again check the correct connection of the emitter with the batteries, as well as how accurately its eye is located in relation to the output hole of the pointer tip.
Paper cutter - the required format in seconds
A paper cutter is a professional paper-cutting machine that allows you to quickly and efficiently format (cut) printed products to the desired and accurate size. As a rule, cutters are used in printing production at both the initial and final stages.
Recently, paper cutting machines have gained popularity in many companies and government agencies. After all, using a professional paper cutter saves effort and time, which can be used for more priority areas of the company or institution.
In order to correctly choose a paper cutter, you need to take into account the basic parameters of paper cutting machines, for example, the length of the cut, the thickness of the cut stack, the type of material being cut, and the required cutting accuracy.
High-quality paper cutters will help you get perfectly evenly cut materials. Processed using a paper cutting machine, they acquire a finished look and “straight lines”, creating respect for the finished product on the part of the user.
Depending on the cutting method and design, paper cutting machines are divided into three types.
Paper Cutting Tools | scruboo.ru
A paper cutter is a device for cutting paper quickly and evenly.
Very useful when designing scrap pages and postcards. The cutter allows you to cut a sheet of paper so smoothly that no scissors can cut it. According to the method of impact on the knife, cutters are divided into mechanical (manual) and electric. In turn, hand cutters come in roller, saber and guillotine types.
A roller cutter (also known as a disk cutter or trimmer) is a rectangular base (work table) along which the cutting mechanism moves along a guide. It, in turn, consists of a sharpened metal disk enclosed in a protective casing. When cutting, the paper ends up between the roller cutter blade and the counter knife (a hard metal plate attached to the end of the platform on the side where the cutter moves). This cutter is ideal for working with a small amount of paper - up to 10 sheets, it comes in different sizes, the most common are 22.5 x 12.5 cm; 31 x 31 cm; 20 x 46 cm. It takes up little space and has a valuable quality - the ability to cut an edge less than a millimeter wide, which allows you to work with maximum precision. In roller cutters, the knives are not subject to secondary sharpening, although they are called self-sharpening. They just need to be changed after a certain time.
The saber cutter is called because of the knife, which is similar to a saber. The reciprocating cutter is the most powerful and is used for working with large volumes of paper, but their accuracy remains within 0.1 mm. Reciprocating cutters have a slightly different operating principle. The sharpened knife of the cutter is fixed at one end (to avoid injury it is covered with a protective casing), and at the other it has a handle. By lowering it, they cut the paper. The knife can be sharpened in a reciprocating cutter, although this procedure is not as simple as it seems at first glance. In addition, using a reciprocating cutter is much more difficult than using a roller cutter. To get the perfect result, you have to try.
The guillotine cutter is used for processing large print runs and is perfect for large printing houses. This cutter can be manual, semi-automatic or automatic. Its working mechanism (a sharpened heavy cutter knife) is located on a massive table and is driven by a lever or electric drive. The blade moves not only from top to bottom, but also obliquely along the cutting line and is capable of “processing” impressive stacks of sheets up to 8 cm. At the same time, the accuracy reaches fractions of a millimeter. When the cutter knife becomes dull, it is removed and sharpened, and after several sharpenings it is replaced.
A breadboard knife is used for cutting paper, sharpening pencils, and is also necessary for cutting out small parts and complex shapes. It is a thin, replaceable blade similar to a feather with a protective cap. When working with such a knife, you must have a breadboard mat (cardboard, hardboard or plywood) so as not to damage the table on which you are working.
Roller breadboard cutters allow you to quickly and effortlessly cut paper, as well as make a variety of shaped cuts with special attachments.
The circular knife is used for cutting circles with a diameter of 10 mm to 150 mm. Ideal for making cards and round parts for scrapbook pages. The knife is an axis with a needle and a movable leg on which a blade is mounted, by means of rotation of which a circle is cut. There is also a scale on the movable leg for selecting the diameter of the circle to be cut. It is necessary to work with a compass knife on a breadboard mat. Make sure all screws on the compass are tight before cutting.
A shape cutter can easily cut out any shape using a special stencil; it is indispensable when creating decorative elements for pages and postcards. Some models of shape cutters can be used without a stencil. When working with such a cutter, you must have a prototype mat so as not to damage the table on which you are working and be sure to check the serviceability of the blade and, if necessary, adjust it in accordance with the density of the selected material.
I hope the review will be useful. We wish everyone a good mood!
www.scraboo.ru