To wash things, you need to connect the washing machine to the water supply and sewerage system; the drainage must be carried out correctly, be it in the bathroom or in the kitchen. In this regard, the location of the unit should be chosen where all systems are located nearby.
Leading engineer for sewerage and water supply - Sergey Krushev (Moscow “Specialist Advice”)
This could be a toilet, bathroom or food preparation room. Please understand that some minor modifications will be required. In general, connecting a washing machine is not such a difficult task; connecting all systems can be done independently.
Where can I install it?
There are several places in a residential area where it is most optimal to install a washing unit:
- Corridor . This installation solution is the most problematic, since there is no water supply or drainage. Everything will need to be tightened up, which takes time and effort. But there is still an interesting solution: install it against the wall of the bathroom and integrate it into existing furniture.
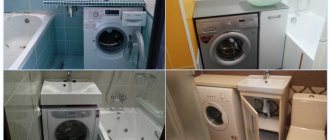
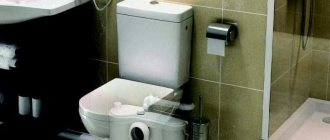
- Bathroom. (this could be a toilet, bathroom or a combined room). When installed in a toilet, there will be no problems with communication connections, but the room itself is very small. Therefore, the ideal option would be to install the unit next to the toilet. If the selected room is a combined room, then installation near a water supply is recommended. This is usually done next to the sink, and if the design of the unit allows, it can be installed directly under the sink. The second good option is to install it between the bathtub and the wall, but the size of the housing must be appropriate.
- Kitchen. The installation location can be determined in the built-in headset, and you can close the machine with the doors or leave it open. It is important that a water supply for washing is provided.
How to remove bolts for transport
After purchasing the washing machine and before installing it, you should:
- remove the packaging paper;
- Unscrew and remove the mounting bolts;
- Place plugs in place of the bolts.
This must be done, otherwise the machine will break down, especially since the warranty does not cover this action. This will be an installation error.
All you have to do is prepare a screwdriver and get to work. The device should not be turned on until the transport bolts have been removed, as this may lead to damage to the drum.
The washing machine has arrived - we begin to unpack and prepare for installation
So, finally, the laundry assistant was purchased, the order was delivered, and the movers brought the box into the apartment. Well, now the first thing you need to do is remove this box. Now we remove the fasteners that secured the elements of the machine during its transportation, protecting the rotating parts from accidental damage. Fasteners are bars, brackets and bolts.
The brackets are located on the back and are designed not only to secure the electrical cord and hose, but also provide the necessary rigidity for transportation. The bars are placed between the body of the device and the tank; they are easily removed if the machine is slightly tilted forward. The bolts are on the front holding the drum in place. After removal, all these parts must be packaged and stored - they will be needed when calling for service.
Keep in mind that after the transportation bolts are removed, the washing machine tub will hang on the springs. Don't be scared - this is normal. Before connecting the device, do not forget to insert the plastic plugs included in the kit into the holes in which these bolts were previously located.
Important: do not turn on the machine under any circumstances before removing all fastening shipping parts - this may end badly for its drum.
Connection to a water source
Connecting water to the unit
To begin the installation process, several steps must be completed. To ensure the operating mode, it is necessary to supply water, and there are several ways to solve this problem. But there are two circumstances:
- The water in the pipeline must be under pressure of at least 1 kgf/cm2.
- Washing water must be free of impurities.
If the pressure is low, it can be increased using a special pump.
A filter is used to purify water.
Water supply methods
Connection to water supply
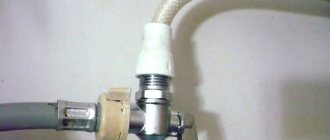
- Use for inserting a crimp sleeve. Prepare a flexible hose, size 3/4 inch. Then you need to connect it to the machine, and to the valve on the other side.
- If the pipe is made of metal . Ensure that the valve is connected to the water supply pipe using a crimp coupling . Two parts of the structure should be put on it. They are connected by bolts. A tap is screwed onto a threaded outlet; it is better to use a ball one. The water flow passes through a special hole directly through the coupling structure.
- Insertion with fitting. When making pipes made of metal-plastic, a fitting should be used; this design is also called a tee . To do this, you need to cut a hole in the material of the connected pipe in a given place and mount this element there, then connect the ball valve to it. Sealing of the seats is ensured by cuffs measuring 32x25, made of rubber.
- Using a tee for connection . The best method is to connect using a flexible hose. For these purposes, a long hose is used, and a tee is used to connect components (see picture No. 3 below) . Fastenings are used to ensure reliability. There is also a way to connect the washing machine to the water supply, through a hose attached to the water filler for the toilet barrel, using a tee (see picture below No. 4) .
Application of tee and union nut
The connection to the sewer through a tee may differ: a hose with a diameter of 22 mm is used, but there are no 50 or 32 mm sockets; therefore, a seal is used - an elastic band made with a transition to 22 mm.
To make the length longer, a fitting is used. If the machine is installed in another room, then an adapter in the form of a PVC pipe is used. Example of connection to a washbasin
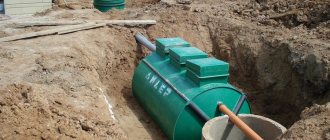
Solution for Dacha
Connecting a washing machine to the sewer is possible without running water. The technical device will be especially in demand at the dacha . To do this, the filling tank must be raised to a height of at least one meter, and a hose must be connected to the washing machine from the bottom of the base. This will ensure pressure for the unit to operate. Purchasing a pumping mechanism will cost significantly more. The last device may be small. A private cottage is the optimal solution for this type of installation.
Providing a water supply is only 50% of the whole matter; then the issue of waste water disposal should be resolved, namely, how to connect the washing machine drain to the sewer.
Step by step guide
Before you begin installing and connecting the washing machine to the water supply and sewer system with your own hands, carefully study the installation instructions , as well as this article, which will help you easily and effortlessly connect the washing machine to ensure its smooth operation.
Preparation
After delivery of the equipment, it must be unpacked, freed from polystyrene foam and adhesive tape and carefully examined, checked for completeness and made sure there are no defects . Then you need:
- Unscrew the transportation bolts with a wrench;
- insert decorative plugs in their place;
- remove the staples;
- remove the transport bars (if any) by slightly tilting the machine backwards;
- fold and hide shipping parts - they may come in handy when moving.
Care should be taken to remove these parts before turning on the washing machine, otherwise the presence of transport parts that have not been removed when starting the washing machine can lead to irreversible consequences in the form of breakdown.
Minimum set of required tools:
- wrench (set of wrenches);
- screwdriver;
- level.
a branch with a shut-off valve for connecting a washing machine is already cut into the water supply system . If it is not there, the set of tools and components depends on the material of the pipes; tees are best equipped with an angle valve to cut off the water supply:
- For iron pipes - a crimp clamp, a screwdriver, a file for cleaning the surface of the pipe, a drill with a drill bit with a diameter of 6-7 mm.
- For metal-plastic pipes - a tee, a calibrator, a wrench, a hacksaw or a special cutter.
- For plastic pipes - a plastic tee, special scissors for cutting polypropylene pipes, a welding machine for polypropylene, fum tape, gaskets.
To connect to the sewer, depending on the chosen method, you need:
- special siphon with outlet;
- kit for installing a sewer outlet - pipe, fittings (tee, coupling);
- rubber cuff.
To connect to power you will need:
- A grounded socket is required;
- waterproof extension cord with grounding - if the power cord is not long enough;
- portable RCD (residual current device) – desirable to ensure safe operation.
You can also check out the instructions and video on how to connect a dishwasher yourself. Do you want to always have hot water in your house? Find out everything about installing a gas water heater in an apartment with your own hands.
Drain installation
There are three options for draining water from the washing machine:
- hook the drain hose using the hook attachment onto the edge of the washbasin or bathtub and secure it;
- connect the end of the drain hose to the additional socket of the siphon;
- make a branch from the sewer pipe and lower the end of the hose into its socket.
The first option is very unreliable ; vibration can cause the hose to become disconnected from the bathtub (washbasin), fall to the floor and flood the room.
In the second case, the hose should not pass along the floor ; it must be fixed in a stationary mount on the rear panel and run over the top.
When leading directly into the sewer, the drain hose of the washing machine must enter it at least half a meter from the floor, and the socket is often located lower. Therefore, the socket of the additional elbow must be raised to the appropriate height.
Reliable fixation of the hose pipe in it is ensured by a rubber cuff.
Below is the simplest diagram for connecting a washing machine to a sewer without a siphon - the drain is connected directly with a hose:
Connection to the water supply system
The machine comes with a water supply hose, one end of which is connected to the corresponding hole on the rear panel, and the other to the water pipe. It is preferable to connect the machine to a cold water supply system , since it has a water heater in its design, but it is impossible to cool hot water.
All work on inserting taps and tees must be carried out with the water in the riser shut off!
Depending on the specific conditions, there are many options for connecting the washing machine to the water supply. The simplest case is the presence in the system of an outlet with a tap for an automatic washing machine ; a flexible hose is simply connected to this outlet; if the thread diameter does not match, an adapter is used.
A diagram of a simple connection of a washing machine to a water supply looks like this:
If the machine is located near a washbasin or bathtub, it is possible to connect the hose to the pipe using a walk-through tee tap. The faucet can cut between the hose and pipe in the following places:
- at the point of water supply to the washbasin faucet;
- above the bathtub, between the mixer with a nut and the eccentric coming out of the wall;
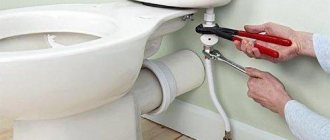
- at the place where the hose is connected to the toilet cistern (if the bathroom is combined or a hole is drilled in the wall between the bathtub and the toilet).
Sometimes, if a mixer with a tap and shower is installed above the bathtub , and a separate mixer is installed on the washbasin, the tap (spout) above the bathtub is unscrewed, and a washing machine hose is connected in its place, if its length allows.
If the machine is located far from the bathtub, washbasin, toilet, the outlet cuts into the pipe closer to the installation site of the equipment. The procedure depends on the material of the pipes.
Iron pipes
- The pipe is stripped of paint and irregularities are removed.
- Parts of the crimp clamp are applied on top of the rubber gasket on both sides, the guide sleeve is fixed in the hole of the gasket, they are attached and the bolts are gradually tightened so that there are no distortions.
- After securing the clamp, a smooth, round window in the rubber gasket should be visible through the hole in the guide sleeve; if it moves, it is necessary to tighten the bolts on one side for alignment.
- The water is shut off along the riser and a hole is drilled in the pipe using a guide bushing.
- The mixer is slowly opened, the remaining water is drained from the pipe and the metal dust is washed off at the same time; in addition, the hole must be wiped with a piece of bandage or toilet paper to remove dust and shavings.
- A tap, preferably an angular one, is installed on the clamp to cut off the water, and a hose is connected to the thread.
Metal-plastic pipes
- On a straight section without bends, a piece is cut out of the pipe corresponding to the installation length of the tee.
- The ends of the pipe with pre-installed nuts are expanded with a calibrator to the required diameter (so that the tee fitting fits in).
- A fitting with a tightening ring on is inserted into the expanded hole until it stops, and the nut is tightened (the tee must be held so that it does not turn). A similar operation is repeated on the other side.
- If the tee is equipped with a tap, it is better to install it before inserting into the pipe.
- A hose is connected to the tee.
If the faucet is constantly leaking, it's time to change the faucet. Find out which faucet is best for your bathroom. It will also be useful to read the instructions for installing a faucet in the bathroom with your own hands.
Did you know that you can buy a small and very convenient water heater that can even be installed on a faucet? Find out everything about how to install an instantaneous electric water heater on your shower.
Plastic pipes
- The pipe is cut, the remaining water is drained, and the ends are wiped dry.
- The joints between the pipe and the tee are heated by a welding machine and after 5 seconds are soldered, first on one side, then on the other.
- The hose connection point is sealed with fum tape.
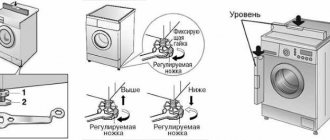
Leveling with a level
A strictly horizontal position of the machine is the key to its long service life ; even a slight misalignment can lead to serious damage.
The easiest way to check whether the car is positioned correctly is to press down on each corner sequentially. She should not stagger, succumbing to pressure.
You can also place a level on the top plane of the machine and attach it to the side wall . If there is a skew of water in the window, you need to adjust the height of the machine legs to compensate for the slope or unevenness of the floor. To do this, the fixing nut is loosened, the leg is rotated in the direction of lengthening or shortening, and after reaching a stable position, the nut is tightened until it stops.
Connection to the power grid
If the house has a grounded (three-wire) outlet located near the bathroom, everything is quite simple; the washing machine's power cord is connected to it.
If such an outlet is not available, you need to take care of its installation; it is better to entrust this to a professional electrician . To connect it, the distribution panel must have a neutral or grounding bus; a three-wire cable runs from the panel to the socket.
If you have an unused electric stove socket in your home, you can install an socket with a grounding contact in its place, with a grounding wire already connected to it. In this case you will have to use an extension cord ; it must also have a grounding contact, and if it is used directly in the bathroom, it must also be waterproof.
It is recommended to install powerful energy-intensive devices , which include a washing machine and automatic switch, on the cable that supplies power from the panel.
Over time the insulation of the wiring may become damaged ; if such damage is not identified and repaired in a timely manner, equipment may break down and people may be electrocuted.
For protection in such situations, it is good to use an easy- to-install portable residual current device . It will also minimize the risk of electric shock if the washing machine is connected to a regular two-wire network without grounding.
It is strictly forbidden to throw the grounding from the washing machine onto metal communication pipes.
How to connect to the sewer
Connecting the drain to the sewer is possible in several ways, and most importantly, it is easy to do independently:
Correct installation to sewer lines
- How to connect a washing machine to the bathroom drain and ensure that the water drains into the drain after washing (picture No. 4) . A hose called a drain hose is used for these purposes; it is inserted into the “tee” element of the sewer pipe and sealed with an elastic band for tightness. The main thing is that the upper part is slightly higher in relation to the drain by 0.6 m. Fastening elements are intended for these purposes.
- Drain for the washing machine into the sewer through a plastic siphon (picture No. 1) . The equipment must be discharged into the sewer line; this action is performed in a stationary version. Having chosen this solution, you need to purchase a drain with a drain designed for these purposes. Don't forget about the top corner to give the drain a slope. Some siphons already provide for drainage. There is an option - place the drain under the knee of the plastic siphon, through a “tee” (picture No. 3) (example in the video below) . If these regulations are neglected, then the penetration of waste water is possible. Afterwards, an odor appears and begins to stink of human waste.
- An alternative way to connect a washing machine to the sewer. For this, a drain hose and a mount resembling the letter “C” are used; it can be easily connected to a bathtub, toilet, sink, or anything that has access to the sewer pipeline. This installation method is temporary; the hose should be inserted to avoid contact with the surface of the waste water.
An example of installing a drain to a washbasin siphon
Connecting the washing machine drain to the sewer and ensuring the outlet of waste water after washing is not difficult to do; here it is important to ensure the tightness of the connection to avoid leaks.
Trial run
How to connect a washing machine to the water supply and sewerage and provide power from the electrical network is now clear. After installation, you must check the correct connection, following the operating instructions. After making sure that everything is in order, it is necessary to perform a test run.
Sequencing:
- Fill the drum with water. During filling, it is necessary to check compliance with the information from the passport. If a leak is detected, the water must be drained and the problem repaired. Afterwards the machine can be turned on.
- After about five minutes, the aquatic environment warms up to the appropriate temperature.
- It is necessary to check that knocking and other sounds are not observed. New technical devices must operate without noise. If a grinding noise is detected, this means that the approach to installation and connection was incorrect.
- Then you need to check the operation of the drain and the spinning device.
The washing unit is now working and the installation and test run are completed.
About the features of connecting machines from different manufacturers
It’s not difficult to connect washing machines correctly with your own hands; it’s important to know the features:
- The LG diagram confirms that the drain hose is located at a distance of 60-100 cm from the floor level. The connection must be through a pipe of a larger diameter than the hose. This is necessary to break the jet.
- The Bosch unit is available with a drain hose, the length of which does not exceed 1.5 m. This must be taken into account when choosing a place to connect the equipment to water supply and drainage systems.
- Sandy equipment is produced with two hoses in one set.
- Haier unit can be installed in the kitchen , hallway or bathroom.
- The installation system for Indesit includes the installation of a crane.
- The hoses of Kastrom can be connected by tapping into a pipeline with cold water supply.
- Connecting a Siemens is difficult, so it is recommended to contact a professional.
- Haier machines is based in China, so you need to carefully study the adjustment details, and if you have any questions, go to the forum and find a sample.
Stage 1. Selecting a location for installation
When choosing a location for placing equipment, you need to pay attention to the possibility of insertion into communication networks. You should also take into account a number of additional factors that affect the operation of the washing machine.
Rules for the location of the washing unit
The operating rules for washing machines require compliance with a number of mandatory conditions for their installation. The base on which the unit is located must be level and strong, without horizontal distortions.
Otherwise, vibrations and beatings of rapidly rotating components and parts may occur, which leads to premature wear of expensive equipment. For the same reason, you should not place the machine on soft carpets - it should stand rigidly and as stable as possible.
There should be ventilation gaps around the machine body to prevent overheating of the mechanisms and the electric motor during operation. It is desirable to provide an optimal working atmosphere in the room, without sudden changes in temperature and humidity.
It is not recommended that the unit be exposed to direct sunlight. The machine should not block access to the taps on the water pipes, so that you can quickly turn off the supply in an emergency.
Determining the installation room
The convenience of further use of the washing machine largely depends on the correct choice of installation location. Most often, washing machines are installed in the following rooms:
Bathroom
The most traditional place to place washing machines. There are all the necessary communications to connect - water supply, sewerage, electricity. The only problem may be the small area of the room. This is especially true for old-style apartments with combined bathrooms.
Kitchen
Another popular option for the location of the automatic machine. There are also water supply, sewerage, and electricity, so there are no special connection problems. The problems for placing the device in the kitchen of a standard apartment are the same as for the bathroom - lack of free space.
Corridor
An option that is occasionally used if it was not possible to install the washing machine in the bathroom or kitchen for some reason. Installing a washing machine in a hallway is possible if there are sewer and water pipes running through it that can be cut into.