A laser cutter is a unique device that is useful to have in the garage of every modern man. Making a laser for cutting metal with your own hands is not difficult, the main thing is to follow simple rules. The power of such a device will be small, but there are ways to increase it using available devices. The functionality of a production machine that can do anything without embellishment cannot be achieved with a homemade product. But for household chores, this unit will come in handy. Let's look at how to build it.
How to make a laser cutter in the garage
Everything is ingeniously simple, so to create such equipment, which is capable of cutting out the most beautiful patterns in durable steel, can be made from ordinary scrap materials. To make this you will definitely need an old laser pointer. In addition, you should stock up on:
- A flashlight powered by rechargeable batteries.
- An old DVD-ROM, from which we will need to remove the matrix with a laser drive.
- Soldering iron and set of screwdrivers.
The first step will be to disassemble the drive of the old computer floppy drive. From there we should remove the device. Be careful not to damage the device itself. The drive of the disk drive must be a writer, and not just a reader, the point is in the structure of the device matrix. We won’t go into details now, but just use modern non-working models.
After this, you will definitely need to remove the red diode, which burns the disk while recording information to it. Just took a soldering iron and soldered the fastenings of this diode. Just don't throw it away under any circumstances. This is a sensitive element that can quickly deteriorate if damaged.
When assembling the laser cutter itself, consider the following:
- Where is it better to install a red diode?
- How will the elements of the entire system be powered?
- How the flow of electric current will be distributed in the part.
Remember! The diode that will perform the burning requires much more electricity than the elements of the pointer.
This dilemma is easily resolved.
The diode from the pointer is replaced by a red light from the drive. The pointer should be disassembled with the same care as the disk drive; damage to the connectors and holders will ruin your future laser for cutting metals with your own hands. Once you have done this, you can begin making the homemade case. To do this, you will need a flashlight and rechargeable batteries to power the laser cutter. Thanks to the flashlight, you will get a convenient and compact item that does not take up much space in your home. The key to equipping such a case is to choose the correct polarity. The protective glass from the former flashlight is removed so that it does not become an obstacle to the directed beam.
The next step is to power the diode itself. To do this, you need to connect it to the battery charging, observing the polarity. Finally, check:
- Reliable fixation of the device in clamps and clamps;
- Device polarity;
- Beam direction.
Fix any inaccuracies, and when everything is ready, you can congratulate yourself on a successfully completed job. The cutter is ready to use. The only thing you need to remember is that its power is much less than the power of its production counterpart, so it cannot handle too thick metal.
Carefully! The power of the device is enough to harm your health, so be careful when operating and try not to put your fingers under the beam.
DIY laser machine
As mentioned above, not everyone can purchase laser-based woodworking equipment, but making it yourself from scrap materials is quite possible.
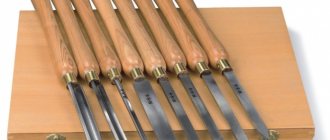
Tools and material for assembly
- laser diode;
- pencil, preferably mechanical;
- radiator as a cooler;
- optical fiber;
- thermal lubricant;
- D or 2 AA batteries;
- eye protection.
The most important point in the work is eye protection. Under no circumstances should you look into the beam to avoid damaging your eyesight.
Regarding the diode... A high power IR diode with a 1W output, capable of burning any material except metal. The diode should operate at 2V with a constant current of 1.7A. Please note that the diodes have different polarities (plus and minus). If the connection is incorrect, the diode will simply burn out.
Layout and its assembly
We connect the diode to the radiator. For better thermal conductivity, treat with thermal lubricant. Next we move on to the mechanical pencil. A pencil with a metal body is best suited, which will further avoid melting if overheated. We disassemble the pencil, insert an optical fiber into the tip and fix it with epoxy resin or glue.
For a DIY laser, it is better to take a thin pencil the size of the optical fiber. Assembling: insert the optical fiber with the tip back into the pencil and twist it tightly. Thanks to such a simple but quick design, everyone will be able to burn various patterns and engrave on wooden products with their own hands.
If you haven’t changed your mind and decided that you simply need a laser machine, then you need to approach the choice of one or another model with special responsibility. Study the full information about each model, compare the parameters you need, and only then proceed to purchase. You can also find information on how to make laser-based equipment with your own hands from an ordinary pencil or an old DVD or CD drive.
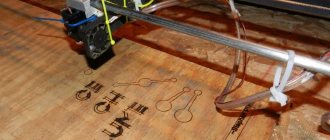
Currently, there are several key technologies for processing wood or plywood. If we talk about the classic manual method, it is losing its popularity due to a number of difficulties and duration. Instead, people are starting to use automated products, including carbon dioxide and plasma systems, as well as a plywood laser cutting machine. The latter option is rapidly gaining great demand and becoming one of the most popular.
Strengthening a homemade installation
To enhance the power and density of the beam, which is the main cutting element, you should prepare:
- 2 “conders” for 100 pF and mF;
- Resistance 2-5 ohms;
- 3 rechargeable batteries;
- Collimator.
The installation that you have already assembled can be strengthened to get enough power at home for any work with metal. When working on gain, remember that plugging your cutter directly into an outlet will be suicide for it, so you should make sure that the current first gets to the capacitors, and then goes to the batteries.
By adding resistors you can increase the power of your installation. To further increase the efficiency of your device, use a collimator that is mounted to focus the beam. This model is sold in any electrician store, and the cost ranges from 200 to 600 rubles, so it’s not difficult to buy it.
Then the assembly circuit is carried out in the same way as discussed above, only you need to wind an aluminum wire around the diode to remove static. After this, you have to measure the current strength, for which you take a multimeter. Both ends of the device are connected to the remaining diode and measured. Depending on your needs, you can adjust the readings from 300 mA to 500 mA.
Once the current calibration is completed, you can move on to aesthetically decorating your cutter. An old steel LED flashlight will do just fine for the case. It is compact and fits in your pocket. To prevent the lens from getting dirty, be sure to get a cover.
The finished cutter should be stored in a box or case. Dust or moisture should not get there, otherwise the device will be damaged.
How to assemble a metal laser cutting machine yourself
Craftsmen make laser cutters with their own hands because of their high cost. In everyday life, you can only create a solid-state cutter with the power to cut into metal just 1-3 cm. This is enough for the manufacture of decorative elements. The laser operates using crystals used in LED equipment and special glasses.
Necessary materials
The main element is the laser of a writing disk drive for a computer with a high writing speed (the higher it is, the greater the power). In addition it is required:
- battery-powered flashlight,
- laser pointer,
- soldering iron,
- locksmith tools.
If you need a more powerful tool, you will need additional elements to make the driver:
- resistors 2-5 Ohm,
- two capacitors (capacitance 100 pF and 100 mF),
- collimator (collector of light rays into a beam),
- LED flashlight (the body must be metal),
- multimeter
If there is no driver between the batteries and the light bulb, it may burn out.
Even more power can be obtained if you use a 60 W laser diode purchased from a store.
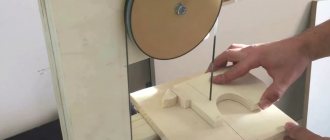
It is best to install such a do-it-yourself metal laser cutting machine on a frame; use a computer equipped with a special program for control. Therefore, in addition to the laser, you will need:
- housing containing all the elements,
- stepper motors (from DVD players or printers),
- boards and transistors that control electric motors,
- a regulator that controls the voltage at the emitter,
- timing belts and pulleys for them,
- sheet steel for making brackets,
- ball bearings, couplers, nuts, bolts, screws, clamps,
- ring switches,
- controller and USB cable connecting it to the computer, and a board with a display,
- cooling system,
- metal boards and rods.
The frame is made from boards, metal rods act as guides.
Important! It is possible to buy a kit for laser cutters for electronic components.
Manufacturing process
The first step is to disassemble the drive to remove the light bulb from it. It is installed in the carriage and reinforced. The fasteners are soldered with a soldering iron. During operation, do not expose the light bulb to strong mechanical stress that could damage it.
Before assembling the cutter, you need to decide what it will be powered from, where to mount the diode and how to distribute the currents.
Important! The diode requires more current than the pointer elements.
You need to carefully disassemble the pointer and replace the diode with a light bulb removed from the disk drive. It is best to use glue for fastening. It is important that the light bulb eye is located in the center of the hole.
The power of the pointer for the cutter is not enough; it is increased with the help of flashlight batteries. To do this, the lower part of the flashlight is combined with the part of the pointer that houses the light bulb from the disk drive. The glass is removed from the flashlight, the light bulb is connected, observing the polarity.
Attention! The power is enough to burn the skin on your hands!
When increasing the power, the driver needs to wind an aluminum wire around the light bulb, which removes static, and mount it into the collimator. When making a laser for cutting metal with your own hands, the resistor elements are connected to the batteries in a series circuit. Precision is required when determining polarity. To change the current strength, a multimeter is connected to the diode, allowing you to adjust the indicator within the range of 300 mA to 500 mA.
The body of the device for manual laser cutting of metal can still serve as a metal flashlight.
For the most powerful option, after installing the body from the boards, the rods are installed. They are first ground and lubricated with a composition containing lithium.
To install stepper electric motors, brackets made of sheet steel bent at right angles are required. 6 holes are required for fastening the sheet and motor with self-tapping screws. Brackets also need to be made to mount the drive, created from two pulleys. Only the sheets need to be bent in the shape of the letter P. Holes are also needed for attaching the profile and the output of the shaft, onto which pulleys for belts are then mounted. The belts are connected to the base using self-tapping screws.
For the cutter to work automatically, you need a special program that can be downloaded and installed on your computer for free.
Important! If you plan to carry out engraving work, you should download the contour library. Setting up the software takes time.
What is the difference between ready-made models
Cost is the main reason why many craftsmen resort to making a laser cutter with their own hands. And the principle of operation is as follows:
- Thanks to the creation of a directed laser beam, the metal is exposed
- The powerful radiation causes the material to evaporate and escape under the force of the flow.
- As a result, thanks to the small diameter of the laser beam, a high-quality cut of the workpiece is obtained.
The cutting depth will depend on the power of the components. If factory models are equipped with high-quality materials that provide sufficient depth. Then homemade models can handle cutting 1-3 cm.
Thanks to such laser systems, you can make unique patterns in the fence of a private house, components for decorating gates or fences. There are only 3 types of cutters:
- Solid state. The operating principle is based on the use of special types of glass or crystals of LED equipment. These are low-cost production plants that are used in production.
- Fiber. Thanks to the use of optical fiber, it is possible to obtain a powerful flow and sufficient cutting depth. They are analogues of solid-state models, but due to their capabilities and performance characteristics they are better than them. But also more expensive.
- Gas. From the name it is clear that gas is used for operation. It can be nitrogen, helium, carbon dioxide. The efficiency of such devices is 20% higher than all previous ones. They are used for cutting and welding polymers, rubber, glass and even metal with a very high level of thermal conductivity.
In everyday life, without special expenses, you can only get a solid-state laser cutter, but its power, with proper amplification, which was discussed above, is enough to perform household work. Now you have knowledge about making such a device, and then just act and try.
Do you have experience in developing a DIY metal laser cutter? Share with readers by leaving a comment under this article!
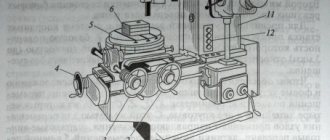
Features of production laser cutters
Not everyone can afford the price of a production-type metal laser cutter.
Such equipment is used for processing and cutting metal materials.
The principle of operation of a laser cutter is based on the production of powerful radiation by the tool, endowed with the property of evaporating or blowing out a molten metal layer.
This production technology, when working with different types of metal, can provide high quality cuts.
The depth of material processing depends on the type of laser installation and the characteristics of the materials being processed.
Today, three types of lasers are used: solid-state, fiber and gas.
The design of solid-state emitters is based on the use of specific types of glass or crystals as a working medium.
IMPORTANT TO KNOW: Review of metal plasma cutting machines
Here, as an example, we can cite inexpensive installations operating on semiconductor lasers.
Fiber - their active medium functions through the use of optical fibers.
This type of device is a modification of solid-state emitters, but according to experts, the fiber laser is successfully displacing its analogues from the field of metalworking.
At the same time, optical fibers are the basis of not only the cutter, but also the engraving machine.
Video:
Gas - the working environment of the laser device combines carbon dioxide, nitrogen and helium gases.
Since the efficiency of the emitters under consideration is not higher than 20%, they are used for cutting and welding polymer, rubber and glass materials, as well as metal with a high degree of thermal conductivity.
Here, as an example, you can take a metal cutter produced by the Hans company; the use of a laser device allows you to cut copper, brass and aluminum; in this case, the minimum power of the machines only outperforms its analogues.