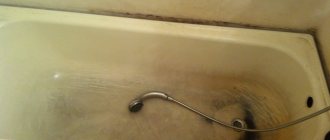
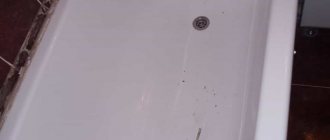
After years, any cast iron or steel bathtub becomes “shabby”, cracks and chips form on it, and in general it looks dirty and not aesthetically pleasing. In this case, dismantling and installing a new bathtub may well result in a full-fledged renovation with damage to the wall and floor covering, which can be inconvenient.
In this article you will learn a simple way out of the situation - how to cover a bathtub with acrylic yourself. With this modern technology, you can update your bathroom while spending a minimum of time and money.
- 1 Advantages of liquid acrylic
- 2 Tools and materials
- 3 Preparatory work
- 4 Preparation of enamel
- 5 Application of acrylic
- 6 Disadvantages of acrylic restoration
- 7 Method with acrylic liner
- 8 Care of acrylic coating
- 9 Should I buy a new bath or restore the old one?
Advantages of liquid acrylic
Restoring a bathtub by applying acrylic enamel is considered one of the most popular and simplest methods. Acrylic has many positive properties in comparison with other finishing materials, the price of which is often unreasonably high:
- If operating conditions are properly observed, the service life will be up to 15 years.
- The complete hardening time of 3 days is not so long, considering that complete hardening will occur without any defects.
- Covering the bathtub with acrylic ensures no stains.
- Acrylic enamel has virtually no odor, so all work can be carried out without burdening yourself with additional protection.
- Air bubbles, drops, smudges and lumps do not form in the uncured material.
Advantages and disadvantages of acrylic
The material used for filling is a two-component composition: in one container there is liquid acrylic, and in the other there is a hardener. Immediately before starting restoration work, the compositions are mixed and the mixture is poured onto the surface. Advantages of liquid acrylic:
- Service life – 15-20 years. It does not deform, does not react to chemicals, and is resistant to corrosion, humidity, and temperature changes.
- Low thermal conductivity. Therefore, the water cools slowly, only 1 degree in half an hour.
- The surface can be easily cleaned with soapy water and a soft sponge.
- Aesthetics. After restoration with acrylic, the bathtub is glossy and snow-white; if desired, the composition can be tinted.
- The material is non-toxic and environmentally friendly.
- Restoration is financially more profitable than buying new plumbing.
- The coating is non-slip.
- Bacteria and germs do not linger on the surface, so mold does not form.
- Liquid acrylic can be used to update bathtubs of any size and shape.
- Impact resistance.
- The noise insulation properties of the bowl are improved.
Liquid acrylic coating can be restored again if damaged, using a repair kit for polishing the surface of acrylic bathtubs.
Despite the long list of positive properties, there are also disadvantages:
- It is difficult to work with this material without experience.
- The composition hardens within 24-36 hours. Moreover, during this period it is susceptible to pollution.
- Some formulations have a smell.
Acrylic is difficult to remove if it is not applied correctly.
Preparatory work
How to cover a bathtub with acrylic correctly? The main thing is thorough pre-treatment of the surface:
- The old coating is removed with sandpaper. To speed up the process, you can use a grinder with an abrasive disc or a drill with a round attachment.
- Remains of enamel and dust are completely removed manually using abrasive powder.
- Then, the surface is degreased with a special solution and completely dried.
- The tap and drain will need to be insulated with film to prevent drops from damaging the metal structure.
- It is better to disconnect the siphon to avoid getting the hardening mixture into it. You can place a basin or bucket under the drain hole.
If any of these actions are performed poorly, the new acrylic will begin to peel off almost immediately.
Cover a bathtub with acrylic yourself
How to make liquid acrylic for covering bathtubs with your own hands
If you want to update your old bathtub, you can use a material such as liquid acrylic. When creating a new coating on products using self-leveling bath technology, this is exactly what is used. The essence of this method is that by pouring a new coating is created for the old bathtub. In this case, tools such as brushes and rollers are not used. The end result is a coating that has high strength characteristics.
Types of liquid acrylic
New technologies for restoring a bathroom using this material have led to the emergence of varieties of liquid acrylic. The following materials appeared:
The peculiarity of these materials is that in addition to the main component of liquid acrylic, they contain epoxy resin, which polymerizes when interacting with a hardener. Ultimately, the coating gains strength. Various additives are also added to the finished material to improve the performance characteristics of the coating being created.
Self-leveling glass is offered in the form of two separate components:
- hardener;
- semi-finished acrylic.
When working to create a new bathroom coating, these two components are mixed together, while maintaining certain proportions. Such materials are classified as compounds consisting of two components. This is due to the fact that the composition contains two substances that combine with each other and form coatings with certain technical characteristics.
Before using these components when restoring bathtubs, they are kept for some time indoors at room temperature. And only after that they are mixed. Hardener is added to acrylic in a small amount, while constantly stirring the mixture. When creating the base material for bathtub restoration, hardeners are added, maintaining a ratio of 9.5% to 100% enamel. Particular attention must be paid to mixing. It must be thorough. When the material for bathtub restoration is ready, it must be soaked for 20 minutes. When this time has passed, it can be applied by pouring onto the old bathtub.
How to choose a composition for bath enamel
When performing work to restore a bathtub, you must first select the enamel, focusing on indicators such as:
It is worth choosing from more expensive materials. They have many advantages. One of them is good drying speed. In addition, they remain fluid for a long time. Another plus is high adhesive properties. They adhere well to the primary layer, forming a rubber coating.
The price of the composition deserves special attention when choosing enamel. It is optimal if it is the same as the old coating. If it was not possible to find an identical one, then you can use a material that differs from the main coating by no more than 1 tone. If, after covering the bathtub with new enamel, you find yellowish spots peeping out, you can eliminate them by applying another coating over the new layer of enamel.
The work of applying enamel has certain differences from the usual painting with paint. You should know that the mixtures used during work are two-component. When a hardener is added to the compound, they lose fluidity. They cease to be liquid within 45 minutes after adding the hardener. After this time, working with this material is more reminiscent of plastering. Using such a non-flowing composition, it is extremely difficult to obtain a perfectly flat surface.
Therefore, if this is your first time creating a bathtub cover using the pouring method, then it would be useful to read the operating instructions before starting it. Before starting work, it is worth practicing on a small site in order to gain the necessary experience in performing the work. Another important point that should not be forgotten is that the material must be prepared immediately before enameling the product. After the preparatory work is completed, you need to start preparing it.
Most often, to create a new coating with your own hands, you use a composition that includes two components. In addition, the product can be enameled with liquid acrylic, which is less toxic and has the ability to maintain fluidity for a long time. In terms of cost, such a composition is more expensive. However, working with it is simpler and safer. But even using liquid acrylic, you should not give up respirators. In addition, before starting work, it is necessary to ensure maximum flow of fresh air into the room.
Preparing the bath for enameling
When the enamel for creating a new bathtub coating has been selected, it is necessary to begin preparatory work. If you approach them frivolously, the enamel applied to the surface of the bathtub will simply drain to the bottom, and in this case, the money will be wasted.
Priority tasks
If we talk about the goals of the preparatory work, the most important are the following:
- Cleaning the surface of the bathtub from dirt and grease stains. If this is not done, the enamel simply will not lie on the surface.
- Creating a rough surface. Thanks to it, the maximum area of contact between the acrylic and the walls of the product will be ensured.
During preparatory work, it is necessary to take into account the recommendations of the manufacturer of the composition that will be used during the work. When using some materials, it is necessary to heat the bath before applying a layer of enamel. This procedure improves the adhesive properties of enamel. To heat the product before work, you need to fill it with a certain amount of hot water.
The procedure for carrying out preparatory work
The first step is to degrease the surface of the bathtub. To do this, the product is washed with any detergent.
Next, it is polished. To do this, you need to use a drill with a grinding attachment. If it is not there, then you can use a grinder. However, when using such a tool, you must be careful not to accidentally perforate the product. To do the job safely, you can use regular sandpaper glued to a wooden block.
Next, you need to remove all the dust formed during the grinding process, then use a cleaning agent to wash the bath again.
Then you should remove the trim from the overflow and drain holes. Then you need to cut the old drain and overflow grates according to their thickness. When the enameling work is completed, they are replaced with new ones.
After the work has been done, all that remains is to wipe the surface of the bathtub dry, and then check the quality of the preparatory work performed. You need to open the shower and watch how streams of water flow down the walls of the product. If the water flows evenly, this indicates that the preparation was done correctly - the surface is well degreased. If water flows down in drops, this means that the preparatory work was not done well enough. It is necessary to degrease the surface again. If this is not done, the enamel will not adhere well to the surface of the bathtub.
If there are areas of old rust on the bathtub, then to remove them you can use soda, which is first diluted with water to form a paste-like mass. After this, the composition is applied to the area with rust for 20 minutes, and after the designated time has passed, it is washed off.
DIY acrylic enamel application
Now, after completing this work, you can proceed to enameling the bathtub. Since the coating will be applied in two layers, the material must be divided into two equal parts. The work must be performed as follows.
- They start by applying the base layer, for which they mix the components of one portion.
- After this, they proceed to applying enamel. First, it is applied in strips along the edges using a 70 mm wide brush.
- The edges are processed, after which strips are drawn from the wall to the bottom. After this, the enamel is smeared in the transverse direction. Thus, the entire product is processed. Particular attention must be paid to the drainage area and the bottom of the bathtub.
- You need to start applying the second layer without waiting for the first one to dry. The technology for creating a coating is called “wet on wet” and is the most effective for restoring the coating of an old bathtub.
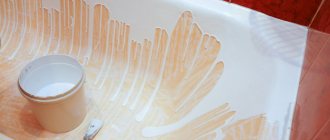
- During the work of applying the second layer, smudges occur, to eliminate which they are smeared 15 minutes after applying the finishing layer. If you delay and waste time, the drops will freeze, and then nothing can be corrected.
- After this, the work can be considered completed. Now all that remains is to wait for the bath to dry, then cut off the drops that have frozen from the outside of the drain hole, and then restore the drain piping.
When the job is complete, you will have a newly refinished bathtub. It will be almost impossible to distinguish it from new. It has the shine and uniformity of color characteristic of a new bathtub.
Important nuances
When performing work, it is necessary to prevent water from entering the surface of the bathtub. To do this, you should move the tap and shower head towards the sink.
When covering a bathtub, the workplace should be organized in such a way that nothing interferes with the master. Therefore, even before starting work, you should remove everything unnecessary from the bathroom. In this case, there will be enough space and when covering the bathtub, the owner will not encounter any inconvenience during the work.
Before using acrylic to cover a bathtub, it is necessary to thoroughly warm the product. The best solution is to use an industrial hair dryer. However, not everyone has the opportunity to use it. Therefore, a regular home hair dryer will do. However, when drying the bathtub, it is necessary to periodically turn it off so that the hair dryer does not burn out due to overload.
Advantages of covering a bathtub with acrylic
If the owner chose liquid acrylic as a material to restore the bathtub with his own hands, then if the work is done correctly, he will receive a bathtub with a new coating that shines and has a uniform color over its entire surface. A high-quality coating with a smooth surface is able to retain its aesthetic appearance for a long time and does not change under the influence of water, temperature changes and mechanical loads. In this case, the influence of various factors will not lead to a decrease in its glossy shine. One of the advantages of liquid acrylic is that it is not subject to wear and has high characteristics in terms of strength.
Due to the fact that it has a low thermal conductivity coefficient, a coating made of this material ensures that the water temperature is maintained for a long time. As for caring for such a coating, it does not require much time and effort from the owner. You need to regularly wipe it with a sponge dipped in soapy water. You should avoid using abrasive products, as they negatively affect its appearance. It is best to use liquid detergents, soap or soluble powders to clean the bathtub cover.
Conclusion
Creating a pour-on acrylic bathtub cover with your own hands is a smart choice if you need to restore the surface of an old bathtub. This work should be approached responsibly, special attention must be paid to preparatory work.
Many people do not pay much attention to this point, and the results are poor-quality coverage. It quickly begins to deteriorate - it peels off, cracks appear on it. Many blame this on the poor quality material used to create the coating. However, in fact, the main reason is poorly performed preparatory work.
If this is your first time restoring a bathtub in this way, then you need to know how this work should be carried out. In this case, the final result of the work will please you. If you have no particular desire to create a new acrylic coating by pouring the material, then you can install an acrylic liner. This method of restoring old bathtubs has recently become quite popular among apartment owners.
Sobolev Yuri Alekseevich
Coating a bathtub with acrylic: reviews from those who tried it. How much does it cost to cover a bathtub with acrylic?
Often, covering a bathtub with acrylic, reviews of which vary widely, is the only possible budget option, because not everyone can afford to install expensive new plumbing fixtures.
Just ten years ago, no one thought of completely renovating an old bathtub in two hours, so that all the rough edges and cracks would be smoothed out and the rust would disappear.
In what cases are reviews positive?
Now this has become possible thanks to such a method as coating the bathtub with acrylic. Reviews from those who have used it depend on the level of the specialist who carried out the repairs. If this is a master of his craft, then the consumer is satisfied: the coating lasts for more than ten years (no one has simply checked for longer), its cost is from two to four thousand rubles (depending on the region and year of restoration). Acrylic does not turn yellow and does not scratch - of course, provided that all the rules for using the bathtub are followed. They are quite simple: dogs should not be washed in the bathtub (or a mat should be placed so that their claws do not scratch the coating); When bathing children, you should not give them metal toys. You should also not use abrasive materials for cleaning - regular dishwashing detergent is sufficient. Do not let the water run too hot. Also, covering bathtubs with acrylic, reviews of which are positive, does not like sudden changes in temperature and water with various impurities, such as iron. In this case, it may turn yellow.
In what cases are reviews negative?
If the renovation was carried out by Uncle Misha, the best neighbor in the world, but who does not have special equipment, knowledge and experience, then the result will be appropriate: poor-quality and unstable acrylic coating of the bathtub. Reviews in such situations are negative: acrylic does not withstand more than a year and peels off (turns yellow, rusts, etc.), roughness and cracks appear.
What is liquid acrylic
Over the years, different materials were used for restoration. At first, covering the bathtub with acrylic was done with a brush, but the composition did not stand up to criticism.
Today, manufacturers have created an excellent material that allows you to obtain a perfectly flat and smooth surface. This is a two-component substance containing a large amount of non-volatile substances. It is made from imported raw materials from companies such as Du Pont (France) and Byk Chemie, Dow (Germany). Thanks to its high-tech basis, covering the bathtub with acrylic allows you to obtain a beautiful and reliable surface.
Material advantages
Restoration eliminates a persistent unpleasant odor - it disappears in a few hours and does not annoy the owners in the future. Unlike previous options, the bathtub is coated with acrylic using the pouring method - rollers and brushes are not used. The layer is 4-6 mm thick, taking into account the defects that need to be corrected.
Liquid acrylic has high plasticity and the ability to mix well. Therefore, you can add any color to change the color of the coating. In addition, no air bubbles remain during application. Its fluid and viscous properties do not allow the material to harden quickly. Therefore, it is evenly distributed over the walls and bottom of the bath in a layer of 4-6 mm. The low thermal conductivity of the material will ensure comfort, and antibacterial properties will ensure health.
How much it costs to cover a bathtub with acrylic will depend only on the size and regional prices. In Moscow, the cost of restoration starts from 1900-2000 rubles.
Self-fill bath
If restoration has never been carried out, it will consist of the following stages.
- Stage one. Covering the bathtub with acrylic yourself will become possible after treating the entire working surface with a grinder with an abrasive wheel or a drill with an attachment. You can use a grinding machine with a special abrasive that allows you to work even with factory enamel of the Soviet Union type. The result should be a rough surface, free of most of the grease and rust. This preparatory stage is the most important, since the strength of adhesion (adhesion) of acrylic to the bathtub depends on the area of their contact. And on rough surfaces it is maximum.
- Stage two. Dirt from stripping is washed away. The bath is degreased with a solvent and removed from dust. The surface is ready for coating.
- Stage three. You need to remove the siphon and place a jar under the hole in case the substance drips. Covering the bathtub with acrylic yourself does not exclude this. Professionals work in such a way that the material does not flow into the hole, or use a special stopper that prevents this.
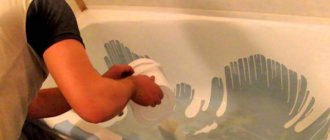
- Stage four. Direct coating of the bathtub with liquid acrylic. To do this, the material is poured onto the edge of the side in a gentle stream. Using a rubber spatula, carefully pull the acrylic to the walls. When it reaches the middle of the bath, the container with acrylic begins to slowly move around the perimeter. It is important to ensure that there is enough material for a continuous coating without gaps. The entire process must be carried out continuously. You cannot stop until the perimeter is passed and the ring is closed. There is no need to fix anything - the sagging and drips will go away on their own.
How to prepare the mixture
Liquid acrylic consists of two components - a base and a hardener. Before mixing, they must be kept at room temperature for at least 20 minutes. Then the base is thoroughly mixed (5 minutes) with the hardener gradually added to it. Kneading is continued for another 10 minutes. The mixture is allowed to stand for 10-15 minutes, and it becomes ready for use. If necessary, add color and mix thoroughly. It should be remembered that the mixture must be used within an hour. If components are purchased in advance, then they should be stored in a dry room, without access to moisture and sunlight, away from heating and heating devices.
Consumption of time and material
To cover a bathtub with liquid acrylic, reviews note that 2-4 hours is enough. In this case, most of the time will be spent preparing the surface.
Material consumption is directly proportional to the size of the bath. A regular container 1.5 m long will require 3.5 kg of base. And for a bathtub 1.7 m long you will need 4 kg.
Filler Bath Tips
When applying liquid acrylic yourself, you cannot avoid drips from the drain hole. Therefore, before connecting the siphon, the dried drops must be cut off and cleaned, and it is better to treat the connecting parts with silicone before installation to avoid leakage.
You need to put newspapers or rags around the bathtub, as acrylic will drip from the sides. On the second day, the frozen drops are removed with an ordinary kitchen knife.
The surface must be dry before applying acrylic.
Often the space between the walls and the sides of the bathtub is tiled or painted. With an ideal new surface, these “artifacts” will look unaesthetic. Therefore, it would be advisable to fill them with acrylic too. To do this, they also need to be cleaned and degreased. If a piece of cement has fallen out somewhere and a through hole has appeared between the wall and the bathtub (usually at the end), then you can push pieces of foam plastic, a dry new sponge for washing dishes, etc. into it, while trying to level the horizontal surface as much as possible for applying acrylic. On the vertical walls in contact with the bathroom, you need to stick masking tape so as not to stain them, and to make the corners clear and even.
Acrylic does not need to be diluted in order to save money. The result will be a thin layer that will not last long.
The bathtub can be used within a day, but it is better to wait four days - for better drying of the coating.
It is advisable to protect freshly applied acrylic from drafts for the first two hours until it sets well. Then you can open all the doors and windows - the smell will quickly disappear.
If the result is not satisfactory, then the restoration can be repeated, but first do not forget to treat the surface with an abrasive.
be careful
You need to carefully review the quality certificates for the material before purchasing it and covering the bathtub with acrylic yourself. Reviews indicate that it is often replaced with homemade enamel. This can be fraught with consequences such as the appearance of a yellow tint of the new coating and streaks, cracking, and peeling.
Tinting liquid acrylic
According to statistics, the majority of the world's population prefers a white acrylic coating on a cast-iron bathtub. Reviews indicate otherwise. Today, more and more often, a white bathtub does not fit into the overall design of the sanitary room and looks unnatural against the backdrop of bright or dark walls. Therefore, many people want to color it in colors that are more consistent with the overall mood of the room.
To do this, add paste or liquid color to acrylic, knead until smooth and check the tone by applying a smear to the surface. The color intensity can be increased. Important: you need to mix colors and acrylics under the same lighting that will be used in the bathroom. A wide variety of color options are possible with this restoration method, such as covering bathtubs with liquid acrylic. Reviews allow us to draw conclusions about the most popular tones. These include shades of red, brown, pink, yellow, light green, emerald green, blue and gray.
Relaxation in a bathtub covered with colored acrylic
Our ancestors knew about the ability of color to affect well-being. For example, in Athens, a stone font was covered with red ocher. Even then, water was endowed with healing properties. It was believed that when combined with the color yellow, these qualities were enhanced. Water, illuminated by the sun's rays through colored glass, improved a person's mood.
The ancients attributed a certain energy to each shade. So, red gives protection and is suitable for insecure people. Orange relieves neuroses and is recommended for public figures. Yellow suits everyone, it gives vital energy. Green brings healing to the sick and wounded. The blue color of the sky will heal after psycho-emotional shocks. Blue will give you determination. Purple will give you the energy of higher powers.
In modern life, achieving the desired shade of water is not easy. Firstly, the bathroom almost always has no windows and, accordingly, no sunlight. Secondly, colored lighting will not solve the problem of water color. Third, adding colored sea salt to the water will scratch the acrylic. Fourthly, not everyone has the opportunity to color water using herbal infusions.
Therefore, colored acrylic bath coverings were immediately appreciated as a practical means of relaxation and color therapy at affordable prices. To use, simply fill the bathtub with water.
If the room is equipped with good ventilation or a window, then aroma lamps can be used to enhance the effect. The choice of oils today is unusually large. You can also place candles and admire the fire. The resulting ensemble of color, light and aroma will come in handy after the difficult work of covering the bathtub with liquid acrylic, and will help you relax and unwind.
How to cover a bathtub with liquid acrylic: pouring and restoration
It is surprising that the bathroom, traditionally associated with immaculate cleanliness and freshness, is the most “dirty” place in an apartment or residential building. Since plumbing fixtures are used several times every day, they are subject to increased wear and tear and heavy contamination.
This fate will not escape the bathtub, which after 2-3 years of operation loses its glossy shine, cleanliness and smoothness, becomes covered with cracks, and turns yellow. To return the product to its original appearance without replacing it, bathtubs are restored with liquid acrylic. In this article we will explain what a “fill bath” is and how it differs from re-enamelling.
Composition and properties of liquid acrylic
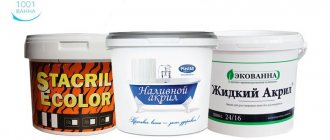
Restoring a bathtub with liquid acrylic is performed when the surface of a sanitary ware becomes rough, yellow, dull, covered with a network of small cracks, but has no through holes. The process involves replacing the factory enamel coating with a more durable and resistant acrylic coating. Liquid acrylic for baths is a snow-white polymer with a liquid, viscous consistency, which after hardening becomes smooth and shiny. There are 2 types of compositions used for the restoration of bathtubs:
- Single-component. One-component acrylic is a ready-to-use paint coating containing a large number of non-volatile components.
- Two-component. Two-component acrylic compounds are called compounds; they consist of a base and a hardener. After mixing the components, a thick, viscous mixture is formed that is easy to apply.
- Durability. Acrylic coating, when applied correctly, retains whiteness, glossy shine and smoothness for more than 15 years, which is 3-4 times longer than the service life of the most durable enamel.
- High speed of polymerization and drying. A “fill-in bath” made of liquid acrylic hardens within 36-48 hours, after which it can be fully used.
- No unpleasant odor. Unlike the re-enamelling process, coating a bathtub with acrylic occurs without a strong chemical odor, so it can be done even in the presence of children and animals.
- Easy to apply. Liquid acrylic has a thick but fluid consistency, so it is not painting that is done, but rather pouring the bath, resulting in a homogeneous, even coating without bubbles or sagging.
- First of all, clean the surface of the bathtub using a strong alkaline detergent, and then rinse it thoroughly with warm water.
Important! You can restore a bathtub using liquid acrylic or stacrylic, consisting of acrylic made from epoxy resin, Epoxy, or Plastall. The color of the composition can be pressed with tinting paste, which is the third component of the mixture for restoring plumbing products with acrylic with your own hands.
Advantages
In the past, repairs to older cast iron or steel plumbing fixtures were performed by re-enamelling the product at home. However, enamel applied in this way turns out to be unstable and fragile. The acrylic coating of the bathtub has higher strength quality and service life. The advantages of this method of restoring the appearance of the bowl are:
Note! A pour-in bathtub made of liquid acrylic is highly hygienic, since the smooth, non-porous surface of this polymer does not absorb dirt, but repels it, making it easier to care for the product. This property of acrylic coating is called the “self-cleaning effect”.
Preparatory work
Recently, many experienced craftsmen have recommended not to buy new plumbing equipment, but to use self-leveling bathtubs with liquid acrylic, because they can restore cast iron and steel products, the damage of which is superficial, but not through. In order for the restoration result to be durable and sustainable, it is necessary to carefully prepare the restored bathtub for work using the following technology:
Cleaning the bathtub from dirt
Removing enamel using a grinder attachment
Please note that the quality of the final result of painting a plumbing fixture with liquid acrylic directly depends on the thoroughness of the preparation technology. More than 80% of the time spent on the bathtub restoration process occurs in the preparatory stage of work.
Application technology
After completing the preparatory stage for the restoration of the bathtub, you can begin applying liquid acrylic. This polymer can be applied by brush, roller or spray, but best results are obtained when using the pour-on method. The technology for filling a bathtub with a compound is as follows:
Application of liquid acrylic
Correcting blemishes with a spatula
It is important to follow the drying technology of liquid acrylic so that the result lasts longer. The poured bathtub hardens in 36-48 hours, so for the first day after pouring it is better not to even open the bathroom door so that dust does not settle on the still soft acrylic. On the second day you can enter the room, but you are allowed to use water in the bowl after two days.
Video instruction
- Replacing an socket with your own hands Replacing an socket is necessary in cases when the old one stops performing its functions or is simply broken.…
Installation of a split system with your own hands (instructions) Stages of installing a split system with your own hands Outdoor unit of the air conditioner
Preparation of enamel
- Thoroughly mix the liquid mixture and hardener in a container.
- Slowly add the solvent in small portions, continuously mixing the mixture. The composition must be homogeneous.
- Add the dye of the desired shade, the final intensity depends on its quantity. In the absence of a dye, the bath will turn out white.
Before you start applying the prepared mixture, you need to let it stand for some time, taking into account the air temperature:
- 15 degrees - 20-25 minutes;
- 20 degrees - 15-20 minutes;
- 25 degrees - 10-15 minutes;
- More than 30 degrees - 5-7 minutes.
Which is better: acrylic or enamel
Enamel bath
Those who decide to restore a bathtub have to choose which is better - coating with liquid acrylic or enamel.
Advantages of enamel coating:
- Enameling work is completed quickly;
- enamel is chemically resistant;
- the restoration kit is inexpensive;
- several layers can be applied;
- wears out slowly.
Flaws:
- has a pungent odor;
- hard - when metal expands under the influence of hot water, the enamel cannot expand and cracks;
- the coating lasts 5-7 years;
- painting technology is more complex than applying acrylic composition;
- you need to carefully level the surface for painting;
- The enamel turns yellow over time and absorbs dirt.
Thus, acrylic coating has fewer disadvantages and, in general, is more practical than enamel.
Application of acrylic
Now let's look at the most important thing - how to cover a bathtub with acrylic at home. First, you need to pour very hot water into it to warm it up. Application should be carried out by progressively pouring the mixture around the entire perimeter and distributing it in an even layer using a spatula. Excess can be removed through the drain hole.
The area around the drain hole should be given special attention; here the acrylic layer should be well sealed. The bottom should be formed immediately, without allowing the mass to harden. It is better to apply it in a certain amount of time in accordance with the ambient temperature:
- 15-20 degrees - 50 minutes;
- 25 degrees - 40 minutes;
- More than 30 degrees - 30 minutes.
Preparing the bathroom for painting
Before covering the bathtub with your own hands, you should thoroughly prepare the surface. List of events:
1. If there are yellow spots and smudges on the walls, you need to sand these places with sandpaper, and the bath should be sprinkled with a cleaning abrasive. If there are cracks, chips and deeper damage, you should use an angle grinder.
2. Exposing the surface to strong acids will help corrode the old enamel. At the end of the work, you should wash off the dirt from the surface of the bathroom. Degreasing with white spirit or acetone is mandatory before applying acrylic. You can use a solution of soda ash.
3. In some cases, it occurs that the processing is not enough and individual inclusions cannot be completely eliminated. To do this, you can use auto putty.
4. To prevent the applied composition from going down the drain, remove the siphon and place a container down under the hole to collect excess. It is recommended to wipe the surface dry using a regular rag.
Advice! The coating with an acrylic mixture will adhere well to the surface if the bath has been warmed up before. To do this, just fill it with hot water and leave for a quarter of an hour.
On video: how to remove old enamel from a bathtub.
Acrylic liner method
This restoration technique is used quite often and differs from the classic one by the presence of an insert. An insert made of ABS plastic 6-7 mm thick, repeating its shape, is placed in the inner surface of the bath. It is glued to a special foam and sealant, and the entire installation will take no more than an hour.
Such a tab will hide the metal or cast iron base from external eyes and create the illusion of a modern acrylic bathtub. At the same time, the two-layer texture of plastic and acrylic makes the insert quite durable, while being white and smooth.
The method with an acrylic liner, like the classic one, is not without its drawbacks. The thickness of the acrylic itself will be less than that of a finished bathtub, and it is unlikely that you will be able to install it yourself, since special tools will be required. In addition, its installation will require dismantling the lower rows of tiles, which will cause additional costs for their restoration.
Restoration of bathtubs by applying a new layer of enamel
Ideally, enameling takes place in an industrial environment, but special compounds that have appeared recently make it possible to do this at home. As a result, you can get a new protective coating without dismantling the bathtub.
- Preparatory work
. Contaminants deposited on the surface of the bath must be removed. The container of the restored structure must be thoroughly washed and dried. - Application of enamel
. Tools for enameling are chosen according to your taste. This could be a roller, brush, etc. During operation, the solution should be thoroughly rubbed to prevent drips.
After at least two days, the enamel will completely harden and the bath will be ready for use.
Acrylic coating care
To ensure that an acrylic-coated bathtub lasts longer, the following measures must be observed:
- Do not throw metal objects at it or hit it with something heavy.
- Do not use harsh abrasives, liquids with acid or chlorine, or rough brushes for cleaning.
- Do not wash hair dye, tinted shampoos and other dyes into the bath, which may leave stains.
- Do not pour boiling water, as this may cause the coating to delaminate.
Further care
Acrylic is softer than enamel and therefore requires special care. Do not use abrasives or metal sponges for cleaning. A soft sponge and dish soap are ideal. There are specialized products for caring for acrylic surfaces on sale.
To avoid damaging the surface made of liquid acrylic when bathing pets, you need to lay a rubber mat on the bottom.
If you strictly follow the instructions, even a non-professional can perform a high-quality restoration of a bathtub with acrylic. Experts involved in renovation of structures advise not to be afraid of increased acrylic consumption. There is always enough of it, since a layer of about 2 cm accumulates at the bottom.
Buy a new bath or restore an old one?
Bathtubs are not replaced often, so when they plan to renovate, of course you want to buy a new one. It would seem that it could be simpler, especially since there are now many models of different shapes and sizes in stores. However, this solution is not suitable for everyone and it’s not even a matter of price.
Old bathtubs themselves are very strong, although the coating deteriorates over time. They already match the dimensions of your bathroom; there is no need to waste effort on dismantling and installing the structure. In the end, when you buy another bathtub, you only get updated enamel in a fresher color.
Restoration of a cast iron bathtub
The appearance of indelible rust stains on the bathroom indicates that the service life of the factory enamel has come to an end. Complete bath replacement
?
But this procedure is technically difficult and expensive. New materials and technologies will make it possible to refresh the surface of plumbing fixtures in the shortest possible time
, and this is:
- Saving finances
. Modern plumbing will cost the new owner a lot of money. Let's add to this list: dismantling the old bathroom, transportation, installation of new plumbing. - Minimum terms
. A practicing master will complete the work in no more than 5 hours, and after 48 hours you can use the updated equipment. - Quality
. The durability of the product, which depends on the material used and the restoration method, is 10-15 years. - Color variation.
Acrylic enamel is often available in white. At the request of the client, by adding color paste, you can get a bathroom shade to suit every taste.
And of course, it’s worth mentioning the most important feature of a cast iron bathtub – the ability to retain heat for a long time
.
All of the above reasons speak about one thing - “ no”
to replacement, “
yes”
to restoration.
Re-enamelling
Restoring cast iron bathtubs by applying a new enamel coating allows you to do the work yourself, since this does not require special skills and experience. In addition to the possibility of independent restoration, the use of enamel compositions has the following advantages:
- The cheapest option for updating coverage.
- Suitable for steel and cast iron products.
- There is no need to dismantle the drain and overflow.
The disadvantages of this method include the toxicity of the compositions: it is recommended to work in a respirator. Re-enamelling has a short service life of about 5 years, but the coating is sensitive to impact and prone to yellowing. In addition, the paint is not able to fill large sinks or chips of old enamel.
Note! Bath enamels are available in two types. The composition for professional use has a liquid consistency and is applied in 3–5 layers. Enamels for household use are thicker and are applied in two layers; they are suitable for self-application at home.
The restoration kit for applying new enamel includes two products: a primer and enamel with a hardener. All components are supplied in separate containers, the capacity of which is designed to repair one bathtub.
In fact, enamel coating an old bathtub is simply painting it with a special compound. The procedure and technology for performing enamel restoration is as follows.
Preparation
To ensure that the paint has sufficient adhesion to the old coating, the inner surface of the bathtub is cleaned with fine sandpaper. This roughens the surface while removing dirt and grease deposits. Dust generated during the grinding process is removed from the bowl using a vacuum cleaner. In this case, it is recommended to leave the body of the vacuum cleaner with the motor behind the door so that the flow of escaping air does not raise dust.
Advice! After sanding the bathtub and removing debris, take a break for 20–30 minutes so that the dust particles finally settle, after which the bathtub is rinsed with water and wiped dry with a napkin.
Padding
The next step is applying a primer. Before this, carefully cover the drain and overflow holes with masking tape, and also protect the lining along the edge of the bathtub.
Then a hardener is added to the mixed primer and the composition is thoroughly mixed.
Note! At room temperature, the lifetime of the primer mixed with the hardener is 45 minutes, during which time you need to have time to completely prime the bath.
Part of the primer is poured onto the bottom of the bath, after which it is evenly rolled out over the entire bowl with a roller. When the poured composition is used up, more is added. The primer is applied in a thin layer to avoid drips and gaps. If necessary, while the primer is moving, you can go through a second pass. Upon completion of priming, the protective masking tape is immediately removed so that it does not stick.
Applying enamel
Start painting the bathtub with enamel after 12–24 hours (depending on the air temperature and the manufacturer’s recommendations).
Before applying the enamel coating, the following activities are carried out:
- The primed surface is sanded with fine sandpaper.
- Sanding dust is removed.
- The bath is washed with water and wiped dry with a rag.
- Drain holes and edges of the cladding are sealed with tape.
The enamel is then mixed with a hardener. The viability of the composition is also 45 minutes. Painting is carried out according to a similar scheme: the enamel is poured onto the bottom of the bathtub, after which it is rolled out over the entire surface in a thin layer, without gaps or sagging. After painting, the protective tape is immediately removed.
You can use the updated bathroom no earlier than specified by the manufacturer (from 3 to 7 days). If you use the bath earlier than the specified period, this will negatively affect the quality and strength of the enamel layer. After the enamel has dried, wipe the bath with a soft, soapy cloth, and then rinse with water.
Restoration of bathtubs using an acrylic liner
The two restoration methods described above are labor intensive. What to do if you need to get results in a short time? For this, there is a “bath in bath” method - installing an acrylic liner on the old surface will allow you to enjoy the updated plumbing in just two hours.
- Preparatory work
. The dimensions of the old bathroom are carefully taken and the appropriate frame is selected. Sandpaper carefully protects the enamel of the old coating - the roughness allows the liner to stick to the old bathtub as accurately as possible. - Installation
. A sealant is applied around the perimeter of the bathroom (protection from moisture), the rest of the part is filled with special foam. An acrylic tab is installed, along with a siphon and screws.
For thorough gluing, you should fill the bath with water - under the influence of the load, the foam will not be able to lift the liner up. Everything is ready, and after two hours you can take water procedures.
Installing an acrylic liner
An acrylic liner is an insert into a bathtub that completely covers a cast iron or metal base. After installing such a liner, your bathtub will look no different from a new acrylic one, because the liner itself is made from the same materials and using the same technology as bathtubs.
Installation of acrylic liner
Acrylic is a snow-white material that is resistant to various influences and therefore durable. Under the acrylic layer is a base made of impact-resistant plastic, which gives the product its shape. The acrylic liner does not change the volume of the bathroom, because the process of installing such a liner is similar to inserting one plastic glass into another: the volumes of the glasses are the same, despite the fact that they are easily inserted into each other. The same thing happens with the liner. Liners only come in certain standardized sizes that will fit most bathtubs.
Installing a liner - advantages of the method
- Hard, impact-resistant, wear-resistant surface.
- Snow-white smooth, but not slippery coating.
- Resistant to household chemicals.
- The price of the liner with installation is lower than the price of a new bathtub.
- Quick installation.
Acrylic bathtub liners only come in standard sizes
Installing the liner - disadvantages of the method
- The thickness of the acrylic layer on the liner is lower than that of an acrylic bathtub.
- A base for installation is required (an old cast iron or metal bathtub).
- Impossibility of manufacturing to individual sizes.
- Experience or calling a specialist is required. You won't be able to install the liner yourself.
- When installing the liner, the tiles adjacent to the bathtub are removed.
Attention. Attempts to install the liner with your own hands, without qualifications and experience, most often lead to poor-quality installation and entail complete destruction of the liner after a short time.
The cost of such a restoration seems low, but it is worth paying attention to whether the price includes delivery, lifting and installation of the liner. In addition, you will additionally have to pay for the removal of the old drain and installation of a new one, as well as for the removal of tiles if they are adjacent to the bathtub.
Entrust the installation of acrylic liner to specialists
Experienced experts say that the acrylic liner is strong and durable if installed correctly and using quality materials. However, there is also a disadvantage to such an installation, which can significantly reduce its service life.
The thing is that the liner itself cannot perfectly follow the contours of the bathtub. When pressure is applied to those places where there is a small gap, a microbend is formed on the liner. A special glue is used to hold the liner in place, which does its job for the first few years, but over time, when “trampled”, the glue begins to peel off in places of such microbends. Thus, voids may form in places where the peeling occurs. When water gets into the void, it stagnates and an unpleasant odor appears.
It is important that after installing the liner, no voids form underneath it
In addition, if the drain siphon is overtightened when installing the liner, a crack may form, and if it is not tightened, water may penetrate inside. That is why the installation of the liner should be trusted only to trusted specialists who have considerable experience in this field.