MrPodshipnik
Bearing replacement, repair
Enter the marking or size (for example: 8*22*7) of the product and the country of sale
New instructions
- How to make your own repairs and replace the bearing on the steering column in a ZOOM bicycle 10/09/2019
- How to independently, at home, replace a bearing in an electric motor of a Philips food processor 10/05/2019
- We repair a DAB heating circulation pump and change the bearing ourselves 10/04/2019
- How to repair a Shimano fishing reel yourself and replace a faulty bearing 10/03/2019
- We replace the bearing and repair the SBR_ 132_A concrete mixer ourselves 10/02/2019
We replace the rotary hammer bearing ourselves
To find out how to replace bearings in a hammer drill yourself at home, read this article.
A rotary hammer is an excellent assistant, both for private owners of this tool and for construction organizations. This device is quite versatile and has a large number of functions. When using it, many problems are solved.
How to replace a hammer drill bearing at home?
Such a tool must be used carefully, according to all the rules. Perform preventive maintenance in a timely manner, check that all components in the device are functioning normally.
If you stop paying attention to small signs, the mechanism will quickly break down. But even with proper use, breakdowns sometimes occur.
In this article we will figure out what kind of malfunctions there are, and whether all of them can be fixed on your own.
A lot of problems can be fixed with your own hands at home. The only exception is engine problems. This will require some experience and knowledge. I'll tell you how to find out what's broken and how to fix it.
How does a hammer drill work?
The enhanced impact function distinguishes the hammer drill from other similar functional electric tools, such as a simple drill and an impact drill. This ability is very convenient when performing work that requires a large force on the material that needs to be processed.
This becomes possible due to the design of this electric tool. The rotary hammer has a special device that creates a strong pneumatic shock. Thanks to this feature, a person does not need to use much physical effort to process hard surfaces. This refers to concrete, stone, and other materials.
The rotational motion of the engine is transformed into vibration energy. This occurs as a result of compression occurring in the pistons. This force is received by the striker. Then, with the help of a striker, which is made of high quality material, the air force is transferred to the working tool, to a chisel, drill, or blade. This design of the hammer drill mechanism increases the impact force to incredible proportions.
The engine in this unit is located differently in different modifications of rotary hammers. Because of this, rotary hammers are divided into the following types:
These types of devices are so named because they are very similar to drills. Here the motor and drill are on the same axis. Drill-like units are more convenient to use in small areas, when it can be difficult to turn around widely.
In such devices, the drill and the motor are perpendicular to each other. Such units are much larger in size. The advantage is that their cooling system is much more advanced, so you can work with such a hammer for a very long time without stopping.
We diagnose problems
When you notice that the tool is not operating normally, unplug it and check visually. Did you find any signs of trouble? We will disassemble the instrument and find the reasons for the breakdown.
If the engine does not start, the power cord may be broken. Carefully inspect the wire responsible for connecting to the electrical network. If it is damaged, broken, or melted, it must be replaced. An undamaged wire will not heat up.
To do an open circuit test, a very useful tool is a multimeter. Use it also for winding ringing.
Almost all breakdowns in a hammer drill are divided into two types:
1. Mechanical failure.
The mechanical part often has the following problems:
- the crown cannot be pulled out (it is jammed);
- the drill stops hammering;
- the rotation of the drill has stopped;
- the chisel falls out of the chuck;
- you hear previously absent sounds in the middle of the device, and a strong vibration is also felt.
Electrical component failures:
- the engine is turned on, but there is no rotation;
- commutator brushes emit sparks;
- you feel an unpleasant odor of combustion products in the insulation;
- started working with the tool - smoke began to appear.
To determine the location of the malfunction, it is necessary to disassemble the hammer drill.
Electrical faults
We will begin the description of common breakdowns with the electrical and switching parts. The electrical compartment of almost every drill is located in the handle, where the button is located. To gain access to it, most often you have to completely disassemble the drill. This is not difficult, but it may be difficult to snap the case off: in addition to several screws, it is held in place by clamps. Having halved the case, remember the location of the elements and wiring, or better yet, take a photo, because the layout can be very intricate.
The main sign of an electrical malfunction is that the drill simply does not turn on. Try to move the power cord with the button pressed in the place where it comes out of the housing: a fracture of the core in this place causes 90% of all malfunctions; if it occurs, the drill will show signs of life. You can also determine a power failure by dialing.
Another common cause of breakdown is failure of the reverse button or switch. Try ringing the contacts to which the wires are connected to check for commutation. A faulty button can be replaced, or you can try to repair it. By unscrewing a couple of small bolts that hold the case together, you will gain access to the insides. Assess the condition of the lamellas (they may wear off or oxidize), check the serviceability of the ejection mechanism, the cleanliness of the printed circuit board and the presence of burns on the main contacts.
Malfunctions of a small printed circuit board or potentiometer inside a button, which acts as a speed controller, cannot be treated independently. In such cases, the drill either does not turn on at all, with the contact group fully operational, or operates at a constant speed. The button will have to be changed.
Don’t forget to also check the reliability of the crimping of the terminals, the integrity of the insulation, and the presence of oxides on the contacts. The electrical circuit of the drill is extremely simple; the main thing is to remember the order in which the wires are connected.
Read also: Small handmade knives
Step-by-step instructions for disassembling and assembling a rotary hammer
For high-quality and successful disassembly of such an electrical unit, you need to stock up on the appropriate tools. To make the repair yourself, you will need the following:
1. A set of screwdrivers, they must have different slots.
2. We will use a vice.
3.Set of socket and wrenches.
4. Bearings are removed using special pullers.
Also take care of other additional materials that will be useful to you in your work. These are lubricants, solvents for cleaning, rags for surface treatment.
The very first thing you need to do to disassemble the hammer drill is to remove the cartridge. It can be disassembled with a screwdriver that has flat slots. Before this, the cartridge must be freed from the drill.
Sometimes the drill gets jammed, and in this case it is quite difficult to remove it. In this case, tap the perimeter of the cartridge with a rubber hammer and drop a little WD-40 lubricant into the middle. After a couple of minutes, try to remove the drill again. I'm sure this time everything will work out.
Now we begin to disassemble the cartridge.
To do this, pull the plastic skirt down. Using a screwdriver, remove the rubber protection boot. There is a stopper ring at the back of the boot. It unclenches and is removed.
The plastic boot, spring, and plates with balls are also removable. Used lubricant is removed from all spare parts.
Now it's time to remove the mode switches. To do this, you will need to place the toggle switch on the impact mark, where a hammer is drawn. Then turn it down a little more. Release the lever located in the socket from it. And pull the lever towards you.
Now we will check the commutator brushes and start buttons. To access these parts, remove the cover at the back. Remove a few screws to do this. You will determine that the brushes are worn out and need to be replaced. Even if only one brush is damaged, both are usually replaced at the same time. Surfaces must be clean, free of foreign impurities.
The button that starts the engine can be checked using a multimeter. If you notice that the working surface is melted, the button must be replaced; in this case, do not expect normal operation from it.
Follow the safety rules - unplug the tool during repairs!
What elements are included in the drill?
There is a huge selection of different tools on the modern market. There are all sorts of different models, they are made in different sizes and colors. But, nevertheless, the filling of this electric tool is almost always the same.
What does almost any impact drill consist of? Made from a cartridge, a metal gear housing, an electric motor, and a start button. There is another button inside that switches modes from normal to shock.
Also the presence of a housing, induction rings, and a capacitor. Connection to the network is carried out using a network cable. There is a third button, in reverse, as well as brushes, a device that regulates the speed.
If you have a simple drill, there is no impact mechanism; in this case, the gearbox does not have a metal housing. The bearings located on the shaft and in the gearbox are placed in the drill body.
We disassemble the gearbox and check the condition of the bearing
To determine if the gearbox is broken, it needs to be disassembled.
The plastic housing is removable. Carefully clean all surfaces of previous grease.
Disconnect the raster bushing, gear shaft, sleeve with a piston, and a bearing called a floating bearing from the gear housing.
This bearing, which has the funny name drunk because of its qualities, is located in the gear housing and is attached with a bracket. Try squeezing this bracket out with a flat-head screwdriver. Take out the bearing and inspect it. If it becomes unusable, replace it with a new part.
There is one more interesting point, don't miss it. In the middle of this bearing there is a second, needle bearing. The drive gear moves on it. The main load during an impact moment is received by the needle bearing. As a result, it most often breaks down and requires replacement.
The raster bushing has a bolt, it is attached in the middle with a metal stopper ring. There are slots on both sides. Through them you can get to the stopper mechanism.
We disassemble the drill ourselves
To find out why the device does not work, disassemble it to access the internal components.
If your model has an additional handle, and the drilling depth is limited by a special part, you need to do the following.
Loosen all the fasteners and remove this handle, bypassing the chuck. In other brands of electric drills, such an additional handle is screwed directly into the body.
If the handle is covered with a cover that connects both parts in the body, pry up the cover using a screwdriver and remove it.
All other fasteners are unscrewed. Now the upper part in the housing can be easily removed. You will see two shorter screws where the shaft in the chuck is held by the housing.
The cord is attached to the body with mounting screws. Unscrew them. Carefully remove all parts with wires from the recesses in which they are located.
Remove the brushes and their holders as well. Disconnect the housing from the chuck and shaft. Remove the gear housing and motor. Pay attention to the ball near the shaft, do not lose it, such parts are not easy to find.
The next step is to remove the stator.
In the electric motor you will see a spindle. The gear housing must be removed from it.
If you notice sparks near the commutator, check the condition of the brushes. This also needs to be done when the speed has dropped or the drill gets too hot.
Do not wait for such signals; check the brushes in your electric drill systematically. If these elements are worn out by almost half, even if only one of them, I recommend replacing both brushes at the same time.
Remove both brushes and their holders from the housing. If there are plugs in the housing, they need to be unscrewed. After removing the worn brushes, install new parts.
If you can’t turn on the drill, take these steps. Your drill is cordless - requires battery charging. If the problem is not solved or you purchased a corded drill, the housing cover on top is removed.
It happens that the tool makes a cracking sound, but does not rotate. Again, disassembly of the case is required. After disassembly, start the engine. The engine turns on - this indicates that the teeth in the large gear located in the gearbox have worn out.
If the engine does not turn on, you need to look at what is wrong with the brushes and windings in the stator and rotor.
Possible breakdowns, why they appear, how to fix them
To successfully repair an electric hammer drill yourself, you must first identify the faults visually, from the outside.
The instrument stopped beating.
The hammer drill is switched to impact mode, but does not strike, although the drill is rotating at this time. In this case, it is highly likely that a faulty floating bearing can be diagnosed. Most likely, it will have to be replaced with a new one.
Another reason for such a breakdown may be a malfunction in the impact mechanism. During operation, sometimes overloads occur and the steel striker breaks. The impact of the mechanism weakens and then stops completely. Replace the broken firing pin.
The last possible cause is the piston system in the hammer drill. Sometimes the liner or piston needs to be replaced.
The unit stopped rotating and drilling.
You turn on the drilling mode, but the chuck does not move. Listen to the sounds the instrument makes. You hear a strong hum, which means the rotor is not rotating. The rotor is located in the middle of the gearbox. To find out what happened to the motor, it is necessary to disassemble the mechanical component of the hammer drill.
If there is no hum in the engine, there is a possibility of motor failure. Remove the instrument cover and determine what could have caused this failure. Is there a break in the power circuits, is the start button broken, or is there a short circuit?
The drill flies out of the cartridge.
This may occur due to using the hammer drill for too long. Such malfunctions are very dangerous and people around may suffer. It is strictly prohibited to use this tool.
The cause is a cartridge failure. It is advisable to disassemble the cartridge and find out where the fault is. Perhaps the balls have become deformed, or the limiter ring has worn out, or there may be a problem with the fixation spring.
When you replace the damaged spare parts, all problems will be solved and the device will work in normal, safe mode.
How to select spare parts for replacement
During disassembly and maintenance of the drill, you may be faced with the fact that some parts are worn out and require replacement. This is a common practice, however, you should not try to replace it with third-party components or, even worse, look for complex workarounds. A typical and serious mistake is when, instead of a broken standard button, a regular toggle switch is attached to the outside of the handle. Such “tuning” is unsafe and should be avoided.
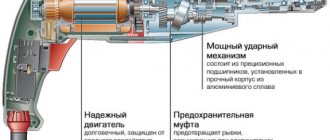
Internal structure of the drill: 1 - network cable; 2 - noise suppression capacitor; 3 — start button; 4 - electric motor stator; 5 — motor bearing; 6 — brush holders with brushes; 7 — rotor collector; 8 — drill body; 9 — impeller that cools the electric motor; 10 — button for switching between normal and shock modes; 11 — gear housing; 12 - gearbox; 13 — cartridge bearings; 14 — return spring; 15 - chuck holding the drill
Moreover, today the market for spare parts for power tools is accessible and extensive. If you bought a tool in a large chain store, then most likely you will find everything you need for repair there: from buttons and brushes to motor rotors and gearbox parts.
All you need is to determine the manufacturer of the drill and the exact name of the model; this information is necessarily present on the nameplate. The problem is that different modifications of the same model may have both compatible components and completely unsuitable ones. Focus on the appearance, do not be lazy to clarify the main dimensions and dimensions of the replacement part.
With the components of the drive mechanism, everything is somewhat simpler due to the high degree of unification: the bearings are marked on the protective rings of the cages, and nomenclature codes are stamped on the gears. Practice shows that spare parts can be found for all popular tool models, including representatives of the foreign Proftula series. The only exceptions are drills over 30 years old, but even for them it is quite possible to find a donor.
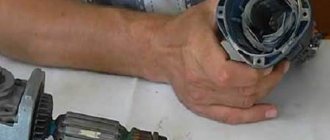
How to remove a bearing from a power tool armature: some practical tips
Today, many home craftsmen and professional craftsmen have a whole arsenal of power tools that help them cope with household and repair and construction tasks.
Hammers, jigsaws, grinders, drills - all of them significantly simplify and speed up work. However, it happens that a power tool breaks down. Don't rush and throw it in the trash because of this. Due to intensive use, parts wear out, and therefore the equipment cannot operate in normal mode. If you know how to remove the bearing from the armature of a power tool, you can extend the life of your “assistant”. Timely replacement and lubrication of parts allows you to operate the device for a longer time. The main task of a power tool motor is rotation.
The armature is the important part of the device that causes the working mechanism to rotate. The service life of the part depends on the power and rotation speed, as well as the activity of using the equipment. To reduce friction during the movement of parts, bearings are needed. They ensure smooth rotation and improve the running of the working mechanism of the power tool. If you take care of the bearings and lubricate them in a timely manner, their service life increases several times.
How to put on a bearing
The new bearing must exactly match the width, inner and outer diameter of the one being replaced.
Make sure that during installation, no dirt gets into the inside of the bearing. Because of this, it will quickly fail. There should also be no corrosion, chips or other damage inside.
The bearing is mounted using a metal pipe matched to the inner diameter of the bearing ring. I recommend lubricating the surfaces before starting the process.
Attention , it is necessary to install the bearing without distortions; for this it is necessary to hit not on the sides of the pipe, but to make a knob, thanks to which it will be possible to hit in the center.
The process can be significantly simplified by heating the bearing in boiling oil. Be careful and do not use open fire when heating; I recommend an electric stove. Let the bearing sit for 5-10 minutes in boiling oil, then remove it with a metal hook and put it on the rotor using pliers or a rag.
How to remove a bearing from an armature to check its functionality?
The condition of the bearing on the motor of a power tool must be given due attention. When it wears above the permissible limit, overheating occurs and the motor begins to operate noisily. If you do not remove the bearing from the armature in time, then in a neglected state, when rotating, the stationary and moving parts will begin to touch each other. And this, in turn, threatens serious damage to the electric motor. This will require replacement of the rotor or armature. Checking bearings is quite simple. To do this, you need to install the engine on a hard surface, place your hand on top of it and rotate the shaft. The rotor should move freely and not jam. If you hear scratching sounds or feel uneven rotation, this will be the first sign that you need to remove the bearing from the armature and repair the problem.
Any bearing has play, that is, gaps. Their presence is quite acceptable, but it is important that the indicators do not go beyond acceptable limits. It is necessary to check the play:
- radial, or longitudinal . To do this, you need to place the engine on a hard surface and try to tilt the shaft in different directions with your hand. The amount of offset depends on the size of the part. For household models of power tools, deviations should be barely noticeable;
- axial _ The check in this case is simpler. You need to grab the shaft with your hand and pull it towards you or push the rotor in the opposite direction. In motors of household appliances, deviations should not exceed 3 mm. The closer this indicator is to zero, the better.
If during disassembly of the electric motor you notice traces of friction of the parts, it means that the bearings have worn out. It is necessary to immediately remove the bearing from the armature and replace spare parts. This will avoid negative consequences such as engine breakdown or complete failure of the tool.
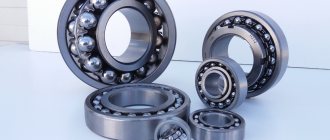
How to remove the bearing from the armature of an angle grinder?
Today, home and professional craftsmen use several methods to solve this problem. If it becomes necessary to remove the bearing from the armature of an angle grinder or other tool, this can be done using the following devices:
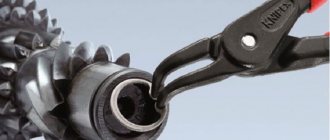
- Pullers . These are special devices that allow you to easily and safely remove bearings of different sizes from the angle grinder’s armature. Using pullers requires virtually no physical force, even if the bearing is tightly seated. Thanks to the centering mechanism, simultaneous installation of the device's grips is ensured. It can be used in any position. Before removing the bearing, you need to clean the armature shaft of the angle grinder from old grease, chips, sand, so that nothing interferes with removing the part. The centering mechanism allows the puller to precisely occupy the seat. If the bearing is intact, and the dismantling process is carried out for inspection, it should be pulled out by the inner ring so as not to damage it. For large armature shafts, grinders use massive pullers with three or four gripping arms, and for small ones, devices with replaceable plates or strips are suitable.
- Hammers, chisels, wrenches and other improvised tools . In this case, in order to remove the bearing from the armature of the angle grinder, it is heated with gas, compressed with a vice, ground off, chopped and many other operations are performed. These methods, of course, can be effective, but there is a high risk that the part’s seat will be mechanically damaged. And often the bearing itself, after such manipulations without a puller, will be unsuitable for further use. In addition, the performer may be injured due to pieces of the clip getting into the face, eyes or head, which fly apart after impacts.
As practice shows, pullers are more effective in this situation. They allow you to quickly, easily and without much risk remove the bearing from the armature of a power tool and inspect or replace parts. If you have to periodically carry out such operations, you should acquire such a useful device. The use of improvised devices is only permissible if you have experience in repairing power tools and urgent replacement of the part is required.
Method one, how to dismantle the bearing
There are a large number of special devices that, even at the factory, received a single purpose - to quickly dismantle the bearing, without requiring power investments and financial costs from the auto mechanic or the car owner. Using special tools to remove the bearing from the shaft is an excellent and easiest solution to carry out repairs. You can save yourself from unforeseen situations. And to do this you just need to follow the instructions. Typically, a standard puller is a threaded shaft that is screwed onto special auxiliary holders. They act as fasteners. Using such a simple puller, the bearing is fixed and removed. Everything ingenious is simple!
Bearing puller
Stages of working with the puller
- We take a puller and bring it to the worn bearing.
- We clamp the bearing with a puller.
- We begin with moderate rotational movements to “pull” the bearing from its seat. Remember that movements should be progressive, without much pressure, so as not to damage the elements of a coherent system.
Thus, the question of how to remove the wheel bearing in car services is resolved. The use of special tools and auxiliary equipment makes the work easier, reduces the cost and speeds up the repair process.
Features of pressing a bearing onto an engine armature
After you have successfully removed the bearing from the armature, you need to carry out a number of necessary manipulations before assembling the equipment. If you are installing new parts, it is necessary that they match the exact width, inner and outer diameters of the old bearings. It is important that during installation, no dirt or dust gets inside the product, as this can lead to corrosion, chipping and various types of damage. The bearing is mounted on the armature using a metal pipe, which must first be lubricated. During the pressing process, it is important to ensure that there are no distortions. The following nuances should also be observed:
- Lubricate the bearings with a special thick substance. It can be moisture resistant;
- Only ½ (for equipment with rotation up to 300 rpm) or 1/3 (for higher speed tools) of the bearing chamber is filled with lubricant. You shouldn’t apply more substance, because all the excess will still be squeezed out during rotation.
Changing the bearings in the armature
This unit has two bearings of different sizes. There is a larger bearing located near the impeller. It is easier to remove these parts using a special puller.
You can do without it if you cannot purchase this tool. Hang the armature from the metal plates so that the armature is at the bottom and the bearing is on top of the plates. Tap the shaft with a wooden object until it comes loose.
To press out the new bearing, use a long quarter-inch socket. Press the head against the inner race
Take the head and rest it against the inner race of the bearing. The bearing is placed inside a metal gear housing. To install it properly, use a hammer.
Anchor for a hammer drill. Replacement or repair?
The hammer drill anchor is one of the critical parts of this type of household power tool. Unlike replacing brushes, armature (rotor) malfunction is considered a technically more complex operation, the order of which is determined by the design of the armature, as well as its service life. Let us remind you that, subject to all operating conditions declared by the manufacturer, the rotor is replaced in warranty workshops and only with branded spare parts.
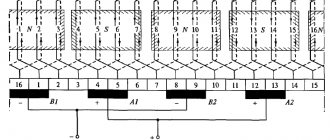
Designs of anchors for rotary hammers of different types
An armature is a rotating unit of any asynchronous motor. Considering that during operation the hammer drill experiences significant resistance from the material it destroys, the loads on the rotor often reach extreme values. Sometimes they cause a significant decrease in armature speed, which leads to immediate failure of the electric motor.
The stability of the armature on a hammer drill from combustion is determined by its design. There are two types of rotary hammer anchors:
- With wound rotor.
- With squirrel-cage rotor.
The short-circuited armature winding is formed by rods, which, when assembling the rotor, are placed in the grooves of its core. In this case, the ends of the rods are connected using a special rotor ring. There are no moving contacts in this design, which has a positive effect on the durability of the unit.
The disadvantage of an armature of this design is the limited starting torque, which, relative to hammer drills, requires a limitation on the intensity of use at the initial time after turning on the tool. Naturally, it is impossible to constantly remember this, because if you use the hammer drill inattentively, the durability of the engine with a squirrel-cage rotor will be low.
The problem is solved by installing electric motors with a squirrel-cage rotor on all rotary hammers. The number of poles of the armature winding in this case fully corresponds to the same parameters for the stator, and the contacts of each phase are brought into the external circuit through carbon-graphite brushes. Replacing brushes is a relatively simple process that can (for equipment not under warranty) be done independently. In other cases, it is worth using the services of specialists. Often the price for this type of service is associated with the need for static and dynamic balancing of the armature on a hammer drill, for which special technology and equipment are used.
How to check the functionality of a hammer drill armature?
The sequence of carrying out this kind of routine work is considered using the example of rotary hammers from the Makita brand, although there are no fundamental features for similar tools from other manufacturers.
The need to replace the armature may arise when the hammer drill does not produce the required number of revolutions, the rotation of the rotor sharply slows down, and characteristic sparking and crackling are observed.
The electric motor armature consists of the following parts:
- a cylindrical element, which is formed by tightly connected stamped plates made of electrical steel with low silicon content, or from Armco low-carbon steel grades EA or EAA;
- the shaft on which the cylinder is mounted;
- phase coils, the windings of which are shifted relative to each other by an angle of 120 0;
- slip rings mounted on the shaft, but electrically insulated both from it and from each other.
The armature on the rotary hammer is in mechanical contact with the gears of the rotary hammer gearbox, so to completely disconnect it, it is enough to disengage the assembly from the worm, which is located on the rotor shaft.
The check begins with an external inspection of the collector plates: they should not have traces of soot or scratches. In this case, the motor brushes are considered operational and cannot be replaced.
Slow rotation of the armature on the hammer drill may be caused by contamination of the bearing dust washer; in this case, it is removed from the housing and thoroughly washed with a technical solvent. Acceptable fluids are usually listed by the manufacturer in the manual for the hammer drill. Not only the outer surface, but also the inner surface of the protective washer should be cleaned.
Despite the fact that the outer winding of the armature also has dust protection, it is worth inspecting the condition of the winding cords, and you can use a regular vacuum cleaner to clean their surface.
The integrity of the collector is checked by a tester. According to the existing electrical diagram of the tool, all elements of the electrical circuit of the hammer drill are checked. If there is a short circuit, the armature needs to be replaced. For long-term use of a tool, the price of the issue is determined by the model of the hammer drill: it is possible that the warranty workshop does not accept hammer drills of a certain brand for repair, and a request for the required anchor model will have to be sent to the manufacturer’s warehouses.
If the unstable operation of the hammer drill was caused only by contamination of its moving parts, then after thorough cleaning, the unit is assembled in the reverse order. In this case, it is necessary to ensure that the contact of the gear with the gear worm is complete, and the dust ring completely covers the outer bearing housing.
How to determine if an angle grinder's armature is faulty
Serviceable rotor for Makita angle grinder 9069 MAX. Photo 220Volt
How to fix a hammer drill? _makita hr 2450 hammer drill_ How to change the bearing _Tool repair
One of the operational advantages of asynchronous commutator motors is the preservation of spindle speed when the load changes. Therefore, it is almost impossible to determine the operation of an angle grinder with an overload based on external signs (rotation frequency, sound tone during operation). The main factor here will be the temperature of the angle grinder body, an increase in which cannot be immediately noticed when working with gloves.
It is the high temperature that causes the insulation on the rotor windings to melt. The engine will start to run rough and eventually stop. If the angle grinder overheats, the contacts of the rotor windings with the commutator may become unsoldered, which leads to a break in the electrical circuit. The presence of interturn closure of the windings makes it possible to rotate the shaft in different directions.
If there is increased sparking (as a cause of turn-to-turn short circuit of the rotor windings or poor contact with the commutator) in the brush-commutator assembly, you should check the operation of the electrical part of the angle grinder.
If the external inspection does not produce results, the search for the causes of malfunctions continues by testing the electrical circuits with instruments (multimeter, short circuit indicator, etc.).
Repair or replacement? The choice is yours!
A home craftsman experienced in electrical engineering is quite capable of repairing the armature on a rotary hammer with his own hands. Work begins with identifying the malfunction. In the event of a break or short circuit in the turns of the armature winding, the reason for the “silence” of the hammer drill or the slow rotation of its rotor (which is accompanied by intense sparking around the entire perimeter) is easily determined by the tester. Sparking, as well as the attempt of the hammer drill armature to rotate in different directions, is a consequence of the short circuit of some of the turns in the winding. If the sparking is in the nature of a single but long spark, then the reason is a broken wire or poor contact with the collector itself.
When checking, it is also worth checking the possibility of a breakdown on the armature body. When measuring actual resistance values, the obtained values should not be less than several ohms.
When the bearing of a hammer drill is worn out, a significant imbalance in the axis of rotation of the armature is possible during operation of the hammer drill. This malfunction is diagnosed after a breakdown in the winding turns is not established. To do this, you need to connect the hammer drill to a rheostat and gradually increase the voltage to the nominal one. If during diagnostics the tone of the electric motor changes and armature vibrations increase, then rotor balancing is necessary.
Since it is almost impossible to rewind the armature at home, it is recommended to resort to the services of specialized workshops. The price of rewinding an armature for a rotary hammer for most models (from Bosch, DeWalt, Makita, etc.) depends on the power of the tool and its design (household or professional). If the drive power does not exceed 1000 W, then the service will cost 1000...1200 rubles, for a drive with a power of up to 1500 W - 1500...1600 rubles, and for more powerful hammer drills - up to 2500 rubles. Comprehensive repair services (for example, bearing replacement) can cost 3500...4000 rubles. At the same time, diagnostics of faults in most workshops is carried out free of charge.
Bearing replacement
During troubleshooting, a common defect is increased play in the rotor bearings . To avoid big troubles, they should be replaced .
When replacing the rotor bearings in a DVT grinder at home, the following video uses any available means . The rotor is pressed out using a metal screwdriver rod and a wrench supported by a boss inside the gearbox housing. This action is not very convenient to perform, but ultimately it achieves its goal.
In the next video, of unscrewing the fastener of the fixing plate to the bearing gear housing through the technological holes in the impeller was further developed Since the impeller is plastic, it is effective to burn holes with a heated rod, such as a nail. To maintain balance, it is recommended to make two holes at once .