Knowing how a hammer drill works is necessary in order to objectively assess the capabilities and features of a specific model and equipment of this type in general. In private and professional construction, this power tool is popular: it can perform more functions compared to an impact drill and is more efficient. Many craftsmen have appreciated how a hammer drill works with hard surfaces: recoil is reduced to a minimum in comparison with a drill, and the speed of passage is significantly increased.
Rotary hammer power plant
The work uses a commutator type electric drive. Depending on the power of the model, a horizontal or vertical engine mounting scheme can be used. In the first case, we are talking mainly about light-class models for household use. This technical solution is simple and convenient (especially when you need to work in places with difficult access). Among the disadvantages of this option, it is worth highlighting insufficient engine cooling and high load on the power plant.
The advantage of a vertically located electric motor:
- Reduced vibration level;
- More intensive cooling (which is especially important for high-power equipment).
- In tools like this, such as the Makita HR3200C, the piston always moves with a larger amplitude.
This tool is designed for long-term operation under difficult operating conditions.
You can find out more: “What is the difference between an impact drill and a hammer drill: 7 main criteria”
We disassemble the hammer drill step by step - quickly find a breakdown
Just imagine that your tool suddenly stopped working or you urgently needed to replace a faulty part. The easiest way is to take the hammer drill to a service center for repairs, but this takes time, which means it will stall your work for some period. But if you know how to disassemble the device, it will be much easier for you to carry out the rest of the work. In addition, this will lead to significant cost savings, because you will not need to spend money on paying for the services of repair centers.
Instructions for disassembling the tool:
- We begin work, starting from the top unit: first, the rubber tip is removed, then the washer, spring, and the ball completes the work.
- After you have removed the ball, unscrew the screws that hold the housing, remove the handle cover, if available, and lastly, disconnect the stator wires.
- Remove the brush holder.
- The next stage is to separate the gearbox and housing until a gap forms. It is through this that we will remove the switch.
- After this, the body of the hammer drill is placed vertically, fixed with a vice, and all its parts are carefully removed from the device.
Whatever breakdown awaits you, clean the case - sometimes it is dirt and dust that prevent the device from working properly.
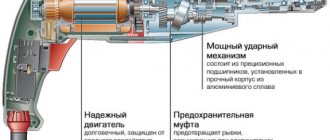
Impact mechanism
Depending on the operating principle, the tool is usually divided into electro-pneumatic and electro-mechanical. Most professional builders prefer the first option, since with a relatively low power it generates maximum impact energy. In both domestic and professional models, the principle will always be based on the transmission of torque supplied from the motor to the bearing sleeve. As a result, the ram hits the firing pin, which in turn hits the main part of the cartridge.
Most models for operation in idle mode have a function to stop impacts of the working part in automatic mode, if pressure is not applied to the surface being processed. When it is resumed, the instrument continues to function in impact mode.
What does a hammer drill consist of?
There are two types of hammer drills:
- Pistol or straight.
Important! Pistol and straight have the same structure and purpose, but differ in the location of the handle.
- Barrel.
Both types differ not so much in appearance as in design, and, accordingly, have different areas of application.
Pistol and straight hammer drill
Let's take a closer look at the structure of the first type. It has a body made of plastic on which the control panel is located:
- Power button and power regulator at the same time.
- Latch. It prevents the device from turning on independently due to the owner’s negligence, and also secures the operation of the device in the selected mode, which makes it possible not to hold down the power button throughout the entire operation.
- Chuck rotation switch (changes direction).
- Switch for changing operating modes.
- Rotation speed switch.
- The second handle allows you to more securely hold the electrical device in your hands.
- The cartridge is an executive body and is also important for changing attachments.
Such a hammer drill is more suitable for household or semi-professional work, where the power it has is sufficient. This type belongs to the light category and is used more like a drill.
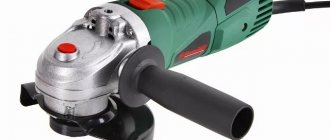
Barrel perforator
The barrel type is distinguished by the quality of the above parts, as well as their location. The design is radically different due to the location of the motor. This entails some changes.
This device is best used in professional activities. It has enormous power, rotation speed and impact force. This technique falls into the heavy category.
Anti-vibration system
The tool is also equipped with other systems. Anti-vibration systems of active and passive types are provided. To eliminate vibrations, in the first case, a shock-absorbing mechanism and a counterweight are used, which additionally involves the presence of a spring. It is this that bears the load during recoil. Additionally, it is possible to dampen vibrations using the handle. When installing, it is connected to the outer shell through a hinge located at the bottom and a spring at the top. Passive configurations typically use rubber gaskets on the body, but it must be taken into account that the effectiveness of such structures is quite low.
Interesting to know: “Unconventional use of a drill - 4 interesting life hacks”
Choosing a hammer drill based on equipment
What is the “fourth mode” of a hammer drill and brush reverse? What other design features and options does this tool have? Is it worth paying extra for them?
- 1 of 1
On the picture:
Safety clutch
Protection when the drill gets jammed.
In relation to rotary hammers, this option cannot be called rare. And for good reason. When the drill accidentally hits the reinforcement in the wall, it jams. To prevent the tool from being suddenly torn out of your hands, a clutch (friction or spring-cam) comes into play, thanks to which the hammer “slips.” In practice, there are quite rigid couplings: at the moment of jamming, a jerk still occurs.
Automatic lock
Simplifies the replacement of equipment.
This option is found in many rotary hammers, mostly professional ones. It allows you to install a drill or chisel with one hand: insert the shank into the chuck and push until it clicks. Ready!
"Fourth Mode"
For free chisel adjustment.
For many models with a pure impact function, the mode selector has not three, but four positions. The intermediate one (between the “drilling” and the “hammer”) frees the barrel, thanks to which you can easily turn the installed chisel to the desired angle by hand. If you choose a hammer drill without a “fourth mode,” then setting up the equipment will require considerable effort.
Electronics
In the photo: Hilti TE 2 rotary hammer.
Speed adjustment
— probably any hammer drill has one.
Firstly, it will allow you to drill accurately and accurately, gradually increasing the frequency and force of the impact. Secondly, it facilitates delicate work with fragile “rocks” and, thirdly, it is useful for twisting. As a rule, with SDS-Plus rotary hammers the speed is regulated by the force of pressing the switch button. Other options.
Today it is possible to choose a rotary hammer with a whole range of electronic systems. This may also include a soft start system. It reduces the load on the network when the tool is turned on and facilitates accurate drilling. In addition, there is a frequency maintenance system and overload protection.
Anti-vibration technologies
Active system with counterweight
- the most effective way to combat strong vibration of a rotary hammer.
Most often, the counterweight is a spring-loaded mass, but sometimes counterweights with forced stroke are also found (they move in antiphase with the impact mechanism due to a separate drive). The vibration eventually decreases, but it cannot be completely eliminated. Dampers.
For machines with a vertical engine, along with an anti-vibration system, another method of damping vibrations can be used: the rear handle is connected to the body not rigidly, but through dampers.
Quick release chuck
Drilling without backlash or runout.
How to choose the right hammer drill if you plan to use it frequently for drilling? A number of expensive models of the SDS-Plus class come with a quick-release drill chuck. It is securely fixed in the barrel, there are no backlashes or beats, thanks to which the hammer turns into something like a drill (adjusted for low speeds).
Brush reverse
Pictured: Milwaukee PLH 26 rotary hammer.
No rev limit.
When using reverse, brush wear occurs faster, so the reverse rotation speed is often limited. To avoid such restrictions, they came up with a reverse mechanism with a rotating brush holder. It allows you to use maximum speed both when rotating to the right and when rotating to the left without damaging the brushes. A slider on the side of the case is responsible for switching.
Dust removal system
Makes the job cleaner.
Which hammer drill should you choose so that concrete dust does not become a serious problem during drilling? You need a model with a dust removal system. Its execution varies. This can be a separate module that is attached to the tool, a system with a storage bag in the form of a bag, or a corrugated cylinder with a pipe for connecting a vacuum cleaner. Before choosing a rotary hammer with dust extraction, compare prices and think about which option is more convenient for you.
Safety clutch
In the event that a hammer drill chuck jams, safety clutches are activated, which are installed to reduce the likelihood of injury while performing the assigned task. An additional function of this mechanism is to protect the motor from overloads during operation. The operation of the device is based on disconnecting the cartridge from the drive shaft to prevent it from burning out.
The most commonly used are spring-cam or friction mechanisms. The difference is that in the first case, the operation of the tool is based on the principle of slipping of two couplings relative to each other. In the second, the disks are pressed against each other in their normal position. Sliding occurs only if the chuck stops functioning.
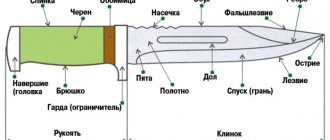
What is a blow
The controls are located on the body of the instrument, as shown in the following photo:
The internal structure of a rotary hammer cannot be understood without disassembling it. The following main components are hidden in the plastic case:
- Electrical engine;
- Safety coupling;
- "Drunk" bearing;
- Flying piston;
- Cartridge.
The principle of operation of a rotating hammer is to convert the rotation of the motor into the impact-rotational movement of the nozzles . The electric motor drives the rest of the hammer mechanism. The safety clutch ensures the safety of specialists during operation. The driven bearing drives the piston, creating impact force, and the cartridge secures the injector clamps. Now let's talk in more detail about each of these nodes.
Electrical engine
The main parts of the engine are the stator and the rotor.
The stator windings create a constant electromagnetic field within which the rotor rotates. The rotor has several windings. The coil terminals are connected to the valve contacts. In this case, one of the windings is part of the electrical circuit. Power is supplied through graphite brushes to the contacts of the fittings. Switching the windings creates a sliding field that causes the rotor to rotate.
The electric motor in the tool can be horizontal or vertical. The horizontal one is typically used in lightweight rotary hammers, while the medium and heavy duty models are equipped with a vertical electric motor.
The operation of the electric part of the hammer is controlled by the trigger by pressing a button on the handle.
Protective coupling
To stop the rotation of the chuck if the working nozzle is jammed, hammer drills are equipped with a safety clutch. This is a necessary element: without its use, the powerful tool unscrews by hand, and prolonged independent rotation of the punch easily leads to injuries. Hammer drills use two main types of clutches: friction or cam.
- Under normal operating conditions, the tool operates with the friction clutch pressed tightly together. this transmits the rotational force to the rest of the mechanism. If rotation is difficult, the discs slide without overloading the drive.
- In the clutch cam, both halves have chamfered lugs that are part of the analog groove. The coupling halves are connected by a spring of a certain stiffness. If the force on the impact mechanism exceeds the spring pressure, the lugs come out of the grooves, disengaging the clutch. At this time, a characteristic crack is heard, for which the jaw coupling is often called a rattle.
READ Auger Drill For Rock Drill For Excavation
Impact mechanism
The impact mechanism in the design of rotary hammers is of two types:
- Electromechanical;
- Electropneumatic.
The most common electro-pneumatic version. The “drunk” (swinging) bearing and piston together form the impact mechanism.
As the main shaft rotates, the slewing bearing moves forward, transmitting force to the pneumatic cylinder plunger. The air in the cylinder pushes the piston with the striker. The working part of the chuck hits, the drill, clamped in the chuck, falls onto the material being processed.
Cartridge
The rotary hammer cartridge is designed in such a way that the user can quickly change the attachment without long breaks. We are talking about two main types of cartridges:
- SDS-Plus;
- SDS-Max.
Tool handle SDS-plus cartridge is clamped with two locking balls.
SDS-max cartridges have tool clamps with different shanks, which provide a more secure fit.
Hammer gearbox and chuck
It will be useful to read: “What is the difference between an impact drill and a hammer drill: 7 main criteria”
A rotary hammer gearbox is a device that performs the function of transferring the driving torque to the chuck. Depending on the installation they are:
- cam (to change the nozzle, a special key is used, which allows you to bring the cams together and apart);
- quick-release (do not require the use of additional tools to replace the hammer drill);
- SDS systems (this option is used in 90% of cases, as it is distinguished by the high speed of replacing the actuator: just insert it into the socket and turn it).
The ease of use of the tool, the speed of drill replacement and, ultimately, the productivity of the builder directly depend on how the hammer drill chuck is designed.
The technical characteristics of the power tool will help you choose. Depending on each of the above parameters, its performance and functionality are determined.
| Specifications | Range of values | |||
| Power | household models | 400-1000 W | ||
| professional models | 1-2 kW | |||
| Impact force | 2-25 J | |||
| Rotational speed | household models | 1500-2000 rpm | ||
| professional models | 2000-4000 rpm | |||
| Beat frequency | 2000-6000 beats/minute | |||
| Cartridge | SDS+ | drills up to 28 mm | ||
| SDS max | drills over 28 mm | |||
| Weight | 2-15 kg | |||
All this will allow you to evaluate the possibilities of choice in accordance with the tasks and their specifics and find the optimal option in all respects.
How to work with a hammer drill or increase the life of the tool
Having understood the principle of operation of a hammer drill, it will not be difficult to learn how to use it correctly. To increase the service life of the tool in question, it is recommended to perform the following actions:
- Always check that the tool is working properly before starting work. If extraneous sounds or interruptions occur, it is prohibited to operate the faulty tool. This is not only life-threatening, but can also lead to failure of the entire mechanism of the tool.
- Be sure to lubricate the shanks of the nozzles that are installed in the hammer drill chuck.
- Keep the tool strictly at right angles to the surface being worked when drilling concrete
- Work exclusively in protective gear
- Do not touch the nozzle with your bare hands after finishing work, as the drills heat up to a temperature of 80-90 degrees or more
- After finishing work, you need to put the tool in a protective case.
- Work must be carried out exclusively with serviceable attachments, that is, they must be sharpened and also free from defects that during the work process could lead to the drill or lance breaking into two parts
Do not forget about periodic diagnostics of the gear unit, which needs regular lubricant replacement. Only with the right approach to using a power tool can we say that it will last not only the specified warranty period, but also five times longer than this period.
Rules for safe use of the tool
To ensure safe working conditions and effective use of the tool when working with a hammer drill, a number of rules should be followed:
- be sure to use personal protective equipment for eyes, ears, hands and feet;
- inspect the tool before each start of work;
- when drilling long holes, it is necessary to start with short drills and drill gradually;
- Long-term continuous operation leads to overheating of the gearbox and armature winding. In this case, the hammer drill must be allowed to cool. The permissible duration of operation in idle mode and under load is indicated in the instrument passport or in the operating manual;
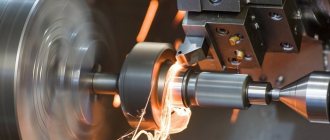
For long-term drilling of particularly hard materials, in order to avoid overheating of the drill, a forced liquid cooling system should be used. Such a system is implemented by supplying a cooling emulsion or ordinary water to the drilling zone. For this, thin tubes or special water couplings are used.
Supplying fluid to the work area
In order not to complicate the work, it is enough to cool the drill in a prepared container with water at regular intervals. These intervals are established experimentally relative to the heating temperature of the drill
It is important not to overheat the drill. Don't let it get to the point where it changes color
In what cases can the lights flash?
If the hammer drill is equipped with warning lights, then their signal may indicate a breakdown or malfunction of any component or mechanism. If the red light on the hammer drill is blinking, you should refer to the device’s operating instructions.
Chuck malfunctions
The SDS cartridge consists of a fitting with one or two holes in which balls are seated, usually with a diameter of 6.7 mm. The balls move freely in the holes while the plastic body of the cartridge is pulled back; in the normal position they are tightly pressed by a spring through a massive steel ring.
To disassemble the cartridge, you need to pry up the front boot with a screwdriver and remove the retaining ring from the fitting
The remaining parts are simply put on the fitting and can be removed without additional manipulation, it is only important to return them to their place in the correct order
As a rule, the main cause of chuck malfunction is ground off balls or a dented plate and pressure ring. Because of this, the equipment either does not hold at all or flies out during operation. You can get such balls in any quantity by breaking bearing number 106. The mounting holes and splines inside the bushing have a much longer life, but if the replacement does not give the expected result, you will only have to change the fitting assembled with the barrel.
Please note that rapid wear of the cartridge parts occurs due to loose sealing of the anthers, both the front one and the annular one on the fitting. The drill shanks should always be kept lubricated, and when drilling the ceiling, use a special dust washer
How to switch a hammer drill to drilling + chiselling
The next mode in the clockwise direction of the mode switch is drilling + chiselling. Perhaps this is the most important and loaded mode of operation of the hammer drill.
Press the red button and set the switch to the position as shown in the photo. Nothing complicated.
In this mode, you can use a drill (drill) with an SDS-plus shank to make a hole in a concrete wall.
Important warning: Do not attempt to insert drill bits into a chuck that are not designed for the specific type of chuck. For example, a drill with a cylindrical shank in an SDS-plus chuck
The drill tail may become flattened and you may not be able to remove the drill bit from the chuck.
Features of barrel perforator repair
Repairing a barrel perforator has the same principles as a simple one. The main difference is in the design and number of elements.
Replacing brushes
- Remove the bottom cover of the case and you will see plugs that need to be unscrewed.
Unscrew the plugs
- The brushes have springs, so after removing the plugs, the springs will rise above the body and you can easily pull out the brushes.
Remove the brushes
Replacing brushes on a barrel perforator
Impact mechanism and gearbox repair
The main difference between a barrel perforator and a gearbox that is simple in design. Some models have an impact mechanism with a screw bearing.
Barrel perforator with a drunken bearing
Barrel perforator with a drunken bearing
But most rotary hammers have a crank impact mechanism.
Barrel hammer drill with crank impact mechanism
Crank impact mechanism in a barrel perforator
All gears and bearings must be inspected and lubricated. Change worn ones. To disassemble such a structure, you need to unscrew the bolts on the body. The barrel is knocked out of the body with a rubber hammer. The bearings are removed with a puller.
- After removing the barrel, you need to remove the raster bushing with the striker. To do this, it is not necessary to disassemble the entire case.
Raster bushing with striker
- Using a wooden mallet, tap the ribs of the metal gearbox housing.
- The firing pin will come out first, then the bushing.