Single-lever ball mixers appeared relatively recently and replaced the already outdated stuffing box mixers, which often failed due to wear of the rubber gaskets. Thanks to their improved design, ball valves are more reliable, although the constant exposure of their internal mechanism to hard water leads to breakdowns over time. To independently troubleshoot a ball valve in the form of a water leak, you need to know its design and how to disassemble it.
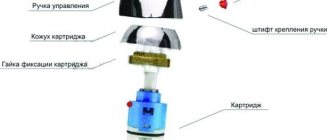
Figure 1. Design of a ball valve.
Main types and design
Manufacturers use several classifications of mixers. At the same time, single-lever devices of this type are practically no different from each other.
Regardless of the chosen model, each ball mixer consists of the following components:
- Rotary handle. Through this part, the flow power and water temperature are regulated. The handle is attached to the body with a screw, which is covered with a decorative cover.
- Cap. This part attaches the valve mechanism to the body.
- "Cam". Most often, a part made of plastic, with the help of which the position of the spherical element is adjusted. The latter closes/opens the flow of cold and hot water. The “cam” is supplemented with rubber seals.
- Body and nut securing the faucet to the sink.
The ball element is not removable. This part has three holes, two of which provide the supply of cold and hot water, and through the third flow it enters the tap.
All-welded
It is impossible to eliminate breakdowns of all-welded models. Such taps are produced in a non-separable body. Therefore, in the event of a malfunction, such mixers must be replaced with new ones.
Collapsible
A more common type of plumbing fixtures. These cranes, due to their design features, are less resistant to prolonged use, but can be repaired.
Step-by-step instructions for installing a ball valve
Above were useful tips that you need to remember when installing the element yourself. Now you are offered step-by-step instructions, according to which you can install the ball valve yourself.
If you are replacing an old product with a new one, you must first remove the old product, thoroughly clean the threads of flax, and then try to screw on the new product. Quite often it happens that after dismantling the old product it turns out that a certain number of turns have simply rotted, so the thread needs to be trimmed. When screwing the product onto a pipe, there must be at least 4 turns on it.
If, after removing the old product, you see that the thread is in normal condition, you can safely screw on a new product, which should be screwed on at least 4 turns. However, first you need to drive the thread with a die. If during the inspection process the product without fum tape can be wound by 4-5 turns, then it is necessary to wind the tape and finally screw the product onto the pipe by 4-5 turns.
Related article: What are the main features of loft style design
When installing plumbing or heating, you must first mark the place where the fittings will be installed, then cut the pipe in this place, make the appropriate thread on it and screw the product 4-5 turns.
After installation is complete, look again to see if anything will interfere with the rotation of the product handle. If a valve with a closed thread on the flange is screwed to a pipe with an open thread, then the fum tape must be wound clockwise (looking at the pipe opening). The product should be fairly heavy to screw on, so if it screws on too easily, add more tape. If the other end of your faucet has an open thread, then you need to wrap fum tape or flax around it and screw the flange from the pipe onto the ball valve, making sure that everything is screwed tightly enough. Now you can turn on the water supply.
If there is a centralized heating supply and high pressure, you need to use high-quality products that can work normally in such conditions. Do not install products without an oil seal, as If a leak occurs, you will not be able to repair it.
Types of cranes
Before repairing a faucet, you should definitely consider the types of faucets. There is a small list of variations:
Two-valve is a traditional type of mixer with the ability to open and regulate the flow of water.
Single lever - a more complex design that allows you to regulate both the water pressure and its temperature with one lever.
Thermostatic is a type of faucet that can automatically supply water at a certain temperature. This variation is used quite rarely.
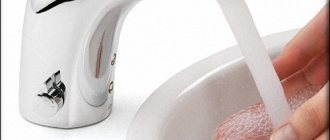
The touchless faucet is controlled by an infrared sensor, which is directly connected to the valve. This option, as a rule, is most often used in public institutions; probably everyone has seen such a design at least once.
Bath-shower switch
Ceramic
Reliable, practical type of switch, unified in principle of operation and part of the elements with ceramic valve axle boxes, maintenance is identical. For replacement or revision it is enough:
- remove (unscrew) the wing plug;
- unscrew the fastening screw;
- remove the lamb;
- unscrew the head.
Button
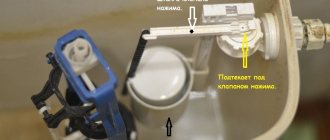
The switch is located on the spout. When pulled, the spring-loaded button lifts the rod, allowing the medium to enter the shower head. The switch is held in the raised position by the water pressure.
The presence of a spring is potentially fraught with breakage and jamming of the rod. Typical faults:
- flow from the shower and spout at the same time;
- There is no lock at the top or return button.
Failures are eliminated by changing the rod gaskets or spring accordingly. The algorithm is explained in the video:
Ball
The switch represents a sphere with three holes connecting the channels: cold, hot, shower. Introduces the principle of operation: https://varion.ru/blog/sharovyy-pereklyuchatel-dush-vanna/.
Common problems:
- leak along the rod or fitting joint;
- incomplete blocking of the flow to the watering can or spout.
The first reason is wear of the rod or butt gaskets, respectively. The second situation is caused by a loose fit of the sphere to the saddles. They fix it by tightening the fittings with seats, grinding the ball, or replace parts from the repair kit.
Sequence of operations:
- disconnect the gander, shower head;
- remove the ball handle plug;
- Unscrew the screw, remove the handle;
- unscrew the central seal;
- Unscrew the inserts with pressed seats using a hex key;
- clean parts from deposits;
- set the sphere to the “closed shower” position;
- install and screw the inserts until they touch the ball, tighten the central fitting;
- put on the handle, adjust the rotation force of the ball, alternately evenly tightening the inserts with a hexagon;
- fix the handle, attach the spout, shower;
- check the result.
Diverter for two showers
Diverters installed between the hull and the jib are typical. The stock shower remains in place and is controlled by a central ball or ceramic valve. The metal hose of the second watering can is connected to the diverter fitting and is controlled by a built-in spool or push-button switch. Failures are similar to those of built-in push-button and spool switches.
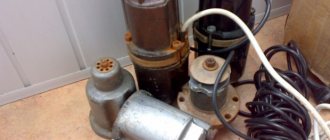
General view of a spool diverter, main elements.
The spool switch is simple, so it works stably. To disassemble, remove the handle, unscrew the fitting, and remove the eccentric. After unscrewing the adapter, push out the plunger. Maintenance consists of cleaning the cavity, eccentric, and plunger from lime. Leaks are eliminated by changing gaskets. Rarely does the eccentric's leading pin break off. The seals on the eccentric rod may require replacement.
Faucet repair
When all the preparatory information has been studied, you can proceed directly to work.
In general, there may be two reasons for repairing a faucet:
- Water flows poorly from the kitchen faucet
- Water leaking from bathroom faucet
If you are faced with the first reason, then the fact is that the pipe is simply clogged in the water supply. If you use an item for a long time, various sand and debris may get there. If you do not have a filter installed, then do not be surprised; such phenomena will occur quite often.
If you are faced with the fact that the faucet has begun to leak, then most likely the issue is the wear of the gaskets. Faucets usually have three of these gaskets.
So, if they have worked for quite a long time and they fail, then rest assured that tightening the nuts will definitely not solve the problem.
Here you need to find out the reason. First, unscrew the nut on the gooseneck using an adjustable wrench. In the body of the pipe you will see a rubber ring-shaped gasket, and another ring that just holds it.
The rubber band needs to be replaced and the mixer must be reassembled in the same way in reverse order.
Recommendation! If you want to exclude the possibility of a selection error, then take the worn-out nut and bring it to the store and show it to the seller. He will tell you the same new nut.
Otherwise, you risk buying something that simply won’t fit your faucet; it’s unlikely that you need it.
Recommendation! Check the mesh through which water flows in a timely manner. Over time, it becomes clogged with dirt, which has a rather bad effect on the operation of the device.
Unscrew the nut in a timely manner and rinse this very mesh, this way you will provide yourself with the most pleasant water pressure.
Common Ball Valve Problems
It is worth looking at the faucet itself, inside and out. If cracks are visible on it, then, alas, it cannot be repaired. Very often, such defects can be found on models in the budget price segment, since they are made from low-quality materials.
The second common problem is a decrease in pressure. In this case, there is no need to immediately sound the alarm. Perhaps the reason lies in the house itself. Perhaps the water pressure has decreased in the system itself. To find out if this is true, ask your neighbors. If their water pressure has decreased, then they need to call the utility services and find out there. The second reason for the decrease in pressure lies in the clogging of the mesh in the outlet channel. Here it is enough to simply wash it.
It happens that red water flows from the faucet. This is usually a problem related to the water supply system, and not specifically to your apartment. So, the most common problems associated with a ball valve:
- Water leaking from the faucet.
- Reducing water pressure.
- Water temperature is poorly regulated.
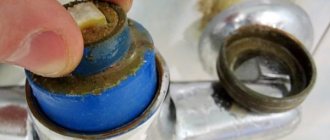
Water leak
The most common cause of water leakage is a clogged space between the ball and the rubber gaskets in the cartridge. Often just a grain of sand is enough to break the seal. As a result, water leaks. In this case, it is necessary to disassemble the mixer and remove all dirt from this place. Otherwise, after some time the leak will be even worse.
Reduced pressure
So, the problem may lie, as mentioned above, in the communications in the house itself. Pipes can be repaired, and then the pressure is often reduced so that they can be repaired. However, a clogged valve can also cause a decrease in water pressure. To prevent this from happening, you need to place a filter in front of the mixer.
Decrease temperature
The reason for the decrease in temperature may be that one of the holes that supplies water is clogged, causing it to flow worse. The shift can be carried out either in the direction of excessive cold or excessive heat.
To avoid problems, you should buy only high-quality faucets. The reason that budget faucets deteriorate so quickly is that they are made of silumin. This material is very fragile. A small mechanical impact is enough, and barely noticeable cracks appear. Although they can often be clearly visible to the naked eye.
Repair of a single lever faucet with swivel spout
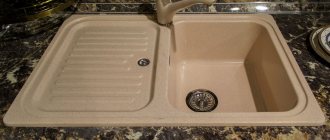
Faucets with a swivel spout are installed on sinks in the kitchen or bathroom. Periodically it starts leaking from under it. In this case, the locking mechanism is not to blame; it’s just that the gaskets have lost their elasticity or the lubricant has dried out.
Repair of a single-lever mixer with a movable spout
In this case, disassemble the mixer as described above, then remove it by pulling the spout up. Remove all old gaskets. If they are stuck, you can use a flathead screwdriver or even a knife blade. You have to remove them, but they are still replaceable. Use the removed gaskets to select new ones. It is advisable that they be made of silicone, not rubber. Silicone is more elastic, retains its properties longer, and tolerates contact with water better.
Lubricate the new gaskets with plumbing silicone grease and install them in place. Reinstall the spout. It must be pressed down well so that it rests against the union nut on the mixer body. Next is the assembly of the rest of the mechanism.
Features of repairing a single-lever mixer
Due to the fact that single-lever models are structurally similar to each other, plumbing fixtures are repaired using a single algorithm. To troubleshoot problems, you will need to disassemble the tap, for which you need to perform the following steps:
- Using a knife or flathead screwdriver, remove the plastic plug on the handle and unscrew the screw. If necessary, the latter must be treated with WD-40.
- Unscrew the decorative metal nozzle. It is not recommended to use force during this procedure. Otherwise, scratches or other defects will appear on the nozzle.
- Unscrew the hex nut with an adjustable wrench and remove the ball mechanism.
If water flows from the tap under low pressure, it is recommended to first check the condition of the mesh located in the drain hole. This part quickly becomes clogged with small particles contained in the water. For some faucet models, to clean the mesh, it is enough to remove the decorative trim attached near the drain hole. To do this, use an adjustable wrench.
Rules for disassembling a ball mixer
If neither tightening the nut nor cleaning the aerator helped eliminate the problem, then you will have to change the gaskets or the “ball” itself.
As already mentioned, the mixing chamber cannot be partially repaired - it is not dismountable. And to replace it, you will have to disassemble the entire mixer, and at the same time check the safety of other internal elements.
The inside of the mixer with the ball removed: holes are visible that allow water to pass through, and when closed, prevent it from moving
To work, you will need the usual tools from a home craftsman's kit: an adjustable wrench, pliers, a screwdriver (straight, Phillips or hex - depends on the screw with which the faucet is equipped).
To remove the seats and springs, it is convenient to use a thin screwdriver. Small parts are threaded onto its end and carefully pulled out.
Step-by-step instructions for disassembling the ball mixer:
- Turn off the water supply, then open the tap to drain the remaining liquid from the pipes.
- Using a screwdriver or a regular knife, pry up the decorative plug on the mixer body and remove it.
- Unscrew the screw located under the plug.
- Remove the lever handle (if the faucet has not been unscrewed for a long time, significant force may be required). In order not to damage the chrome-plated outer coating of the case, it is advisable to work with a key or pliers through a thin cloth or napkin.
- Now you need to remove the cap. To do this, you can use an adjustable wrench or place the pointed end of a screwdriver at an angle to unscrew the part counterclockwise with light pressure. If the faucet is old, the cap may “stick” and not respond to light pressure. In this case, you can lightly tap the screwdriver handle with a hammer so that the part “moves away.”
- After the ring is unscrewed and removed, inside the mixer you will see a dome-shaped part - a cam and a washer. They need to be picked up with pliers, pulled out and washed to remove all dirt and lime deposits.
- Now you can remove the “ball” itself from the mixer, wash it from dirt and carefully examine it using the same magnifying glass. If microcracks, grooves, chips or other damage are found, the part should be replaced with a new one. In order not to make a mistake with the diameter, take the damaged “ball” with you - it will be easier to choose a suitable analogue in the store.
- After this, you need to remove the rubber valve seals - the so-called “seats”. They can also be damaged or simply lose elasticity over time, and a loose fit of the “seats” to the ball chamber can cause water to leak inside the faucet. Such parts are not difficult to find on sale, and they are inexpensive, so even if during a visual inspection you do not find any defects in the rubber, but the faucet has been working for quite a long time, you just need to replace the seals for preventive purposes. Applying plumbing lubricant after installation will help extend the life of the seals.
- Then inspect the tension springs located inside the “saddles”. If they are damaged, weakened or sagging, pick up new ones.
- The entire internal cavity of the mixer must be rinsed and cleaned, after which reassembly can begin.
- Springs are inserted into the “saddles”, then each element is placed all the way into the recess. A thin layer of silicone grease is applied to the ball, then the part is installed inside the body so that the limiting protrusion coincides with the groove.
- Now you need to put the plastic parts back in place - the “cam” and the dome washer. There shouldn’t be any difficulties at this stage, because there is a groove on the body that easily aligns with the protrusion on the “cam”.
Then all that remains is to assemble the upper part of the faucet: screw on the metal cap, install the handle, secure it with a screw and close it with a decorative plug.
Image gallery
Photo from
Step 1: Removing the Decorative Plug
Step 2: Unscrewing the screw holding the lever
Step 3: Removing the Articulating Faucet Handle
Step 4: Removing the Ball Mechanism from the Housing
Problems during operation
Even high-quality plumbing fixtures fail over time. The service life of the faucet depends on the material from which it is made, the quality of the tap water and the intensity of use. The most common problems that arise when using single-lever models are:
- Cracks on the device body. They arise due to poor quality material and installation errors.
- Aerator clogged. The cause of this malfunction is the poor quality of tap water.
- Wear of rubber gaskets. Seals are consumables; they wear out over time due to the high intensity of use of the device.
Types of faults that occur
There is space between the ball cartridge and the rubber seats that secure this element. Its clogging is the most common cause of ball valve failure. Even a seemingly insignificant speck can lead to a violation of the tightness of the connection. As a result, the rubber seat may become deformed, causing the ball mount to become unusable.
Another frequently occurring breakdown is a clogged shutter. As such, repairs are not needed in this case. This problem can be solved by simply cleaning the plumbing fixture. True, for this the crane will have to be disassembled. But then, when you collect it, everything will be in order again.
Water may leak from the rotary knob cap. In this case, the connection should be tightened more tightly. If the flow of water stopped, then the reason for it was hidden precisely in a loose connection.
A clogged aerator leads to insufficient water pressure flowing from the faucet spout; this problem can be corrected by simply cleaning the aerator itself or replacing it.
The easiest way to solve the problem is with a clogged aerator. It is this that can become an obstacle to creating normal water pressure. If you remove the aerator and try to run water without it, then the change in pressure will make it clear whether the aerator was the cause of the malfunction. The aerator can be washed and replaced. Or you can simply replace it with a new one, as is done in the event of a complete failure of this part.
O-rings can also wear out. In this case, water may leak from underneath the faucet base. This malfunction is eliminated by replacing failed seals. Before starting work, turn off the water supply, then remove the mixer, disconnecting it from the inlets and unscrewing the nut that secures it. A worn gasket is replaced with a product of the same diameter. If the gasket is selected correctly, it will be installed in place with force. All that remains is to assemble the crane.
The only breakdown in which the mixer has to be completely replaced is a crack in its body: even if the ball switch is mechanically damaged, only this element can be replaced
The situation is worse if the ball cartridge itself is broken. It may crack, and, alas, then it cannot be repaired. You will simply have to replace it with a new one. You will have to act in exactly the same way in case of mechanical damage to the mixer body. There's no point in repairing it. It’s easier to buy and install a new faucet. If you are unable to immediately replace the faucet, you can use a sealant that will temporarily stop the leak, but remember that the device needs to be replaced. And the sooner the better.
Problems especially often arise due to increased hardness of the water circulating in your water supply system. Moreover, the type of mixer you use does not really matter. In order not to change faucets endlessly, you should install a filter that purifies the water. Even a rough cleaning device can block those particles that cause major breakdowns of plumbing fixtures.
Single lever mixer with ball switch
Alas, modern faucets, like their valves, fail from time to time. After all, their production uses the same materials: metal, rubber and plastic, which can wear out during operation or under the influence of external factors.
To repair a ball valve, you need to understand its structure and be able to dismantle it if necessary. The ball device includes:
- rotary handle; At its core, it is a lever, which is sometimes called a “butterfly”.
- stock; The rod seal is adjusted using a nut and washer, which are also included in the package.
- body with nut; The ball cartridge and rod are located inside this housing.
- ball cartridge; It is fixed using rubber saddles.
This mixer can be repaired independently, without the help of specialists; only if the body is mechanically damaged, you will have to buy a new mixer.
The ball cartridge is a non-separable element that has three holes: for incoming cold and hot water and for the output of mixed water of the required temperature and pressure from the device.
The operating algorithm for a crane of this design is quite simple:
- when the lever is lifted, the ball begins to rotate;
- the holes on the ball cartridge begin to align with similar holes in the seats;
- Depending on the area of coincidence of these holes, the jet pressure changes.
Water ball valve device
A ball valve works as follows: inside the faucet or mixer there is a special metal ball, the task of which is to block the flow of water. There are two holes inside this shut-off device that allow water to pass through. If this ball is turned, the pressure either decreases altogether or ends. The faucet itself has holes to supply hot and cold water. As a result, water is dispensed at the required temperature.