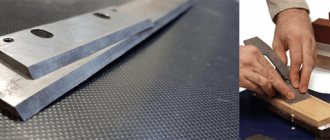
The easiest way to sharpen a kitchen knife is to use a regular sharpening stone. However, with this method it is difficult to maintain the correct sharpening angle.
If you sharpen “by eye,” especially if you have no experience, you can completely dull the blade.
To sharpen a knife correctly, we recommend using a special device - a tabletop knife sharpener.
Similar devices are sold in hardware and construction stores.
1
How to make a knife sharpener in 15 minutes
If you are looking for the simplest homemade knife sharpening device, this option is what you need.
To make a sharpener you will need only nine parts:
- whetstone;
- metal strip (you can use a part from a children's construction set);
- long bolt;
- regular hex nut;
- plastic ball with thread (ballpoint pen);
- screw;
- steel washer;
- 2 wing nuts.
1
A simple device for sharpening knives
The simplest device for sharpening knives is based on the use of an angular frame and a whetstone. The price of such a primitive factory-made device is quite high, as is the price of replaceable whetstones, but making such a device for sharpening knives at home will not be difficult for a craftsman. You will need the following equipment:
- Wooden blocks of the same size - 4 pcs.
- Drill (or any other drilling tool).
- Bolts and nuts (about 4 pieces each).
- Touchstone.
- Protractor.
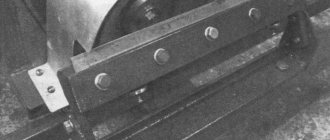
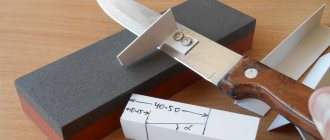
First you need to make a pair of wooden corners, placing the bars to each other strictly at an angle of 90º (Fig. 1). Close the resulting wooden corners together parallel to each other as a single whole and drill holes through the diameter of the bolts. Insert bolts into the holes and tighten the corners slightly with nuts.
The simplest device for sharpening knives
The point of this invention is that it is possible to sharpen simply by holding the knife vertically in relation to the sharpening surface located at a given angle.
The most important thing is to properly secure the whetstone between the wooden corners of the device. To do this, using a protractor, you need to set the desired angle of inclination of the touchstone and tighten the bolts tightly to clearly fix the position of the touchstone.
With some modification of the device, you can also fix the position of the knife relative to the sharpening stone. A significant disadvantage of such a machine for manual sharpening is the inability to smoothly adjust the angle of inclination of the sharpening stone.
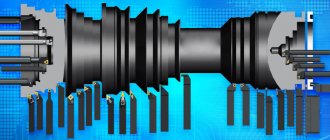
Carbide sharpener
No wonder they say: “Everything ingenious is simple.” And this homemade knife is a clear confirmation of this.
To make a sharpening device, you will need a metal plate (for example, steel or aluminum), as well as two replaceable carbide inserts from a turning cutter.
Please note: you can use even completely dull plates that are not suitable for work. They can be found in any lathe shop.
The idea of this homemade product was shared by the author of the YouTube channel TOKARKA.
First, we make markings on the metal plate to drill the mounting holes.
We drill two holes, then use a tap to cut the thread. By the way, it is very convenient to use a screwdriver for this.
We clamp the tap of the required size in the screwdriver chuck, and then cut the thread in the drilled hole. It turns out more convenient and faster.
After drilling the holes and tapping them, we attach the carbide inserts to the workpiece using screws.
At the end of the metal strip, you need to make a V-shaped slot between the two cutters.
You can use a hacksaw or a Dremel for this. We remove burrs using a file or sandpaper.
Our homemade sharpener with an adjustable sharpening angle is ready. By turning the carbide inserts, you can adjust the angle between them.
With the help of this universal device, you can not only sharpen a kitchen knife, but also sharpen any cutting or chopping tool that you have at home or in the workshop.
For convenience, a metal strip with carbide plates from a cutter can be attached to the edge of the work table using a clamp.
A step-by-step process for making a simple homemade knife sharpener with your own hands can be seen in the video below.
By the way, the design of a homemade device can be simplified even further - this is for those who do not want to bother with drilling holes and cutting threads.
To do this, replace the metal strip with a wooden block or piece of plywood. In this case, replaceable carbide plates can simply be screwed onto self-tapping screws with washers.
Sharpener with rotary mechanism
If the previous two options for homemade tabletop sharpeners do not suit you for some reason, and you need something more practical and functional, we bring to your attention a sharpening device with a rotating mechanism.
The idea of this homemade product was shared by the author of the YouTube channel “Hands from Shoulders”.
Necessary materials:
- plastic pipe clips;
- tablet;
- fastening - screw with nut;
- polypropylene pipe;
- bolt 12 mm;
- professional pipe;
- T-shaped aluminum profile;
- clamps;
- metal plates.
The first step is to connect the two clips together using a screw and nut. In this case, plastic clips are used for a PP pipe with a diameter of 25 mm and an M4 screw.
To prevent the fasteners from touching the pipe, a small countersink must be made on the inside of each clip - for example, using a countersink or drill of a suitable diameter.
At the next stage, we cut two pieces from a piece of polypropylene pipe with a diameter of 25 mm - insert them into the clip, and then fix them.
Now let's start making the homemade base. We saw off a piece of plywood or a board 120 mm wide (length is at your discretion).
We make markings and drill a hole at an angle of about 70 degrees. Cut a piece of PVC pipe with a diameter of 16 mm and insert it into the hole.
For greater reliability, you can additionally secure the pipe with a self-tapping screw or “plant” it with glue.
Next, cut two rings from a piece of polypropylene pipe. We drill holes in them and screw in the screws. These parts will serve as stops for a guide made from clips and pieces of pipe.
To make a rotating mechanism you will need: a bolt with a diameter of 12 mm, an aluminum brand, a polypropylene pipe with a diameter of 20 mm and a corrugated pipe 20x20 mm.
It is necessary to drill a hole in the center in the profile pipe. We also drill two more holes along the edges, and use rivets to attach the aluminum brand to the corrugated pipe.
For the knife holder, two pairs of metal plates measuring 40x80 mm are used. If the knife blade is short, then one pair is enough. We fasten the plates to the T-shaped profile using a screw and nut.
We insert a nut inside the profile pipe, and then screw in an M12 bolt, onto which we first need to put a piece of PP pipe with a diameter of 20 mm. Fix the bolt with a nut on the other side.
We put two metal clamps on the polypropylene pipe and screw them to the base.
The rod for forms can be made from 16 mm PVC pipe. If possible, it is better to use an aluminum pipe. We put two pieces of polypropylene pipe with a diameter of 25 mm on the rod.
To make the connection more dense, you can use heat shrink.
Forms can be made from ordinary glass or plexiglass with a thickness of 4-5 mm. And as an abrasive material, waterproof sandpaper is used, which is attached to double-sided tape.
For form holders, plastic clips are used for PP pipes with a diameter of 25 mm.
We assemble all the design details together, after which we can begin sharpening the knives.
The step-by-step process of making a tabletop machine for sharpening knives with your own hands is shown in the video below.
Thanks to the presence of a rotating mechanism, there is no need to unfasten the knife each time to sharpen the opposite side of the cutting edge.
DIY knife sharpener » Useful homemade products
Materials
1. Plywood or plastic plate 10 mm thick.2. Screws, wing screws, washers and rod (0.5 m) with M6 or M8.3 thread. Magnets from a used computer hard drive
4. Bearing from an old coffee grinder.
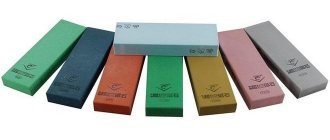
5. Emery (abrasive skins) sheets and bars of different grain sizes: 120, 320, 600, 1500.
Manufacturing
1. The stationary part of the machine is made of plywood (plastic). Strips 30 cm and 5 cm long and (10...12) cm wide are fastened with the letter G from the bottom with an aluminum corner. We install 1 or 2 magnets in the upper part (fill them with epoxy resin). We drill a hole in the lower opposite part and install a threaded rod (height 12...15 cm) with a bearing vertically.
On the surface (to support the knife being sharpened) we install a prepared aluminum (or stainless steel) plate with a slot in the middle (up to 2 mm thick) with a wing clamp.
2. The moving part has two options:
Option A. For sharpening with whetstones.
Option B. For sharpening with abrasive cloths.
The aluminum profile has 4 sides with a width of 25 mm.
A strip of abrasive sandpaper of different grain sizes is glued to each side: 120, 320, 600, 1500. For stickers, I use a stationery glue stick. Afterwards, the used strip of skin is easily removed with a knife and a new strip is glued on.
Sharpening process
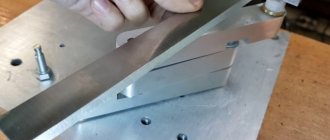
1. Install the knife to be sharpened as in the photo.
The knife is clearly fixed due to the magnet and there is no need to secure it mechanically. Using a movable stop, we set the knife up to the required position and secure the stop with a wing screw. We place the movable part of the machine on the knife.
Now we set the sharpening angle by lowering or lifting the bearing using screws.
For the first sharpening, we turn the side with the minimum grit number 120 (the coarsest) towards the knife blade. We sharpen until we get a solid strip on the edge of the blade (0.5...1 mm wide.) We turn the knife over and repeat everything. We continue the process with sandpaper 320, 600, 1500. Now you can shave with a knife.
The same procedure for sharpening with sharpening stones. But in this case there are several disadvantages:
1. The middle part of the block wears out over time, then the sharpening angle “floats”, which is not the case in the first option.2. Bars with different grain sizes need to be changed, but in the first option, to change the grain size you only need to rotate the edge. The bar is removed by pressing the spring with two fingers.
All knives are now fully sharpened. If some of the knives become dull during use. I only sharpen these 600 or 1500 grit knives with two or three strokes on each side of the knife.
Thank you for your attention! Especially for the site “Useful homemade products” from Gamir Khamitov
Knife sharpener from furniture guide
Each craftsman has his own opinion about what materials are best to use to make a homemade device for sharpening kitchen and other knives.
Although in most cases, home craftsmen simply proceed from what is currently at hand - so as not to spend a lot of time searching for suitable materials, and the result is inexpensive.
Let's look at another simple way to make a homemade knife sharpener with your own hands (in this case, from a piece of board and furniture fittings).
Necessary materials:
- board or plywood 18-20 mm thick;
- furniture guide;
- fasteners - bolts or screws;
- Seaming machine handle.
As a base, you can use a piece of board or plywood 400 mm long. A support platform is attached to one end of the base, and a knife table to the other.
A regular furniture guide is attached to the support platform. We screw the table onto one self-tapping screw (or you can fasten it with a bolt) so that it is swivel.
The surface of the work table should be inclined - approximately at an angle of 15 to 22 degrees. A knife or other cutting tool is attached to the table with self-tapping screws.
The base of a homemade knife is attached to a table or other horizontal surface using a clamp.
Using this universal sharpener, you can sharpen knives, chisels, and axes. By rotating the support table 180 degrees, you can even sharpen dull scissor blades.
The form can be made from laminated plywood, plexiglass or ordinary glass. It is attached to the bottom of the furniture rail.
You can watch a detailed review of the DIY knife sharpener in the author’s video. This idea was shared by the author of the YouTube channel “LAZY”. We recommend watching it.
As for the homemade product itself, it turned out to be very simple, inexpensive and easy to use. Every master can do it.
How to sharpen a knife correctly
For high-quality sharpening of the machine, you need experience and certain knowledge. Let's start with the basics.
Optimal sharpening angles and degree of sharpness for kitchen knives
It's no secret that there are a lot of knives for different materials. A good housewife has her own knife for vegetables and meat. Let's look at the correct sharpening angles for different tools.
| Tool type | Sharpening angle |
| Razor and medical scalpel | 10-50° |
| Professional for chefs | 20-25° |
| Universal | 25-30° |
| For complex work | 25-30° |
| Kitchen cutlery | 55-60° |
| For fillet | 15-20° |
| Home universal | 30-35° |
| Deboning and cutting | 25-30° |
| Professional for fish | 25° |
| Professional for vegetables | 35° |
| Hunting and “Swiss” (spicy) | 30-35° |
| Hunting and “Swiss”, resistant to blunting | 40-45° |
In general, the sharpness of a blade depends on the shape of the blade. And it, in turn, must correlate with certain clear correspondences of the relationships between the blade and the blade.
For example, a strong blade will be in the shape of a trapezoid, and the sharpest one will be an isosceles triangle.
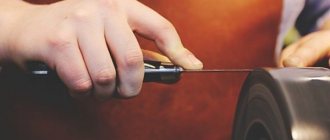
How to sharpen a knife at home with a whetstone
The process is simple, but quite painstaking. Without sharpening experience, trying this process is pointless. Typically, craftsmen use two sharpening stones with different abrasive densities - with a large grain and a fine one.
The next step is choosing the sharpening angle. Here we focus on the table above and take the range from and to. Don't forget, the smaller the sharpening angle, the faster the knife will become dull. For a beginner it will be difficult to maintain the same angle
In order to successfully complete this stage, it is important to hold the knife with both hands.
To maintain the correct angle, beginners can be advised to grind a special blade out of wood, the angle of which would correspond to the required sharpening angle. Carefully place the blade on this blade, lower its corner to the sharpening surface and begin working.
We start working on a coarse-grained stone, and then, when the edge grinding stage begins, with a fine abrasive
How to sharpen a knife with musat at home
Sharpening takes place by weight. The blade is passed along the entire length of the instrument; usually several such “passes” are enough.
The process of sharpening with musat is quite simple. The tool is placed in one hand, the knife in the other
To prevent the blade from slipping, the musat is equipped with a special stopper or guard, which prevents the blade from injuring the hand.
How to properly sharpen a knife on an electric sharpener
The sharpening process is practically no different from manual sharpening. The only difference is that in this case it is not the blade that is wetted, but the sharpening disk itself. Usually this happens automatically, like in the machines we talked about above.
Typical mistakes when sharpening knives with your own hands
Everyone knows that it is better to prevent mistakes than to correct them later. That is why the editors of HouseChief.ru have prepared a list of the most common mistakes beginners make when sharpening knives:
- Incorrect level of sharpening angle.
- Blade sharpening. It occurs when excessive pressure is applied to the sharpener by the blade, which can cause it to become damaged or even crack.
- Sharpening an unprepared tool or a worn sharpening disc.
- Use of musat at all stages of work. As we remember, musat is used to polish the cutting edge.
- Use fine-grained abrasive.
It is important to take into account all these subtleties already at the stage of organizing work. To learn how to properly sharpen a knife with a whetstone, watch this video.
Watch this video on YouTube
A simple two-corner sharpener
This homemade design is based on metal furniture corners. Getting them is not a problem.
The width of one corner is 25 mm. Dimensions - 125x125 mm. There are holes drilled in the corners from the factory that will come in handy for us.
If you are using metal corners without holes, then you will have to drill them in place.
Let's start making homemade products. First of all, we take two corners and sharpen the edges on a grinding machine.
We use a piece of plywood as the base of the structure. We drill out a seat for the nut in the center and press it there. Then we screw the threaded rod into the nut.
We attach a metal mounting plate to the base, and screw a nut onto the stud and tighten it with a wrench.
We connect two furniture corners to each other using bolts and nuts. We install them on a threaded rod, having previously screwed two nuts onto it. We rest the lower corner against the stop and fix it with an eccentric clamp.
Next, we saw off a wooden block to size and drill a longitudinal hole in it. We insert a round steel bar into it.
We glue strips of sandpaper of different grits to all four sides of the wooden block. Thus, we got a pen with several forms at once.
The homemade sharpening device is ready, and now you can start assembling.
We attach the base to the table using a clamp. We clamp a kitchen or other knife between the clamping “jaws” of the metal corners, as shown in the photo below.
We install the handle with forms in one of the holes in the upper corner. If necessary, the holes can be drilled with a larger diameter drill.
Details on how to make a knife sharpener can be seen in the author's video. The author of the YouTube channel Sinan Keskin shared his experience with us.
The design turned out to be quite simple to manufacture and assemble, as well as compact.
Using this device is also very convenient. For example, after sharpening one side of a knife, the mount can easily be turned 180 degrees, and you can sharpen the second side.
Sharpener made from glass cutter rollers
Surely, many people have old glass cutters lying around idle in their home workshop (perhaps even from the distant Soviet past).
So, from them you can make a quite suitable sharpener for sharpening knives.
In addition to glass cutters, to make homemade products you will also need brass bushings, at one end of which there is a hole with an M3 thread, and at the other - a threaded rod with a similar thread.
As for the number of parts, to make one homemade knife you will need 10 rollers from a glass cutter (they are made of tungsten carbide) and four brass bushings.
Holes will need to be drilled in each bushing. But not through, but about half the wall thickness.
Next you will need an aluminum plate. We drill holes in the workpiece along the edges, cut the threads, and screw in brass bushings - two pieces on each side.
We cut two pieces of steel rod 1 mm thick, and put the rollers from the glass cutter and nuts on it. We insert the rods into the holes in the brass bushings. For reliability, we fix the ends of the rods with tin solder.
We screw the aluminum plate to the handle of one of the glass cutters, having previously drilled the necessary mounting holes.
The operating principle of this device is incredibly simple. We insert the knife blade between the rollers, and by moving back and forth we sharpen the cutting edge at the required angle.
The step-by-step process of making this sharpening device with comments from the master is shown in the video below. The idea for this homemade product belongs to the author of A Craft.
In general, the design turned out to be quite compact and easy to manufacture.
Instead of an aluminum plate, you can use a steel plate or even a piece of plywood of suitable dimensions.
The only problem is finding so many videos. But at a flea market, you can probably find more than a dozen glass cutters, so the problem can be solved.
By the way, in a similar way you can make your own knife sharpener from a lighter. In this case, instead of rollers from a glass cutter, wheels from a lighter are used.
Do-it-yourself blade sharpening
Sharpening a knife with a whetstone
Sharpening a blade made with a sharpening stone is considered to be of the highest quality, provided, of course, that it was carried out by an experienced craftsman. To sharpen a knife on a whetstone, do the following:
- Place a low abrasive grit sandstone on a stationary surface. If the block is small, it can be clamped in a vice.
- Holding the knife at an angle of 20-25 degrees relative to the surface of the block, begin moving the knife along the whetstone with the cutting edge forward.
- Move the blade along the block so that during movement it touches the surface of the whetstone along its entire length.
- As you move, try to maintain the same blade angle.
- After making 2-3 movements, turn the knife over and repeat the sharpening process on the other side of the blade.
- Thus, alternating sides, sharpen the knife until an edge (burr) appears along the edge of the blade.
- Swap the coarse whetstone for a grinding stone.
- Sand the knife blade until the edge disappears.
- Test the sharpness of the knife by cutting a hemp rope folded several times, or try cutting a sheet of paper.
Sharpening a hunting knife on a Lansky sharpener
Hunting knives are made of hard steel, so their initial sharpening requires sharpening stones with a low content of abrasive grains.
- Clamp the knife in a sharpener vice.
- Place a sharpening stone with a low content of abrasive grains on the rod.
- Select the angle of the block (for hunting knives it is usually from 20 to 30 degrees).
- Insert the rod into the desired hole.
- Lubricate the whetstone with the special oil included in the sharpener kit.
- Start moving the block along the knife blade, from the base to the tip.
- Flip the sharpener over and repeat the process on the other side of the knife.
- Once the edge is formed, change the stone and do the final sanding.
- Since hunting knives are mostly made with a double-sided blade, after finishing sharpening on one side, change the position of the knife in the vice and begin the sharpening process on the other side.
- Once you've finished sharpening, polish the knife blade with felt.
How to sharpen knives in a Lansky sharpener, watch the video:
Sharpening scissors
Sharpening of scissors must be done on a special sharpening machine. Sharpening blades using improvised materials (sandpaper, the edge of a glass, etc.) can temporarily improve the sharpness of scissors, but not for long. If you do not have the opportunity to have your scissors sharpened by a professional, you can try to sharpen them yourself on an abrasive stone. When sharpening you need to follow a few simple rules:
- The sharpening stone should be fine-grained.
- The blade is sharpened over the entire surface of the edge at the same time.
- The angle of the blade should match the factory edge.
- The movement of the blade along the stone should be from the screw to the tip.
- Scissors need to be sharpened disassembled.
When sharpening scissors, do not rush; patience will be your ally in this matter.
You can also watch the video on how to quickly sharpen scissors:
Sharpening plane and chisel blades
Sharpening the blade of a plane and a chisel are practically no different from each other. Therefore, the sharpening process described below applies to both tools:
- Place the chisel on the whetstone at an angle of 30-40 degrees.
- Holding the chisel with your hand, use the fingers of your free hand to press the bevel onto the whetstone.
- Start running the chisel over the whetstone until a burr forms on the smooth side of the chisel.
- Change the whetstone to a fine-grained one and do the final grinding of the chisel.
- Check the sharpness of the chisel blade by removing shavings from the corner of the block.
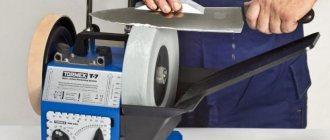
In addition to manual sharpening, the chisel can be sharpened on a machine with a rotating abrasive disk:
- Turn on the machine and let the disc reach full speed.
- Holding the chisel with both hands, place its bevel against the sharpening wheel.
- Be sure to maintain the angle of the chisel, otherwise you will damage the blade of the tool.
- Do not press the chisel with great force and do not hold it on the blade for too long, this will lead to overheating of the metal and destruction of the blade.
- While sharpening, wet the blade with water.
- The final grinding of the chisel blade is best done by hand, using a fine-grained stone or sandpaper.
Do not forget that when sharpening products on a machine, a lot of sparks and small particles are generated that can get into your eyes, so be sure to wear safety glasses. To avoid damaging your hands on the rotating disk, wear gloves.
You can also learn how to sharpen tools from the video:
How to make a budget knife sharpener
Necessary materials:
- plywood or MDF;
- wooden block;
- round pipe (steel or aluminum);
- nuts;
- threaded rod;
- profile pipe.
The peculiarity of this design is that there is no need to make a base for it - all structural elements can be fixed directly on the work table while sharpening the knife.
The first step is to make a guide sleeve for the handle with the form.
We cut out a round piece of the required size from a piece of plywood or MDF, and then drill a hole in the center. We press a piece of round pipe into the resulting ring.
A round pipe will be inserted into the guide sleeve. You can take a steel one, but in order not to make the structure heavier, it is better to use an aluminum tube.
Next, we need a wheel with a mount from a cabinet or chair.
The wheel itself (in this case it has the shape of a ball) is removed. Instead, we attach a guide sleeve using 2 self-tapping screws.
We weld a nut to the end of the round pipe. If you are using an aluminum tube, it can be rounded and pressed inside. Or you can solder the nut using special solder.
We screw a piece of threaded rod into the welded nut.
We screw the mount with the bushing to the end of a wooden block, which is mounted on the desktop in a vertical position. We insert the handle into the guide.
We cut two identical pieces from a rectangular profile pipe and drill holes in them.
We put the blanks on the threaded rod and secure them with nuts. Between the clamps we install a form for sharpening the knife.
The knife or hatchet itself is attached to the edge of the work table using screws.
You can watch step-by-step instructions on how to make a simple knife sharpener with your own hands below in the author’s video. This idea was shared by the author of the YouTube channel Be Creative.
If there is no space on the workbench, then you will need to make a base. You can use a piece of plywood or furniture board for this.
Advice from the master: it is better to start sharpening the cutting edge from the base of the knife, smoothly moving towards the tip.
Convenient DIY metal sharpener
Required parts and materials:
- round steel rod (stainless steel) with a diameter of 8 mm;
- metal corner;
- profile pipe;
- metal plate 8 mm thick;
- bolts with nuts;
- steel strip;
- a piece of thick plastic.
Additionally, to make a form holder you will need a piece of metal 12 mm thick.
We cut off a piece of steel strip, use a grinder to make two cuts along the edges, and then bend the edges at an angle of 90 degrees.
We drill two holes in the curved edges of the steel strip. We cut off two corners and also drill holes in them. Then we connect the workpieces together using bolts and nuts.
We drill three holes in a piece of square profile pipe. Using a grinder, we cut out the profile wall that has no holes. As a result, we should get a U-shaped part.
From thick plastic it is necessary to cut a rectangular part that will be inserted between the walls of the profiles. We drill holes in it.
Using two bolts, we fasten the plastic between the walls of the profile pipe. A long bolt will need to be attached to the third hole. As a result, we have a sharpening angle adjustment unit.
A metal plate 8 mm thick acts as a clamp. It needs to be sharpened at an angle on one side, and then screwed to the corner.
You need to make a semicircular notch on the inside of the clamp so that you can press the knife more tightly.
We make holders for forms from a thick piece of metal. We drill holes in them and make grooves with a file. On the grinder we give the holders their final shape.
At the last stage, we assemble the entire structure. We insert a round stainless steel rod into the hole in the plastic.
At the end of the rod, holders are installed, between which the form is attached. We attach the metal strip to a section of profile pipe.
You can watch the author's video for details on how to assemble a mini table-top sharpening machine with your own hands. The idea was shared by the author of the YouTube channel SK workshop.
Compared to other options, this design turned out to be a little confusing. But due to the fact that it is made of metal, it is more reliable.