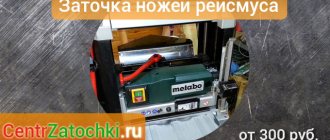
Modern craftsmen who process lumber must have an electric plane in their arsenal. It has significant advantages over hand tools. To ensure maximum equipment performance, proper installation of the knives on the electric planer is necessary. The precise position of sharp knives increases the productivity of the machine.
Types of knives for electric planer
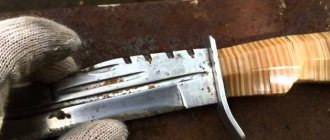
The tool has a rotating drum on which the cutting parts are fixed. The drum is secured with ordinary nuts. If you loosen them, it will be possible to remove the knives. Since the blade has two sharpening sides, if one of the sides becomes dull, the knife can be quickly turned over.
The industry produces several blades for such a tool . They differ in their design and shape:
- Direct. Planing of small workpieces. You can choose a quarter.
- Wavy. They imitate “aged” wood.
- Rounded. They are used for processing wide surfaces when it is necessary to make a neat shaped transition between planing planes.
Knives differ not only in their shape. Their size also plays a major role. There are several groups:
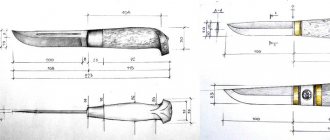
- Plates - 82x5.5x1.2 mm. They are used on foreign equipment such as Black&Deccer. Carbon steel is used to make the blade.
- Special knives. They differ from plates in their dimensions. They are much thicker and wider. Available in lengths of 82 or 102 mm. The large thickness makes it easier to sharpen the tool.
- Blades for a specific device. Typically the blade width does not exceed 110 mm. To secure the blade, special holes are provided.
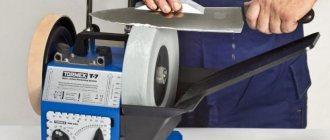
Sharpening electric planer knives with your own hands
Using a device with dull blades increases the load on the motor, which can lead to premature wear. In addition, the quality of processing deteriorates.
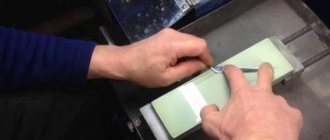
Sharpening power tool knives at home is not that difficult if you are careful.
Necessary materials
- sharpening stone: coarse-grained - for primary sharpening, fine-grained - for final sharpening;
- two laminate boards, a wooden block - if you need to make a sharpener yourself.
Find out: How to choose an eccentric sander: 5 tips and rules
Tools
- hacksaw;
- grinder;
- knife clip;
- ruler;
- screwdriver;
- pencil;
- wood knife;
- chisel;
- hammer;
- mounting screws and studs;
- electric drill;
- plane knife;
- two identical bearings.
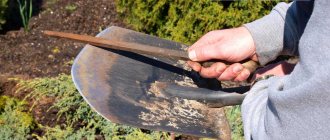
How to properly sharpen with your own hands:
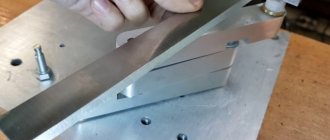
1. Remove the knives.
2. Carefully screw them to the clamp so that the edges lie in the same plane.
3. Gently, with light pressure, move the knives along the abrasive. It is important to ensure that the blades are sharpened at the same time. This way the original sharpening angle will be maintained.
Advice : to prevent dust from the abrasive being ground from flying into your face, it is better to wet the stone in advance.
4. Check the work: inspect the knives for defects, make sure that the cutting part is sharp enough.
5. Install the plates on the electric planer and adjust them.
This method is suitable if you need to slightly sharpen the accessory. For knives that are too dull you will need a special tool. But you can also do it yourself.
How to make a sharpening device
Building a sharpening cart yourself is not an easy task, but it can be done.
| Creating a Corpus | Creating blanks for fasteners: |
| 1. Use a pencil to draw an axis on the laminate. | |
| 2. Mark a couple of points on it that are slightly larger than the width of the electric plane knife. | |
| 3. Using an electric drill, make holes for the studs. | |
| 4. Now you need to do the same with another piece of laminate. The first one can be used as a template. | |
| Transfer the size to the body of the future device: | |
| Place the wooden block vertically. | |
| Make a through hole at the edge, the distance should be slightly wider than the wheel. | |
| Make another similar hole on the other side. | |
| Final stage: | |
| 1. Insert a pin into the drilled hole. | |
| 2. Put the blank on it. | |
| 3. Screw the nuts onto the studs with a screwdriver. | |
| 4. Attach the lower part of the laminate to the block using screws. It can be drilled and countersunk directly on it. | |
| 5. All that remains is to tighten the screws. | |
| Bearing installation | Creating protrusions: |
| Mark lines on the block where the wheels will be installed. | |
| Use a hacksaw to cut it at the bearing mounting points. | |
| Remove excess wood. A chisel and a hammer will come in handy here. | |
| Securing the bearings: | |
| 1. Draw an axle for the centers of the wheels. | |
| 2. Shape the protrusions into a cylindrical shape using a knife. | |
| 3. Drive the bearings into the prepared grooves. | |
| Tip : for better fixation, the surface where the wheels are attached can be coated with glue. | |
| Final part | Secure the second laminate strip. |
| Insert an electric plane knife between the top and bottom boards and secure it with nuts. |
Let's figure it out: Which of the 2 types of hammer drills is better - vertical or horizontal?
Disposable equipment
This tool is made of high-strength alloy. The plate has two sharp sides. Its cutting part is never sharpened. After the edge wears out, the blade is turned over and secured in the drum with the reverse side. When the second edge becomes dull, the knife is thrown away and a new tool is installed.
Disposable equipment is used to perform work that does not require high precision and when no increased demands are placed on the quality of the surface. However, it is very convenient to work with. No precise adjustment of the electric planer knives is required, no balancing required.
Determining the need for sharpening
The relevance of this issue primarily concerns carpentry tools, because working with wood does not tolerate inaccuracies. If something is cut off too much or the cut is oblique and does not correspond to the specified parameters, then the whole work will have to be redone.
Therefore, characteristics such as serviceability and quality are fundamental and require timely determination. This also applies to all types of planes, or more precisely, their knives, which must always be sharpened and ready for use.
Reusable nozzle
This tool differs from disposable plates in its dimensions and shape. High quality steel is used for production. After processing the surface with such blades, a smooth surface that does not require further grinding. Machine tools are marked with the letters HSS (High Speed Stil or high-speed steel). The equipment is of a professional type.
To install the knife, special adjustments are required, as well as high-precision balancing. The sharpening angle of the plane knife must have precise parameters.
How to sharpen a knife at home?
It is known that a sharp knife allows you to quickly cope with the cooking process in the kitchen, leaving time for other important matters. But not everyone knows how to sharpen a knife. First, you should familiarize yourself with the main rules that will help you cope with sharpening efficiently and quickly.
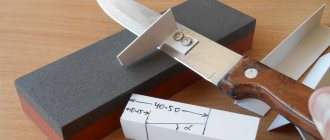
Corner
The angle at which the tool is held while sharpening is a significant factor. Different knives have different purposes and different characteristics.
Thus, their blades are also different, and therefore it is important to position the device at the correct angle while sharpening
Below is a list of optimal angles for different types of knives:
- 55-60 – for canteens;
- 40-45 – for hunting;
- 30-35 – for kitchen;
- 35 – for knives that are used for cutting vegetables;
- 25-30 – for knives that are used for slicing meat;
- 25 – for knives that are used for slicing fish.
The last three options were written by those who use professional tools in their work.
Adjusting tool knives
A woodworking master knows very well how to adjust the knives on an electric planer . To perform this work you must have:
- Hexagon included with the product.
- Metal ruler.
In order to set up a tool with several knives quickly and correctly, it is necessary to follow a certain technological sequence:
- Turning the device over, you need to remove tar deposits from the canvas with a solvent.
- The front side of the sole is exposed. Its position must correspond to the minimum planing depth.
- Each blade is installed in the gap between the plates.
- The ruler is placed on the base plate. Moreover, the cutting edge must touch the supporting surface. If this does not happen, you need to loosen the fastening bolts and set the desired level.
- Then tighten the bolts.
- All attachments are subjected to the operation. The exposed gaps must have the same dimensions. As a result, vibration and tool imbalance are eliminated.
- To determine the ease of rotation of the drum on the shaft, you need to turn it by hand.
- To check the correctness of the settings, process the unnecessary workpiece.
Main types of homemade devices
The main condition for homemade knife blades is not to distort the angle between the edges of the blades specified in production. It is not easy to hold it by hand without a trained hand and skill.
The device fixes the sharpening angle, so sharpening a knife with a special tool is much easier than with a whetstone.
The simplest and most popular sharpeners are listed below, each of which you can make yourself:
- Selecting a quality stone. If you have a sharpening stone in the shape of a roof with two slopes, you can easily restore the sharpness of a dull instrument. This “house” is easy to work with: the blade is attached to one roof slope, and its other side is sharpened with an abrasive stone, making horizontal movements. Then the knife is turned over and the second surface of the blade is processed. The convenience and effectiveness of the method is that you do not need to maintain the angle between the blades with your hands; it is fixed by the shape and angle of the bar.
- A simple home sharpening device can be made from two wooden triangles.
They are placed parallel to each other and connected with wing screws. The sharpening stone is fixed between wooden supports at an angle, which can be changed if desired. The required inclination of the abrasive can be easily set using a protractor or a program on a tablet. When processing blades on triangles, the knife must be held 100% vertically. If such a design is used for a long time, the ties may weaken and the set degree of the beam will change, and with it the sharpening angle. - Instead of vertical triangles, you can make a reliable horizontal base from wood, plastic or metal. It must have movable mechanisms for fixing the sharpening stones. The idea is that it should be possible to set different angles of inclination of the bars. Abrasive stones are inserted into holes in the base and fastened. The knife “walks” vertically. Such a device must be held by hand so that it does not move on the table or secured with clamps.
- You can make a sharpener from a stable block that is attached to a rolling cart with wheels. The knife is sharpened by moving the hand back and forth. The sharpening angle is determined by the height of the block in relation to the working surface. This device is used for working with kitchen knives and only on a flat plane. It happens that the sharpening angle during movement deviates slightly from the specified one. For greater accuracy, the structure should stand still in place.
- A more complex device, the manufacture of which will require time and effort, involves not only fixing the beam, but also the ability to adjust its position. The peculiarity of the system is as follows: the knife blade is securely fixed on a horizontal support, the sharpening stone is attached to the guide, and a slotted bar is made on the vertical stand. Thanks to the hole in the vertical support, the guide with a fixed abrasive surface can be moved and the angle of the blade can be adjusted. With this method, maximum accuracy is achieved.
A sharpening (abrasive) bar or stone is a necessary element of any factory or homemade device for sharpening a knife. It is convenient when it has the shape of a rectangle (it should be longer than the blade), it makes it easier to sharpen the tool.
Stones come in different grain sizes: coarse, medium and fine.
It is determined by the number of grains per unit area and is expressed as a number; the smaller it is, the rougher the stone.
To sharpen knives, you will need stones with medium and fine grain.
To sharpen knives, abrasives with a grain size of 200-350 are not used. Such grains can deform the blade. Knives are sharpened on bars with medium grain - from 600. After the main processing, the blade is ground and brought to a shine with sandpaper of 1000-1200 grains.
A double-sided whetstone, with a rough abrasive surface on one side and a more refined one on the other, is doubly convenient, since it can be used for basic knife sharpening and finishing work.
Stones also differ in the material from which they are made. Natural - from shale and corundum rocks. These stones have a large grain and are quickly ground down because they are moistened with water or oil during operation. There are diamond and ceramic bars, which are more wear-resistant and will last longer than natural ones.