Pros and cons of a homemade file knife
To make a knife, you can use any unnecessary metal part.
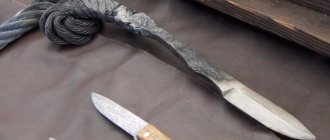
But it is better to use a file for this purpose (Figure 1). Surely, in everyone’s closet or garage, collecting dust on a shelf, are several files produced in the USSR. These tools are best suited for conversion into a knife, since in Soviet times a very high-quality metal was used to make hand tools - alloy steel. After hardening, such a knife will last a very long time and will not become dull.
The main advantages of a homemade file knife are:
- High-quality material: as mentioned above, Soviet files were made of high-quality steel, so even an old and rusty hand tool will be an excellent raw material for making a knife.
- Tool Shape: Flat file is ideal for making your own knife blade.
- Suitable for long-term use: Since most files were made from alloy steel, the finished knife will have to be further hardened. As a result, its blade will not lose its sharpness even with constant and intensive use.
Figure 1. From an ordinary Soviet file you can make a high-quality and sharp knife.
But there are also disadvantages that relate to the material of manufacture. If the file is made of alloy steel, it is possible to make a knife out of it without forging and hardening, but the finished product will not have sufficient performance characteristics. That is why we will consider technology that involves forging.
Required tools and materials
For a novice master, the main thing is to have all the tools, so that at a crucial moment he will not be distracted by searching.
Handmade file knife.
The whole set looks like this:
- several hacksaws for metal with different grains;
- forge or muffle furnace;
- file for processing the workpiece;
- cleats and a set of sandpaper;
- material for making the handle;
- grinder or grinder;
- large forging tongs;
- machine oil and water in a bucket in different containers, will be needed for hardening;
- clean workplace.
And it is desirable that everything is at hand, nearby, so as not to run “from corner to corner.” We will consider the manufacture of the handle from various materials. The set of tools and procedure will be described below.
Features of a file knife
Even a novice craftsman can make a knife from a file; he just needs to have the starting material and some tools - not the most expensive or rare ones.
But before you start the process, it’s worth familiarizing yourself with some of its features:
- A truly high-quality knife can only be made from good material, so you should not use cheap Chinese files as a donor. It is worth giving preference to those intended for working with metals.
- There is no need to study the basics of forging and purchase a specific tool - there are options for making cutting tools without this step. But in this case, you need to prepare for monotonous, long-term work with a hammer.
- If you make a knife without forging, then the “output” will be a tool with a “soft”, fragile blade. And this happens even if the master performs the metal hardening procedure according to all the rules.
- There is no need to choose an overly complex design or an elaborate blade shape. The simpler the idea, the faster the work will go.
- An alloy steel file is absolutely not suitable as a “starting material”. To grind such material, you will need expensive specific equipment.
Advantages and disadvantages
A homemade knife made from a file has its pros and cons. And if we talk about the advantages of such a tool, the following stand out in particular:
- durability of operation;
- metal thickness;
- the strength of the resulting blade;
- high hardness parameters - up to 60-62 HRC.
Types of files The advantages of the process include the availability of the source material - you can still easily find Soviet-made files in which the metal meets the highest requirements.
There are few disadvantages to such a homemade knife:
- The manufacturing process is quite labor-intensive. It will be necessary to strictly observe the stages of production and adhere to precise parameters - for example, maintain a certain temperature during forging and hardening.
- The knife blade will not be flexible like regular kitchen knives. This means that the tool is unlikely to be used for cutting meat or bread.
- The metal on the knife will be susceptible to corrosion. The formation of rust can only be avoided by regular maintenance of the metal and proper storage of the tool.
If you carry out all the work in strict accordance with the recommended algorithm, you will get a strong, practical and durable tool, the scope of which will be almost unlimited.
Selection of working materials
Before telling you how to make a knife from metal, you should consider what materials will be required to make it. If a file will be used as a workpiece, it is better to take a Soviet-made product produced 35-50 years ago. Even in the presence of rust, U-13 steel of this period is distinguished by high quality and uniform carbon content due to strict adherence to alloying standards by the USSR metallurgical industry.
It is advisable to choose a diamond-shaped file, with a rectangular cross-section and a width of 30-40 mm. If you use a product with a flat configuration, the blade will be less durable. To create a handle, you can take wood, birch bark, a piece of leather, bone, plastic plates, or deer antler. The handle is attached to the blade using rivets made of brass or aluminum or epoxy resin.
To work you will need the following tools:
- vice;
- hacksaw for metal;
- a pair of clamps;
- Workbench;
- convenient file with a large handle;
- Bulgarian;
- charcoal for starting a fire in the forge;
- whetstone, iron brush;
- sandpaper with coarse and fine grain;
- sharpening machine or grinder;
- used motor oil (for hardening metal);
- magnet, glass;
- ferric chloride (for etching the blade).
Determining the quality of work
Having gone through all the stages described above, I would like to know what will come of it. How to check the quality of the work done is quite simple:
- sharpening should last for a long time;
- the blade should not wrinkle or crumble when in contact with dense materials;
- the blade must have plasticity, bending and restoring its previous shape;
- a normal tool, with regular sharpening and constant use, should last at least 10 years.
Don't forget that true mastery comes with experience. And experience, as we know, is the son of difficult mistakes.
If you didn’t succeed the first time, or the second, then be persistent - the tenth time it will turn out no worse than others. Study the material, practice and sculpt true beauty.
Previous Making knives How to make bevels on a knife at home Next Knives How to choose a knife for your purposes
Proper processing
The initial processing of the knife blade is performed with any available tool. Sharpening a knife from a file can be done on a grinding machine, which will speed up the process and make the blade more uniform across the plane. The initial sharpening does not require ideal parameters, since the etching process occurs after it.
Etching the blade in citric acid
Etching occurs chemically using ferric chloride, which can be purchased at radio components or hardware stores. It is necessary to completely lubricate the product with the solution, or lower it into a flat container with it. The process will give the blade a film formed on the blade, which will provide protection and it is highly not recommended to remove it. At home, you can use citric acid mixed with vinegar for etching.
After all the processes carried out to process and produce a knife from a file, it is necessary to carry out final processing. The blade is carefully sharpened on a grinding machine to give it sharpness. The handle is polished with a solution of wax and turpentine or varnished.
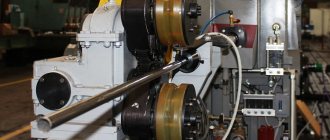
Machining the bearing and preparing the part for forging
An outboard bearing for a car driveshaft or any other with a diameter of 100–150 mm is suitable as a knife blank. For example, it is allowed to use copies of the required sizes from the axial mechanism and drive equipment of machine tools and moving units. The direct source is the most massive part of the product, called the outer race of the bearing. It is made of structural steel grade ШХ15.
There are different methods for disassembling a bearing. Since you won’t need anything other than the outer shell, and you can’t split the shell under any circumstances, we’ll use the most “humane” method - sawing the metal with a grinder. It is better to clamp the bearing in a vice and, if possible, saw the inner ring. It is better to saw the outer ring diagonally, thereby forming the nose of the knife. After cutting with a chisel, the separator is destroyed and all the insides are removed along with the balls. If required, the cut area is opened with a metalwork tool. The circumference should be 1–2 cm longer than the knife, so the extra centimeters of the workpiece are sawed off.
Shaping the blade and handle of the blade
The cooled workpiece is fixed in a vice and the excess parts are cut off, giving a shape according to the patterns prepared in accordance with the drawing. The precision of removing excess metal with a hacksaw will reduce the duration of sharpening the product with a file. When cutting out the shank, you need to take into account that its size must correspond to the length of the fingers. Processing with an abrasive disc attached to an electric sharpener will help give the knife the intended shape.
When turning slopes, the workpiece is secured to the workbench with clamps. When performing this operation, it is necessary to control the symmetry of the processing of both sides of the product, removing layers of metal at one angle throughout the descent. Holes drilled on the handle of the blade will allow you to attach the handle plates using rivets. When the future knife takes on the intended shape, begin finishing the surface with sandpaper secured to the block. The softness of the annealed metal makes it easier to form a blade, but to get a good knife, the steel must be hardened and tempered.
Made by hand
Now we get to the most interesting part. The conversation about manual sharpening was raised at the very beginning, it’s worth returning to it, since it is really, really necessary for the most novice craftsmen. As already written above, this magical and grueling action is necessary to understand steel itself. You need to feel it. It takes a lot of sweat to learn how to do this manually. This procedure is done with files, and, in the end, “caught up” with sharpening stones of different grain sizes.
Yes, sometimes you should resort to special mechanical “assistants” in exceptional cases. Feeling the steel manually can be called “aerobatics.” Moreover, the blade will always feel the warmth of your hands, and perhaps you will put a piece of your soul into it.
Previous Making How to make a handle for a knife Next
Making Knife hardening at home
Creating a knife layout
The first step is to create a model of the future knife from a saw. At this stage of work, you can decide on the shape of the blade of the future blade and the shape of the handle. The layout is best made from thick cardboard or thin plywood. You can also use thick plastic. A rigid pattern will allow you to understand how a knife from a circular saw will lie in your hand and how convenient it will be to use.
When making a layout, it is important to adhere to the following rules:
- Right angles must be avoided. A right angle is a place of stress concentration. The blade of the knife most often breaks or cracks in this place.
- The shape of the blade must be chosen based on the purpose of the future knife. The most versatile forms are with straight or descending butt. Such a blade can cut and stab equally well.
- The dimensions of the layout must correspond to the size of the circular saw blade.
Knife preparation
When making a model, you should also remember that a knife can be classified as a bladed weapon. It all depends on the shape and size. Manufacturing and possession of bladed weapons is criminally punishable. Therefore, in order not to fall under the article of the criminal code, it is necessary to create a layout that complies with the following rules:
- The length of the blade or cutting part should not exceed 9 centimeters. Exceeding this length even by 1 mm will allow you to classify a homemade blade as a bladed weapon.
- A knife with a blade thickness of more than 2.6 mm is also a bladed weapon. This parameter can be neglected, since the thickness of the saw blade is usually 2 mm.
- Hardness should not be more than 42 units. This parameter relates to hardening, so we also skip it at the stage of making the pattern.
- The handle should have a limiter that protrudes beyond its limits by no more than half a centimeter. If there is no limiter, then the sub-finger recess should be less than 4 mm deep.
Once a layout that satisfies the letter of the law and personal preferences has been drawn, you can proceed to transfer the layout to the saw blade. The pattern is applied to the saw blade and outlined with a marker. It's best to use a fine marker. A thin line will allow you to cut the workpiece more accurately and avoid unnecessary filing of the workpiece.
Making the handle
Before making a handle for a product, you should decide on the appearance, materials and shape. You can use any material that is at hand. A wooden handle is considered a harmonious option.
File knife handle
The process includes several stages:
- Selection of materials, it is possible to use different types of wood for a unique design.
- It is necessary to make a bolster, the lower part of the knife. The remainder of a file or other metal is used.
- Wooden pieces are placed on top of each other and glued together with epoxy glue.
- To glue the pieces together better and faster, you need to use a press.
- The excess parts are trimmed with a saw, after which they are processed with sandpaper to the required shape.
- When finished, the handle is varnished for greater preservation; it is possible to use stain to darken it.
It is important to understand that all knives, regardless of category, are considered edged weapons. However, a cutting product whose blade length is no more than 90 cm and whose thickness is more than 6 mm can be removed from the category of edged weapons.
Sharpening is done in the usual way on a grinding machine.
The handle can be made of leather, deer antler or other materials. Installation depends on the form; each type requires an individual approach. The leather belt is tightly placed over the handle area, glued with special glue.
Photos of knives made from a file
Instructions on how to make a knife from a file with your own hands
Let's take a step-by-step look at the process of making a homemade knife from start to finish. Based on the instructions, it will not be difficult to make a knife at home yourself.
Temper the metal. This is done to make the work easier. To do this, you need to warm up the surface of the file by placing it in a gas oven for 1 hour. The exposure temperature should be no less than 200 degrees and no more than 300 degrees. Cooling must be natural, otherwise the workpiece may crack
The next step is to make the profile of the knife. Here you can’t do without diagrams and drawings. You can come up with your own profile or take it from analogues. On a piece of cardboard, draw the corresponding profile of the blade with the handle, and then cut it out. The resulting drawing will allow you to make the tool strictly according to the template, increasing the quality of appearance. The finished template must be attached to a file, and traced along the contour using a marker. Cut out the workpiece according to the marks. To do this, it is better to use a hacksaw for metal, which will eliminate the need to release the material. If you use a grinder, it is recommended to water the file during the cutting process. It will be faster with a grinder, but the slightest overheating will lead to a loss of metal strength, so it is better to use a hacksaw. The presence of irregularities should be ground down using sandpaper. Grinding the bevel is the part of the blade that will gradually decrease in thickness to ultimately obtain a sharpened base. To sew a bevel, you first need to draw it. To do this, use a marker to draw bevel lines. To ensure uniform grinding on both sides, it is necessary to take a metal drill of the same diameter as the thickness of the workpiece. After this, place the workpiece on a workbench (flat surface) and place a drill next to it. Run the drill along the end of the blade where the sharpening point will be. You can use the resulting line as a guide when grinding metal. Preparing pins for handle linings. The easiest way to make a handle is to cut it out of sheet wood and attach it to the resulting workpiece on both sides. You can also make a round handle by turning it on a lathe. If sheet wood is used, then cylindrical aluminum sleeves will need to be used to secure it to the base of the tool. These sleeves should be of small diameter. Cut the handle from chipboard or other woodworking materials. It is better to use high-quality wood, since in a knife the main role is played not only by the blade, but also by the handle, which affects the quality of use of the tool. The shape of the handle is drawn out with a marker, and then cut out using a jigsaw or a hacksaw. To secure the handles to the tool, you will need to drill holes in the metal base of the knife. Sleeves are installed in these holes, and then wooden blanks are placed on both sides. Cleaning the metal with vinegar or citric acid. This procedure is performed in order to prevent the occurrence of corrosion processes. To clean metal, the main thing is not to leave the workpiece longer than necessary.
Place the workpiece in vinegar or citric acid for 1.5-2 hours. After this, the metal will turn black, so sandpaper of minimal roughness is used to remove the blackness. We grind the metal to a shine on the blade, but it is not necessary to process the handle, since it will be covered with wooden handles. Assemble the handle by gluing wooden blanks. To do this, it is recommended to use epoxy glue, which is also called cold welding.
It is important to choose liquid glue. Metal and the inside of wooden pieces must be thoroughly cleaned and degreased before applying glue.
As a result, we get a finished tool that is distinguished by high levels of strength, reliability and efficiency. Finally, the handle should be treated with paints and varnishes, which will prevent moisture from getting inside. Under such a knife, you can sew a sheath on your belt, which will allow you to always keep it with you while performing construction, repair and other types of work.
https://youtube.com/watch?v=rzVsvZSEBVI%3F
If you plan to make a round handle for a knife, then the back of the workpiece should look like this, as shown in the photo below.
Stages of product creation
Making a knife using a file begins with tempering the metal. This must be done because this material is highly fragile. However, it is too strong for further processing. The easiest way to perform this operation is in a regular household oven.
For firing, the oven is heated to 200°C and a file is placed. The instrument should remain inside for an hour. After the specified period, you must turn off the oven and let it cool down along with the file.
If you want to make the workpiece even softer so that it can be processed with hand tools, you need to do it differently. In this case, the file is thrown into the fire, after which it is allowed to cool in the open air.
Forming the workpiece
To get a good knife, you need to take a responsible approach to choosing its profile. It is recommended to draw the outline of the future instrument on cardboard or thick paper and then cut it out. In this case, you can hold it in your hand and make sure that it is comfortable. The finished stencil is placed on a file and the outline is traced with a marker.
Only after this is the workpiece clamped in a vice and all excess is cut out. To do this, it is best to use a grinder (angle grinder). This work is done very carefully and slowly. The metal should not be allowed to overheat, which will lead to its tempering. Therefore, the workpiece is constantly watered. It is advisable to control the process, preventing changes in the color of the metal.
The next step is to start sanding the file. Using a grinder, grind the edges to obtain the desired shape. You can achieve perfectly smooth surfaces using a belt sander.
When the knife blank is ready, begin to form the bevels. The thinner the blade, the better its cutting performance. But too thin metal is easily deformed, which should not be forgotten. The future bevel is drawn on the metal using a marker. It is recommended to divide the future blade into two parts, which will make the whole job easier. Using a drill on a file, draw a straight line.
You can grind the bevels using a belt sander. If there is none, it is permissible to use a grinder or metal files. During the work process, it is necessary to remember to periodically cool the material using water.
Forming knife bevels on a grinder
Hardening
For efficient operation of a file knife, it is recommended to first harden it. When carrying out this work, it is incorrect to focus on the color of the metal. It is best to use a regular magnet. Sufficiently hardened metal simply stops reacting to its presence.
It is recommended to heat only a small area of the blade 3-4 cm wide using a heating pad. During hardening, you must not forget about cooling the metal. When its surface warms up evenly and stops responding to the magnet, the blade is lowered into a prepared container of water.
The main sign that the hardening was successful is that the knife will be able to scratch the glass. But this processing method has many disadvantages. If you do not follow the technology, the metal will crumble during use.
Tables of approximate metal color during quenching and tempering
Shaping the handle
To get a high-quality knife from a file, you need to take care of making a comfortable handle. Special pins are used to hold the handle. To obtain them, wire, nails, metal tubes or other suitable materials are used.
To make holes in a file, you need to lower it with the blade into water and heat the handle with a torch until it turns red. After cooling, the metal will drill well, which is necessary to secure the handle. To fix the pins, at least two holes are made in the handle.
To make the handle, do the following:
- take a piece of wood and cut out a piece of the required size. You need to get two halves, between which the blade is inserted;
- the workpiece is applied to the knife, clamped and holes drilled for the pins;
- the handle is carefully polished;
- the handle is fixed to the knife using epoxy glue and prepared pins;
- so that all parts are well connected, the handle is clamped in a vice and left in this form for a day;
- after the glue has hardened, the handle is sanded well again on a belt machine;
- to obtain a perfectly smooth surface, use fine sandpaper;
- After making the handle, it is coated with any protective composition to prevent destruction from water.
Wooden handle for a knife - drawing
Finishing
In order for the knife you created yourself to be effective, you must not forget about its final polishing. To do this, use one of the materials:
- felt;
- sandpaper;
- metal brush;
- grinding machine.
Polishing the blade must be done very carefully so as not to damage it. After completing the work, the knife should be perfectly smooth and even. In order for the metal to have a pleasant grayish color, it must be etched. To do this, use ferric chloride, vinegar, lemon juice. After etching is completed, a protective film forms on the surface of the knife. It is this that prevents the development of the corrosion process.
Pickling is carried out only after high-quality cleaning of the metal. Any contamination will become clearer after this process. Subsequently, it is almost impossible to get rid of them.
Features of working with steel
The main purpose of hardening a metal is to change its structure and rearrange the atomic lattice. When the temperature rises above the peak point, called the Curie point, the steel becomes especially strong and wear-resistant. Subsequent rapid cooling reduces the fragility of the metal resulting from internal stress and increases its ductility. It will not be easy to break well-hardened steel - cracks will appear on it only when bent at an angle of more than 45°. However, violation of the hardening technology can lead to the transition of the atomic lattice to an intermediate state. In this case, the strength of the material, on the contrary, will decrease.
Properly hardening a knife at home is not that difficult. The main thing is to accurately observe the time, heating and cooling temperatures. In the absence of special equipment, not every type of steel can be hardened. Only metals with a high carbon content are suitable for this purpose. You can find out what type of steel was used to make the blade by the marking - the mark on the blade.
It is easiest to work with products from the structural variety of grades 45, 50, heat-resistant 40´13 or instrumental. Moreover, the higher the carbon content, the stronger the blade will be, but it will be more difficult to process (sharpen) it. Blades made of high-carbon steel and alloy alloys are hardened at fairly high temperatures in special chambers. Low-carbon steels containing the numbers 10, 20 and 25 in the markings, and cast iron are not subjected to this procedure.
A liquid medium, machine oil (waste) or water is used as a coolant. A too rapid decrease in temperature is undesirable - it can lead to cracks.
Therefore, it is important to observe the exact time of not only hardening, but also further cooling
How to make a knife from a file
› Manufacturing
02.09.2019
A blade made by yourself is not only a guarantee of good quality, but also a certain “prestige” among friends. Making a knife from a file at home may seem like a daunting task. But with some skill and careful study of this material, almost anyone can cope with this. You need to take the process seriously and everything will work out.
A knife made from a file.
Technology and stages of making a knife from a file with your own hands
Let us separately touch on the topic of “design” of the future blade. If you don’t have enough imagination, don’t hesitate, go to specialized forums and find the best option for yourself. If you have very little or no experience, in general, it is recommended to choose a simpler blade. You should not immediately make a product of incredible shape.
A simple shape and high slopes, this shape will be the easiest to work with. Draw a sketch on paper and compare it with the width of the file. And first of all, use a grinder with an abrasive wheel to remove all the teeth from the file, this will make it easier in future work.
Firing the workpiece and the step-by-step manufacturing process
Having a real forge or muffle furnace will make the annealing process easy. You can make both yourself, but that's another topic. The easiest option is to make a homemade “camping” version of the forge. A hole is dug in the ground, filled with coal, a fire is lit and the most important point is that you need to supply air under the coals.
The process of making a knife from a file with your own hands.
This can be done even with a simple foot pump; it is clear that you need to use a metal tube so that the hose does not burn out. If you have a small car compressor on hand, even better. This way you can reach pretty decent temperatures.
- Let's say our forge is ready, and in full readiness. We place a file on the coals, carefully monitor it and supply air, the temperature should be constantly high. There are several ways to measure the readiness of a workpiece: with a special laser thermometer, by the color of hot metal, or the simplest - with a magnet. The file will have the required heating of about 700-800 °C, its color will be cherry-red, and it will stop being magnetic. Having reached this heating point, we stop the air supply and leave everything as is for a day. In this way, we will relieve stress from the metal, and it will become more pliable for processing.
- At this stage, we apply our paper template to the workpiece, outline it and begin cutting. It is better to do this with a hacksaw, but it is labor-intensive and time-consuming, but if you perform the process with a grinder, there is a possibility of the metal overheating. And thus, it is easy to lose the strength of the blade. Think over the shank in advance, taking into account the material of the handle. For a beginner, it will be easier to do it in the form of a simple, thin blade extension.
- If any irregularities remain, it is easier to remove them with an emery machine, but again, be very careful about overheating and prevent it. Moisten the workpiece with water more often.
- Making a bevel is a very important moment of the whole work. For non-professionals, it is recommended to circle them on both sides, exactly symmetrically. If you do this work incorrectly, there is a risk of ruining the entire workpiece or it will take a very long time to straighten it.
The blade is almost ready, all that remains is finishing. But in order for it to be fully ready for work, and to get rid of the softness of the metal, another important operation is needed.
How to harden a knife
This process involves a change in the structure of the crystal lattice in the metal. The most common method for hardening a steel blade is to use two liquids - motor oil and water.
We return to our forge again and heat the workpiece to the same temperatures as before. We take the product with long tongs and dip it in oil for two seconds and in water for two. Then, again, we put it on the coals, heat it up and lower it in the same order in the liquid, just hold it there for 3 seconds. To be safe, you can do it a third time, increasing the time by another 1 second.
Three repeated dippings with increasing time will give you a guarantee of a normally hardened blade. A glass bottle is often used for testing; when cutting into it, marks should remain. If so, everything was done correctly.
How to forge a blade from a file
For forging you will need a standard blacksmith's set: a forge, an anvil, a pair of hammers (one 1.5-2 kg, and one 0.3-0.5 kg), pliers, a metal brush.
Preparation of material
When making a knife from a file using the blacksmith method, the first thing you need to do is burn the steel. The procedure is done as follows.
- Light a fire in a stove (not gas!) and place the workpiece in the hearth.
- Keep the metal on fire for about 4-5 hours.
- Allow the workpiece to cool along with the oven.
This is done in order to release the metal, since in tools it is additionally hardened and, if this is not done, stress will arise in the structure during forging.
After firing, the combustion temperature must be reduced gradually, and then the workpiece should be left in the smoldering coals until it cools completely (about a day). If you cool a heated metal very quickly, it can simply crack or even crumble.
Forging
If you follow all the technologies for forging a knife at home, the process will be simple and you can get a pretty good product on the first try. Forging a simple straight blade is done according to the following algorithm.
The file blank must be placed in the forge and brought to the required forging temperature. For example, for steel grade 9ХС, it is the upper limit of 1180 degrees, the lower limit is 800.
We check the color of the hot workpiece using a temperature and steel color scale.
When the heating reaches the required limit, the workpiece is placed on an anvil with pliers and forged (crimped). The entire surface must be compressed in one heating session.
- Afterwards, the metal is heated and a strip of approximately the required thickness begins to form.
- The slopes of the blade can be formed after forging is completed - using sandpaper or using a grinder. However, this can also be done by forging, giving the knife the desired cross-section in diameter.
- The workpiece is heated again and the place where the handle will be - the shank - is forged. In this case, you need to retreat slightly less than the length of the edge of the strip, about two-thirds from the planned handle. When molding the shank, it will stretch out and take on the desired length.
Also, together with the tang, the forging gives the configuration to the blade's shoulders (the place where the tang and blade meet).
Once finished, the forged knife is left in the forge until it cools completely.
A slightly different technology will be used in the manufacture of a Yakut knife. The blade needs to be formed with a semicircular cross-section, and then the fuller is formed on the opposite side.
Algorithms for forging a Yakut knife can be viewed in the presented video:
Forging a knife from a bearing is a more complex technological process for a novice blacksmith. But everything will depend on the planned size of the blade. For example, you can make a good knife by forging from a single bearing roller. The work technique is shown in the video:
Large knives can be made from bearing walls by first sawing them and hammering them together.
When forging is complete, the blade is stabilized by placing it in the hearth of the forge and leaving it there to cool.
When planning for forging a knife, you can initially practice on various materials. For example, you can take a strip of 65G spring steel. You can also make a good example of a working blade from it, since such steel is of quite high quality, and its volume will be enough to make a dozen different knives.
Some experts recommend getting good at forging horseshoes before forging knives! When developing such technology, the same blacksmith techniques are trained.
With practice, you can forge almost any blade.
If you can share your experience, leave your comments or take part in the discussion of this material. Tell us what materials and techniques you used when forging knives, as well as what types you had to make.
What is metal hardening and its types
Hardening is understood as a type of heat treatment of a metal, consisting of heating it to a temperature, upon reaching which a change in the structure of the crystal lattice occurs (polymorphic transformation) and further accelerated cooling in water or an oil medium. The purpose of this heat treatment is to increase the hardness of the metal.
Hardening is also used, in which the heating temperature of the metal prevents a polymorphic transformation from taking place. In this case, its state is recorded, which is characteristic of the metal at the heating temperature. This state is called a supersaturated solid solution.
Polymorphic transformation hardening technology is used mainly for products made of steel alloys. Non-ferrous metals are subjected to hardening without achieving a polymorphic change.
After such treatment, steel alloys become harder, but at the same time they become more brittle, losing their ductility.
To reduce unwanted brittleness after heating with polymorphic change, a heat treatment called tempering is used. It is carried out at a lower temperature with gradual further cooling of the metal. In this way, the stress of the metal is relieved after the hardening process, and its fragility is reduced.
When hardening without polymorphic transformation, there is no problem with excessive brittleness, but the hardness of the alloy does not reach the required value, therefore, during repeated heat treatment, called aging, it is, on the contrary, increased due to the decomposition of the supersaturated solid solution.
Features of steel hardening
Mainly stainless steel products and alloys intended for their manufacture are hardened. They have a martensitic structure and are characterized by increased hardness, leading to brittleness of products.
If you heat treat such products by heating to a certain temperature followed by rapid tempering, you can achieve an increase in viscosity. This will allow the use of such products in various fields.
Types of steel hardening
Depending on the purpose of stainless steel products, it is possible to harden the entire item or only that part of it that must be functional and have increased strength characteristics.
Therefore, hardening of stainless steel products is divided into two methods: global and local.
Video:
Cooling medium
Achieving the required properties of stainless materials largely depends on the choice of cooling method.
Different grades of stainless steel undergo cooling differently. If low-alloy steels are cooled in water or its solutions, then for stainless alloys oil solutions are used for these purposes.
In order to obtain high metal hardness, cooling is carried out in running cold water. Also, to increase the hardening effect, a brine solution is prepared for cooling by adding about 10% table salt to the water, or an acidic medium containing at least 10% acid (usually sulfuric) is used.
In addition to the choice of cooling medium, the cooling mode and speed are also important. The temperature decrease rate must be at least 150°C per second. Thus, in 3 seconds the temperature of the alloy should drop to 300°C. A further decrease in temperature can be carried out at any speed, since the structure fixed as a result of rapid cooling will no longer be destroyed at low temperatures.
The following cooling methods are distinguished:
- Using one medium, when the product is placed in a liquid and kept there until completely cooled.
- Cooling in two liquid media: oil and water (or saline solution) for stainless steels. Products made of carbon steel are first cooled in water, since it is a fast cooling medium, and then in oil.
- Using the jet method, when the part is cooled with a stream of water. This is very convenient when you need to harden a specific area of the product.
- Using the method of step cooling in compliance with temperature conditions.
Temperature
The correct temperature regime for hardening stainless steel products is an important condition for their quality. To achieve good characteristics, they are uniformly heated to 750-850°C, and then quickly cooled to a temperature of 400-450°C.
To relieve stress after heating the metal to the desired hardening temperature, step-by-step cooling of products is sometimes used, gradually lowering the temperature at each heating stage. This technology allows you to completely remove internal stress and obtain a durable product with the required hardness.
Giving the workpiece its final shape
The rough workpiece is brought to its final shape using a file or emery. To avoid overheating of the future knife from the saw, when processing it with sandpaper, it is necessary to periodically lower it into a container of water. This will allow the workpiece to cool. When processing a workpiece with a file, no additional cooling is required. The most optimal way would be to roughly process the workpiece on sandpaper, and then fine-tune it with a file.
Processing the knife blank
During finishing, special attention should be paid to smooth bends.
It is important to ensure that the bend is smooth, without depressions or bulges. Miniature depressions can be easily checked with a file. To do this, use a marker to paint over the end of the workpiece being checked.
Next, apply a file with light pressure along the workpiece along the entire bend. In those places where the marker trace remains there are depressions
To do this, use a marker to paint over the end of the workpiece being checked. Next, apply a file with light pressure along the workpiece along the entire bend. In those places where the marker trace remains there are depressions
Miniature depressions can be easily checked with a file. To do this, use a marker to paint over the end of the workpiece being checked. Next, apply a file with light pressure along the workpiece along the entire bend. There are depressions in the places where the marker trace remains.
Next, the workpiece is cleared of burrs and sanded using sandpaper. You can start with 60 grit and finish with 320 grit. The workpiece will still be subject to heat treatment, so finishing the blade will be polished later.
Blade sharpening
It is better to sharpen a knife manually, since when using an electric sharpener there is a danger of overheating the metal. A whetstone is usually used for sharpening. The procedure begins after etching is completed, after the epoxy resin has dried. The blade is fixed so that the sharpening angle is 20°.
- First, sharpening is done with a coarse abrasive sharpener (for example, an “extra-extra coarse” diamond stone). Processing is carried out exclusively in the direction perpendicular to the cutting edge. It is necessary to periodically wash the sharpener in soapy water. Having finished sharpening one side of the blade, turn it over and sharpen the second.
- Then they start fine-tuning. An “extrafine” diamond stone or a ceramic stone with a grain size of 1000 is suitable for this purpose. During finishing, the sharpening direction changes to the opposite (along the blade).
- The next stage is surface polishing. For this process, an extra-extra fine diamond stone or 8000 grit ceramic sharpener is used. The tool must move perpendicular to the edge of the knife blade. This rule must be observed during the final polishing of the product.
Descents on a file knife
The bevels on a file knife can be made with a grinding machine. The cutting quality of the finished product will directly depend on them - the thinner the bevels, the easier it will be to sharpen the finished knife, and the less often you will have to perform this manipulation. At the same time, you cannot make the blade too thin, because it will be fragile.
What needs to be done to form descents:
- use a marker to draw the future slope on the blade;
- designate two equal parts of the future knife with a vertical line;
- take a drill with a diameter equal to the thickness of the workpiece and draw a line along the marks with it;
- form slopes with a grinding tool, trying to do the work symmetrically on both sides.
If specific grinding tanks are not available, then the bevels can be made with a file, but it must be designed for working with metals. We must not forget about periodic cooling of the workpiece, because overheating may damage the metal structure and the knife will become fragile.
Preparing for work
At the preparatory stage, you should come up with the shape of the blade and the handle for it. These details must be displayed on the drawing of the future product. Also mark on the sketch the method of their fastening. Professionally making a dagger from a file involves forging iron in a forge.
This ensures the strength of the metal, giving it elasticity, allows you to remove excess thickness by flattening the steel with hammer blows, and also speeds up the stiletto manufacturing process, reducing the time spent on its subsequent processing. In the absence of blacksmithing equipment and special skills, you can make a good homemade knife without forging. Its quality will not be inferior to that made by an experienced blacksmith, provided that a real Soviet file is selected.
You can check whether the steel is alloyed or regular, hardened, in the following way: just place the part on the edge of the table and hit its tail tip with a hammer. It should not break, but bend a little.
Processing on a grinding machine will also determine the quality of the metal - ordinary steel will produce many long beams of sparks, while high-alloy steel will produce a lush sheaf of sparks of short length.
The first stage of making a knife with your own hands is firing. Heating the metal ensures its pliability necessary for machining. Therefore, it is impossible to make a knife from a file without heat treatment.
Assembling a homemade knife
Having completed all the above operations and bringing the knife steel to the required hardness, we proceed to assembly. We adjust the shape of the pads to the shank of the knife and cut out two additional leather inserts.
Then we lubricate the parts with glue, install brass inserts on the glue and leave to dry for several hours.
It is better to make the extreme insert not from a rod, but from a tube of the required diameter. This will help attach the finished product to a leather strap during use, which will prevent its loss while hiking, fishing or hunting.
After the glue has dried, carefully sand the handle and blade with sandpaper. To protect the blade from corrosion, it is enough to polish it well after final sharpening and finishing.
Dear readers, if you have any questions, please ask them using the form below. We will be glad to communicate with you