Microscope from a camera
One of the simplest and most affordable ways, but with everything you need. You will need a camera with a 400 mm, 17 mm lens. There is no need to disassemble or remove anything, the camera will remain working.
We make a microscope from a camera with our own hands:
- We connect a 400 mm and a 17 mm lens.
- We bring a flashlight to the lens and turn it on.
- We apply a drug, substance or other micro-subject of study to the glass.
We focus and photograph the object under study in an enlarged state. The photo from such a homemade microscope turns out to be quite clear; the device can enlarge hair or fur, or onion scales. More suitable for entertainment.
Microscope from a mobile phone
The second simplified method for making an alternative microscope. You need any phone with a camera, preferably one without auto focus. Additionally, you will need a lens from a small laser pointer. It is usually small, rarely exceeding 6 mm. It is important not to scratch.
We fix the removed lens on the camera eye with the convex side outward. We press it with tweezers, straighten it, you can make a frame around the edges from a piece of foil. It will hold a small piece of glass. We point the camera with the lens at the object and look at the phone screen. You can simply observe or take an electronic photograph.
If you don’t currently have a laser pointer at hand, you can use the same method to use a sight from a children’s toy with a laser beam; you just need the glass itself.
How to build a microscope with your own hands: manufacturing instructions
Before you make a microscope with your own hands, you should understand what it can be used for, as well as what materials will be required for this. It should be noted right away that you can build such a structure yourself, and you do not need any expensive elements.
What is the device used for?
In principle, the main goal of any microscope is to magnify an object by several tens or hundreds of times. The presented devices are used not only in biology lessons at school, but also in medicine, electronics and other fields. For example, thanks to a digital microscope, it is possible to repair very small microcircuits, mobile and computer boards.
The most convenient is the electronic device, since it is capable of magnifying the object very much. It should be noted that building a microscope with your own hands is not difficult. You just need to know its structure and also collect the necessary materials.
What can the device be made from?
Naturally, you can construct a microscope with your own hands from scratch. However, often those people who understand electronics, computer technology and optics make the presented device based on other units: cameras, binoculars, web cameras.
Before starting to manufacture a structure, it is necessary to accurately determine its functions and select the necessary elements. It is also advisable to make a drawing of the device on paper. Naturally, all the necessary calculations are made.
We make the device from scratch: necessary materials and tools
In order to make a microscope with your own hands without ready-made instruments, you will need the following equipment:
- Glass tube. Its length should be approximately 20 cm and its diameter up to 6 mm.
— Several plates (preferably made of copper). The thickness of the metal should not be large (about 1 mm). As for the overall dimensions of the plates, they are 3*6 cm.
— Several small pieces of glass.
— Drill of small diameter.
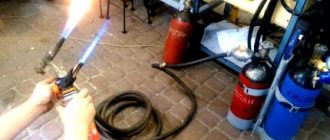
- Gas-burner.
- Hammer.
- Screwdriver.
- Nuts and screws.
If you do not have metal that will serve as a base for the structure, you can use thick cardboard. However, keep in mind that in this case the device will not be durable and will not last for a long time.
Making a device: instructions
Before making a microscope, familiarize yourself with the sequence of work:
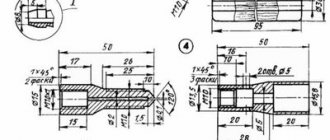
1. First of all, you need to make a small ball from a glass tube using a torch, which will serve as a lens for the device. Please note that this element should never be touched with your hands, as marks will remain on the surface, which will subsequently distort the image.
2. At this stage you need to make a housing for the lens. To do this you will need metal plates. To make the use of such a device convenient and safe, it is necessary to round the corners. Holes should be drilled in the “body”: 4 mounting holes and one inspection hole.
3. Now you can put the whole structure together. To do this, a “lens” is installed between the plates, and the body is bolted together. Next, on one side of the lens, using tape, you can glue the glass onto which the object will be placed.
This microscope design is manual and the simplest. The presented device can be used by adults and children at home. For professional work, you will need a more complex, digital device. Next you will learn how to build it.
How to make an electron microscope: necessary materials
To make the presented device, a webcam is usually used. Before making a microscope of this type, collect all the necessary material and tools:
— Personal computer or laptop.
— Webcam (preferably with manual focus adjustment). Please note that we will need a lens, so it should be easy to remove from the original device.
— Several large and small corners, from which a stand will subsequently be built.
— A steel tube of small diameter and a special mount that can move and be fixed on the metal surface.
- Glass.
— A small mirror or flash from a mobile phone to create lighting.
— Metal plate for making a platform.
— Fasteners, as well as a hot glue gun.
Instructions for making a digital microscope
Making a digital microscope with your own hands is very simple, you just need to follow a certain sequence of actions:
1. First you need to build a “skeleton” of the structure. To do this, you need to connect the metal plate to the corners. All elements can be bolted together. A small diameter metal pipe can be used as a tripod. It has certain advantages.
For example, using special fasteners, you can screw another small piece of pipe to the vertical element, to which the lens will be attached. If necessary, you can raise or lower this element.
In addition, to build a platform, you can also use a small cardboard box into which a tripod is inserted and filled with tile (or other) glue. Please note that the structure must be as stable as possible.
2. Next, you can make a focus adjustment knob. For this, a nylon thread (or elastic band), a movable sleeve, and an eyelet are used to fix the thread on a tripod. That is, you need to make a kind of gearbox, thanks to which the focusing accuracy of the lens increases.
3. Next, making an electron microscope with your own hands is simple. Now you need to unscrew the lens from the webcam. Do this carefully so as not to damage the element.
Next you need to turn it over and put it in place. Use hot glue for fastening. The finished structure can be attached to the movable part of the tripod.
Under it you should organize a subject table with lighting. For this, a regular LED is used.
4. Lastly, you need to process the webcam wire. That is, you should cut off its thick braid. In this case, it will become more flexible and will not interfere with the movement of the lens.
Now you know how to make a microscope with your own hands. Good luck!
Microscope from a webcam
Detailed instructions for making a USB microscope from a webcam. You can use the simplest and oldest model, but this will affect the image quality.
Additionally, you need optics from a sight from a children's weapon or other similar toy, a tube for the sleeve and other small items at hand. For backlighting, LEDs taken from the old laptop matrix will be used.
Making a microscope from a webcam with your own hands:
- Preparation. We disassemble the camera, leaving the pixel matrix. We remove the optics. Instead, we fix a bronze bushing in this place. It should match the size of the new optics; it can be turned from a tube on a lathe.
- The new optics from the sight must be secured in the manufactured sleeve. To do this, we drill two holes approximately 1.5 mm each and immediately make threads on them.
- We stick in the bolts, which should follow the threads and match in size. Thanks to screwing, you can adjust the focus distance. For convenience, you can put beads or balls on the bolts.
- Backlight. We use fiberglass. It's better to take double-sided. We make a ring of the appropriate size.
- For LEDs and resistors you need to cut small tracks. We solder it.
- Installing the backlight. To fix it, you need a threaded nut, the size is equal to the inside of the manufactured ring. Solder.
- We provide food. To do this, from the wire that will connect the former camera and the computer, we bring out two wires +5V and -5V. After which the optical part can be considered ready.
You can do it in a simpler way and make a stand-alone light from a gas lighter with a flashlight. But when it all works from different sources, the result is a cluttered design.
To improve your home microscope, you can build a moving mechanism. An old floppy drive will work just fine for this. This is a once used device for floppy disks. You need to disassemble it, remove the device that moved the read head.
If desired, we make a special work table from plastic, plexiglass or other available material. A tripod with a mount will be useful, which will facilitate the use of a homemade device. Here you can turn on your imagination.
There are also other instructions and diagrams on how to make a microscope. But most often the above methods are used. They may vary only slightly depending on the presence or absence of key parts. But, the need for invention is cunning, you can always come up with something of your own and show off your originality.
DIY microscope - how to make a simple and powerful microscope with your own hands (85 photos and videos)
Children always dream of at least two inaccessible things: to look into distant worlds and to see a close and also invisible life. In the first case, we are talking about observing the starry world through a telescope, and in the other, observing life through a microscope.
Many astronomy lovers themselves make telescopes from lenses, through which they can see the sky much further than through their grandfather’s “Zeiss” binoculars.
How is the ciliate slipper doing?
Below we will tell meticulous kids in detail how to make a microscope with their own hands at home. It may allow them to look at more than just the ciliate slipper. This is a single-celled living organism, which they first saw at school through a real microscope.
A do-it-yourself microscope made from lenses is a very technically complex optical device; not everything is visible from the outside in the photo; the main thing is hidden in the body.
It is possible to achieve image quality at home if the lenses are professionally made.
Then increasing things several times is quite achievable. We will present a design diagram of a quite good homemade product developed by L. Pomerantsev.
What is needed for the job?
Buy a pair of lenses for ten diopters plus at an optics store. Buy them with a small diameter, about two centimeters.
Looking ahead, let's say that one lens will be installed in the eyepiece, that is, where the eye will come into contact with it, the other - for the lens.
Dioptres (D) is the power of the optics, the reciprocal of the focus (distance). One unit is equal to a meter focus, two – half a meter. Therefore, ten D is only 10 cm. We will design from them.
Step-by-step method for assembling a microscope
Select a ready-made cylinder or assemble it yourself to the specified length and to fit the circumference of the selected lenses. Divide it into 2 equal parts. Strengthen the diopter glasses in them.
Paint the insides with black gouache. Glue the lenses in half tubes with cardboard ring inserts. Then make another tube - the future tube - with a diameter so that the two halves with optics fit tightly into it, one above the other. Also paint the inside black.
Now working with wood
Using a compass, draw a pair of circles on five-millimeter plywood - one with a diameter of 20 cm, the other inside it - 12. Carefully cut out the outer and inner diameters with a jigsaw. Cut into two semicircles.
To understand what you will do next, look at the wiring diagram on the website. Since making a tripod for a microscope and everything together is not easy.
Semicircles in the shape of a large letter “C” will become the axis of rotation of the microscope and the carrier of optical systems. They are connected to each other at the top and bottom by rectangles (marked with the letter “G”), protruding a couple of centimeters beyond the inner semicircles.
The upper “G” from the protruding part is cut along the circumference of the tube in the form of a groove; this will be its upper bed. The adjusting screw will hold everything together and will turn a little to move the tube up and down.
Oddly enough, but on this mount the work will stall for some time. After all, the stopper is necessary not only for firmly holding the tube, but also for its movement. Therefore, there is no need to secure it tightly. At the plant it is easy to get out of this technical situation.
What's the best way to make a stopper at home?
Cut the block “G” horizontally (lengthwise), insert a wooden screw rod into one part, with a rubber or other polymer tube attached to it, and place both halves on the glue. Place between the letters "C".
Glue levers for rotation onto the screw on both sides; halves of a wooden thread spool will do. It will be both durable and convenient for managing the tube. The rubber band will slowly move it in both directions.
You can do without this difficult work. The tube is fixed tightly, and you will focus by moving the lenses.
Attach plastic or plywood with a hole in the center with a diameter of one centimeter to the fastening of the letter “C” from below. This is a table on which you will place a square of glass with the object being examined. To prevent the glass from moving, glue grooves-clamps for it on the sides of the table.
Place the diaphragm firmly under the table - a circle with holes from 2 to 10 mm. It should rotate, and the holes should align with the hole of the table. She will adjust the light beam. Under it there is a 5x4 cm mirror; when attaching it, provide a way to change the tilt. This is how you can illuminate a microscope with your own hands.
Secure everything assembled onto the main stand. It is also made from a board at least 20-25 millimeters thick of any wood, preferably hardwood, so that it does not crack due to the humidity of the room.
You adjust the microscope by rotating the mirror, the screw of the tube and the lenses in it. The increase is guaranteed to be a hundred times, or even more significant. Take a photo of a microscope you made yourself.
Your next step will be to make your own electron microscope. After all, more and more similar studies are being conducted using digital technologies. And it’s no more difficult to assemble than usual. But this is a topic for another article.