Dear visitors of the site “Homemade Friend”, from the material presented you will learn how to independently and safely make a barbecue from a gas cylinder. We will need a gas cylinder... Nowadays you can make a barbecue from various materials, such as metal or brick, but it will all cost a pretty penny. Every craftsman has the necessary tools (welding machine, grinder, drill). Braziers and barbecues made from gas cylinders have proven themselves well. This material can be found at a scrap metal collection point, they will give it to you at the price of metal per kg. You will need 1 unit, but you need to cut the gas cylinder correctly and safely wisely. The first step is to drain the remaining gas by opening the valve and placing the cylinder on the ground; it is best to do this away from the house because the smell of gasoline does not disappear for a long time. Next, the gas cylinder is filled with water from a hose through the tap hole. After that, the tap needs to be unscrewed, but rarely does anyone succeed; most people cut it off with a hacksaw.
Let's look at what exactly is needed to create a barbecue?
Materials
- gas cylinder 50 l
- metal tube
- professional rectangular pipe
- loops 2 pcs
- pen 1 piece
- heat resistant paint
- varnish
- board 25-30 mm
- fittings
Tools
- welding machine
- drill
- grinder (angle grinder)
- ruler
- marker
- brush
Step-by-step instructions for making a barbecue from a gas cylinder with your own hands| How to safely cut a gas cylinder.
The first step is to drain the remaining gasoline, for which we open the tap valve all the way and place it on the ground, preferably away from the house, because the stench is excellent)) and does not dissipate for a long time))
Fill with water from a hose through an open tap. Let it sit for a day.
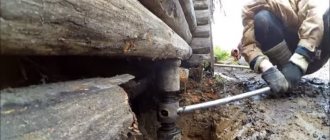
Next you need to unscrew the tap, but this is difficult and it is better to just cut it off with a hacksaw.
This way.
We drain the water and fill it again, that is, rinse it.
To make sure that there is no gas left in the cylinder, take a wick soaked in kerosene and set it on fire.
Only after making sure that there is no gas in the cylinder, fill it with water again and cut off the top tap, as well as the bottom ring, with a grinder.
Next, the cylinder is marked, where the side seam of the cylinder is taken as the center. Then the seam was indented 24 cm in both directions, and the side seams were indented 2.5 cm. For air supply, the indentation was also 10 cm long and the distance between the cuts was 5 cm.
The lid is sawn through, but not all the way to make it convenient to cook. The air supply is sawed through. Spacers are welded onto the lid to prevent it from overheating. Holes for skewers are drilled. A plate with slots for skewers is welded on. The plate will close the gap when closing the grill lid. The hole is welded with a metal plate. Next, a base for the grill is made from a corrugated pipe of rectangular cross-section. We make the legs from a round pipe. This is exactly what should happen. A removable table was also made from the corner, that is, part of the corner was cut down to fit into the cavity of the professional pipe. For ease of carrying, handles are welded on. An opening limiter is welded from the fittings. Hooks for hanging the barbecue and poker are welded onto the end part of the base. At the bottom there is a mesh for storing firewood. Next, a table is made. The skewers fit compactly into the cavity of the pipe. After which the entire structure is carefully sanded and painted. Before painting, it is advisable to light a fire and finally get rid of the smell of gas. Bon appetit;) As you can see, if safety precautions are followed, a gas cylinder can easily be turned into a first-class barbecue. You have detailed instructions, so let’s take it and do it. Thank you all very much for your attention! You can also watch the video and consolidate the material covered.
source
- Tweet
How to disassemble a gas cylinder for parts
- In this review, the author will share with us his personal experience on how to properly disassemble a 50-liter gas (propane) cylinder without violating safety regulations.
- Since the cylinder will need to be cut with a grinder, it is necessary to properly prepare it - to get rid of any remaining explosive substances.
Moreover, if you, for example, plan to use the cylinder as a receiver for a compressor, then you will also need to get rid of the specific smell. We'll also tell you how to do this.
Interesting idea! How to make a machine for making metal waves with your own hands.
Main stages of work
The first step is to unscrew the valve. This is not so easy to do, but there are no impossible tasks.
To unscrew the valve, the author clamped a gas cylinder in a lathe. Then use a gas wrench to unscrew the valve.
After this, you need to drain the remaining “slurry” from the cylinder: into some container or directly onto the ground - but it’s better away from the house, because the unpleasant smell will last a long time.
How to get rid of unpleasant odor
To do this, the author pours some sand into the container, pours detergent and five liters of water.
We tighten the valve and turn the cylinder on a lathe for half an hour. Sand acts as an abrasive and cleans off “plaque” on the inner walls well.
After this procedure, there will be no odor from the balloon (checked by the author). You can safely use it as a receiver for an air compressor.
Drain the water and sand. We rinse the bottle several times to get rid of any remaining sand.
Cutting a cylinder with a grinder
Before cutting, you need to fill the container with water. Additionally, the author also made forced ventilation - he inserted a hose into the cylinder, connected to a blow gun.
Then all that remains is to actually cut the balloon. Cut off the top part, then the bottom. Finally, cut the middle lengthwise.
Disassembly of the gas cylinder has been successfully completed.
For details on how to disassemble a gas cylinder, see the video below. ARS Pro shared his experience .
How does recycling work?
The process consists of a number of sequential steps:
- The balloon is filled with water.
- The cylinder is sealed with a special threaded plug.
- Cool the water near the neck to its freezing temperature.
- Cool the vessel until the difference in the volumes of ice and water leads to the gradual destruction of the walls of the container.
- The cylinder is cut using flame or mechanical cutting.
- Remove ice from the inner walls of the cylinder.
Despite the prevalence of this method of disposal, it still has disadvantages. This is sparking during cutting, as well as the possibility of some of the frozen gases entering the atmosphere or onto food products. Therefore, disposal is carried out in specially designated places, and with very good ventilation. All enterprises that offer such services must have a license giving the right to carry out recycling work.
Correctly and safely cutting an old gas cylinder
Surely, you have often wondered what can be made from an old gas cylinder? An amateur will mistake the receiver for unnecessary scrap metal and send it to a landfill, but only a real master will be able to use the container as the basis for a new product.
Agree, a used gas cylinder is an ideal housing for a homemade barbecue, smokehouse, boiler or even fireplace. Detailed instructions will help even a beginner quickly understand how to disassemble a gas cylinder as safely as possible.
Disassembling the receiver requires the technician to follow important rules used for safely cutting the container in which flammable materials were stored. We have compiled detailed instructions for disassembling a propane tank, which describes step by step how to empty the container of gas residues and cut it correctly.
What should you pay attention to?
There are a few things to consider when cutting. The main ones can be called:
- Cutting must be carried out using special protection.
- Processing along the seams is easier, but often the markings do not match. When cutting on a round plane, you need to put a slight load on the grinder, since a small contact area leads to slipping of the nozzle.
- Many problems arise with removing rust and paint.
In general, we can say that the cutting process does not create significant problems.
Safe disassembly of the gas cylinder
There are a number of useful products that you can make yourself using an old liquefied gas cylinder. Among the most popular homemade products are a hand roller, barbecue, smokehouse, wood stove, etc. The process of disassembling a steel container requires special care.
Preparing tools
Unlike carbon dioxide or oxygen cylinders, which can be sawed immediately after the gas is released, propane cylinders require additional preparation.
List of required tools:
- a key that opens the valve to release remaining gas;
- hacksaw for metal;
- hose and nozzle for pouring water into the container;
- grinder with a protective casing and a set of spare discs.
You should also ensure that you have protective gloves and glasses to avoid injury during cutting. Abrasive wheels for an angle grinder must match the thickness of the metal walls.
Bleeding remaining gas
To remove remaining gas from the cylinder, you need to unscrew the valve. A special key is used for this.
If even a little propane remains inside the container, using an angle grinder may cause an explosion. To make sure that all the gas has escaped, a solution of soap and water is applied to the valve.
During the procedure, it is prohibited to stand in front of the neck. Gasoline is drained after removing the valve.
Valve dismantling
To remove the valve, you need to unscrew it and remove the retaining pins. This is quite difficult to do, because... The locking mechanism is very difficult to unscrew by hand. After dismantling the valve, a 6 mm round hole should appear. In cases where an attempt to remove the valve is unsuccessful, it is cut off with a hacksaw.
Flushing
To fill the cylinder with water, use the hole that appears in place of the valve. A funnel is inserted into it, and filling is carried out through the hose. The container must be filled to the brim to ensure complete displacement of the gas.
An aqueous solution of water and gas does not pose any danger; it can simply be poured onto the ground. This is usually done away from home. If the drained liquid has a strong odor, it is recommended to repeat the flushing procedure again.
What you will need
Despite the variety of ways to use an empty gas container, the principle of operation is similar in each case. The preliminary stage includes the preparation of tools and equipment, namely:
- hacksaws for metal;
- grinders with cutting disc;
- construction funnel;
- watering hose;
- pump, compressor;
- buckets;
- the emptiest gas cylinder.
You may not need a pump or compressor - it all depends on how you fill the container with water. Now let's talk about everything in order.
How and what to paint
Paint selection
It is best to paint the grill with heat-resistant paints, because when cooking in it the temperature can reach up to 700 degrees. When choosing paint, this is the first thing you should pay attention to. Usually the instructions for the paint indicate the temperature it can withstand.
In addition, it is important that the paint, when heated, does not release harmful substances to the human body.
Painting stages
- Clean the body of old paint using a drill and a special metal attachment or sandpaper.
- Degrease the surface with alcohol, acetone or solvent.
- Mix the paint well to obtain a uniform consistency and remove any sediment or clots. If the paint is too thick, thin it with thinner.
- Apply paint using a brush or roller. It is better to use several layers to get a beautiful and smooth surface. Each layer must be dried for 30-120 minutes depending on the type of paint used.
Please note that it is necessary to paint the grill outdoors at an air temperature of no lower than 20 degrees and no higher than 40, because at lower temperatures the paint will freeze, and at higher temperatures it will bake.
( 1 rating, average 4 out of 5 )
Creating a barbecue
Preparing the balloon
Before you start making a barbecue, you need to completely empty the gas cylinder. All work should be performed outdoors, away from sources of fire. First you need to open the valve and completely release the gas. You can check that the gas has escaped using a soap solution. Apply it to the valve outlet. If the soap bubbles, gas is still escaping.
Read also: Press mold for metal stamping
When you are sure that the cylinder is empty, turn it over - condensation should pour out. Next, use a garden hose to completely fill the container with water and leave for 2-3 days. This procedure will help remove the gas odor. It is better to drain water away from residential premises. Your cylinder is now ready to be used safely.
Required Tools
To make a grill, you will need the following tools:
- welding machine;
- Bulgarian;
- drill and metal drill bit;
- rivet gun;
- adjustable wrench;
- hammer;
- chisel;
- screwdriver;
- gloves;
- protective glasses.
Stages of work
- We mark the balloon. Draw cut lines for the cap and skewer and marks for the legs with chalk on the container.
- We saw the balloon. Treat this stage very responsibly, because the performance characteristics and how your grill will look depend on the quality of sawing. Before cutting, use an adjustable wrench to completely unscrew the valve or cut it off with a grinder, while pouring water on it to prevent accidental ignition of residual gas from a spark. Next, using a grinder, make cuts along the chalk lines.
- Screw on the lid and handles. The easiest way to attach the lid is with hinges. To do this, we first fix them with rivets, then weld them to the body and lid. If the hinges are not welded, then the high temperature may simply cause them to bounce off, and then the lid will fall off. On both sides, for convenient movement of the barbecue, you can screw metal handles purchased in the store or simply weld handles from bent reinforcement. Who likes it more? To open the lid, screw a nice handle onto it.
- We weld the legs. As legs we use pipes or corners, which need to be cut into 4 parts 50-70 cm long and welded to the marked lines at the bottom of the cylinder at the same distance from each other so that they form a rectangle. In addition, it is recommended to weld square metal plates onto the ends of the legs so that the legs do not go deeper into the ground.
- We make holes in the housing for the flow of oxygen. For the combustion process to occur, a constant flow of air is required. To do this, approximately 10-15 holes with a diameter of up to 16 mm must be drilled in the rear of the case. You can arrange them in one row or do them in a checkerboard pattern.
- Using a grinder, we make cuts for skewers along the marked lines.
- We install the chimney pipe. You can install a chimney pipe in the place where the valve used to be. Simple water pipes are usually used as a chimney.
- Additionally, several cast iron grates can be placed on the bottom. They are usually used to supply air in potbelly stoves or boilers. When burning coals, they will create additional air ventilation. In addition, hot grates allow the coals to remain hot longer.
Read also: How to make a curl from a profile pipe
Required Tools
You can install LPG on your car yourself or contact a service center. In any case, in order to carry out the work efficiently, you will need to take care of the necessary tools and equipment in advance. So, you need:
- set of fourth generation gas equipment;
- gas hoses with clamps, the length of which is 0.6-0.8 m, and the diameter is 4-5 mm and 12 mm for 0.5-1 m (for a 4-cylinder engine);
- gas tubes 40-70 cm long and 6 mm in diameter;
- a cooling system hose with two metal tees corresponding to the size of the inlet/outlet on the gearbox;
- thermoplastic gas tube. A product made of copper and aluminum is also suitable;
- automotive tools;
- drill;
- pliers;
- screwdriver;
- metal drills with a diameter of 4.8 mm, crown 3 cm;
- thread tap – 6 mm;
- electrical tape, construction tape, heat shrink tube;
- soldering iron and everything necessary for soldering wires;
- multimeter;
- metal clamps or brackets with self-tapping screws - will be needed for fastening lines under the bottom of the vehicle;
- car enamel or anti-corrosion treatment;
- bolts, nuts;
- engine intake manifold gasket
Attention! The length of all tubes, hoses and the diameter of clamps is determined taking into account the car model. It is convenient to carry out work in an inspection hole or on an overpass
Instructions for installing Euro equipment will help you avoid mistakes. But it’s unlikely to be possible to do this without a tool.
It is convenient to carry out work in an inspection hole or on an overpass. Instructions for installing Euro equipment will help you avoid mistakes. But it’s unlikely to be possible to do this without a tool.
Refilling valve thread cartridges
Refilling valve threaded cartridges requires the following pre-prepared equipment:
- Two fittings: one, with a union nut, is connected to a household gas cylinder, and the second, threaded, is connected to a gas cartridge;
- A transparent hose with which you can monitor the process of gas transfusion. Also serves as an adapter and connects to two fittings;
- Valves that allow you to turn on and off the gas supply from the cylinder right at the valve;
- A filter built into the valve that prevents debris from entering and clogging the can;
- An additional valve that allows you to bleed gas without removing the adapter.
A good adapter model outperforms a cheap one due to a number of advantages:
- The adapter valve ensures the safety of the valve of a household cylinder, which deteriorates due to regular unscrewing and tightening and due to rust or other metal particles falling on the threads;
- Due to the fact that the valve is in the closest position to the canister valve, during the next filling cycle there is practically no leakage of excess gas, pouring it onto your hands and spraying it into the environment;
- The ball valve design allows you to quickly stop the gas supply and avoid unwanted overflow and forced release of excess gas;
- Thanks to the advantages described above, the refueling process is noticeably easier, safer and more economical.
The adapter is screwed onto the valve of a large household gas cylinder instead of the reducer. It is better to do refueling in the company of an assistant and in the open air away from crowded places. Since there will be a strong smell of gas, people passing by may become worried and call the gas service.
The process of refilling valve threaded cartridges consists of the following steps:
Step 1. First of all, you should drain the remaining condensate, release the residual pressure in all cylinders that you plan to refill before the adapter is connected to the large cylinder. This will make the refueling process a little faster.
The adapter is screwed onto the canister, which is turned upside down; with warm hands, the cartridge is slightly heated, which increases the volume of gas and speeds up the bleeding process. It is preferable to drain the condensate into a plastic bottle. It smells quite unpleasant and permeates the surrounding objects with the smell.
Step 2. Preparing the system consists of placing the gas cylinder in a stable position with the valve pointing downwards and opening free access to it. Under no circumstances should the cylinder rest against the valve. The ideal option is to hang the cylinder upside down. Next, tighten the adapter and open the valve of the large cylinder.
Step 3. The adapter is screwed tightly to the can. Open the valve on the adapter and begin to fill in gas. The cessation of the noise made by the gas pouring means the end of the filling.
Step 4. The next step is to release the gas in order to cool the canister. The procedure is performed by opening the bleed valve on the adapter. After a few seconds, the can will become cold enough and the pressure in it will drop to the desired level. Close the valve. If necessary, refilling is carried out.
Step 5. The most important step is to create a buffer cushion in the can in order to prevent possible expansion and explosion. Open the bleed valve and wait for the moment when the liquid no longer flows.
Never point the gas stream at yourself. When you shake the can, you should definitely feel some fluffing. Another effective method is to weigh the filled canister on a scale.
After going through all the stages, it is important to check the tightness of all filled containers
When bleeding, draining remaining condensate and creating a buffer cushion, always point the end of the hose away from you
For safety reasons, it is not recommended to store cans in the sun, in damp or cold places. Cold cylinders after filling are covered with a layer of condensate. To prevent rusting processes, it is worth wiping the containers with a dry towel.
Safety rules when working with an angle grinder
When cutting metal, it is important to take into account the basic rules for using an angle grinder, which allow the master to create the safest conditions possible while working.
The features of working with an angle grinder include the following rules:
- Before starting to work with an angle grinder, you must wear a special protective suit made of non-flammable material. It is not recommended to cut metal while wearing clothing with exposed skin, since if fragments get on its surface, a burn may form.
- Before you start cutting metal, you should pay special attention to the condition of the disc. It is recommended to inspect the nozzle for defects and assess the degree of wear.
- Metal cutting is carried out only with safety glasses, since during the work a huge number of fragments are formed that fly in different directions and can cause serious injury to the eyes.
In some cases, the steel cutting procedure is divided into several stages. This is necessary when the nozzle heats up during long-term cutting, which causes it to wear out quickly.
In addition, prolonged use of the grinder often leads to malfunctions in its operation, which can even lead to injury to the technician.
During metal processing, it is recommended to stand to the side of the cutting line so that the maximum part of the fragments does not fly towards the master
Professional craftsmen recommend using a respirator when working with an angle grinder, since when cutting steel, microscopic fragments of metal can be released into the air and settle in the human respiratory tract.
DIY rocket stove from an oxygen cylinder
- Step one: cutting the balloon
- Step two: loading chamber
- Step Three: Loading Hole
- Step four: ash pan
- Step Five: Vortex Flow
- Step six: welding work
- Step seven: thermal insulation
- Step eight: gas afterburning system
- Step Nine: Cover
- Step ten: support
There are several options for building such a furnace. The master combined two such versions of photos 1 and 2, and made his photo 3.
For production, the homemade master used the following
Tools and materials:
- Oxygen balloon;
- Cardboard;
- Marker;
- Insulating tape;
- angle grinder;
- Magnetic square;
- Welding machine;
- Profile pipe;
- Band saw for metal;
- Channel;
- Roulette;
- Wire brush;
- Hammer;
- Clamp;
- Metal container;
- Pliers;
- Bolt;
- Two bushings;
- Perlite;
Step one: cutting the balloon
For the stove to function properly, its vertical part must be 2.5 times longer than the fuel chamber. Taking this into account, the master marks the cylinder. For an even cut, wrap a piece of cardboard around the balloon, align the edge and outline it with a marker. When marking volumetric parts in this way, you can be sure that the cut location will be level.
Next, the master cuts the cylinder according to the markings.
Step two: loading chamber
Now you need to properly cut off the edge of the loading chamber. The master makes a template from paper. Transfers the template to the workpiece.
Cuts according to markings.
Step Three: Loading Hole
Using a magnetic square, it secures the loading chamber to the workpiece. He traces it along the contour from the inside and outside.
Cuts a hole.
Checks the fit and adjusts if necessary.
Step four: ash pan
The ash pan provides access to the combustion chamber and can also be used to control draft. The master made the ash pan from a 100*100 mm profile pipe. Cut it to the required size.
I adjusted it to the radius of the pipe.
I cut a hole in the pipe.
Step Five: Vortex Flow
To ensure greater draft, the master makes fresh ventilation. The pipe will draw in air and, passing through the curved pipe, it will increase the draft.
Trims channel flanges.
Makes a notch.
Bends the edge of the workpiece around the pipe.
Step six: welding work
All parts are prepared and welding can begin.
Welds the loading chamber.
Grabs the ash pan.
Now you need to measure where to cut the hole for the supply ventilation. The craftsman places the workpiece on the ash pan and outlines the location of the curved part.
Cuts a hole.
He welds the workpiece and scalds the ash pan.
Step seven: thermal insulation
The master uses a barrel to insulate the upper part of the riser. Cuts a hole in it. Makes "petals".
Places the barrel on the pipe.
Subsequently, the master filled the interior space with perlite.
Step eight: gas afterburning system
To improve efficiency, the master makes a gas afterburning system. The air rising through the chamber will enter the upper part of the furnace and mix with gas. Due to the influx of oxygen, the gas will be burned.
A box is made from a channel.
Marks the location for the hole on the oven body.
He cuts a series of holes and welds plates onto them.
Welds the box.
The master makes a lid for the ash pan. The cover is secured with a bolt and two bushings turned on a lathe.
How to check for leaks?
When checking the tightness of the valve connection, you will need to pump gas under pressure into the gas cylinder.
This can be done in two ways:
- Pump gas using compressor equipment or a car pump.
- Connect two cylinders with a hose, the first of which is empty (tested), and the second is filled with gas.
If soap bubbles are not inflated anywhere, then the connection is sealed. But if even slight swelling of foam appears, you will have to re-tighten the valve.
When immersing the valve in water, it is advisable to close the side fitting with a plug so that water and suspended particles contained in it do not get into the locking mechanism
If the cylinder is small, then you can immerse its valve in a small bowl of water and see for bubbles.
After replacing the shut-off valves, the corresponding mark must be placed in the gas cylinder passport.
It should be remembered that the methods described above for replacing a used valve are applicable only to metal tanks. If you have a composite gas storage cylinder, you cannot act this way because of the possibility of damaging the flask and breaking its seal.
The tightness of the connections and the absence of gas leaks after connecting the reducer is checked using soap foam, which is applied with a sponge to all connections (valve, union nut, reducer housing, to the connection of the reducer with the outgoing hose).
Fire safety diagram when working with gas cylinders: (1-Do not open the valve suddenly! The gas stream electrifies the neck of the cylinder and the reducer, and can cause ignition and explosion; 2-Do not allow more than 1 cylinder with propane butane to be in the workplace; 3-At least once a quarter, check the safety valve by forced opening; 4- check for gas leaks)
The height of negligence is to check the tightness of connections using matches or an electric discharge. Usually, owners of gas cylinders do not worry about replacing the valve on a propane cylinder and then checking the valve thread for leaks, since such operations are carried out by specialists at gas filling stations using special equipment
First, under the control of a pressure gauge, you need to fill the test cylinder with gas with a pressure of 1.5-2 atmospheres. After this, soap foam is applied to the connection and the tap is opened slightly. If soap bubbles are not inflated anywhere, then the connection is sealed. But if even slight swelling of foam appears, you will have to re-tighten the valve.