Ever since people learned to process metal, all blacksmiths have constantly been faced with the question of how to give hardness to a blade. Most craftsmen guessed that to do this, the heated steel should be immediately cooled. There are legends that craftsmen from Damascus hardened their blades in mountain gorges, where they were cooled by strong winds. The blacksmiths believed that the weapon would become more elastic, gain hardness and would not break if the force of the wind entered it.
@metall.trubygid.ru
How to harden knife steel
Having chosen high-quality steel, the only thing left to do is small, but no less important - to properly heat treat the metal.
When starting to make a knife at home, you should know the main points and rules of how to harden steel for a knife, following which you will be able to achieve maximum results.
The hardening procedure is a mandatory step in the manufacture of a product. It should be started after the blade has been given the desired shape during the annealing process. This manipulation is intended to reduce the hardness of the part so that the sketch of the future blade can be followed. However, the knife must not only be beautiful, but also hard and durable if it is intended to be used. This is where hardening the metal for a knife comes to the rescue.
This procedure begins by bringing the desired samples to the required temperature. As already mentioned, the temperature depends on the type and grade of steel, but on average we can give a figure of 700°C. Warming up should be done evenly along the entire length of the product. Uneven heating, along with sudden cooling, can cause various defects and cause warping of steel. The color of the steel will tell you whether the surface has warmed up to the required temperature and whether it can be removed to perform the next step.
The cherry-red and scarlet color of the metal will indicate the acquisition of a temperature ranging from 730 to 800°C. Approaching light shades of yellow indicates that the temperature has gone off scale beyond 1100°C. With white color there was a clear overshoot, since it shows a value above 1300°C.
If the part is overheated, it will be hopelessly damaged (it will become irreversibly brittle and brittle, and may simply crumble) and you will have to start all over again. If the steel is underheated, the product will turn out to be soft and bend easily, but in this case, if you repeat the procedure correctly, everything can be corrected. Such hardening will increase the hardness of the part by 3–4 times.
Once a metal blade has been hardened, it becomes very hard, but at the same time brittle. This is an unacceptable situation for a knife. Therefore, there is the next stage aimed at returning strength to the blade (which many call the priority quality in knives) - tempering.
It involves repeated heating of the metal followed by slow cooling. This can be either a natural process (cooling in air) or dipping in water or quenching oils (this depends on the type, brand, shape of the steel). In some cases, the technology of alternate dipping into different media is used: both water and oil. In this case, pure water will not work (it can cause cracks); you should add salt to it, for example. This manipulation will return not only strength to the parts, but also toughness, and will relieve internal stress in the alloy.
To temper, the product must be hardened again, but now not to a critical temperature, but to one that is suitable for a particular product. There are 3 types of vacation:
- low temperature - heating to 250°C, which will give the part good wear resistance, but will make it unsuitable for heavy power loads. Essentially an ideal option for a knife blade;
- medium temperature - temperature ranges from 350 to 500°C. This is an option for dies, springs;
- high temperature – from 500 to 680°C. This is how parts that are subject to shock loads (shafts) are heated.
The temperature will again be shown by the product itself due to the tarnished color (for a knife, light yellow is optimal). This is due to the formation of an oxide film that needs to be cleaned off. After cleaning from the hardening products, the tempering itself can be carried out. In liquid it will take a couple of seconds. In the air - a couple of hours.
Rules for quality hardening
To properly harden the blade of a knife or any other metal tool, certain rules must be followed. Otherwise, you can easily damage the blade.
The essence of heat treatment of a metal is to heat it to a certain temperature, at which the structure of the crystal lattice changes. Next, the workpiece is cooled in a water or oil environment.
Hardening is performed to achieve the following goals:
- increasing the hardness of the top layer of the product;
- increasing strength;
- increasing bending resistance by reducing ductility;
- weight reduction while maintaining performance parameters.
There are many methods for hardening metal. The main differences depend on the following parameters:
- degree of heating;
- speed of reaching operating temperature;
- duration of heat treatment;
- cooling rate.
The degree of heating depends on the content of carbon and other impurities in the metal. Maximum temperature is usually used as the unit of hardening measurement.
The use of spring steel for making a knife
How to make a knife with your own hands at home
Spring material 65G is used by amateur knife makers to make knives. Thanks to its unique characteristics, the metal finds its application in various fields.
Spring steel.
Blades for the kitchen, hunting, tourism - all show excellent cutting qualities. If there is a special need, you can actually forge a sword or an ax. After hardening, the steel acquires good rigidity, which allows the product to be cut. Examples of using spring steel:
- Kitchen knife. In difficult times for the country, after the collapse of the USSR, not all people could afford a good set of kitchen knives. I had to get out. Springs and plates made of 65G steel were easily accessible. In the kitchens of the post-Soviet space, homemade products were often found. The handle was made from improvised material: wood, simple epoxy, and electrical tape - which did not prevent the knives from remaining at their height.
- Tourist knife. The disadvantage of spring metal is that it is susceptible to corrosion and requires constant care after use. The knife is suitable for use in hiking conditions. An important point is hardening. If it is weak, the blade will quickly become dull on the tin can. You should know the hardness of the knife.
- Army. Tactical or, nowadays, military knives do their job well. Serrated sharpening will increase the scope of use of the blade. Withstands piercing blows without problems. In everyday conditions it will become a valuable assistant for a fighter or a “survivalist”.
- Axe, machete or sword. Alloy 65G and analogs allow you to make truly formidable weapons. The thickness of the product certainly plays a significant role. When producing such a masterpiece, you need to stock up on springs from a truck, or get a long plate.
With proper processing of the metal, we are guaranteed to get an excellent blade. Little experience with the manufacture of steel products, nonsense. Further, in the article we will provide a detailed description of the manufacture of knives from springs using various methods.
The best knife steel for heating
In order for the result of heat treatment to meet expectations, you should find out what metal or alloy the knife is made of.
This will help you select the optimal parameters for the procedure in question. The most common material for cutting objects is steel - an alloy of iron and carbon. There are many varieties of it, which have their own advantages and disadvantages. For example, stainless steel grades, which are characterized by a high carbon content and the presence of additional impurities, are characterized by good cutting properties and blade edge resistance. Many manufacturers prefer to use high carbon steel as the main blade material. The 420 NS variety is especially popular.
Steels with low carbon content are characterized by high ductility and hardness. At the same time, the material will have low resistance to wear and corrosion.
Leading manufacturers use the following steel grades as base raw materials:
- Laminated. It is a welded composite material. The core is made of solid high-carbon steel, which is coated on the outside with a more viscous and visually attractive substance. For example, damask.
- Homogeneous. The opposite of multi-component materials. This is a steel with high homogeneity, for the production of which powder technologies are used.
Those who like to work independently can be advised to use a regular file as a workpiece. You can use a used tool with a ground surface - this will not affect the quality of the future product at all. The main material for Soviet files was hard, unalloyed carbon steel U10, which is an excellent raw material for making a knife.
Etching the blade and creating the handle
Main stages of glass production: overview + video
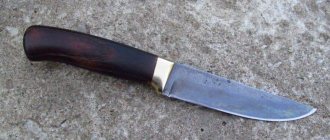
The knife, which has passed all stages of heat treatment, is polished with a wire brush, sandpaper and a felt wheel to make the blade smooth. Iron oxidation can be prevented by etching - immersion in ferric chloride. As a result, the material is covered with a matte protective film. In the absence of ferric chloride, you can wipe the blade with vinegar or use gruel from grated raw potatoes for etching. The film covering the etched steel protects the surface of the knife from rust, so you should avoid damaging its integrity.
When installing a dial handle, the individual parts are assembled and then tightly compressed on the thread. A bolster is placed on the shank, which can be machined from aluminum, brass or duralumin. To fasten the side plates, wooden or made of bone, rivets are used; they can be reinforced with epoxy resin. When using leather, special glue is applied to the material and tightly wound around the handle. Before attaching the deer antler to the tang, the hole drilled in the bone substance is filled with epoxy resin. To give the handle a finished look, its material can be sharpened, sanded and waxed.
Home hardening and its tricks
Making a knife from a file with your own hands at home
High-quality hardening can be successfully performed at home, you just need to have the right approach to such a fascinating process and your tool - a folding or hunting knife, a homemade file or a butterfly knife. The problem will become a little more serious if your product is made of stainless steel, but even in this case there is a solution, you just need to get acquainted with the nuances of the procedure and prepare the necessary equipment for heating.
A couple of paragraphs about cooling media
Such a cooling medium can be various substances. The most popular, due to their availability, are oil and water. Therefore, check out the cooling rates of steel products:
- Water. If its temperature slightly exceeds 20°, then the cooling rate will be 450°/s. When it is icy, the value is higher - 600°/s.
- Oil. Its room temperature allows you to cool the blade at a rate of 150°, but if it is heated to 200°, this value will double.
Graphite hardening
Hardening in graphite is excellent for hardening the cutting edge of a knife with a fairly thick blade. This technology allows for high-quality processing of a variety of models, and carrying out this procedure at home is not difficult. You can get acquainted with the process, but it is better to do this by watching the video.
Sending the knife on zone vacation
It is also possible to zone harden the knife if you are satisfied with the blades, but you want the middle part to become more elastic. Then the processing algorithm is as follows:
- Take a rod with a diameter of 10 mm. It is heated “to white heat”, after which it is applied to the middle part of the knife.
- After this part has thoroughly warmed up, the blade is placed in boiling water, in which it is left for 2 hours.
- When the exposure time comes to an end, the knife should be immersed in ice water.
This operation is called low release. What needs to be taken into account for a high-quality result:
- A small volume of liquid will not be able to provide the desired result: the liquid will quickly heat up, and because of this, both a change in the required cooling rate and a violation of the temperature regime will occur. The minimum amount of water in this case is 20 liters.
- The position of the blade in the cooling environment must be fixed, otherwise problems will arise with the uniformity of heat transfer, which will lead to disappointing consequences for the knife.
Hardening a knife - step-by-step instructions for hardening various types of metals (75 photos and videos)
Surface hardening of the knife provides additional strength to the cutting base. Heat treating a steel billet significantly improves the mechanical and physical properties of that item.
If you neglect this requirement, then the risk of quickly erasing the metal plate increases. In simple terms, the knife will constantly become dull, which will affect its performance.
In our material we will talk about how to harden a knife at home. Here are recommendations from professionals who know all the intricacies of working with metal.
What material are knives made of?
An alloy of carbon and iron is used to produce knives. When these components are heated, high carbon steel is formed.
This material is able to cope with sudden changes in temperature. In addition, it is characterized by high density and resistance to various mechanical influences.
Products made from pure carbon steel are quite expensive. To reduce the cost of materials and components, many craftsmen prefer to add special additives.
To do this they use the following substances:
- Molybdenum;
- Vanadium;
- Zinc;
- Tungsten;
- Calcium.
If the workpiece contains a minimum amount of carbon steel, then which products are elastic? They require proper hardening, which will provide them with additional strength.
We make a chamber for hardening metal
Before you begin processing the metal base, you need to prepare the appropriate equipment. It is recommended to pay special attention to the oven in which high-temperature processing will be carried out.
The oven chamber should have dimensions of 30 cm x 20 cm x 10 cm. It is made of refractory clay and brick. The clay composition should not contain any impurities.
The design of the furnace is a rectangle. The walls and back panel are on the same level. A metal door on hinges is installed in front. This will maintain the temperature inside the furnace structure.
To harden steel you will need from 300 to 900 degrees. This parameter directly depends on the material from which the metal product is made. For example, to harden a knife from a file, you will need a temperature of 500 degrees.
The composition of this material contains a high steel content and a minimal amount of tungsten. The finished item is quite strong and durable.
The process of hardening steel at home
The easiest way to harden a workpiece is an open fire. Our ancestors used a similar method more than 100 years ago. The processing process is carried out “by eye”.
For the work process you will need the following materials and tools. These include:
- Fire;
- Large container with oil;
- Bucket of cold water;
- Metal pliers with long handles. They will help you carefully remove and lower the iron for further heating.
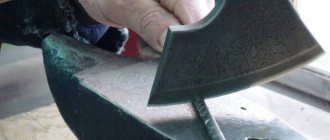
The first step is to achieve the desired temperature. We send combustible material in the form of firewood and coal to the oven. The flame begins to change its hue from bright orange to crimson.
At this time, wood and combustible material are added to the fire. When the flames change their color to white, you can proceed to hardening the metal product.
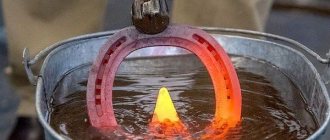
Place the base of the knife on burning coals and leave until the metal turns red. On average, this will take from 5 to 15 minutes. When the product acquires a bright red hue, it is immersed in oil.
Tempering a knife with oil helps add ductility and strength. After the first dive, similar manipulations are carried out 5 more times. Next, he sends the metal blade back to the heating furnace
.
The next step is cold water quenching. This procedure is final. It adds strength to the metal product. The hot workpiece is placed in ice water for 20 minutes. A photo of knife hardening shows this manipulation.
We present to your attention a detailed video of knife hardening. Here is presented all the regular actions and manipulations with carbon steel.
Photo of knife hardening
How to harden a knife using graphite?
To give strength to a homemade knife with a thick blade, a hardening procedure using graphite is used. Using this technology, not the entire tool is hardened, but only its cutting part, which greatly simplifies the work. Another name for such hardening is carburization. Its main goal is to increase the hardness and wear resistance of the metal.
Graphite can be obtained from ordinary AA batteries or a simple pencil. For the cementation procedure, you will need to grind the graphite rod to a powder state. Then you need to prepare a sheet of metal - for example, a galvanized profile, on which the graphite powder will be placed. To carry out hardening, you will need a power source - ideally, a pulsed DC welding machine. If it is not available, another device that produces direct or alternating current with a voltage of 30-60 volts will do.
The hardening technology is as follows:
- pour graphite powder onto a sheet of metal;
- connect the “plus” of the welding machine to the base of the metal substrate, and the “minus” to the edge of the knife;
- Using the settings, set the minimum power and turn on the device;
- slowly, with smooth movements, move the edge of the knife along the graphite layer, avoiding contact with the metal substrate;
- Make sure that the graphite layer does not catch fire.
The entire hardening procedure takes no more than 5 minutes. As soon as the edge of the blade heats up, the knife must be removed immediately.
How to easily understand what temperature to heat to
Remember a couple of simple rules about how to harden knives without consequences, without complex measurements:
- the part of the blade that is sharpened needs to be heated only once until it turns yellow;
- after that you need to check it with a magnet, make sure that it has stopped being attracted to it;
- The part that is not involved in cutting must be heated until purple three times.
Looking at the colors a blade takes on is much easier than measuring temperatures and doesn't require any equipment.
DIY file knife
You can’t do your work without:
- A good, large, Soviet-made file.
- Hacksaws for metal (several spare blades).
- Working file with a comfortable handle.
- Sandpaper and block.
- Workbench and vice.
- Clamps (2 pcs.).
- Wood (kebab) charcoal for the forge.
- Processing (of old motor oil) for hardening.
Good products are obtained from files with ground teeth - in this case, you do not have to waste time removing them.
At the initial stage, the metal is annealed. But before this, you should make a “camping” forge: pour a hearth of earth, insert a two-inch pipe (to allow air to flow in) and light the coal. When the steel turns red, stop supplying air and leave the workpiece to cool slowly. The metal will be pliable and can be easily processed.
All excess is cut off with a hacksaw according to pre-prepared patterns. Try to repeat the future shape as accurately as possible in order to use less file work. Cut a shank as long as your fingers.
Then process the workpiece using a file or emery, shaping it according to the pattern. Press the future knife against the workbench and use a clamp to sharpen the slopes. This part of the work is responsible and should not be done by eye. The two sides should be symmetrical, the metal removal angle should be the same along the entire length of the trigger, including the bend of the tip. For convenience, you can build an auxiliary device in the form of a metal pipe with a guide, and attach a long file to it.
Since the workpiece is annealed, it does not require much effort to process it. After the rough shaping is completed, the final finishing is done with sandpaper. For maximum effectiveness, it can be wound on a small wooden block.
The blade is ready, but the softness of the annealed steel will not allow you to use it to your fullest, so hardening will be required.
Hardening procedure
During this procedure, the structure of the metal changes, it becomes hard and slightly brittle. Quenching is carried out in processing oil. The finished product should be heated until it acquires a dark cherry hue.
When the weather is sunny outside and it is difficult to determine the temperature by color, readiness can be checked using a magnet: if the steel is well heated, it will not be magnetized. Then quickly lower the blade into the container with oil. To cool it faster, place a bowl of cold water under the container - this way you can achieve a more effective result.
Glassware will help check the hardness: if it is well tempered, grooves will remain on it. The main disadvantage is the labor-intensive manufacturing process. Another feature is that a file cannot be used to make a thin and flexible blade.
Among the indisputable advantages are the strength and durability of such products. The material for manufacturing is freely available, practically free, with a butt thickness of 6 mm, which does not allow knives made from files to be classified as edged weapons.
Knife design and shaping
One of the most difficult tasks in making a knife is designing its shape. The simplest solution for a novice knife maker would be to copy the outlines from any product you like. It is best to pay attention to models with simple forms, since it will be problematic to repeat complex elements, which most often negatively affect functionality, at home.
Having some experience in fine arts, you can draw a unique author’s project. In this case, you should pay attention to the harmony of the lines and the combination of shapes of the handle and blade. The most common design mistake is a “break” along the butt line at the point where they join. If the specific application (such as a boning or skinning knife) does not require just such an articulation, then it would be best to make the transition along a straight line or a smooth arc.
The next point is the length of the handle. For most manufacturers, this parameter is 110 - 120 mm and almost does not depend on the length of the blade. In any case, even if the knife is made to suit your own hand, it is advisable to comply with such tolerance.
You should also not get carried away with the number and depth of finger grooves and stops. This reduces the convenience of working with a reverse grip and may well transform the product into the category of edged weapon.
To match the chosen shape, first make a simple cardboard template and check the correctness of the work by checking it.
One of the essential parts of a knife is the handle. For its manufacture, various types of wood are most widely used. Our version uses oak overlays, which will be connected with brass rivets. To install them, three holes must be drilled in the tail part of the workpiece. This work will not be difficult with annealed metal.'
Requirements for the hardening chamber
The main thing in the forge is the choice of bricks from the right material. They must be made of fireproof clay. This is the key to long-term operation of the entire structure. If you plan to harden long knives, you can make a forge of one and a half or two bricks.
When choosing a propane burner, you should pay attention to the presence of a control valve. This will allow you to select the optimal temperature regime based on the size and type of knife
The hole for the heating chamber can be made with a regular drill. Refractory materials are not very hard, so this procedure does not take much time. In addition, it is necessary to make a side hole for the burner flame. It should be remembered that the nozzle should be located at a distance of 2-3 cm from the edge of the brick.
With this design, you can quickly and conveniently heat small knives. Alternative heat sources will be discussed below.
Heat source
In order to harden metal products, different heat sources are used:
- muffle furnace;
- propane torch;
- forge;
- blowtorch.
Experts agree that heat treatment in a muffle furnace gives the best result when hardening a knife. This is explained by the stability of temperature parameters, uniform heating and the ability to control and quickly adjust the temperature.
Muffle furnace
Forge
The next best quality will be a burner and a blowtorch, if you are not too lazy to lay out a temporary stove for them from refractory bricks.
Hardening methods
To calcinate the simplest blades made of structural steel, you can use a regular fire. It is impossible to raise the temperature above the required 900 °C when processing high-carbon alloys over an open fire. For this purpose you will need a special muffle furnace (chamber), you can make it yourself.
In the cell
If you want to make your own knives, it is better to use a stove made of refractory clay with a nichrome winding for these purposes. Heat treatment will take place under ideal conditions, at a sufficiently high temperature according to a given schedule. The size of this design is 200x100x77 mm.
First, a blank is made from cardboard, which is coated with paraffin. Next, clay is used - it is applied to the paper in a layer of sufficient thickness so that there are no cracks left. The joints are coated especially carefully. The door is made separately.
The clay will gain the necessary strength after thorough drying and further calcination in the oven at 90-110 °C. The final firing is carried out in a kiln over an open fire at 900 °C. The structure should be cooled slowly, so it should not be opened ahead of time. After the clay chamber has completely cooled, the doors are attached to it: they do this so that they swing open horizontally.
The well-dried workpiece is wrapped with nichrome wire, which will serve as a heating element. It will need about 18 meters. The turns should go tightly. To avoid interturn short circuits, the wire should be pre-coated with wet clay. We must not forget about making 2 holes in the oven. One is necessary to insert a thermocouple, a measuring device with which you can control the heating process. The second hole will be needed to control the process.
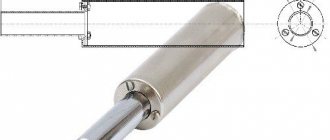
Scheme: 1 - nichrome wire; 2 - inner part of the chamber; 3 — outer part of the chamber; 4 - rear wall with spiral leads
Making a clay casing
Ready-made camera
On an open fire
You can harden the blade of a blade made of metal grades 45 and 50 over a regular fire or using a gas burner. To carry out the work, you will need fuel for the fire (coals), as well as a couple of large containers. One will contain machine oil, the second will contain water. Blacksmith's tongs are used to hold the hot blade.
Determining the temperature
Do not forget to take into account how to heat the knife and to what temperature. The main rule is that rapid heating will lead to increased fragility of the metal, so this is not necessary. As for the maximum, it all depends on the composition.
For example, a high-carbon alloy can withstand up to 850 degrees, low-carbon alloys can withstand up to 950 degrees, while alloy alloys can heat up to 1150 degrees. It is also important to remember about uniform heating, otherwise completely unwanted transverse cracks may form.
How to carry out the procedure yourself
To do this, you do not need to have any experience - just follow the instructions exactly, which will tell you how to harden knives at home on your own. The procedure can be used for any type of blade - an ax, scissors, and other cutting tools.
Heating source
In the open air, part of the heat emanating from the fire evaporates - the resulting temperature, especially when heat treating high-carbon steel, may not be enough. In these cases, it is better to use a muffle furnace, cutter, blowtorch, forge, even a regular electric or gas stove. When making a batch of knives, it is better to determine the hardening time experimentally using a test. To do this, several metal plates are heated: one to the maximum, the other a little less.
The fuel is coals, which are heated to a maximum white color. The shade of the flame is yellow-orange or crimson. The fire should be distributed evenly over the entire area of the fire. After heat treatment, the hot object is dipped into the oil three times for a few seconds. The last stage is immersion in a container of water. The liquid should be thoroughly mixed (shaken) beforehand.
Blowtorch
Bake
Horn
Gas stove
Temperature
There are several methods for hardening steel with different heating temperatures, holding times and cooling rates. Each grade of metal requires a certain temperature regime:
- for knives made of low-carbon steel, the temperature range should be 757-950 ° C;
- blades made from high-carbon grades are hardened at 680-850 °C;
- alloying alloys will require heating to 850-1150 °C.
In production conditions, to determine the degree of heating, a non-contact measuring device is used - a pyrometer; in everyday life, an ordinary magnet is used. With a significant increase in temperature, the magnetic properties of the metal decrease: if the steel workpiece is not attracted to it, the temperature is optimal.
Experienced craftsmen are able to determine the quality of hardening by the color of the steel: the lighter it is, the stronger the heating. The metal should not be overheated, otherwise it will turn black and it will be impossible to clean it. The sharpened part of the blade is heated 3 times to an almost purple color, that is, to a temperature of 285 ° C. The cutting part is processed on fire only once, but heated more strongly, until a yellow-orange tint appears, that is, up to 950-1000 ° C.
Red color indicates heating to 720-950 °C. Raspberry or light cherry shades of steel mean that the heating temperature corresponds to 800-850 °C. The appearance of a burgundy color in the flame indicates that the blade is not heated enough, only to 650-720 °C, brown - the temperature is not higher than 530-580 °C.
Cooling and holiday
Depending on the heat treatment method and the type of blades, different cooling methods are used, for example, in mineral oil (waste oil) or ordinary water with added salt. Options:
- if the blades to be hardened are heated red-hot, they are cooled in oil, dipping into it three times, so that each subsequent cooling is longer than the previous one; the last stage is immersion in pre-mixed water;
- for knives with double-sided blades, to give them greater sharpness and elasticity, the blades, on the contrary, are first dipped in water for a couple of seconds and then used for sharpening;
- To make the middle of the blade as elastic as possible, you can first warm it up with a metal rod, then immerse the knife in boiling water for a couple of hours, then in ice water.
It should be taken into account that metal cools 2 times faster in oil (working oil). To determine the cooling rate of a material in different solutions, you can refer to the summary table.
| Environment used | Cooling rate, °C |
| Water heated to 27 °C | 450 |
| Room temperature oil | 150 |
| Ice water | 600 |
| Machine oil heated to 20 °C | 150 |
Steel that has been quenched and cooled is still too brittle. To further increase the characteristics of plasticity and viscosity, it should be heated again for an hour, but only to 150-200 ° C (this procedure is called tempering). For alloyed metal, the temperature should be in the range of 270-320 °C, for high-speed metal – even higher. To prevent the blade from bending during rapid cooling, it must be lowered into the liquid strictly vertically, the cutting edge must be at the bottom, and the blade must remain motionless.
Cooling in oil
Vacation
What is the purpose of the hardening process?
High-temperature processing of a metal allows you to change its internal structure - when heated to a certain temperature, the carbon content in it changes, and when it cools sharply, the metal retains the acquired structure. When alternating the heating and cooling process, the metal acquires strength. But heating at a certain temperature allows you to maintain the elasticity of the metal.
However, hardening is only the first part of the metal heat treatment process. The second part is the gradual cooling of the metal after heating. Tempering is necessary to relieve internal stress that arises in the crystal lattice of the metal and makes it brittle. Thus, in order to harden a knife, it is necessary to perform a complete hardening technology and complete it with a metal tempering process.
Increased hardness over open fire
In everyday life, hardening is often carried out over an open fire. This method is only suitable for a one-time process of increasing surface hardness.
All work can be divided into several stages:
- First you need to make a fire;
- at the time of lighting the fire, two large containers are prepared that will correspond to the size of the part;
- In order for the fire to produce more heat, you need to provide a large amount of coals. they give a lot of heat for a long time;
- one container should contain water, the other should contain motor oil;
- special tools should be used to hold the hot part being processed. In the video you can often see blacksmith pliers, which are the most effective;
- After preparing the necessary tools, you should place the object in the very center of the flame. in this case, the part can be buried in the very depths of the coals, which will ensure heating of the metal to a fusible state;
- coals that are bright white are hotter than others. The metal smelting process must be closely monitored. the flame should be crimson, but not white. if the fire is white, then there is a possibility of overheating of the metal. in this case, performance deteriorates significantly and service life is reduced;
- the correct color, uniform over the entire surface, determines the uniform heating of the metal;
- if darkening to a blue color occurs, this indicates a strong softening of the metal, that is, it becomes excessively plastic. this should not be allowed, since the structure is significantly disrupted;
- when the metal is completely heated, it should be removed from the source of high temperature;
- after this, the hot metal should be placed in a container with oil with a frequency of 3 seconds;
- The final stage can be called immersing the part in water. In this case, the water is periodically shaken. This is due to the fact that the water quickly heats up around the product.
When performing work, care should be taken as hot oil can cause damage to the skin. In the video you can pay attention to what color the surface should be when the desired degree of plasticity is achieved. But to harden non-ferrous metals, it is often necessary to be exposed to temperatures in the range of 700 to 900 degrees Celsius
It is practically impossible to heat non-ferrous alloys over an open fire, since it is impossible to achieve such a temperature without special equipment. An example is the use of an electric furnace, which can heat the surface up to 800 degrees Celsius
But to harden non-ferrous metals, it is often necessary to be exposed to temperatures in the range of 700 to 900 degrees Celsius. It is practically impossible to heat non-ferrous alloys over an open fire, since it is impossible to achieve such a temperature without special equipment. An example is the use of an electric furnace, which is capable of heating the surface up to 800 degrees Celsius.
Release of blanks
High temperature treatment creates internal stress in the metal. This negatively affects the flexibility and strength of the metal. The workpiece becomes fragile - if the pressure is incorrect or skewed, it begins to crumble or burst.
In order for the metal to become more ductile, a tempering procedure is carried out - bringing the temperature of the workpiece to the point of maximum ductility of the metal and its gradual, natural cooling. To do this, the metal is heated in a muffle furnace to the required temperature, and then, with the door closed, it is gradually cooled for 2-3 days.
It is quite simple to check whether the blade has been properly hardened - just run a file over the blade - if the blade slides, the hardening was successful, but if it touches the metal, then the procedure will have to be repeated.
Shaping the blade and handle of the blade
The cooled workpiece is fixed in a vice and the excess parts are cut off, giving a shape according to the patterns prepared in accordance with the drawing. The precision of removing excess metal with a hacksaw will reduce the duration of sharpening the product with a file. When cutting out the shank, you need to take into account that its size must correspond to the length of the fingers. Processing with an abrasive disc attached to an electric sharpener will help give the knife the intended shape.
When turning slopes, the workpiece is secured to the workbench with clamps. When performing this operation, it is necessary to control the symmetry of the processing of both sides of the product, removing layers of metal at one angle throughout the descent. Holes drilled on the handle of the blade will allow you to attach the handle plates using rivets. When the future knife takes on the intended shape, begin finishing the surface with sandpaper secured to the block. The softness of the annealed metal makes it easier to form a blade, but to get a good knife, the steel must be hardened and tempered.
https://youtube.com/watch?v=-rWxWfg12Uc
Assembling a homemade knife
Having completed all the above operations and bringing the knife steel to the required hardness, we proceed to assembly. We adjust the shape of the pads to the shank of the knife and cut out two additional leather inserts.
Then we lubricate the parts with glue, install brass inserts on the glue and leave to dry for several hours.
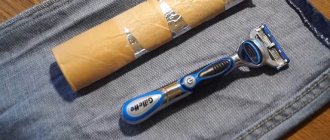
It is better to make the extreme insert not from a rod, but from a tube of the required diameter. This will help attach the finished product to a leather strap during use, which will prevent its loss while hiking, fishing or hunting.
After the glue has dried, carefully sand the handle and blade with sandpaper. To protect the blade from corrosion, it is enough to polish it well after final sharpening and finishing.
Dear readers, if you have any questions, please ask them using the form below. We will be glad to communicate with you