Homemade products from a washing machine engine:
1. How to connect a motor from an old washing machine through a capacitor or without it 2. Homemade emery from a washing machine engine 3. Homemade generator from a washing machine engine 4. Connecting and adjusting the speed of a commutator motor from an automatic washing machine 5. Potter's wheel from a washing machine machines 6. Lathe from an automatic washing machine 7. Wood splitter with an engine from a washing machine 8. Homemade concrete mixer
Homemade devices
We are opening a new section about homemade devices that you can make with your own hands from scrap materials for your home workshop:
for a walk-behind tractor with your own hands for welding work with your own hands for an angle grinder for a home workshop for car repairs with your own hands for sharpening drills with your own hands for a home workshop and garage for an angle grinder with your own hands video for sharpening knives with your own hands
EuroSamodelki.ru is a huge number of homemade products, which are accompanied by detailed illustrated instructions for self-production. There are already more than 2500 homemade products in our catalog. Join us, join our social group on VKontakte. We are waiting for you! Do something useful for yourself, for your home, for your loved ones.
Make homemade things with your own hands like us, do better than us!
Every home usually has a certain set of tools. But it happens that there is a need for those tools for the workshop that are not available. Today, specialized stores offer a wide range of various devices and equipment, but they all cost money, so such a purchase may simply not be affordable. It also happens that such a tool is simply not on sale. What to do in this situation? Available materials come to the rescue, from which you can make a useful device with your own hands.
Our website contains photographs and video materials of homemade tools, devices for the garage and workshop. Also, some homemade products have step-by-step manufacturing instructions. If you have new ideas for creating useful mechanisms with your own hands, you can post their manufacturing instructions in this section.
A special place in the section is occupied by homemade products for the garage, namely, what devices can be made for the garage and homemade garage machines that make human work easier. The arrangement of a garage must be taken extremely seriously, because for some men it is a second home.
Thanks to the useful information that is posted in this section, you will learn how to make useful devices with your own hands, which will become your assistant in any housework in the workshop. Here you will find a drawing of the device and a detailed description of each of the presented tools. Do-it-yourself homemade devices will replace your expensive tools purchased in a specialized store.
It is important that the tool you make meets all necessary safety requirements. Homemade devices should not cause harm.
Currently, you can purchase ready-made machines, tools and equipment to equip your own workshop, but all this will be quite expensive. Homemade machines will help the master in his practical work , and will not burden his budget. Why buy something that you can do yourself, and even in relation to specific conditions.
How to use for home workshop?
Each owner chooses the equipment of his own workshop himself. It depends on the characteristics of the hobby , i.e. type of work and area of the premises. The minimum area of a home workshop in which it makes sense to place equipment is 3-4 m² .
It can be located in a small room or on the balcony of an apartment, a separate building on its own site or in a garage. The ideal option is a secluded room where you can make noise without disturbing other people.
According to its purpose, a home workshop can be universal , i.e. to carry out any work that unexpectedly arises in everyday life, or have a specific direction related to the hobby of the master. Most often, workshops are equipped for working with wood, i.e. for carpentry work . Quite often there is a need for metal processing ( metalwork ) and car repairs .
Shelves for tools and materials
Setting up a home workshop begins with installing practical shelves for tools with your own hands. They can be made of metal or wood, or have a combined design - a metal frame with shelves made of wood, plywood, chipboard, plastic, etc.
The following basic structures :
- Racks in the form of a frame and shelves located at different heights.
- Shelves mounted on the wall. They can be installed on brackets or attached with dowels directly to the wall surface.
- Hanging shelves with ceiling mounting.
Recommendation . Shelf-boards are convenient and practical in the home workshop . They can be used to install small tools that can be viewed and easily removed.
Practical shelf-boards have this design. The basis is a shield cut from plywood 8-12 mm thick.
There are 3 types of fasteners mounted on it:
- a rail with slots for placing tools with a handle in a vertical position (hammer, screwdrivers, chisels, etc.);
- shelves with a side for placing boxes with small tools (drills, taps, dies, etc.);
- hooks for hanging small tools (knife, scissors, measuring tool, etc.).
This shelf-shield is fixed to the wall using dowels.
Summary
As you can see, you can assemble a large number of different devices with your own hands in the workshop. The matter is not limited to those listed in the article. Additional ideas about crafts for the workshop can be shared in the comments to the article. An excellent solution for the workshop is a chip removal system, which can be built using a garden or regular vacuum cleaner. If you route the air ducts correctly and make it possible to close them, you can use a chip removal system for each machine in the workshop. You should also not forget about good lighting in your home workshop, which can be created using LED spotlights.
Carpentry workbench
A carpenter's workbench is a durable table with a working surface on which a carpenter's vice (2 pieces) is fixed, clamps for securing the workpiece when planing with a plane, and places are provided for installing a router and other hand-held machines .
The height should ensure ease of work, taking into account the actual height of the master. The length should be at least 1 m (usually 1.7-2 m), and the width should be 70-80 cm .
Instructions for making a carpentry workbench:
- The working surface is made in the form of a shield with tightly fitted boards with a thickness of at least 55 mm. Beech, oak, and hornbeam are best suited. They should first be soaked in drying oil. Strengthening is achieved with a beam measuring 4-5 cm, which is attached along the entire perimeter of the shield.
- Vertical table supports can be made of pine or linden. Typically, a beam measuring 12x12 or 15x15 cm with a length of about 120-135 cm is used. The supporting elements are connected by horizontal jumpers made of a wide board, fixed at a height of 20-30 cm from the floor.
- Tools and accessories are stored on shelves that are located under the lid. It is better to make them in the form of a cabinet with a door. Shelf panels can be placed on the wall above the workbench.
- A pair of homemade or factory-made carpentry vices is attached to the working surface.
Vise
For a homemade vice, you will need a long screw rod with a diameter of at least 20 mm with a threaded part length of at least 14-16 cm, metal pins and wooden blocks.
Manufacturing is carried out in the following order:
- A wooden block is cut out (possibly from pine) about 20x30 cm in size and at least 5 cm thick, in which a hole for a screw is drilled in the center, and at the bottom there are 2 holes for guide pins. This first vise jaw is permanently fixed to the work surface.
- The second sponge is cut from a similar board and has dimensions of 20x18 cm. This will be a movable element.
- A screw pin is passed through the jaws. To prevent displacement of elements, studs with a diameter of about 8-10 mm are fixed. A handle is installed on the screw rod.
Making a puller
Normal work on a car is done using a standard set of tools. Craftsmen make special equipment. A puller is often required to pull bearings together. The most convenient is the three-valve design. A standard device may not be enough. If you make a puller with your own hands, it will last for many years.
Small devices are made from steel sheet 10 mm thick. A pattern is drawn on it and the legs are cut out with a gas cutter. They are processed on an emery machine, adjusting the dimensions. The core is turned on a lathe from round timber, the leg holders are welded, the thread for the knob is cut and the necessary holes are drilled. The legs are held on by bolts with a diameter of 8-10 mm.
The job of making a puller requires skill with many tools. Helpers may be needed here. A convenient solution is to make removable feet of the desired configurations, which can be changed on a product purchased in a store.
How to make a metal workbench with your own hands?
To carry out plumbing work you will need a metal workbench. Its standard size is: length 1.8-2.1 m, width – 0.7-0.8 m, height – 0.9-1.2 m. Manufacturing includes the following steps:
- Assembling the workbench frame with imparting longitudinal rigidity.
- Assembling and securing 2 cabinets in the form of a frame covered with a metal sheet.
- Installation of the working surface - a wooden board covered with a metal sheet on top.
- Installation of a tool rack, which is attached to the back of the workbench and further strengthens it.
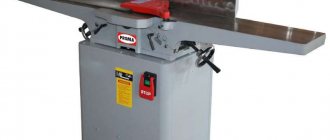
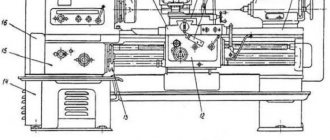
Features of creating a wood lathe
A homemade lathe for working with wooden blanks includes the following elements:
- Bed . It must have sufficient strength. It is better to make it from a metal profile (pipe, corner), but it can also be made from a wooden beam. It is important to securely fasten the frame to the workshop floor and weight the structure at the bottom.
- Headstock or clamping spindle . As this element of the machine, you can use a head from a high-power drill.
- Tailstock . In order to ensure longitudinal feed of the workpiece, it is better to use a standard factory spindle with 3-4 cams.
- Support or stop for cutters . It must provide reliable fastening and the ability to move towards the workpiece, which is ensured by a screw rod.
- Tool table . A working surface should be formed on the bed on which cutters and other tools can be laid out.
- Drive unit . To create torque, an electric motor with a rotation speed of 1500 rpm and a power of 250-400 W is used. You can use a motor from a washing machine. A belt drive is used as a transmission, for which pulleys of the required size are installed on the shafts.
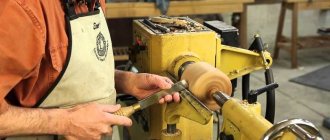
Incisors
Even in a homemade lathe, it is better to use factory cutters , which will provide improved quality. However, if you wish, you can do this on your own. wood cutters
- Steel reinforcement . The best option is a square section with a size close to the size of the factory tool.
- Files . A worn tool is selected, but without significant defects.
- Automotive spring of rectangular (square) cross-section.
Prepared cutter blanks are sharpened . For roughing work, a semicircular cutting edge is used, and for finishing work, a cutter with a straight blade is needed. In addition, shaped and through cutters with specific sharpening may be required. Next, the cutting part requires hardening . To do this, it is heated and then lowered into engine oil.
What's in the workshop?
Among the most popular DIY home appliances, the most popular are:
- Carpentry workbench.
- Sharpener for cutting.
- Drilling machine.
- Cutting disc device.
- Press.
Getting started is by drawing up a project. Before drawing up a drawing of an ordinary workbench, the largest device, it is necessary to decide what types of work you plan to perform. What tools and equipment are needed?
First on the list of accessories is a workbench for carpentry work. Such a table is characterized by increased strength, on the surface of which a vice is fixed, workpieces are fixed during processing with a plane, and places for installing homemade machines and devices.
The dimensions of the workbench are selected for practical reasons. The height of the device is taken into account, which should be calculated according to the height of the person, the table is at least one meter long, and the width is 80 centimeters.
DIY workbench
To make the working surface of this device, a thick wooden board is used. The material can be oak, beech or hornbeam wood, pre-impregnated with drying oil. To construct the supports, pine beams with dimensions of 15x15 cm and a length of 130 cm are used. Between them, jumpers made of boards are attached to connect them, fixed at a distance of 20-30 cm from the floor. Shelves are made under the cover of the workbench for storing tools, sometimes they are made in the form of a cabinet with a door . There are shield shelves on the wall above the workbench.
Workbenches are stationary, collapsible and mobile. In the case of the first option, the table legs are deepened 20 cm into the ground. In addition to wooden starting materials, a metal frame is sometimes used. This specimen is stronger and will withstand a sledgehammer. A vice for a workbench is made from a profile pipe.
To construct them, you need to prepare:
- long screw metal rod with cut threads, hardware and bars;
- drill a central hole in a wooden pine beam 5 cm thick, and drill holes for the pin at the bottom;
- the first vise jaws are permanently fixed on the table surface;
- the second sponges are made in the same way, but with different sizes;
- a pin is passed through the jaws. To prevent the elements from moving, they are reinforced with studs;
- A handle is installed on the screw rod.
Woodworking Machine
Before creating woodworking devices, the component elements are understood.
- The bed is the main element of a do-it-yourself machine. It is made of profile metal (metal corner or pipe), sometimes wood beams are used. The frame is strengthened in the floor and the lower part is made heavier. This element is highly durable.
- For the headstock, use a head from a powerful drill.
- The tailstock will feed each workpiece lengthwise using a cam spindle.
- The stop reliably secures and moves the cutters towards the workpiece, this is provided by a screw rod.
- A table and a working surface are organized on the bed, where cutters and auxiliary items are laid out.
- A drive will help create torque; a motor from an old washing machine is suitable for it. The principle of timing transmission is used, with pulleys on the shaft.
Homemade cutters are used from steel reinforcement, files, and machine springs.
The workpieces are sharpened, semicircular cutting edges are used for roughing work, and a cutter with a straight blade is used for finishing. For various jobs, shaped, through cutters with specific sharpening can be useful. The cutting part of the cutters is subjected to hardening; for this, it is heated and then dipped into machine oil.
A circular saw
A circular saw is made from a grinder. All work consists of the following step-by-step actions:
- The main element of the device is a sturdy table with a sheet metal top and frame. To create strength, stiffeners are welded from pieces of corners. On the tabletop there are: a cutting disc, regulating and thrust elements, and guide parts.
- A hole is cut on the surface into which the disk will be inserted.
- Wooden stops are fixed.
- To adjust the cutting process, a special scale is installed.
- Clamps are installed to secure guide elements and individual workpieces. A grinder is attached to the bottom of the table, and a disc is inserted into the slot.
In your personal workshop, you can install a device for a circular saw, invented using a drill.
This universal multifunctional machine combines several actions:
- saws;
- grinding device;
- sharpened;
- devices.
Sharpening knives on the farm is useful
No housewife can do without knives in the kitchen. And to prevent them from becoming dull, you need to sharpen the blade regularly.
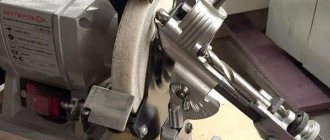
Performing this function correctly is not as easy as it seems. It is necessary to maintain a certain sharpening angle of the blade, but without a special device this will not work. An engine is taken from an old washing machine, which will be useful in assembling a sharpening machine. To assemble the installation, you will need a 200W motor. In addition to this, you need to prepare metal for the casing, a small pipe for making a flange, a sharpener, an electrical cable, hardware, a starting mechanism, a beam, and a corner.
To create a device, perform the following steps:
- First you need to make a flange - a transition element between the engine and the grindstone. At one end of the tube, cut a thread with a length corresponding to two diameters of the pipe. The carving is done using a tap. The other end is pressed onto the shaft by heating and fastened with a bolted connection, or, alternatively, welded. A hole is drilled through the pipe and shaft. The easiest way is to turn such a part from a turner, providing him with a drawing indicating all the dimensions. When cutting a thread and putting a circle on the motor shaft, take into account the direction in which the circle rotates. To prevent the nut from unwinding during operation of the device, the thread is in the direction opposite to the rotation of the motor shaft.
- The next step is to connect the motor to a wire with a plug at the end. Find the windings of the washing machine motor using a multimeter. The resistance is measured in both windings; the working winding has less resistance. Its conclusions are connected to the cable. The grinding wheel will rotate by hand feed. To prevent your hand from getting tired, they came up with a start button. If you use the engine of an old automatic machine, then there is no need for such a button, the machine will start working when it is plugged into the network.
- The last stage of manufacturing the frame on which the machine is mounted will complete the work. There should be a cover over the circle for protection. Small metal particles and dust may fly from the grindstone. Most often it is made of metal.
The base can be different; a metal corner makes a stronger and more reliable base. The installation can be wall-mounted or mobile (mobile).
In addition to a sharpening machine with a motor, you can build a simple device without it. Taking two identical wooden blocks and a sharpening stone, sand the wood well with emery cloth. Attach a sharpener to the marking line to sharpen the blade. Make small cuts, secure the bars in the sawn recesses correctly so that the grooves coincide, and secure with bolts.
You can make a home sharpener in various ways. You need to choose the right one and create it yourself.
Instructions for creating a stationary circular saw
The most important element of a stationary circular saw is a reliable table with a working surface . The most suitable for it is a metal sheet reinforced with stiffening ribs from a steel angle. The following parts are located on the worktop: cutting disc, guides, thrust and control elements.
The drive is provided
by an electric motor with a power of about 0.8 kW with a minimum speed of 1700 rpm.
Transmission – belt drive. You can make a circular saw from a grinder in the following order :
- Installation of the frame and production of the working surface. Cutting a space to install the disk.
- Fastening parallel stops from wooden beams.
- Installing a scale to adjust the cutting process.
- Installation of clamps for fixing guides and workpieces.
- Fastening the grinder from the bottom of the tabletop with the disk directed into the slot.
Assembling a homemade drilling machine
The procedure for assembling a homemade drilling machine is shown in the video below . It is based on an electric drill, which is mounted on a frame with the possibility of vertical movement.
- Electric drill.
- Metal base with clamps for workpieces (clamps).
- Stand for attaching a drill. It can be made from chipboard 2-2.5 cm thick. A good option is the base from an old photographic enlarger.
- Feeding mechanism for cutting tools. Guide rails are installed on the stand to ensure strictly vertical movement of the drill. The easiest way to feed a tool is with a lever for manual pressing and a spring . Adjustable stops are installed to control the depth.
CNC milling machines for wood and metal
When milling wooden parts, the software can significantly expand the capabilities of the machine and the quality of processing. To form it, elements such as an LPT port and a CNC unit . To make a copy unit, you can use the carriages of an old dot matrix printer.
Assembling the wood router is carried out in the following order:
- The tabletop is made of chipboard or plywood with a thickness of at least 15 mm.
- A cutout is made for the cutter and its installation.
- The drive, transmission and spindle of the machine are secured.
- Stops and limiters are installed.
Thicknesser
A homemade thicknessing machine for wood includes the following elements:
- Bed . It is made of 2 frames welded from a corner 40x40 or 50x50 mm. The frames are connected with studs.
- Broach . Rubber squeezing rollers from a washing machine work well. They are mounted on bearings and rotated manually using a handle.
- Work surface, table top . A wide board impregnated with drying oil is used, which is secured to the frame with bolts.
- Drive unit . You need a three-phase electric motor with a power of 5-6 kW with a rotation speed of at least 3000 rpm.
- Casing . To protect the rotating parts, a casing of 4-5 mm thick steel sheet is installed, mounted on a frame made of steel angle 20x20 mm.
It is fixed with clamps on the working surface to form the required gap. This gap must be adjusted using shims and set taking into account the thickness of the workpiece.
Homemade tools and machines
Pipe bender
A device for bending metal pipes is a metal rod welded to the frame. I make the rod from a piece of reinforcement. The pipe is placed on a pin, and on the other side a long piece of reinforcement is inserted into the pipe. By pressing the lever, the pipe is bent at the desired angle. The device is suitable for small sections of round pipes.
Device for bending profiled pipes
Greenhouse owners know how important it is to have a device for bending long lengths of profile pipe. The curved profile is used as an arched structure for the formation of polyethylene coverings for greenhouses
A pipe bender allows you to save a lot of money on the construction of a greenhouse. The design consists of 3 rollers - two are guides, and the third roller performs the leading function.
The profile pipe is inserted into the opening between the two wheels and the roller. The roller has a stop and a rotating device in the form of a lever or an electric motor drive.
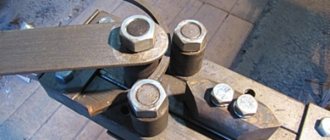
Making a pipe bender with your own hands
- Two axles are welded to a metal frame from pieces of smooth reinforcement, onto which old car hubs are placed.
- Protruding chamfers are removed from the hubs so that the side surfaces of the rollers are smooth.
- The channel is placed in the opening between the hubs with the shelves facing up.
- The same profile, smaller in width, with the flanges down, is placed into the channel.
- An axle is welded to the top of the inner profile, onto which the third hub is placed.
- A vertical shelf made of steel sheet is welded to the frame.
- A hole is cut in the vertical bar and the bearing is pressed into it.
- A nut is secured to the middle channel by welding.
- One end of the screw rod is screwed into the nut.
- The screw shank is threaded through a bearing in a vertical bar.
- A rotary handle is welded to the shank on the back side of the bar.
- A swing arm is welded to the axis of the drive hub.
The machine is ready for use. A profile pipe is inserted between the rollers and clamped with a screw. The rotary lever drives the rollers, which pull the pipe, bending it. The bending radius is set using the rotary handle of the screw.
A pipe bender made from car hubs is one of the device options. There are many designs of bending devices. In some models, the drive roller is coaxially connected to the motor shaft.
Creating a wood sanding machine
A homemade grinding machine has a drum design , i.e. emery cloth placed on it . It can be produced in the following varieties:
- surface grinding type, providing grinding in only one plane;
- planetary type, capable of processing a part in different directions, creating an even plane on it;
- cylindrical grinding type for processing cylindrical workpieces.
When securing the abrasive cloth, the following recommendations should be taken into account:
- The width of the tape is selected about 20-25 cm.
- The strips are connected end-to-end, without a gap.
- To strengthen the joint seam, a thick tape is placed under it.
- Only high quality glue should be used.
- The shaft for the sanding strip has a side at the edges that protrudes by 2.5-4 mm.
- It is recommended to use thin rubber (for example, a bicycle inner tube) as a backing for the abrasive element.
Homemade device for the home workshop - foam cutters
Foam materials are used in almost all repair or construction work. Therefore, it is very convenient to have a homemade device for cutting them for the home workshop. To make it you will need:
- MDF sheet.
- Wooden blocks measuring 2 by 4 cm.
- A strip of aluminum 1 - 1.5 cm wide.
- 12 Volt power supply.
- Switch.
- Nichrome wire with a cross-sectional diameter of 0.5 mm.
A rectangular MDF sheet is used as the base of the entire structure (the size can be arbitrary). First you need to drill a hole in its center and draw guides from it intersecting at an angle of 90 degrees. On the back side of the sheet, as well as in the back part of the plane, bars are attached, which will play the role of supporting elements in a homemade device for a home workshop.
DIY foam cutter
electrical circuit for foam cutting
After this, you can begin preparing the cutting element itself. It uses nichrome wire, mounted on a curved aluminum strip and connected to the power supply. Due to the passage of an electric discharge through it, it heats up and, upon contact with foam materials, will easily cut them.
We connect the wire and wires from the voltage source to the aluminum mount, fixing it with a regular screw. The power supply itself is placed on the bottom of the structure so that the wooden legs prevent it from contacting the table surface.
For more convenient turning on and off of the device, you can bring the button out. To do this, using connecting wires, connect the switch to the power supply and bring it out.
With the help of such a homemade device for the home workshop, you can always evenly cut any sheet materials that have a foamy structure.
Rules for operating a wood jointer
A homemade jointing machine will help when repairing furniture and apartments. When using it, the following rules should be observed:
- The jointer is adjusted in such a way that the maximum errors are ensured - vertically (perpendicular) - no more than 0.11 mm for every 1 cm; in plane - no more than 0.16 mm for every 1 m.
- When processing workpieces smaller than 3.5x35 cm, pushers should be used to hold them.
- Wear of the cutting element is indicated by scorching and moss on the surface of the part.
- An uneven surface after machining indicates an inaccurate positioning of the cutting edges.
Homemade garage gadgets
In a home workshop equipped in a garage, you can repair your car yourself. In particular, the following homemade devices and machines are of interest.
Hydraulic jack press
It will help when removing and crimping the silent blocks of the car.
With its help, a load of several hundred kg is provided. The structure consists of a frame and a hydraulic jack. The frame is welded from a high-strength rectangular pipe.
After lifting the car, it becomes a stationary, reliable support for the car.
This allows you to safely press out the jammed part using the internal races of the bearing.
Ball joint remover
It can be made in different ways:
- Lever type . These are 2 levers connected in the center. On one side, a coupling bolt is installed on them. When acting on the support, it unscrews, bringing the ends of the levers closer together. In this case, one end is inserted between the support and the eye, the second - under the finger.
- Option "wedge" . A wedge-shaped workpiece is cut from a metal plate. From the side of the upper corner, a strictly vertical cut is made at 70% of the height. This wedge is installed between the ball joint and the eye. Then it is hammered in until the finger comes out of the socket.
Homemade tool for home workshop - tool box
Order and ergonomics – these are the principles that must be followed when organizing your workspace. And such a homemade device for the home workshop as a tool box can help with this. Its production is carried out according to the following scheme:
- Drawing and marking. The first step is to decide on the dimensions of the product and its shape, which will be displayed on the drawing. A standard box consists of 6 components: 2 side (triangle-shaped with the base cut off on the sides and top), back and front (rectangular) walls, bottom (rectangular) and a handle. The most optimal material is pine boards. They have good strength and resistance to external influences. After drawing up the drawing, all sizes and shapes can be transferred to the boards.
- Slicing. After applying the cutting lines, you can begin the actual production of structural elements. For this, it is best to use a circular saw, but if you don’t have one, then an ordinary jigsaw will do.
- Gluing. In order to fasten all the elements, you can use wood glue or PVA. First of all, the side walls are attached to the bottom and fixed until completely dry. After this, they can be further strengthened with nails. Next, having previously coated the surface with glue, the front and rear walls are installed. Lastly, a handle is installed at the top of the structure.
- Treatment. In order to protect the wood from deformation, the box can be coated with varnish or paint.
how to make a tool box with your own hands
torx screwdrivers
This product will serve as an excellent organizer for any home workshop tool.