Wash the product thoroughly
Wet the chrome piece with cool water from a faucet or hose, then wipe it with a microfiber cloth. Spray the surface with an all-purpose metal cleaner and wipe off with the same cloth, just a clean one. After removing dirt, allow the product to dry.
If you'll be painting your car rims, use a heavy-duty cleaner and a soft-bristled brush to remove all the dirt collected from the roads.
If you want to paint a small object (for example, an emblem), first unscrew it from the machine, and then wash and clean it thoroughly.
Painting over primer
Painting chrome parts is possible without the use of acidic agents. It is necessary to choose a suitable primer on which the paint will adhere well. Primers in the form of aerosols are often chosen. If you choose primer in cans, it is better to use a primer-putty that paint adheres well to.
- First, the chrome surface must be degreased, since its surface is very smooth and shiny. First, wipe the part with a solvent, and before the priming process, degrease the surfaces with anti-silicone. To prevent fingerprints from remaining on the part, you need to use napkins or cloth gloves.
- Then you need to remove the gloss from the surface, since the paint will not stick to such a flat surface. To do this, use fine-grained sanding paper with a grit of 2000. If this step is skipped, the paint will peel off.
- Then the parts are primed. It is best to apply the primer in two thin layers, waiting for the first layer to dry.
- If high quality painting is required, the primer layer is also sanded with 500, 800 or 1000 sandpaper. If dust or other contaminants adhere to the surface during the process, they are also removed with sandpaper.
- For painting it is better to use a small spray gun. The paint must be applied in a thin, even layer. If desired, you can apply several layers to achieve uniform, dense paint.
How to carve a spoon from wood
How to make a wooden staircase to the second floor with your own hands
How to attach a veranda to a country house: step-by-step first-hand instructions
Protect your work area and other parts of the product from paint.
To prevent paint from getting onto your work area, cover the table with oilcloth, scrap fabric or sheets of newspaper. The area you need to cover depends on the size of the piece you want to paint.
Ideal for bold photos: Madonna's daughter Lourdes became a model
Even Dubai amazed me with its luxury. A 22-year-old Ukrainian in a Rolls-Royce impressed a blogger
Heat the pan high: simple life hacks for cooking perfect fish
Painting tape will help you hide from the paint those areas of the item that you did not plan to change the color of. This is especially true for painting wheels - just cover the entire inner edge of the wheel with pieces of tape and the paint will not get on it.
Mercedes-Benz C-class ♠️ › Logbook › Painting chrome parts in gloss black.
Pasany, hello✋ I am writing this post for all those who are bored and who do not want to spend money on painting or covering chrome parts with film (this is what prompted me to take this action). I'm not much of a writer, but I'll try. Maybe I can bring at least some benefit to someone)
This is what my swallow♠️ looked like before the blackening procedure:
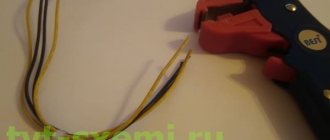
Now let's move on to the process itself. First of all, we take 600 rubles, go to the store and buy the following: - A can of glossy black paint - A primer in a can (I bought a black primer) - A degreaser - Sandpaper (preferably harder to rub off the chrome as much as possible)
Next, you need to remove all the parts that you want to paint (in our case, the emblem on the trunk and the chrome strip). So, the algorithm of actions: 1. Remove the trunk trim. 2. Remove the emblem. We look under the casing and see the following:
I strongly recommend not to delay
for the badge on the outside, as
it is fragile and may break
.
You need to take some kind of strong stick (I heard somewhere else that you can use a coin) and carefully
squeeze out the emblem from the inside. If you manage to squeeze it out only halfway, then you can try to pry it and pull it from the outside by the attachment points:
3. Removing the plastic (I don’t know what it’s called) that holds the chrome strip. Unfortunately, I don’t have any photos left, but I can say that it’s easy to photograph. First, you need to unscrew the screws from the outside (next to the light bulbs that illuminate the rear license plate) and remove this plastic piece (pull it out by carefully using your power tool). I cannot provide a more detailed description, because... I didn’t understand how I removed it)) After you have removed this plastic piece, you need to remove the chrome strip from it (it just snaps off).
4. The next step is to sand the chrome so that the paint adheres better. I didn’t really sand the chrome because I bought bad sandpaper, but if possible, it’s better to sand it until it’s matte (loss of shine).
5. Painting. We wipe the parts with a degreaser, prepare the area for painting, put them down and off we go:
First, apply 2-3 layers of primer. After applying each layer, you need to wait 30 minutes for the layer to dry, after which you can apply the next one. To speed up the process, I used a hair dryer. Next, we do the same with glossy paint (we also apply 2-3 layers of paint). After applying the last layer, we leave the parts to dry for about a day, seal the holes in the trunk with tape and go about our business:
6. Put the painted parts back on the car. Assembling the chrome strip and the plastic on which it rests will not be difficult (only if you removed it without any problems), but with the emblem things are a little more complicated. Firstly, the emblem has the shape of a body, therefore it must be placed exactly as it was (on the back of the emblem there is a reference dimple - the lower part of the emblem). Secondly, you may need lubricant so that the emblem fits into the holes without problems. But, I’ll tell you how I did it: I stuck the emblem, put a soft cloth on it and mercilessly gently hit it until it took its rightful place.
After all the parts are in place, we put the trim back together, close the trunk and admire:
Apply a primer coat of black paint
First, you need to shake the aerosol can of primer for 10-20 seconds. Inside the can is a small metal ball that helps the paint mix.
Applying a primer helps the paint “stick” to the chrome. This also ensures that the applied color remains preserved, for example from being washed off in the event of heavy rain. To apply the primer, hold the can 7-10cm away from the item and cover the surface in an even layer.
Don't worry if you get uneven spots or smudges while applying the primer - you'll apply several coats of paint on top. When applied correctly, you will get a dark matte surface without shine or metallic gaps.
Leave the primed surface for at least 20 minutes. If you do not allow the primer to dry, subsequent coats of paint will dry unevenly, which will negatively affect the outcome of your efforts.
Scientists debunk popular myths about aloe vera
Some students are behind, others are ahead: is a flexible school program necessary?
Hitchhiking and other things that are not recommended for foreigners to do in Indonesia
Procedure for painting parts
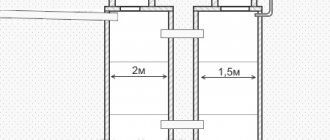
The process of working with chrome is quite long, but you need to be careful and perform priming according to the following scheme:
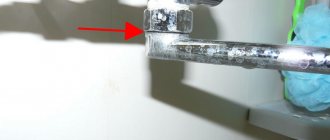
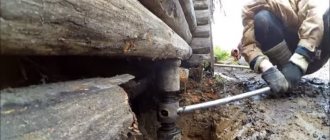
- Remove the chrome part from the car using a flat tool, depending on the case, it can be a flat-head screwdriver or a clip-on clip.
- Rub the surface of the chrome with sandpaper until a matte effect appears. Sometimes, if the chrome is already pretty cracked, you can remove the chrome coating using a knife or the same screwdriver. It will come off in small pieces that resemble foil.
Repainting chrome plates
You can use Scotchbrite to matt all glossy surfaces. This should be done very carefully and “wet”, since any glossy area, even the smallest one, can cause the paint to crack and peel off.
A sufficiently matted chrome surface will resemble aluminum, with hints of copper visible in places. This surface can then be painted by performing preliminary priming.
- Then the part must be washed very well and dried perfectly, then apply a degreaser.
- If your part is not completely, but only in fragments, covered with chrome, then the next step is to apply a primer for plastic parts coated with chrome. Read the instructions carefully and follow the manufacturer's instructions - shake the can for a minute, then spray an even layer, wait 5 minutes until it dries and repeat application. It is very important not to get on matted chrome. Leave to dry for 15-20 minutes.
Please note that it is impossible to completely remove the chrome film from the part manually; all you can achieve at home is to grout the chrome to a matte state. This is necessary to increase adhesion, which will prevent the paint from peeling.
In addition, it is advisable to use a phosphating or acid primer, since it can penetrate quite deeply into micro-scratches in chrome. We have a separate article about acidic soil - acidic soil for a car.
Read also: Error code 267 when installing the game
Painting chrome parts black
Choose the right paint
If you are working on a chrome item, use plain black spray paint. However, there are specialized varieties, and you should opt for them. For example, if you are painting your rims, be sure to get automotive paint because it will have a strong formula that can withstand moisture, dirt, and extreme conditions. If we are talking about painting craft metal, you will need a paint that is safe for soft metal surfaces.
Add color to the product
When spraying paint, shake the can periodically. This will allow you to achieve an even application of color without smudges or unevenness. Hold the paint can 7-10cm away from the item and press down on the spray nozzle to release the paint. Move the jet slowly back and forth to completely cover the object.
For the next coat, again let it sit for at least 20 minutes, as with the primer. This will need to be done for each subsequent layer, so if you are limited in time, set a timer so as not to miss the next moment of painting.
Asymmetry, with bangs and other options for fashionable haircuts for women over 40: photos
Falling CO2 concentrations could have contributed to the migration of dinosaurs
Happiness on the third try: what Maxim Leonidov’s young wife looks like
Even if time has passed, it is necessary to check whether the previous layer has dried before applying a new one. Don't be afraid and just touch the surface with your fingertip. If there is a mark (even a small one), wait another 5-10 minutes, then repeat.
The number of layers depends on how dark the color you want to get in the end.
For a shade close to gray, two or three layers of paint, in addition to the primer, will be sufficient. However, if you want to make your chrome piece look bright black, it may take five to ten coats. Keep this in mind when purchasing the required amount of paint. Remember that each layer will lighten slightly as it dries. So if immediately after painting you realize that you have got the desired color, after the layer has dried you will need another one.
Don't forget about the protective transparent coating
Once the last coat of black paint has dried, you will need to apply the clear coat. This also needs to be done correctly.
Shake the spray can for about 20 seconds and then apply a light, even coat over your painted item. As before, keep the can 7-10cm away from the point of application. Start from the side and work your way towards the front to make sure you are completely covering the painted area. If your product turns out to be slightly shiny from the paint, you may not understand where the protective coating has already been applied and where not. Be extremely careful.
My sister-in-law and her husband constantly demanded help. One day we told them no
Making a warm cat bed with your own hands: I used an old sweater
And there is no shame in serving it to guests. Simple tuna pasta recipe
Only thanks to the protective coating, the black color of your chrome product will remain for many years.
When 20 minutes have passed, apply a couple more light coats of protective coating and leave the product for a couple of hours.
Making disks with a mirror surface
We paint the wheels with our own hands
Vadik and I had to paint the wheels in chrome. They decided to do it in my garage, it is better equipped. They took off both cars and did not remove the ramps. The rubber was covered with newspapers and film. Then everything was cleaned of dirt, dust, remnants of the old coating and sanded. We washed it with distilled water and laid it out on a workbench.
- Apply 2 layers of black undercoat. Placed in the oven for 20 minutes at 60 degrees. This temperature does not affect the rubber. Wash with distilled water.
- Acrylic varnish was sprayed with a large air supply in small portions. Vadik laid the first layer with his own hands. He had used the spray before, had experience, and acted similarly.
- After drying, rinse again with water.
- Chrome paint was applied. With universal sprayer. A friend worked as an airbrush. Polished after crystallization with a napkin. Wash with water and dry.
- Acrylic varnish was applied the next day.
A day later, the surface was washed under pressure with water. Our disks were shining.
Advice! Try to apply thinner layers along the edge of the disc. Then, when you disassemble the wheel, the paint will remain.
Apply final coat
After two or three light coats, it's time to apply a solid protective layer. It is needed not only for beauty, but also to enhance protection. First of all, it will save the product from extreme moisture. After shaking the can thoroughly, hold it at a distance of about 5 cm and move it more slowly than before. Try to give each area at least five seconds of continuous spraying.
Now it will take at least half an hour before the next “heavy” transparent layers. There should be three more, and take half an hour between each one. When you apply the final coat, leave the product for one to two hours. You can set the timer again.
Be sure to touch the product when the time is up. As with black paint, if you feel sticky or see a mark on your finger, no matter how minute, it is best to let the product dry further, checking every 20-30 minutes. If you have time, it is better to leave the product overnight. The next morning you will be sure that it is thoroughly dry and ready for use. If you are limited in time and this is not possible, you will have to rearrange the timer and check. Otherwise, you risk starting to use an item that is not yet ready for this, and as a result, all the paint will simply be damaged and peel off after the layer of transparent protection.
Features of working with chrome-plated parts
During preparatory work and during the painting process, difficulties may arise with removing chrome, which is best rubbed with a special machine. Manual work will require diligence and a large supply of free time.
If you decide to transform the appearance of your car yourself and replace boring chrome parts with beautiful coal-black ones, then you should be patient and use high-quality materials. This process is quite lengthy, especially if you have to remove chrome from plastic yourself, but by following our recommendations, you will be able to do this job efficiently, and the effect will last a long time.
Pasany, hello✋ I am writing this post for all those who are bored and who do not want to spend money on painting or covering chrome parts with film (this is what prompted me to take this action). I'm not much of a writer, but I'll try. Maybe I can bring at least some benefit to someone)
This is what my swallow♠️ looked like before the blackening procedure:
Now let's move on to the process itself. First of all, we take 600 rubles, go to the store and buy the following: - A can of glossy black paint - A primer in a can (I bought a black primer) - A degreaser - Sandpaper (preferably harder to rub off the chrome as much as possible)
Read also: Mitsubishi Pajero 3 door diesel
Next, you need to remove all the parts that you want to paint (in our case, the emblem on the trunk and the chrome strip). So, the algorithm of actions: 1. Remove the trunk trim. 2. Remove the emblem. We look under the casing and see the following:
I strongly recommend not to delay
for the badge on the outside, as
it is fragile and may break
.
You need to take some kind of strong stick (I heard somewhere else that you can use a coin) and carefully
squeeze out the emblem from the inside. If you manage to squeeze it out only halfway, then you can try to pry it and pull it from the outside by the attachment points:
3. Removing the plastic (I don’t know what it’s called) that holds the chrome strip. Unfortunately, I don’t have any photos left, but I can say that it’s easy to photograph. First, you need to unscrew the screws from the outside (next to the light bulbs that illuminate the rear license plate) and remove this plastic piece (pull it out by carefully using your power tool). I cannot provide a more detailed description, because... I didn’t understand how I removed it)) After you have removed this plastic piece, you need to remove the chrome strip from it (it just snaps off).
4. The next step is to sand the chrome so that the paint adheres better. I didn’t really sand the chrome because I bought bad sandpaper, but if possible, it’s better to sand it until it’s matte (loss of shine).
5. Painting. We wipe the parts with a degreaser, prepare the area for painting, put them down and off we go:
First, apply 2-3 layers of primer. After applying each layer, you need to wait 30 minutes for the layer to dry, after which you can apply the next one. To speed up the process, I used a hair dryer. Next, we do the same with glossy paint (we also apply 2-3 layers of paint). After applying the last layer, we leave the parts to dry for about a day, seal the holes in the trunk with tape and go about our business:
6. Put the painted parts back on the car. Assembling the chrome strip and the plastic on which it rests will not be difficult (only if you removed it without any problems), but with the emblem things are a little more complicated. Firstly, the emblem has the shape of a body, therefore it must be placed exactly as it was (on the back of the emblem there is a reference dimple - the lower part of the emblem). Secondly, you may need lubricant so that the emblem fits into the holes without problems