Now everyone, without exception, has a household appliance such as a vacuum cleaner in their home. The latest generation of vacuum cleaners are mainly equipped with cyclone or reusable dust collectors, but not everyone has modern vacuum cleaners at home. Disposable dust collection bags can be bought in stores, but owners of old vacuum cleaners are faced with the problem of a lack of dust collectors for their models in stores, which forces them to make consumables with their own hands.
In this article you will learn how to make vacuum cleaner bags yourself and at the same time save your budget and time on buying new ones.
Types of bags
Vacuum cleaner bags are disposable and reusable. Before you get started, you need to find out what type of dust collector is in your vacuum cleaner. Reusable and disposable are made from different materials.
The disposable bag is made of multi-layer breathable paper.
At first glance, the product looks like a simple paper bag equipped with a cardboard frame for sucking up debris. The bags are made from multi-layer filtered paper, which gives it strength and breathability.
pylesos_tech
Reusable, made of synthetic fabric that is highly breathable. There is a hole at the bottom of the bag for removing debris. This hole can be equipped with a zipper or a plastic lock.
To make bags at home, natural or synthetic dense fabric is suitable.
DIY vacuum cleaner bag
Today it is impossible to imagine life without such a universal home assistant as a vacuum cleaner. With the development of technology, their design has changed and at the moment container-type dust collectors are the most common, and the age of vacuum cleaners with garbage bags is gradually coming to an end. It is for this reason that it has become increasingly difficult to purchase new replacement bags, which, by their nature, have to be frequently replaced with new ones. However, there is a way out of the situation - to make a vacuum cleaner bag with your own hands.
What material is best to make a bag from?
For making bags yourself, the best option when choosing a material would be a covering non-woven material - spunbond. It is easy to use and has all the necessary properties that a dust collector should have.
pylesos_tech
pylesos_tech
pylesos_tech
pylesos_tech
It is better to choose a spunbond density of 120-150 g/m2.
Instead of spunbond, you can use denim - this is a fairly durable, natural and easy-to-handle material. Old jeans are suitable for this.
Teak has the same characteristics; pillowcases are usually made from this material. Those. nothing stops you from taking an old pillowcase.
pylesos_tech
pylesos_tech
pylesos_tech
How to sew a bag. Two ways
The first method is more suitable for making a disposable bag.
For work you will need the following materials and tools:
- spunbond;
- stapler with staples;
- glue;
- cardboard.
Initially, you need to take measurements from the old factory bag. Double the resulting length and add 1 cm for seam allowances. Let's say the dimensions of the bag are 30x30 cm, therefore the pattern will look like a rectangle 62x32 cm.
pylesos_tech
Thick cardboard is suitable for making bag fastenings. Two rectangular blanks are made from it, in the center of which a circle equal to the diameter of the inlet hole of the vacuum cleaner is cut out with a stationery knife. You can also take a fastener from an old bag.
pylesos_tech
In the center of one rug pattern, a circle is cut out identically to the fasteners, then the cardboard blanks are glued to the pattern on both sides and secured with a stapler for greater strength. At the end, the pattern is folded in half and the seams are fastened with a stapler in increments of 5 mm.
For strength, before fastening the seams with a stapler, they can be glued.
The bag made by the second method can be used repeatedly.
For this we need:
- old plastic bag fasteners;
- spunbond;
- glue;
- threads;
- sewing machine;
- an old plastic profile for clamping the hole in the bag, or a zipper, or Velcro tape.
To make a reusable bag, you need to take all the same measurements, only for the pattern you take twice as much spunbond, because they fold it in two layers.
- Lay out the pattern along its entire length into a 62x32 rectangle and cut out a circle in the center equal to the diameter of the inlet hole. To make it easier, you can simply trace it using old plastic bag fasteners and then cut it out.
- Then the plastic fasteners are attached to the pattern.
- After this, the length of the entire rectangle is marked into four equal parts, the pattern is folded in half and the outer fourth parts are stitched on both sides.
- Then unfold the bag so that the unstitched part folds into another rectangle with a hole in the center. The corners of this rectangle are cut off and stitched on a machine.
For better strength and durability, it is better to make all seams double.
You can process the edge of the bag in several ways, it all depends on the choice of tools:
- lightning;
- plastic clip from an old bag;
- Velcro tape.
Velcro tape is not the most reliable method of fastening, so it is better to choose between the first and second.
When using a zipper or Velcro tape, they are sewn into the edges of the product.
If you use a plastic clamp, then the edges of the bag are folded, glued, machine stitched or fastened with a stapler.
Afterwards, the finished bag is turned inside out, closed and used for its intended purpose.
How to make a disposable dust collector?
Depending on the tasks at hand, you can use disposable or reusable bags during cleaning. Disposable accessories are good because they are easy to use. Once filled, you can throw it away and put a new copy. Disposable accessories are made from synthetic and paper components. Paper ones are suitable for collecting small debris, but are not suitable for collecting large and sharp debris. Below we will look at how to make a disposable garbage collection bag with your own hands.
Manufacturing process and required materials
First, let's look at the basic set of accessories for making an accessory for a vacuum cleaner:
- synthetic fabric
- paper
- stationery knife
- cardboard
- stapler
- glue
When choosing a base for a bag, be sure to take into account the type of waste collected. For example, synthetic fabrics should be multi-layered. You can also fold a piece of fabric in half and you will get a two-layer dust collector. Paper is suitable for collecting construction waste, dust, and household waste.
Let's figure out how to properly make a garbage collection bag:
- We take the fabric we have chosen, fold it in half and process 3 edges with a stapler. After that
You can turn the package over to the other side. For the quality of the accessory made and the strength of the dust collector, step back 2-3 cm from the edge. - Turn the bag over the other way so that the staples remain on the inside.
- Cut a small piece of thick cardboard, in which we cut out a semicircle. Through a semicircle, debris enters the dust collector. You should have two of these parts. Using glue we glue them together. Glue the cardboard to the garbage bin
- In the resulting hole inside the cardboard, we make a hole in the dust collector about 5-7 cm in size to allow debris to get inside.
- We also turn the remaining parts of the bag inside out and stitch them to create a complete garbage container. The dust collector is ready.
Advantages and disadvantages
Both disposable and reusable accessories have their advantages and disadvantages. The benefits include:
- simplicity and ease of use
- no human contact with dust
- Consistent suction power
- guaranteed cleanliness of the equipment used
Disadvantages include a reduction in power depending on the degree of filling of the bag and additional costs for replacement accessories.
Other recommendations
Today, there are a huge number of options for making a vacuum cleaner bag with your own hands, the only difference is what material and technology to choose for this. This can be either a disposable product or a durable, reusable product. For example, instead of gluing and fastening the edges of a homemade bag with a stapler, you can simply stitch it.
For reusable use, the edge that remains open is treated with Velcro or a large-tooth zipper so that the fastener will not be damaged when removing debris from the dust container.
The material for the bag can be not only spunbond, but also a piece from an old jeans or trousers leg with intact thick fabric. You can fix a problem with a weak plastic frame (pinch) and create a tightness in the bag for collecting dust and debris of the vacuum cleaner using a regular office clip.
You can quickly and efficiently remove debris from a vacuum cleaner bag using old nylon tights. A small piece of tights is taken and tied into a knot at one end, and then placed in a bag. When the dust bag is full, all the debris and dust will be collected on this piece of nylon fabric, which as a result can be very easily and simply removed from the bag without unpleasant shaking of the dust.
Disposable bag
Let's start by preparing all the tools and materials we need.
We will need:
Preferably! so that before your eyes there is a clean, original dust collection bag designed specifically for your vacuum cleaner model.
You can use as a sample.
We fold thick fabric (spunbond) in half and secure it in this position using a stapler or thread. This is done so that even fine dust or pollen does not have the opportunity to leave the filter and end up back in the room.
Now we fold our fabric so that we get a bag.
We also secure its neck with a stapler. We fasten the staples at a distance of two millimeters from each other.
The resulting dust collector must be turned inside out. This is done to ensure that all fastenings with a stapler remain on the inside. We measure the diameter of the inlet hole in the dust collector compartment. Using its parameters, we draw and cut out two holes on two small square pieces of cardboard.
Remember! You need to add a couple more millimeters to the measured diameter for landing docking.
two pieces of cardboard with a round cutout in the middle on one side with glue (preferably the glue is Moment).
We thread the neck of our bag into one of the cardboards so that the side coated with glue is on top. We place the second cardboard on it, but with the glue-coated side down. It turns out that the neck of the bag is clamped between two pieces of cardboard and fixed with glue.
For reliability, you can secure the neck of the bag between the cardboards by walking along the edge with a stapler . Our dust collector is ready to use. All that remains is to insert it into the appropriate compartment of the vacuum cleaner.
Read how to care for your vacuum cleaner bag here.
Important! If you use paper, it should be of such density that sharp debris cannot damage it by barely touching it!
After use, the dust container is simply removed and thrown into the trash. Now you know how quickly and easily you can make a disposable dust collector with your own hands.
If you fold thick fabric not in two layers, but in three. The density of the bag will increase, and hence the efficiency of the filter.
Making a vacuum cleaner bag with your own hands
To make your own collection for garbage and dust, it is enough to comply with the requirements described in this article. Follow the recommendations, complete them in accordance with the specified order, and, of course, prepare the materials and tools necessary for making a dust collector.
Different types of vacuum cleaner designs require the use of certain types of dust bags. Disposable dust bags are easy to use and save time on cleaning and washing. Since a person does not come into contact with the debris that gets inside, the process of cleaning the house becomes more hygienic. It should be remembered that they will have to be changed immediately after use, which implies constant costs for the purchase of new and new garbage containers.
Reusable bags are the most common type used in vacuum cleaners. Thanks to their special design and the ability to be cleaned for reuse, they last quite a long time and do not force the owner to spend money on frequent purchases after cleaning. It is important to know that this type of dust collectors requires constant monitoring; they need to be cleaned and washed on time, otherwise hygiene in the house may suffer.
When shaking out debris from the dust container, do not forget to wear gloves, as well as glasses and a protective mask to protect the body from dust and other debris that can cause harm to health!
Materials and tools
To make your own dust collector, you need to prepare the following components:
- scissors or stationery knife;
- thick paper and cardboard;
- needle or awl with thread;
- office stapler;
- good fast-acting glue;
- textile.
The fabric for work must be chosen in such a density that it does not allow dust particles to pass through it. You can use teak, spunbond (a special material for covering greenhouses, it can be found in a construction store), corduroy. The work will require about one and a half meters of material, but its size may vary depending on the size of the bag being made.
To understand what should ultimately happen, it is best to have a new, clean vacuum cleaner bag in front of your eyes, which you can use as a guide during the work process.
Stages of making a vacuum cleaner bag
To make a bag for a vacuum cleaner, you need to perform the following steps:
- First you need to prepare a pattern. The texture of the fabric determines how many times it will need to be folded, and then secured with staples or sewn with thread. The more layers you get, the better the purification of the air trapped inside will be and the less dust will be able to leave the filter. Compare the resulting design with the dimensions of the original product, after which it will be possible to make corrections to the work. It would be a good idea to leave a margin of a few centimeters for hemming the fabric.
- Then the resulting workpiece should be placed in the shape of a bag. Use a stapler to fasten all sides of the product, then stitch it by hand or stitch it on a sewing machine. If you want to end up with a reusable bag, leave a place on one side of the workpiece for a zipper or Velcro. After completing all procedures, the workpiece should be turned out. This is done to ensure that the seams and staples are inside and do not interfere with the installation or removal of the dust collector.
- In a certain place on the fabric, a circular hole is cut, the diameter of which depends on the diameter of the vacuum cleaner hose.
- The hole made in the fabric is outlined on two sheets of cardboard. To properly fit the hose, you need to add a few millimeters to the specified diameter, and then cut holes in the cardboard. The next step is to apply glue to one of the sides of the resulting blanks. Then the sewn fabric bag is threaded into one cardboard, the adhesive side of which faces up. The second sheet is applied from the outside with the coated side down, the fabric is in the middle and firmly fixed with adhesive. As a result of these procedures, the cut holes should completely coincide. To increase strength, cardboards are stapled.
Use only strong sheets of cardboard that can withstand the impact of flying debris.
If necessary, you can use parts of the design of used original products, remembering to thoroughly clean them before installing them in the workpiece.
Drawings, diagrams, dimensions
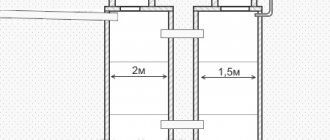
For the incoming hole you will need a piece of thick cardboard measuring 30x15 cm. Cut it in half. In the middle of each workpiece, draw a circle along the diameter of the hose inlet. In some models, the dust collector is secured with a plastic holder. Such a mount can also be made from thick cardboard or removed from an old bag.
The piece of material should be 1-1.5 m in size. It is better to make a bag from fabric folded in half or three. Use an old dust collector as a pattern. If this is not possible, you need to take measurements from the vacuum cleaner. To do this, open the lid and measure the length and width of the compartment.
Attention! It is necessary to make seam allowances of at least 1-2 cm. Without this, the finished dust collector will be smaller than necessary, which will negatively affect the operation of the vacuum cleaner.
Phased work
You can make a functional, high-quality and reusable bag for a vacuum cleaner with your own hands in almost 20-30 minutes, if you have all the necessary materials available. So, the stages of work will look like this:
- Spunbond approximately 1-1.5 m in size is folded 2 times (in half). This will make the vacuum cleaner bag denser and will not let in even the smallest debris.
- The edges of the folded material are folded, leaving one “entrance”, glued and stapled with a stapler in increments of 2-3 mm.
- The resulting bag is turned inside out in order to hide the staples of the stapler inside the bag.
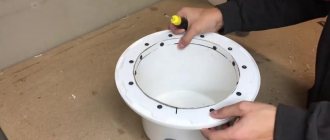
- Take small thick cardboard, 2-3 mm thick, and using a regular pencil you will need to carefully draw on it the corresponding diameter of the inlet hole of the vacuum cleaner being repaired. There should be 2 of these cardboards with holes, to which you will definitely need to add a few millimeters for the mounting diameter.
- The cardboards are cut out, and then each one side is treated with a large amount of glue.
- One rectangular glued cardboard is glued through the open edge of the bag from the inside, while the second is glued onto it, but from the outside.
- Using scissors, cut the holes for the pipe in the cardboard so that a “star” is formed. For more reliable fixation, the cardboards are additionally processed around the perimeter with a stapler.
- The open edge of the bag is folded inward and stitched or stapled, or you can also purchase a special device for hermetically closing the bag (plastic clamp) or use an old one, which will have to remain from an outdated dust collector kit. The bag is ready, all that remains is to insert it into the vacuum cleaner.
Making a vacuum cleaner bag with your own hands
To make a dust collector yourself, you do not need special knowledge and skills. It is enough to follow the simple recommendations presented below. In addition, it is necessary to follow all stages of manufacturing in the required sequence and prepare in advance all the required materials and tools.
Vacuum cleaners use bags to collect different types of dust. There are disposable dust collectors. They are very convenient because after use they immediately go into the trash container. Accordingly, they do not need to be washed and cleaned. Their main advantage is that a person does not come into contact with garbage during their use. That is, cleaning becomes more hygienic. Such devices are often used to collect small debris. The disadvantages include the fact that for each use of the vacuum cleaner you need to buy new bags, and this is very expensive.
The second type is reusable bags. The name speaks for itself. Such accessories are very wear-resistant and can be used many times. Thus, you do not need to spend a lot of money on them. They can be used for almost any type of waste. Their significant disadvantage is that they require constant washing. Leaving them with garbage for a long time is not recommended, as this is not hygienic - they can serve as a source of spread of pathogenic bacteria. Especially if the collected garbage was damp or water got in there.
ATTENTION! Be sure to wear a protective mask when cleaning the garbage bag, as dust can easily enter the respiratory tract and cause harm to health.
Materials and tools
In order to sew an accessory for collecting dust you will need:
- scissors;
- cardboard;
- threads;
- stapler;
- glue, preferably Moment;
- fabric or paper.
This can be cushion fabric (teak), non-woven fabric or corduroy. Some craftsmen even use nylon tights for these purposes. However, it is advisable to use a thick fabric because it does not allow dust particles to pass through. Spunbond works great. This is a covering material that can be purchased at any hardware store or department. The fabric consumption is approximately one and a half meters. But it all depends on the dimensions of the filter that needs to be made.
IMPORTANT! For a sample, it is better to use a clean original bag from the manufacturer, which was originally in the vacuum cleaner. This is an excellent example to use as a guide during your work.
Necessary materials
If you are seriously thinking about making a bag for a household appliance with your own hands, then you should make sure that you have all the necessary materials and tools in the house. During your work, you will definitely need comfortable and sharp scissors, with which you can easily cut cardboard. You will also need a marker or bright pencil, stapler or glue.
To make the so-called frame, you will need thick cardboard. It should be rectangular in shape, approximately 30x15 centimeters. And most importantly, you will need the material itself from which you plan to make the bag.
It is best to choose a material called “spunbond”; it can be found in any hardware store. This is a non-woven fabric that has a number of significant advantages. This material is particularly strong, durable and environmentally friendly. It is quite dense, thanks to which even small dust particles will be retained in the homemade bag.
The dust collector made from this fabric is easy to wash, and over time it does not deform, which is very important. In addition, after cleaning, washing and drying, it will not emit any unpleasant odors while the vacuum cleaner is running.
What and how to make a vacuum cleaner bag with your own hands
First of all, we recommend that you go to the store to purchase components as soon as possible!
Any attempt to vacuum cleaner without filter material jeopardizes the performance of your device, which may have been purchased for a lot of money.
This situation can be prevented by purchasing (in addition to disposable bags) a reusable fabric dust collector, which can be used if supplies are depleted. This bag is ideal as a replacement for basic disposable bags.
If it is impossible to purchase either disposable or reusable bags, you can, at your own peril and risk, try to build a dust collector bag yourself.
We strongly advise against resorting to the use of self-made material; it may lead to contamination of important compartments of the vacuum cleaner or complete, costly breakdown of the entire device.
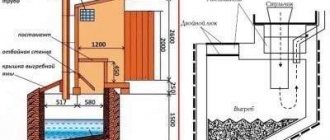
Garden vacuum cleaner bag
Many summer residents use devices called garden vacuum cleaners to collect leaves and small debris from the garden. You can also make such a device yourself. An ordinary vacuum cleaner with a power of at least 2 kW is required. In this case, a plastic barrel or a piece of wide sewer pipe is used to collect leaves. A cloth bag must be inserted inside it.
In size, it should be 1-2 cm smaller than the diameter of the pipe, so that when the engine is running, it is stretched and adjacent to its walls. Such a bag is made from spunbond with a density of 30-50 g/m2. If it is denser, the vacuum cleaner’s power will not be enough for suction. It is sewn in a cylindrical shape. At the front edge you need to make a hole for the pipe. To prevent it from wobbling, line it with a rubber seal.