Features of repairing angle grinders of various brands
This article offers ways to find faults in angle grinders of various models without repairing an angle grinder (angle grinder) on your own. Here you can find answers to questions about the procedure for disassembling gearboxes of grinders of the most popular models, replacing gears, bearings and their repair. Recommendations are given on the procedure for pressing in and unpressing gears and bearings, and methods for repairing devices.
Along with general malfunctions, angle grinders of various brands have their own characteristics. This occurs not so much from differences in the designs of angle grinders, but also from the non-component materials used.
It is important that at first, who made the instrument. Knowledge of the design features of angle grinders allows you to repair angle grinders yourself, but not quickly. The information below will help you repair any brand of angle grinder.
Along with original tools, the construction market is flooded with cheap fakes. It makes no sense to think that counterfeits are made exclusively in China. Power tools from Chinese manufacturers are in no way inferior in quality to those from European countries, or in other words, Southeast Asian countries.
High-quality tools from Chinese manufacturers for European consumers undergo several stages of incoming control. For third countries, Chinese manufacturers do not control tools. But the instruments are produced on the same lines, in the same factories, by the same people. This is why there is such a difference in price.
To repair an angle grinder in makeshift conditions, you need to have a diagram of this angle grinder without understanding it. Repairing a Bosch grinder differs from repairing an Interskol grinder. You can find grinders under the brands Makita, Hitachi, Metabo.
Some general useful tips for organizing the repair of an angle grinder
Before we start repairing the angle grinder, let’s look at some useful tips:
- Before you start disassembling the angle grinder, carefully read its description, assembly diagram and the order of work.
- Be sure to follow the sequence of technological operations.
- Strictly follow safety precautions.
The most common reason why an angle grinder breaks down is a broken wire near the handle. First of all, you need to check the presence of voltage on the button, this is done with a regular voltage tester. Then we check the button itself for functionality.
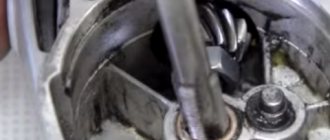
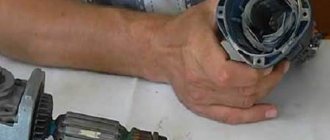
How to remove a needle bearing or a damaged journal bearing race
Grinder gearboxes use various bearings. They are subjected to heavy loads and do not cause malfunctions.
Bearing failure is determined by an increase in spindle shaft play. Having disassembled the gearbox housing without dismantling the large gear shaft, the needle bearing is visible.
The needle bearing is not used in many angle grinders. In the same grinders in which it is installed, its dismantling is carried out in several ways.
Having taken out the destroyed part of the bearing , there is an option to remove the inner race using a machine tap. Clamp a machine tap of a suitable diameter into the screwdriver chuck and do not try to screw it into the bearing race until the tap rests on the bottom of the housing. Continue to slowly screw the tap into the cage. It will lift the clip along the threads.
The second method is that the remaining race of the destroyed needle bearing can be removed using a special bolt not a retaining ring.
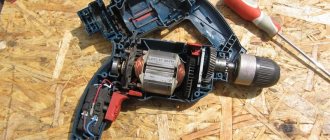
Communities › Kulibin Club › Blog › How to remove a blind bearing without a puller
Hi all! During quarantine, we got around to sorting out a long-broken hammer drill, and during disassembly and troubleshooting, a collapsed bearing was found (only the inner race remained, the rest had spilled out) pressed into a dead tide in the area. In general, all the bearings were easy to get, but not this one, I don’t have a collet puller, and its price did not justify the repair economically. I found a solution in the form of a homemade reverse hammer from an old screwdriver, which I sharpened with sandpaper, and a holder for dies, which acted as a striker, and heated it up. with a hairdryer and in several approaches we managed to pick up and knock out the remnants of the bearing. I hope it helps someone)
Comments 48
In this case, was it possible to drill a couple of holes “from the outside” to the holder?
The alloy did not look particularly strong, I was afraid that the fit would crack later
Only this is not the inner ring...
Soap, bread crumb
Plasticine, bread, etc.
It would be so easy to pull out of the flywheels! In principle lifekah is not bad
In this case, it was enough to heat it up. The coefficient of linear expansion of luminaire is much greater than that of iron. I would have fallen out myself.
Unfortunately no, I tried to heat it, without success
to how many degrees?
Construction hairdryer up to about 200
200 is not a temperature! 450-500 would work! When I glue the vibroplast, I heat it at 400 degrees so that it is elastic and you metal 200, it’s like holding it over a candle!
I understand, it was especially scary to warm it up, because... Chinese product
The bread and the setting are denser, it really works! ))
I usually weld either a washer or a nut to the bearing race and knock it out with a reverse hammer. There is no need to sharpen anything and no hassles!
It’s good when you have welding and a factory reverse hammer, then there are no problems, and even less when you have a puller)) the message of the post was to solve the problem using what everyone has))
Well, a semi-automatic welding machine - yes, I agree, not everyone has one. Although today it is relatively inexpensive and the item will never sit idle on the household. And finding someone who can carefully weld the nut is not a problem now. As for the factory return hammer, I don’t have one either. An ordinary pin and any heavy cylinder or even a weighted block with a slot... That's it, but I don’t see the point in buying a reverse hammer for 1-2 uses a year, everything is done from improvised means.
A block with a slot is perfect for a dumbbell or barbell plate. The choice is large.
Well, this is only for a very large reverse hammer... well, or from a dumbbell or a barbell... such a small one... ))))
Well, I knocked out the injectors for the Opel Insignia 2.5kg
Well, a semi-automatic welding machine - yes, I agree, not everyone has one. Although today it is relatively inexpensive and the item will never sit idle on the household. And finding someone who can carefully weld the nut is not a problem now. As for the factory return hammer, I don’t have one either. An ordinary pin and any heavy cylinder or even a weighted block with a slot... That's it, but I don’t see the point in buying a reverse hammer for 1-2 uses a year, everything is done from improvised means.
Even without a semi-automatic machine, I welded an old bearing of a smaller diameter to the old outer race. True, I didn’t have a blind hole. But there was no other way to knock out the clip. The central hole under the shaft was smaller than it was possible to push something through it and hit it
It’s good when you have welding and a factory reverse hammer, then there are no problems, and even less when you have a puller)) the message of the post was to solve the problem using what everyone has))
The puller is also made from scrap materials.
Not bad, but if you have a welding machine, everything is much simpler; it’s quite easy to apply a seam along the collar when the outlet has cooled down. From personal experience.
I thought about doing this too, but there is a big risk of damaging the oil supply plastics. plus you will still need to adjust the gearbox. And for this it is necessary to assemble it completely, check the shaft play and disassemble it. Remove the clip (without damaging it), place the adjusting washers and reassemble it. In view of this, I abandoned this idea.
The puller is also made from scrap materials.
This can break the gearbox cover. Purely at your own peril and risk.
It’s good when you have welding and a factory reverse hammer, then there are no problems, and even less when you have a puller)) the message of the post was to solve the problem using what everyone has))
I removed such bearings on a pf6 gearbox from Renault Traffic (the one that is complete crap and falls apart for everyone.) So I had to sharpen the expansion puller and pull it with a two-ton jack... And it was difficult for both of them to come out. It's still a pleasure. and here they look like flowers, since I managed to draw them out with a crochet
I’m not saying that I made a tool that can now be used to repair gearboxes))
What I mean is that often such bearings sit very tightly
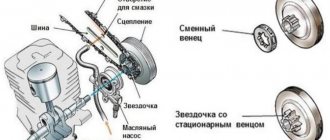
How to remove helical gears of an angle grinder gearbox
Repair of the grinder gearbox begins with the dismantling of the helical gears. It is the gears that become the main cause of malfunctions of the grinder gearbox. In grinders, you most often have to change the small drive gear attached to the rotor shaft.
The helical gear can be attached to the rotor shaft in two ways:
- The gear is fixed with a key connection and is not clamped with a nut.
- The gear is attached using a threaded connection. Moreover, both right-hand and not left-hand threads are used.
The large driven helical gear is mounted on the spindle shaft in two ways:
- The gear is pressed onto the shaft.
- The gear is attached using a keyed connection.
In addition to replacing gears in angle grinders, it is often necessary to replace one or other bearings. And there are at least three of them in the design of an angle grinder.
How to make your own and select gears for the gearbox of a large and small grinder
Gears in the grinder gearbox
In grinder gearboxes, two types of bevel gears are used - spur and helical . Conical teeth with straight teeth are quite rare and only in small, low-power grinders. The smaller contact patch compared to helical gears does not allow high power transmission. Ease of manufacture and the use of cheap ball bearings due to the absence of axial loads make such angle grinders an inexpensive product.
The vast majority of grinders use bevel helical gears . These are good quality household grinders and powerful professional angle grinders. Since they ensure smooth contact, they do not create increased noise during operation, are more durable in operation and have no power limitations.
For those who are faced with the problem of replacing worn or broken gears on an angle grinder, information on repairing various models along with watching the video will be useful.
How to remove and change a BOSCH angle grinder
In the video, in one of the BOSCH angle grinder models, a “metallic” sound appeared when the gearbox gears rotated. To fully diagnose the defect, it was decided to completely disassemble the angle grinder, where, in addition to the plastic electrical housing, the aluminum alloy gearbox housing was disassembled.
After opening the gearbox, the wear of the gears, especially the large drive gear, is visually recorded . However, replacement is done by an interchangeable pair, regardless of the absence of critical wear on the second, usually small gear. The lubricant, which contains abrasive particles from worn parts, is washed out with gasoline or kerosene, and the surface of the body is thoroughly wiped and dried. In its pure form it is much easier to identify all defective parts.
In order to remove the electric motor rotor from the gearbox, it is necessary to free the commutator assembly from the brushes pressed to it . By the way, in this video they were in critically poor condition and also had to be replaced . After the final determination of all defective parts, except for the gear and brushes, it was decided to change the rotor bearings and the support sleeve of the large gear , which is located in the gearbox housing. The feasibility of replacement is made on the basis of the large size of the gaps.
Bosch angle grinder repair
Bosch grinders are a reliable tool that does not cause much trouble to the user. Unfortunately, it is a rare user who treats the instrument correctly. Bosch angle grinder repair most often involves replacing bearings.
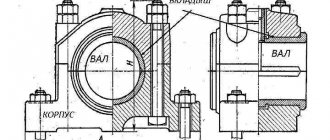
Structurally, our client is left with Bosch angle grinders made according to the same design. The spindle shaft pos. 25 is pressed into the driven helical gear pos. 26 and does not rest in the gear housing pos. 821 on the needle bearing pos. 51.
When a bearing is destroyed, a bearing race remains inside the housing, which is not easy to obtain. We recommend two methods for removing the needle bearing race. They are described in the section “How to remove a needle bearing”.
When the teeth of a pair of gears become worn out or licked, both must be replaced, not only in pairs. When dismantling the gears, remember that the drive gear is attached to the rotor shaft on a thread, and the LEFT gear is not secured with a nut. The driven large helical gear, pos. 26, is pressed onto the spindle shaft, pos. 25.
Hitachi angle grinder repair
Hitachi grinders have gained particular popularity among Russian consumers. All this is natural. There are practically no handicraft fakes of Hitachi angle grinders on the economic market. The simplicity of the design makes it easy to carry out repairs of varying complexity.
Hitachi grinders have increased reliability and do not often come to the attention of repairmen. The main reason why a Hinachi angle grinder needs to be repaired is a breakdown of the gearbox, specifically, the wear of gear teeth.
Replacing bearings on an angle grinder. Replacement of bearings angular polishers.
Replacement considered
all
bearings
in
the grinder
, with disassembly and reassembly I tried to maximize the income
The grinder gearbox is easy to disassemble. To disconnect the gearbox housing, pos. 3, from the stator housing, pos. 37, the carbon brushes must be released.
Unscrew the four screws, item 1, securing the gearbox housing and stator housing. Separate the gearbox housing and the stator housing. The gearbox housing will be disconnected together with the rotor, pos. 8.
To remove the gearbox cover pos. 23, you need to unscrew the four screws pos. 24. The driven helical gear pos. 33 is fixed on the spindle shaft pos. 26 using a key pos. 25 and is driven off with a puller. Bearing pos. 21 is removed with a puller.
Necessary tools for disassembling angle grinders
Lubricant for Makita angle grinder gearbox, 30 grams. Photo AllInstruments.Ru
The gearbox must be disassembled at a trained workplace where there are no unnecessary parts. This is necessary in order not to lose small structural elements of the gearbox. The workplace needs to be equipped with the following tools and equipment:
- Bench pressure;
- Set of wrenches and screwdrivers;
- Various types of hammers - from wooden to steel;
- Pliers;
- Tool for working with retaining rings;
- Gas key;
- Pullers for bearings and gears pressed against the shaft;
- For high-quality assembly of bearing units, it is good to have appropriate pressing equipment;
- In its absence, expansion of various designs can be used;
- Wipes with detergents (kerosene and other similar liquids);
- Availability of lubricants.
Makita angle grinder repair
A special feature of the Makita family of angle grinders is the quick-release protective cover pos. 19.
Makita grinders are more likely than others to be repaired. But the reason is the high percentage of counterfeits that have flooded the Russian market.
A true Makita is a reliable, durable tool. But, like all angle grinders, it suffers from failure of the gearbox and its gears.
Reducer gears are replaced if they become jammed or destroyed.
To repair a Makita 9069 or Makita 9558 HN angle grinder, you need to disassemble the angle grinder.
If the gearbox is faulty, and this is determined by the appearance of play in the spindle shaft, jamming of the gearbox, or slipping of the driven gear, then the gearbox should be disconnected from the stator housing. Release the carbon brushes, pos. 35, unscrew the four screws, pos. 10, and disconnect the gear housing from the stator housing, pos. 37.
At the next stage, unscrew the four screws pos. 18 holding the rotor cover pos. 15. The driven gear pos. 14 is removed using a tool. The drive gear, pos. 43, is secured by a keyed connection and secured with a nut, pos. 42. The rotor shaft bearings pos. 3 are removed using pullers.
How to repair an angle grinder yourself
One of the most common household appliances for repair and construction work is a grinder, or angle grinder (angle grinder).
When operating the machine, there are often cases of heavy loads and careless handling, which leads to wear and tear of parts and breakdown. But it is possible to repair an angle grinder yourself. To do this, it’s worth watching how to repair an angle grinder with your own hands in the video. The device of the grinder
- The angle grinder's anchor (rotor) is the most overloaded element of the angle grinder mechanism. It is subject to thermal, electromagnetic and mechanical damage, so its failure is not surprising. When heated, the armature winding may burn out, leading to a short circuit. Therefore, repairing the anchor of an angle grinder with your own hands is a common practice.
- If the commutator fails during operation due to strong vibration of the brushes, they burn, resulting in very noticeable sparking. The brushes conduct current to the commutator.
- The bearings on the rotor shaft are also subject to severe wear, which can completely collapse if not replaced in a timely manner. They need to be checked if there is any extraneous noise from the operation of the machine.
- The fixed part of the electric motor of the angle grinder is the stator, which contains the winding. The stator itself is quite rarely the reason why the grinder breaks down.
- The gearbox is a rotation transmission mechanism that needs timely cleaning and lubrication.
- The easiest way to replace the brushes on an angle grinder, but this is also the most common repair procedure, because... they are made on the basis of graphite.
Recommendations before starting repairs
It is worth considering that repair technologies for angle grinders of different models and manufacturers may differ. So, repairing an Interskol grinder with your own hands differs from repairing malfunctions of a Bosch machine.
That is, it is important to know the features of your angle grinder and have a diagram from it in your hands, then repairing an angle grinder with your own hands can be done easily and efficiently.
Do-it-yourself grinder repair
Only after reading the detailed description and diagram of the angle grinder can you begin to disassemble it. The repair must have a certain sequence of actions. And most importantly, compliance with safety regulations.
Power cable
A break in the electrical wire at the handle is the most common problem when a device fails to work. To verify this malfunction on the button, you must use a standard voltage tester. Only after this check whether the button itself works.
Bearing replacement
If you notice an increase in spindle shaft play, then the needle bearing needs to be replaced. By the way, it is not available in all models of angle grinders. To dismantle it, you need to disassemble the housing and remove the large gear shaft.
Using a machine tap, the inner race located in the damaged bearing is removed.
The tap must be clamped into the screwdriver chuck and screwed into the bearing race. When the bottom of the housing is reached, you need to continue screwing in slowly so that the collar rises along the threads.
Removing helical gears
Due to damage to the helical gears, the gearbox breaks down. Often the small drive gear attached to the rotor shaft is replaced, which is attached in two ways:
- They resort to a keyed connection with a nut clamping;
- A threaded connection is used.
The driven large gear can also be attached using a keyed connection, but also by pressing onto the shaft.
Differences in the repair of angle grinders Interskol
Subject to the correct operating conditions, repairing an Interskol angle grinder with your own hands can be done very rarely.
In order to replace the gears of the gearbox, its housing is disassembled and the cover is released. Since the driven gear is attached by pressing, it must be removed using a press. Next, remove the bearing with a puller.
If the stator burns out, you need to calculate how many turns the wire has and what its cross-section is.
It would be a good idea to watch the repair of an Interskol angle grinder with your own hands on video.
Features of Bosch angle grinder repair
The design of all models in the Bosch line has an identical design. Repairing a Bosch angle grinder with your own hands usually comes down to replacing the bearings.
The spindle shaft is pressed onto the driven gear. It is supported by a needle bearing in the gearbox housing, which, when worn, leaves only a cage inside. The drive gear is attached to the rotor shaft with a left-hand thread and then secured with a nut.
Makita angle grinder repair
The Makita angle grinder is distinguished by its protective casing, which can be quickly removed. This can be called a plus, because... Grinders from this company are most often prone to breakdowns. This applies mainly to counterfeits that have flooded the domestic market.
The real Makita angle grinder is famous for its durability and reliability. Regardless of whether you get your hands on a fake or a real grinder, the most common cause of failure will still be the gearbox and its gears.
This becomes noticeable when the driven gear slips, the gearbox gets jammed and the shaft play increases.
When repairing, the grinder is first disassembled. The gearbox is disconnected from the stator housing; to do this, the brushes are released and the screws are unscrewed. Next, remove the screws holding the rotor cover.
The driven gear can be removed with a press, and the drive gear is attached by a keyed connection with a locking nut. Pullers remove the rotor shaft bearings.
Thus, no matter what kind of grinder you have, if you properly study the problem, you can fix the main problems yourself with your own hands. The main thing is to correctly understand the circuit and have the necessary equipment for repairs.
Despite this, an angle grinder is a complex mechanical power tool, and cases of damage to more inaccessible parts of the mechanism are not uncommon. In this case, if you have not encountered such breakdowns before, it would be more effective to first consult with specialists specifically about your problem.
Source: https://metall.trubygid.ru/bolgarka/proizvesti-remont-bolgarki
Angle grinder repair Interskol
With proper use, Interskol grinders can work for years.
Along with the infrequent failure of the grinder gearbox, in which the weak link is a pair of gears and a bearing, there have been cases of malfunctions in the stator.
To replace the gears of the gearbox, it is necessary
the gearbox housing, pos. 19, by releasing the cover, pos. 6.
The driven gear pos. 11 is pressed onto the shaft pos. 8 and is removed using a press. The bearing pos.9 is removed with a puller.
You can repair the stator of an Interskol angle grinder yourself if you know the necessary data. When disassembling a burnt stator, you must count the number of turns of the wire used and its cross-section.
Repair of angle grinder Lepse
Grinders under the Lepse brand are marked with the LPS Lepse Kirov 1.8-230-A. These grinders trace their history back to the famous Soviet-made grinder IZH. An amazingly durable tool with the most vandal-proof design.
The advantages of the Lepse grinder are the ability to replace worn carbon brushes without disassembling the body of the machine.
Repairing Lepse angle grinders in terms of replacing brushes is simple. Through special windows pos. 45, closed with caps pos. 48, carbon brushes pos. 47 are inserted into the brush holder housing pos. 46.
When repairing the gearbox of a Lepse angle grinder, it is necessary to dismantle the gear pair.
The driving small helical gear is mounted on the rotor shaft on a key and secured with a nut.
The driven gear, pos. 15, is screwed onto the spindle shaft, pos. 10, and secured with a nut, pos. 18.
Video: Replacing the Grinder Gear Bearing
After analyzing the condition of the components and parts, it turned out that the cause of the malfunction of the grinding machine was the front rotor bearing . It was easily replaced with a new one , inserted into the gearbox housing without any obstructions and secured with a washer using threaded screws. The Sparky sander in the video has a service life of 15 years, so other defects are possible, and the author correctly concludes that the sander was purchased new.
Source
The design of the shredders does not create problems in this case for repair or maintenance related to their assembly/disassembly. This is one of the advantages of this power tool. However, disassembly such as a gearbox requires work with a high degree of precision . This is due to the fact that the materials used (aluminum, magnesium alloys, plastic) are not very durable. Using “hard” methods to work with threaded connections can compromise their integrity, which can create additional problems. This article presents some effective methods for repairing gear grinders.
- Items
- The most common faults
- Necessary tools for disassembling angle grinders
- Correctly disassemble an angle grinder, video
- Bosch
- Hitachi
- Dualt
- Makita
- Sparkling
- Lepse
- purple ribbon
- Diold
- DVT
- How to pull out an anchor
- How to replace bearings
Repair of angle grinder Fiolent
Recently, Fiolent grinders have become especially popular. What attracts us is not only the affordable price, but also the reliability of the tool.
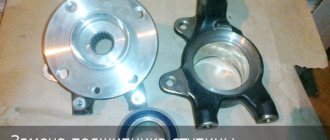
repairing the Fiolent angle grinder with your own hands by studying emerging faults. If you need to disassemble the Fiolent angle grinder, then in order to remove the driven gear, pos. 11, it must be pressed out from the spindle shaft, pos. 8.
To remove the spindle shaft bearing, you must first remove the large helical gear. These are minor inconveniences.
Replacing the rotor bearings requires the removal of the small helical gear, pos. 22.
What device will help you remove the bearing from the crankshaft without any problems if you don’t have a chisel and a hammer?
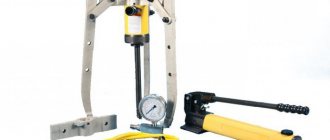
The bearing is considered the most important part of the crankshaft, performing the lion's share of the work. So, it is the bearing that takes the load and transmits it further to the moving unit of the crankshaft. That is why the working condition of the product is so important for the operation of the engine, and any malfunctions lead to troubles and stop the operation of the entire structure. However, repairing and replacing bearings often becomes a difficult task. The problem lies in the rather complex system for removing the bearing from the crankshaft. So, it fits so tightly to the crankshaft that it is not possible to simply pry it off and remove it. Car enthusiasts often resort to the method of breaking the product using a hammer and chisel. But today there are more humane methods and devices that allow you to remove the bearing without extra effort.
Bearing pullers
In the modern automotive market, special devices are offered - pullers, with the help of which the process of removing the bearing is greatly simplified. The tool is made of durable metal using power bolts. Often such pullers are equipped with a hydraulic motor, but such devices are usually used by professional auto mechanics and at service stations.
Types of pullers
Depending on the design features, the tool comes in the following types:
- Universal;
- Sliding;
- Turning;
- Conical;
- With separator.
Universal puller
In everyday life, it is most advisable to use a universal mechanical puller: two- and three-fingered. This tool can also be used to remove rings, bushings, gears, brake discs, pulleys and other elements. Using the tool is extremely simple: rotation of the power bolt transmits force to the clamps, which lift or, conversely, press (depending on the direction of rotation) the bearing. Thus, the puller can be used not only to remove, but also to install a new bearing. Therefore, it is appropriate for every motorist to have this tool.
DIY tool
In the absence of access to special tools, you can use one of the “folk” methods. So, you can try to remove the part using a homemade hook made from reinforcement, a metal cylinder and a welding machine. This method will work if there is a small gap between the part and the back wall. A reinforcing rod with a diameter of 5-8 mm and a length of 40-50 cm is bent at a right angle, the length of the hook is about 1 cm. On the other side, it is necessary to cut off a piece about 10 cm long. The cut part is welded to the unbent edge in a T-shape. A metal cylinder is placed on the bent hook, in which a through hole is pre-drilled. A massive sprocket or hub may be suitable as a cylinder.
The rod is inserted into the bearing cage and secured with a cylinder, after which the T-shaped handle is struck with any heavy object. During the process, it is advisable to rotate the resulting homemade puller to create a uniform load.
Thus, crushing the bearing with a hammer and chisel is, although the fastest, but by no means the only removal method. Using special or homemade devices will help you cope with the task.
What repairs can a user make to an angle grinder with his own hands?
Although the grinder is not a particularly complex tool, the user cannot perform repair work on all components.
Along with simply replacing the bearings or gears of the gearbox, there are malfunctions that cannot be made without special equipment or devices.
- To press out the driven gear you will need a press. It will not be possible to wind the rotor without tools.
- Such malfunctions include rotor failure. For the average consumer, such a malfunction ends with a trip to the service center.
- Advanced users can revive a burnt out rotor with certain skills and concepts. But sometimes it’s easier to buy a new one than to rewind.
For most users, repairing an angle grinder with your own hands is limited to a certain range of faults.
How to Change a Bearing on a Grinder
How to change a bearing on an angle grinder
We are successfully promoting
Terms
An armature is a rotating element of an electric motor containing windings. A collector is a place on the armature to which the windings are brought out, which remains to be done by our client. It looks like a series of plates isolated from each other. The stator is the fixed part of the electric motor containing the windings. The brushes are carbon parallelepipeds that supply current to the commutator.
A gearbox is a mechanical device for transmitting rotation with changes in power and rotation speed.
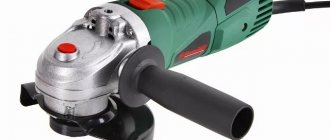
The most necessary equipment in everyday life after a drill is an angle grinder, as it is also called, as it is more often called, an angle grinder.
The grinder is used for cutting metals, wood, concrete, grinding various surfaces, cutting gaps, doors, niches.
If it is natural to use an angle grinder, then you will always find a use for it; it is not particularly sad when the oil stops working normally, jerking, twitching, and a burning smell occur...
The angle grinders for our client are constructed identically: an oblong body in which the engine is located, not a gearbox, a handle is screwed on the side, not a protective casing.
A sticker with initial data is placed on the body of the angle grinder. Here you can easily find both the personal number of the angle grinder and the supply voltage - 230 V. This means a very permissible voltage in the network. The frequency of the current in the network is 50 Hz. Current consumption – 5 A.
The power consumed from the network is 1100 W, as oil comes out as the product of voltage (220 V) and current (5 A) multipliers. The rotational speed of the disk mounted on the angle grinder is 2800-11000 rpm. Specifically, the anchor itself rotates at a higher speed than the disk. Directly on this grinder you can adjust the rotation speed in stages.
The disk mounted on the grinder has an outer diameter of 125 mm, the disk mounting nut has an M14 thread.
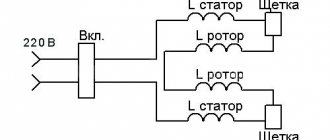
A household tool designed for phase voltage 220 V has an armature winding and not a stator winding. Energy is transferred from the network to the anchor using graphite brushes.
The voltage from the network is supplied to the switch, which is mechanically connected to the power button of the angle grinder. The stator winding consists of two halves that are not electrically connected.
The armature winding consists of many windings, but at any given time the brushes connect only two armature windings.
When the grinder is turned on, current is supplied to the input of half of the stator winding, the output of the stator winding is connected to the brush holder into which the brush is inserted using a spring.
The brush transmits current to half of the armature winding, on the other hand, the other brush receives current and through the brush holder transmits current to the other half of the stator winding. The current entered and exited the grinder.
If the entire electrical circuit is working properly, the armature will begin to rotate.
Reverse, i.e. changing the direction of rotation of the disk can be done by swapping the wires going to the brushes from the stator windings. Just disconnect the wires on the brushes and swap them.
At the end of the angle grinder body there is a red wheel for stepwise regulation of the speed of rotation of the armature and a screw for removing the casing.
In this type of grinder, the brushes themselves are located inside the body and there is no access to them, but the developers have simplified the replacement of brushes when removing the casing. After unscrewing the screw, the plastic plate is removed and the outer casing moves towards the cord, exposing all the insides, including the brush holders.
The speed control mechanism is electronic. The entire circuit is filled with epoxy resin and only the speed control wheel and the radiator are placed outside. What's hidden inside. trade secret of the company. When the block fails.
the speed is no longer regulated, but remains at the maximum level. In any case, you shouldn’t despair, and you can turn on the most ordinary dimmer in series with the angle grinder. dimmer
With its help, you can regulate the speed of any brushed AC motor, the main thing is that the motor power does not exceed the power of the dimmer.
Do-it-yourself grinder repair (Bearing replacement)
Sometimes it is better to carry out preventive maintenance on the instrument in time than to end up with expensive repairs.
Systematization of faults in the electrical part of angle grinders
- The simplest fault that causes the angle grinder to not turn on is a broken power cord. Most often, a break occurs in the power cord near the plug or at the entrance to the instrument. The malfunction can be easily resolved by replacing the power cord or removing the broken piece of wire.
- Increased heating in the area where carbon brushes are installed. Most often, such a malfunction occurs due to shortening the carbon brushes below the nominal size. The length of carbon brushes cannot be shorter than 8 mm.
- The grinder's power button goes down. The malfunction is due to burnout of the internal contacts in the button. Eliminated by completely replacing the switch with a new one.
- Some models of angle grinders use a device that allows you to smoothly regulate the speed of the angle grinder. The angle grinder's speed regulator improves the smooth operation of the angle grinder and prevents the working tool from biting. Repair of the angle grinder speed controller consists of completely replacing it.
Grouping of faults according to the mechanical part of the angle grinder
- The appearance of extraneous noise in the grinder gearbox, heating of the gearbox. The malfunction is associated with the destruction of the support bearing, wear of the gear teeth of the gearbox, and drying out of the lubricant. Eliminated by replacing gears when tooth wear is high. If there is slight wear on the gear teeth, you can try to fix it. The tooth profile is corrected manually by filing using a round file and a drill. The lubricant is replaced with a new one every time the gearbox is repaired. New lubricant is applied to thoroughly washed parts.
- Bearing replacement is required when it is damaged or large play appears. In some models, the bearing is mounted on the spindle with interference. Replacement requires special equipment, in particular a press. Parts need to be cooled or heated.
- Replacing the bearings on the rotor is required when large runout occurs. The presence of increased runout can be easily seen on the rotor commutator and by the wear rate of the carbon brushes.
Simple faults and methods for diagnosing and eliminating them yourself
If your grinder does not turn on when you press the “Start” button, then the test begins by inspecting the power cable at the point of entry into the tool.
Unscrew the lid of the angle grinder and check the integrity of the power cord using a tester or phase. Strictly follow safety rules.
If the power cord is intact and the angle grinder does not turn on, replace the “Start” button.
If the grinder does not work when installing a new button, check the quality of fastening of the carbon brushes and their tight fit to the rotor commutator.
How to remove a bearing from a vacuum cleaner armature video
I tried to pry it off with screwdrivers from both sides. Hit the bushing on the ground with a hammer. In general, it does not lend itself. In the photo he is in front of the fan. It is the fan that makes it difficult to remove.
Nadezhda If for replacement, then break the outer circle. And on the inside, tap with a hammer on something hard around the circumference. He'll talk and come out. Only all operations must be carried out very carefully so as not to damage the parts and the armature shaft
Gregory When a bearing is heated, the diameter of its inner ring increases, and the diameter of the shaft decreases when cooled. Hence the conclusion:...
Zinaida warm up with a construction hairdryer Alexandra
Svetlana There are special bearing pullers - . The new bearing should be installed, very accurately ensuring its alignment with the shaft. It is best to use a lathe for this - its chuck and tailstock have very good alignment.
PS Breaking it down and heating it up is all a hassle, it’s easier to just throw the rotor away, because that’s all that will be the final result anyway!
Gennady
How to remove a bearing from a vacuum cleaner armature video
Making a cyclone
24 Oct 2014 – 1 min. – Added by the user Home Craftsman We disassemble the vacuum cleaner and do an audit of the d8A.
dom_service
Everything is simple here; with good maintenance, a vacuum cleaner can work for more than one year without any problems.
I will give simple maintenance tips: Engine. The engine is a centrifugal type, creating a vacuum of air. The air is swirled by the rotor blades and, under the influence of centrifugal force, flows to the edges of the disk. A vacuum arises in the center, and thanks to it, air and dust are sucked through the hose.
Main engine malfunctions:
The vacuum cleaner is plugged in, the switch is flipped, but it does not work and does not make the slightest sound. Obviously, no current is flowing to the motor.
We disassemble the vacuum cleaner and check with an ohmmeter the presence of conductivity in the cord wires from the switch to the plug. We check the switch with an ohmmeter. We replace faulty switches and cords.
Another case: the vacuum cleaner is plugged in, the switch is flipped, but there are interruptions in operation, sparking of the collector, which can be seen through the discharge hole. The first thing you need to check is the carbon brushes.
When the graphite brushes wear out and the force of the springs pressing them to the commutator decreases, the sparking of the brushes, wear and overheating of the commutator increases. Sparking on the edge of the brush is allowed no more than a filament-like faintly luminous line. Most often it happens that they wear down to the springs and the steel springs come into contact with the collector.
Worn brushes must be replaced.
The new brush must be ground into the commutator so thoroughly that the entire end area of the brush touches the commutator.
This is done by pulling fine-grained sandpaper between the brush and the commutator, with the abrasive side of the sandpaper facing the brush. To prevent the edge from grinding off, the sandpaper should fit around half of the collector's circumference.
When using a vacuum cleaner for a long time, the engine manifold becomes “greasy”. For better brush contact, it is useful to wipe it with solvent or alcohol.
When the engine operates, a so-called polish is formed on the surface of the commutator - a mixture of carbon brushes and commutator copper. When the polish is created, the brushes wear out the slowest. Grinding the commutator destroys the polish and the brushes will quickly wear out before a new polish is formed.
At the same time, you must not allow the slightest scratch on the turns of the stator or armature - this will damage the engine!
If you can’t find original brushes, feel free to take larger brushes, but always of the same brand as your original ones (EG-8 brand brushes are good for vacuum cleaners). A smaller size can be easily made using a fine-grained file. However, it should be remembered that the brushes should move easily in the brush holder, without the slightest jamming. A small backlash is even useful - during operation the brushes heat up and the backlash will be removed.
Sometimes commutator sparking occurs even with normal brushes; this can be caused by the following reasons: interturn short circuit in the armature or stator winding and increased load on the motor.
First of all, you need to check whether there is an increased load on the engine. This may be caused by a blockage in the air system of the vacuum cleaner or a jamming of the motor. In older vacuum cleaners with a long service life, the bearing on the armature on the fan side is almost always badly worn.
Sometimes it is worn out so much that the armature begins to catch on the stator or the fan rotor catches on the housing. And even if it doesn’t catch, when the bearing is heavily worn, the air gap between the armature and the stator constantly changes, which causes current surges and, accordingly, sparking.
In addition, the air filter that separates dust from the air does not filter the air 100% of dust. And over time, micro dust particles stick to the bearing lubricant and sharply deteriorate its properties, even despite the fact that sealed bearings are installed there.
Therefore, the force for turning the bearings increases significantly, the current and sparking increase. This is easy to check - you need to take the armature by the bearing and turn it. A bearing with dust will hear a characteristic “crunch” instead of lubricant.
How to remove the impeller from the armature of a vacuum cleaner using improvised...
6 Nov 2014 ... The front bearing needs to be replaced.... in this case it is the “Ametek” motor from the Philips vacuum cleaner. you will need a 3.2 mm drill...
Source: https://jelektrotexnika.ru/elektricheskie-ustroystva-dlya-kuhni-i-doma/kak-snyat-podshipnik-s-yakorya-pilesosa-video.php
A few words about lubrication
The reliability of the gearbox and its durability largely depend on the timely replacement of lubricant and its correct selection.
The Russian fuel and lubricants market offers a wide range of lubricants. Among them, lubricants from Russian manufacturers stand out.
Modern tool manufacturers strongly recommend using only their own lubricants. This is the manufacturer's policy.
Among Russian lubricants, we recommend using lubricants specially designed for gearboxes.
But the quality of work of an angle grinder is affected not only by correctly selected lubricant, but, to a greater extent, by its timely replacement! Do not delay replacing the lubricant; monitor its condition.
Assembling the tool with new parts
After disassembling the instrument and necessary replacement of all damaged parts, we will reassemble it. Make sure you have all the tools, lubricants, and clean rags on hand for finishing touches.
All previous grease must be removed and replaced with fresh grease. Use lubricants from trusted manufacturers, buy them in specialized stores.
First of all, you need to assemble the rotor. You need to press in the bearings and install the impeller. Before doing this, carefully lubricate the bearings. Using a wooden tool, press them onto the top of the shaft.
Cover the collector bearing with rubber protection. This is the same diagram of how to assemble a rotor shaft.
Next, we reassemble the gearbox. We begin this process by installing the gearbox on the rotor shaft housing. When the shaft is already inside the housing, place the drive gear on it, then the washer and fixing nut.
Now install the gear housing, together with the shaft located in it, inside the stator housing. It is necessary to press both housings after the commutator bearing is already in the seat. Next, check whether the rotor rotates easily on the bearings.
The final step is to place the lid back where it was. Check how the spindle shaft rotates. If you determine that the rotation is easy even with the movement of your hands, you can start tightening the screws. They secure the cover to the body. Before doing this, lubricate all screws using sealant.