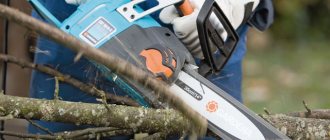
to disassemble an angle grinder yourself
Disassembling an angle grinder does not require any special metalworking skills; it does not cause serious difficulties. However, the work must be done very carefully and not with the utmost care. How to disassemble an angle grinder
, we often see on the Internet. Some sites show videos detailing the process. It is necessary to disassemble the angle grinder not only when the oil breaks down and when there is no need to replace any part, this must also be done to clean the tool from dirt.
When an angle grinder breaks down, the first thing you should do is disassemble it and clean it thoroughly; for the most part, the tool starts working.
It is for this reason that the actions that are necessary to disassemble an angle grinder should be known to anyone who owns such a tool and does not want it to work poorly for a long time. The stores offer a large assortment of this mechanism, manufactured by controversial companies. To the slave
gear as well as the housing, the grinder gearbox. They differ:
However, what remains for our client to do? Models from any manufacturer have the same technological assembly. Our client is left with the grinders equipped with the same set of parts.
Main modules used
- Housing, usually made of special impact-resistant plastic.
- Powerful electric motor.
- High quality gearbox.
- Smooth start.
- Electric motor switch.
- SJS system. The presence of accounting software (software) allows the tool to work smoothly without jumps. Today, like oil, it turns off the grinder for which the disc jamming design is intended, reduces vibration as much as possible. Like oil, it saves the operator from serious injury.
- Protective cover.
- Additional handle. With its help, of course, you can hold the grinder while doing the work. This handle can of course be installed in different positions, which gives the tool versatility.
Disassembling an angle grinder for prevention
I would recommend disassembling your sander not only for repairs and replacement of worn parts, but also for regular maintenance. This will significantly extend the operating time of the electrical device. Any mechanism works longer and better if it is properly cared for. The Bulgarian is no exception.
Disassemble the tool as described in this article. Only now you are doing this not for repairs, but in order to thoroughly clean and lubricate such a necessary tool in the household.
The most ideal option for cleaning is to use compressed air and a blower attachment in compressors. You will have to take into account that the angle grinder is cooled through the distance in the middle of the armature and stator.
Excessive amount of construction dust, various particles on the engine. All this needs to be cleaned from time to time.
And if you have already disassembled the angle grinder for prevention, apply fresh lubricant to the parts, as described earlier.
As you can see, maintaining and repairing an angle grinder is not such a difficult task!
What may be required for work
The process of disassembling the grinder requires
availability of several tools:
- spanners;
- screwdrivers;
- pliers;
- vice;
- hammer;
- lubricant;
- rags;
- gas key.
The difficulty of disassembling the angle grinder is due to the fact that the parts are in very close contact. This allows you to cope with the highest loads. The parts do not move during operation, and there is not even any oscillatory movement. This disassembly would be much better done by a master, but there is an option for our client to try and do it himself with maximum care.
Tools needed at work: pliers, ruler, calipers, pliers, electric drill, steel brush, megger.
What repairs can a user make to an angle grinder with his own hands?
Although the grinder is not a particularly complex tool, the user cannot perform repair work on all components.
Along with simply replacing the bearings or gears of the gearbox, there are malfunctions that cannot be made without special equipment or devices.
- To press out the driven gear you will need a press. It will not be possible to wind the rotor without tools.
- Such malfunctions include rotor failure. For the average consumer, such a malfunction ends with a trip to the service center.
- Advanced users can revive a burnt out rotor with certain skills and concepts. But sometimes it’s easier to buy a new one than to rewind.
For most users, repairing an angle grinder with your own hands is limited to a certain range of faults.
Systematization of faults in the electrical part of angle grinders
- The simplest fault that causes the angle grinder to not turn on is a broken power cord. Most often, a break occurs in the power cord near the plug or at the entrance to the instrument. The malfunction can be easily resolved by replacing the power cord or removing the broken piece of wire.
- Increased heating in the area where carbon brushes are installed. Most often, such a malfunction occurs due to shortening the carbon brushes below the nominal size. The length of carbon brushes cannot be shorter than 8 mm.
- The grinder's power button goes down. The malfunction is due to burnout of the internal contacts in the button. Eliminated by completely replacing the switch with a new one.
- Some models of angle grinders use a device that allows you to smoothly regulate the speed of the angle grinder. The angle grinder's speed regulator improves the smooth operation of the angle grinder and prevents the working tool from biting. Repair of the angle grinder speed controller consists of completely replacing it.
Grouping of faults according to the mechanical part of the angle grinder
- The appearance of extraneous noise in the grinder gearbox, heating of the gearbox. The malfunction is associated with the destruction of the support bearing, wear of the gear teeth of the gearbox, and drying out of the lubricant. Eliminated by replacing gears when tooth wear is high. If there is slight wear on the gear teeth, you can try to fix it. The tooth profile is corrected manually by filing using a round file and a drill. The lubricant is replaced with a new one every time the gearbox is repaired. New lubricant is applied to thoroughly washed parts.
- Bearing replacement is required when it is damaged or large play appears. In some models, the bearing is mounted on the spindle with interference. Replacement requires special equipment, in particular a press. Parts need to be cooled or heated.
- Replacing the bearings on the rotor is required when large runout occurs. The presence of increased runout can be easily seen on the rotor commutator and by the wear rate of the carbon brushes.
Simple faults and methods for diagnosing and eliminating them yourself
If your grinder does not turn on when you press the “Start” button, then the test begins by inspecting the power cable at the point of entry into the tool.
Unscrew the lid of the angle grinder and check the integrity of the power cord using a tester or phase. Strictly follow safety rules.
If the power cord is intact and the angle grinder does not turn on, replace the “Start” button.
If the grinder does not work when installing a new button, check the quality of fastening of the carbon brushes and their tight fit to the rotor commutator.
Do-it-yourself complex malfunctions and repairs of angle grinders
The following types of breakdowns require certain knowledge and skills to eliminate them:
- Seized or damaged bearings.
- Licking or destruction of gear teeth of the gearbox.
- Open circuit or short circuit in the rotor or stator.
- Failure of control circuit parts.
- Destruction of the gearbox housing.
How to change gears on a regular angle grinder \ angle grinder Energomash \ Power tool repair \ M Brest
: Group: Life channel:
While we are starting to disassemble the angle grinder, we need to prepare the work site by removing unnecessary parts from the workbench; our client is left with unnecessary parts. A clean table will make it possible not to accidentally lose any small detail.
First, the bolt holding the casing is unscrewed. It is very easy to remove; there are no particularly tight joints here. Then you need to unscrew the screw and remove the plastic plate. The outer casing must be moved towards the cord.
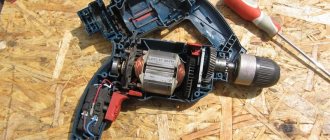
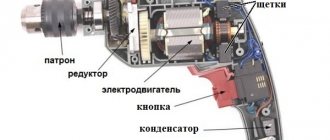
Mainly for our client, the models of grinders have a variety of devices. However, the common part is the electric motor, which includes:
The next mandatory part of the grinder is the gearbox, designed to regulate power and speed. The electric motor together with the gearbox is mounted in the housing.
How to remove an anchor from an angle grinder?
Often, during operation, power tools become clogged with small mechanical debris. This is fraught with overheating and failure of the device. To prevent such situations, it is recommended to periodically disassemble the tool to assess wear and clean it from contaminants.
The grinder also needs regular preventive examination. When sawing or grinding various hard materials with it, fine mechanical dust flies in different directions.
It often gets directly inside the instrument. To clean the device, you will have to disassemble it, and you will need to navigate the question of how to remove the anchor from the angle grinder.
Similar manipulations are also performed during the process of repairing or replacing any part of the tool.
In an angle grinder, it is the anchor that is most susceptible to natural wear. Due to overheating or regular use, a short circuit may occur in its contacts. You can also remove the anchor from the angle grinder to check its serviceability.
In most cases, a failed part is not suitable for further use. It is replaced with a new one.
But how to disassemble the tool without breaking it, and how to remove the anchor of an angle grinder? In this article we will try to provide you with detailed information that will help you understand all the intricacies of the process.
How to remove an anchor from an angle grinder - preparation for work
Disassembling a tool, as a rule, does not require special training. It is enough to be attentive and careful, and you will be able to correctly remove the anchor from the angle grinder. The surface on which the power tool is disassembled must be level, dry and clean. Make sure there is sufficient lighting so that all parts and fasteners are clearly visible.
The process of removing an anchor from an angle grinder
Every serious work requires close attention. When disassembling the tool and removing the anchor from the angle grinder, you must try to remember the location of the components inside the body in order to successfully perform subsequent assembly. For bolts, take a separate place so as not to lose parts. When disassembling the device, you may find the following tools useful:
- screwdrivers;
- pliers;
- hammer;
- vice;
- gas key.
You may also need some lubricant and a rag. All parts of the equipment are in close contact with each other. This is necessary so that under load they do not vibrate or break, hitting each other.
Sometimes such dense placement can cause difficulty in disassembly, including removing the anchor from the angle grinder. But just be extremely careful and attentive, and you will succeed.
Analysis of the elements, components and systems of the device involves disassembling the gearbox, since they form a single whole.
How to remove an anchor from an angle grinder - step by step guide
The process is carried out in several stages:
- In order to remove the anchor on an angle grinder, you must first unscrew the bolt that holds the casing . You can easily perform this manipulation, since there are no tight connections. To carry out the work you will need a universal multifunctional screwdriver with a ratcheting mechanism.
- After unscrewing the bolt, the outer casing moves towards the cable . Some models of grinders are created using a variety of components. A part that is present in all power tools is the motor. It consists of a stator, armature, commutator and brushes. After removing the body, you need to remove these same brushes. To remove it, you must first move the springs, after which they can be easily removed.
- Once you have removed the brushes, you can begin to remove the rotor . To do this, you need to unscrew the four outer bolts. You can unscrew them using a screwdriver. Then the rotor head is removed. It is quite easy to remove it - manually, pulling it up. All that remains is to remove the rotor. It is removed along with the plastic pillow. This action can also be performed manually.
- After removing the anchor from the angle grinder, you need to remove the rubber seals on its axis . Next, it remains to free the part from the plastic cushion with the bearing and gear. The upper nut is clamped with a gas wrench and unscrewed. This action does not require much effort. After this, the plastic pad, gear and bearing are removed. The anchor has been removed from the angle grinder. Therefore, the process is completed.
To assemble the power tool, all steps must be repeated in reverse order.
Mandatory manipulations when removing the anchor from an angle grinder
Damage may not be visible on contaminated parts. When performing manipulations to remove the anchor from the angle grinder, as well as other components of the tool, do not forget to thoroughly clean them and wipe them with a dry cloth.
If all the spare parts are intact and working, still removing dirt from their surfaces will be an excellent preventive measure to increase the service life of the device.
Perform this step periodically to reduce stress on tool parts when working in challenging environments.
When removing the anchor from the angle grinder and generally disassembling it for cleaning or repair, check the need to replace the lubricant of the metal parts of the tool. Litol-24 lubricant is usually used.
By promptly replacing the lubricant and removing internal mechanical blockages, you can significantly extend the life of your electric angle grinder.
This simple process will help prevent premature wear of the component parts and the tool as a whole, as well as improve its performance.
The main difficulties that may arise in the process of removing the anchor from the angle grinder
Remember the sequence of actions when disassembling the tool and the position of all parts in the body. Sometimes, when removing the anchor from an angle grinder, certain difficulties may arise:
- it happens that bolts and connections rust or threads break off during disassembly;
- as a result of a short circuit, the plastic parts of the device may melt;
- deformed plastic elements stick to metal parts, making disassembling the tool much more difficult.
If you are not confident in your abilities, it is better not to open an angle grinder at home. In this case, you will need the help of a specialist to properly remove the anchor from the tool.
If, when analyzing the condition of the systems, tool parts and removing the anchor from the angle grinder, you find a breakdown that you cannot fix on your own, stop all further actions to restore the operation of the device. Contact a service center or workshop for assistance.
A qualified specialist will conduct a detailed diagnosis of all parts and mechanisms of the tool, will be able to correctly remove the anchor from the angle grinder, and will find and repair the breakdown. Your device will be ready for use again.
Buy the necessary accessories to remove the anchor from an angle grinder from a reliable supplier
To repair the device yourself, you will need a certain tool. High-quality components, as well as devices for removing the anchor from an angle grinder and restoring the functionality of the device, are presented in a huge assortment in the ToolParts store.
Our managers are always happy to provide information support to customers and help in choosing parts. Ordered goods, including devices that will allow you to remove the anchor from an angle grinder at home, are promptly delivered to all settlements of Ukraine.
Source: https://toolparts.com.ua/novosti/kak-sniat-iakor-s-bolgarki
Device reducer
It is held in place by four bolts. They need to be unscrewed and with extreme caution, remove the gearbox from the angle grinder
.
Disassembly of the gearbox is necessary to clean it and not replace worn parts. How to remove the drive, remove the drive gear
from the rotor (gearbox housing). This is one of the most important components of the angle grinder, which experiences enormous loads during operation.
It includes:
- frame;
- big gear;
- driven gear;
- bearing. It must be lubricated to reduce friction.
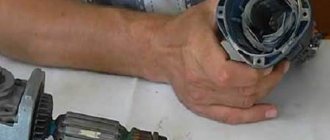
To remove the rotor from the gearbox housing, it is necessary to hold the rotor. Use a special puller to remove the rotor. Such an operation is associated with some difficulties; if there are no special skills, it is better to leave such work to professionals. There is no way to do this without a puller.
It should be said that such detailed disassembly is not necessary to simply remove dirt. Just like oil is needed only to replace a worn bearing or a rotor that has become unusable.
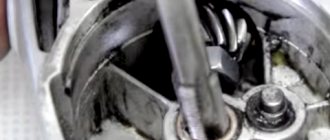
To remove the anchor, you must first remove
brushes are not a gearbox, carefully pull out the armature, holding it by the gear.
This operation will require some effort. Removing the anchor from the housing must be done very carefully, as it breaks easily.
When during operation there is strong sparking and high heating of the housing, you just need to take out the armature to clean the collector. The device will be ready for use again.
Some general useful tips for organizing the repair of an angle grinder
Before you start repairing your angle grinder, let's consider a few useful tips:
- Before you start disassembling the angle grinder, carefully read its description, assembly diagram and work order.
- Be sure to follow the sequence of technological operations.
- Strictly follow safety precautions.
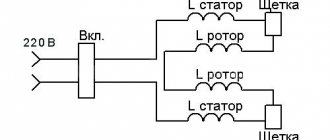
The most common reason why an angle grinder breaks down is a broken wire near the handle. First you need to check the presence of voltage on the button, this is done with a regular voltage tester. Then we check the button itself for functionality.
Learn more about diagnosing and repairing the electrical part of an angle grinder.
How to remove a needle bearing or a damaged journal bearing race
Grinder gearboxes use various bearings. They are subject to heavy loads and cause malfunctions.
Bearing failure is determined by an increase in spindle shaft play. By disassembling the gearbox housing and removing the large gear shaft, you will see the needle bearing.
The needle bearing is not used in all angle grinders. In the same grinders in which it is installed, its dismantling can be done in several ways.
Having removed the destroyed part of the bearing, the inner race can be removed using a machine tap. Clamp a machine tap of a suitable diameter into the screwdriver chuck and try to screw it into the bearing race until the tap rests on the bottom of the housing. Continue to slowly screw the tap into the cage. It will lift the clip along the threads.
The second method is that the remaining race of the destroyed needle bearing can be removed using a special bolt and a retaining ring.
How to remove helical gears of an angle grinder gearbox
Repair of the grinder gearbox begins with the dismantling of the helical gears. It is the gears that become the main cause of malfunctions of the grinder gearbox. In grinders, you most often have to change the small drive gear attached to the rotor shaft.
The helical gear can be attached to the rotor shaft in two ways:
- The gear is secured with a keyed connection and clamped with a nut.
- The gear is attached using a threaded connection. Moreover, both right-hand and left-hand threads are used.
The large driven helical gear is mounted on the spindle shaft in two ways:
- The gear is pressed onto the shaft.
- The gear is secured using a keyed connection.
In addition to replacing gears, angle grinders often require replacing one or another bearing. And there are at least three of them in the design of the grinder.
How to disassemble the gearbox correctly: recommendations
When the gearbox completely refuses to work, it requires complete disassembly to replace parts without thorough cleaning. To carry out the work, you need to prepare a bench vice. The work is carried out in a certain technological sequence:
- Use a wrench to unscrew the bolt holding the gearbox housing.
- The rotor body is secured with great care in a vice.
- By making gentle blows with a hammer, the body is removed.
- The rotor is in a convenient position for removing the bearing. The vice is clamped again.
By placing a wooden block, the bearing is knocked out. To remove the gear from the gearbox
necessary:
- Wrap the rotor with a rag and do not secure it with the jaws of a vice.
- The gear is also wrapped in rags, using a gas wrench, and turned counterclockwise.
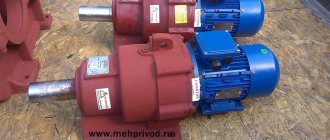
Design features of angle grinders from domestic manufacturers
Among domestic manufacturers, a special place is occupied by the products of such well-known brands as Interskol, Fiolent, Lepse.
Angle grinder repair Interskol
With proper use, Interskol grinders can work for years.
Along with the infrequent failure of the grinder gearbox, in which the weak link is a pair of gears and a bearing, there have been cases of malfunctions in the stator.
To replace the gears of the gearbox, it is necessary to disassemble the gearbox housing, pos. 19, by releasing the cover, pos. 6.
The driven gear pos. 11 is pressed onto the shaft pos. 8 and is removed using a press. The bearing pos.9 is removed with a puller.
You can repair the stator of an Interskol angle grinder yourself if you know the necessary data. When disassembling a burnt stator, you must count the number of turns of the wire used and its cross-section.
Video:
Repair of angle grinder Lepse
Grinders under the Lepse brand are marked with the LPS Lepse Kirov 1.8-230-A. These grinders trace their history back to the famous Soviet-made grinder IZH. An amazingly durable tool with the most vandal-proof design.
The advantages of the Lepse grinder are the ability to replace worn carbon brushes without disassembling the body of the machine.
Repairing Lepse angle grinders in terms of replacing brushes is simple. Through special windows pos. 45, closed with caps pos. 48, carbon brushes pos. 47 are inserted into the brush holder housing pos. 46.
When repairing the gearbox of a Lepse angle grinder, it is necessary to dismantle the gear pair.
The driving small helical gear is mounted on the rotor shaft on a key and secured with a nut.
The driven gear, pos. 15, is screwed onto the spindle shaft, pos. 10, and secured with a nut, pos. 18.
Repair of angle grinder Fiolent
Recently, Fiolent grinders have become especially popular. What attracts us is not only the affordable price, but also the reliability of the tool.
It is recommended to start repairing the Fiolent angle grinder with your own hands by studying emerging faults. If you need to disassemble the Fiolent angle grinder, then in order to remove the driven gear, pos. 11, it must be pressed out from the spindle shaft, pos. 8.
To remove the spindle shaft bearing, you must first remove the large helical gear. These are minor inconveniences.
Replacing the rotor bearings requires the removal of the small helical gear, pos. 22.
How to remove a spindle: tips
The spindle axis works in conjunction with the main gear, which contains:
To disassemble the spindle housing, you must first remove the main gear, for which purpose special tools are used.
After removing the gear, the housing is placed in a vice. Applying a wooden block and hitting it with a hammer, carefully remove the spindle where the bearing is mounted. Removing the bearing is done as described above.
Disassembly of the gearbox should be performed regularly, especially when the tool has been subjected to intensive use. After disassembling, replace the lubricant. The most commonly used is Litol-24. It should be noted that the lubricant must be changed constantly after a certain period. How to remove the drive gear from the rotor of an angle grinder. This allows you to increase the life of the gearbox by more than one year, due to reduced wear of its component parts.
A few words about lubrication
The reliability of the gearbox and its durability largely depend on the timely replacement of lubricant and its correct selection.
The Russian fuel and lubricants market offers a wide range of lubricants. Among them, Russian lubricants stand out class=”aligncenter” width=”500″ height=”389″[/img]
Modern tool manufacturers strongly recommend using only their own lubricants. This is the manufacturer's policy.
Among Russian lubricants, we recommend using lubricants specially designed for gearboxes.
But the quality of work of an angle grinder is affected not only by correctly selected lubricant, but, to a greater extent, by its timely replacement! Do not delay replacing the lubricant; monitor its condition.
Repair, preparation for work, necessary tools
Before carrying out repair work, diagnostics are carried out in order to identify parts and assemblies due to which the angle grinder cannot function normally. The electrical part of the angle grinder is inspected visually to find traces of surface burning in places of short circuit. If, after inspection, there are no obvious signs of malfunction, the electrical part is checked by ringing using special instruments (multimeter, short circuit indicator, and others). After finding and analyzing the damage, a method for eliminating it is adopted.
There are two main ways to repair a stator yourself:
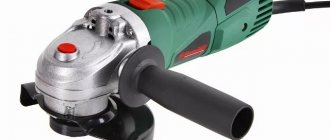
What are the reasons why an angle grinder fails?
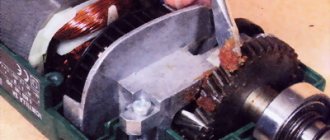
The grinder has a mechanism that bears the heaviest load - the rotor. It is also called an anchor. The damage it suffers is varied. These include temperature loads, electromagnetic, and, of course, mechanical problems.
As a result, do not be surprised that the angle grinder does not work precisely because the rotor is faulty. The armature winding overheats and burns out, this will cause a short circuit. So many owners of this tool often carry out all repair work themselves.
A worn commutator causes increased vibration in parts such as brushes. They burn, causing the mechanism to spark strongly. The main function of such brushes is to transmit current to the commutator.
The bearings in the rotor wear out very often. If you do not carry out timely diagnostics and prevention of bearings, they are completely destroyed. If during operation of the angle grinder you hear a noise that was not there before, be sure to check the condition of the bearings.
The stator is a stationary component in an electric motor; it contains a winding. The angle grinder directly because of the stator .
The gearbox is responsible for rotating the gear. It needs to be cleaned and lubricated on time.
Most often, brushes are changed in a grinding machine, because the basis for their manufacture is graphite. Replacing these parts is not difficult.