Why is there a bearing in the hub?
The wheel rim or the wheel rim itself is attached to the hub flange.
Elements of the brake system are also installed on it. If the wheels attached to the hub are driven, it acts as part of a car transmission. The front steering wheel hub is a steering element. The diameter of the hub is significantly larger than that of its internal hole, where the bearing is pressed. Its length usually exceeds the diameter of this hole. The high strength and design of the hub does not require frequent replacement. At the same time, replacing the wheel bearing pressed into it should be done more often. This part, together with other similar bearings, holds the weight of the machine, allowing the wheels to rotate. In the hubs of driven axles that do not experience heavy loads, single-row tapered bearings are usually used. For driving applications, tapered bearings with two rows are used, which can withstand twice the load than single-row bearings.
Wheel bearings have a closed design, which means they can be used until they are almost completely worn out. They do not need to change the lubricant. However, timely replacement of the wheel bearing is necessary, first of all, because it ensures safe movement under the influence of severe radial and lateral loads.
Replacing the hub bearing
The wheel bearing can rightfully be called one of the most important parts of a modern car. Despite the fact that these parts have rather modest dimensions, they perform a number of very important functions. First of all, it should be noted that it is wheel bearings that reduce the level of bearing friction during wheel rotation. Secondly, these elements support considerable weight of the car.
Unfortunately, many car owners pay attention to the wheel bearings only after uncharacteristic noise occurs in the wheel area. We must not forget that these bearings are constantly subjected to quite large loads. Here we can note regular temperature changes, as well as other negative environmental impacts.
In addition, wheel bearings are adversely affected by uneven roads, malfunctions of the brake system, or vehicle steering. If we take into account all the above circumstances, we can come to the conclusion that wheel bearings should be inspected as often as possible. When analyzing the condition of the car, you should pay special attention to the wheel rotation characteristics: there should be no extraneous noise or play, and friction should also be minimal.
If it was not possible to avoid malfunctions, you should study the general information regarding replacing broken wheel bearings with new parts.
So, the hub contains a double-row ball bearing that does not require additional lubrication or adjustment during vehicle operation.
Do not forget that pressing out the hub will destroy the bearing. In other words, the hub should be pressed out correctly and only if the bearings are to be replaced. As for the materials used for pressing, special mandrels sold in sets are suitable here. If you don’t have any mandrels at hand, you can use the rings left over from the old bearing.
When to change a bearing
The wheel bearing directly affects the vehicle's ability to move confidently on the road without endangering those inside and outside the vehicle. If at least one of these bearings fails, there is a risk of vehicle uncontrollability and an emergency. In order to understand in time whether the wheel bearing needs to be replaced, you should rock each wheel with both hands every couple of weeks to detect any play or extraneous sounds.
Sure signs that your wheel bearing needs to be replaced are:
- detection of noticeable play in the wheel when it rocks in different planes;
- the appearance of a monotonous hum emanating from the wheel while driving;
- howling or noise that disappears when turning sharply;
- The hub or hub cap is hot to the touch.
The reasons for such phenomena may be loss of lubricant due to high temperature, washout if the car often overcomes water obstacles. Fine sand and dust can get into the bearing housing and have an abrasive effect.
In any case, it is worth thinking about how to change the wheel bearing. After all, its wear also affects the vibration of the steering wheel when the car is moving. Usually this procedure is carried out after 110-130 thousand km. mileage However, this indicator may vary depending on the operating conditions of the car and its driving style. It is believed that every fourth car with a mileage of over a hundred thousand kilometers requires special attention to the condition of such bearings. To prevent problems with them, car owners should make it a rule to regularly diagnose wheel bearings on their own or using the services of a car service center.
At the same time, it is important to remember that attempts to repair it yourself or how to replace the hub bearing cheaper will not lead to anything good, since it cannot be repaired. If it fails, it simply needs to be replaced.
Do-it-yourself front wheel bearing replacement: when necessary
Hi all! Today I would like to talk about such a procedure as replacing the front wheel bearing, that is, on the front wheel side. Many of you probably know what a hub is. But just in case, I’ll remind you.
This is the main component of the rotation mechanism of a car wheel. The hub is mounted directly on the shaft or axle, and is also connected together with the rim or spokes. In fact, this is a connecting part that ensures the correct rotation of the car wheels. The brake system is directly connected to the hub mechanism.
The hub contains a bearing, which promotes better connection to the axle and is considered the most important element of the chassis. It can be changed on almost all cars. An exception is considered to be machines where the hub has a prefabricated structure and is replaced entirely. If such an important component is not replaced in a timely manner, the driver risks losing control and getting into an accident.
What you need to replace a wheel bearing
To replace a wheel bearing with your own hands, you need to be extremely careful and not overestimate your strength. In a service station, this is much easier and faster to do. Most of these enterprises employ experienced craftsmen who use professional tools to knock the bearing out of the hub.
Having decided to carry out the work on your own, you need to answer the question of how to remove the wheel bearing and how to replace it with a new one.
To do this you need to prepare:
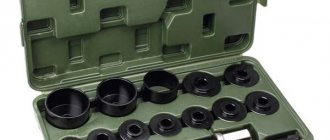
- new bearing, preferably made in Europe, retaining rings and hub nut;
- hub diagram and detailed instructions for carrying out work;
- a repair room with a vice and good lighting of the unit being repaired;
- special device for removing the bearing;
- a set of keys and sockets with a knob;
- round nose pliers, which may be needed to remove the retaining ring;
- lubricant (litol);
- a piece of pipe up to a meter long as a lever.
Before starting work, you should consider in detail how best to remove the wheel bearing. When doing this for the first time, it is better to invite an assistant. The wheel bearing puller deserves special attention during preparation. With its help, you can carefully remove the bearing without damaging the wheel and other parts of the car. It is better to familiarize yourself with its structure and operating principle in advance. Typically, such a wheel bearing puller has a fairly simple device.
It is based on a metal rod and two or three metal legs connected to it. Their ends are bent inward. The paws can be easily moved along the shaft for easy grip. They can be unfolded to remove the bearing or other parts. Using the clamps included in the kit, the damaged bearing can be removed more easily. To remove stuck bearings, a service station can use either a mechanical or hydraulic puller to remove the wheel bearing. Working with the bearing removal device requires care and precision. Here a sledgehammer and a drift are unacceptable, because... the hub seat may be damaged.
How to make a simple bearing puller with your own hands
Today, there are different types of pullers that are used to remove bearings from a shaft. In this review, we will consider the simplest option, the production of which does not require a welding machine. The removable device will be universal and easy to use.
To make a simple bearing puller with your own hands, you will need square steel bars, a metal plate, long and short mounting screws, a tap for threading, as well as a marker, a metal file, a grinder, a vice, and a hammer.
First of all, you need to prepare three pieces of a square steel block, two of them the same in length and one about half as long. We mark the ends with a marker and cut out the corners so that the bars are then neatly inserted into each other. We clean the cut areas with a metal file.
Main stages of work
We make cutouts from one edge of two long bars, also pre-marking them with a marker. We remove burrs and smooth out sharp corners. The next task is to connect the structure with bolts. To do this, we combine the bars and drill holes: two along the edges, one in the center of the short beam from the side.
Immediately cut the threads in the holes. We connect the bars with screws, and screw a long screw into the third hole. We cut off a metal strip of the required size, marking and slightly cutting the bend points, bend it into an elongated letter “P”, using a hammer and a vice.
To attach the U-shaped strip using bolts, we will make threaded holes in it and the long bar. We also drill it in the middle of the “crossbar”. On another long block you need to make a recess from the outer edge in the center.
Sharpen the edge of the screw. We assemble the product using screws. Everything is ready, the job is done! Now we check: we clamp the bushing, fix the puller with a side screw, place the pointed edge of the second screw on the bearing axis and tighten it. A few seconds and the bearing is removed! Such a puller will be useful for any craftsman on the farm.
Rate this post
Source: https://sdelairukami.ru/kak-sdelat-prostoj-semnik-podshipnikov-svoimi-rukami/
Replacing the front wheel bearing
When deciding how to replace the front wheel bearing, you should consider its location.
After all, the front suspension is the main part that affects the handling of the car. Therefore, it is better to do this work using a puller, which helps to remove such a bearing without any problems. First of all, you need to secure the car in a position convenient for work. Put it in first gear, place chocks under the wheels, and tighten the handbrake. Replacing the front wheel bearing requires careful preparation of the work area. You should carefully examine the parts you are dealing with, figure out how best to remove the bearing, and prepare the necessary tools. It should be taken into account that two bearings can be installed on the front hubs of the drive wheels.
To replace the wheel bearing on the front wheel, you must:
- Using a screwdriver, remove the bearing plug from the front wheel and loosen and loosen the hub nut.
- Hang up the wheel.
- Tie the caliper to the suspension part to prevent it from hanging on the front brake hose. After this, press it out with a screwdriver and remove it from the steering knuckle.
- Unscrew the brake disc bolts from the hub and remove.
- Use a screwdriver to pry up the retaining ring and remove it.
- Using a puller, press out the wheel bearing.
- Inspect the bearing seat, clean it of corrosion and dirt, old grease, and apply new grease.
- Press the new bearing into the hub using a puller without allowing it to become distorted.
- Replace the retaining ring.
- Secure the bearing to the axle with a thrust washer and nut.
- By tightening the nut, adjust the rotation of the wheel to eliminate play.
Necessary materials for making a bearing puller
- First of all, you will need a metal pipe. The diameter of the pipe should be larger than the outer diameter of the bearings you plan to remove. It is desirable that the pipe wall be thicker.
Pipe
- M10 bolt with full length thread and 2 nuts for it.
M10 bolt with nut.
- The washer is flat. The washer can be replaced with a piece of sheet metal with a drilled hole with a diameter of 11mm. In this case, sharp corners will need to be cut off with a grinder.
- Sheet steel.
We cut the blank from the pipe.
Now you need to weld two nuts to the washer on both sides. First screw one nut onto the bolt until it stops. We put the washer on the bolt and clamp the washer with the second nut. The second nut should be screwed on by hand. There is no need to tighten it with a wrench. If you tighten it too much, then after welding the nuts, the bolt may turn with difficulty.
Before welding, it is necessary to protect the bolt threads from welding. To do this, you can thickly lubricate the bolt threads with grease or put a tube of suitable diameter on the bolt.
Bolt assembly with washer and nuts. The bolt is fitted with a metal tube to protect the thread from welding.
The nut was welded to the washer.
The nut was welded to the washer.
- We weld the washer to the pipe.
A pipe with a washer welded to it.
Now you need to make two slits in the pipe. They must be made in such a way that two jumpers remain on the pipe opposite each other. The width of the jumpers should be approximately 1cm.
Slotted pipe.
In addition to the two slots, two holes must be drilled in the pipe. These holes will serve as viewing windows.
Pipe with drilled holes.
The bearing puller body is ready. It remains to cut off two pieces of sheet steel, which will act as stops for the bearing.
Two sheet steel plates. This way the plates will be inserted into the slots of the pipe.
Now you need to modify the bolt. Most often, the diameter of the shaft from which the bearing needs to be removed is smaller than the diameter of the bolt. Therefore, the tip of the bolt must be sharpened. But another problem may arise here.
The most common bolts are made from steel 3. This is a fairly soft and cheap steel. If you sharpen the tip of a bolt made of such soft steel, it will bend during the process of removing the bearings.
But this problem can be solved.
You need to drill a hole inside the bolt and insert a piece of hard steel or a ball from a bearing into it. This modified bolt will last a long time.
A bolt with a hole drilled in it.
- We use a needle from a diesel injector as a solid rod.
Diesel injector needle. This is a hard, hardened part. We insert the needle from the injector into our bolt.
The bearing puller is now ready. All that remains is to test it.
We put the shaft with the bearing inside the puller body and press the bearing with the plates.
We install the shaft with the bearing into the puller. We install the shaft with the bearing into the puller.
- We tighten the bolt and look through the inspection hole so that the tip of the bolt rests against the shaft.
We pull the bearing from the shaft using a puller.
- Weld two corners to the puller body. This way the puller can be held in a vice rather than being held in your hands.
- Drill holes with a diameter of 11 mm in the plates. After using the puller, you should tighten the bolt until it stops so that it sticks out of the pipe and put the plates on the bolt. Then tighten the nut. This way the records will never get lost. You just need to take into account that the length of the bolt is greater than the length of the pipe.
- Connect two removable plates to the third plate with a swivel joint, and it, in turn, is welded to the puller body. This way the records will never get lost and it will be more convenient to insert them and hold them in the desired position.
- Weld the handle to the bolt head.
Source: https://delairukami.ru/avto/semnik-podschipnikov/
Replacing the rear wheel bearing
Before replacing the bearing on the rear hub, you need to remove the wheel and brake drum as usual, and unscrew the hub nut.
The brake pads can be left untouched. After removing the hub using a puller, remove the bearing from its seat. Replacement of the rear wheel bearing is carried out after a careful inspection of the hole in which it was located, cleaning it, and removing possible burrs. The hub must be cleaned of dust and dirt, old grease. The rear wheel bearing should be replaced only after these procedures have been completed and the bearing seat has been lubricated with lithol. To do this, use a puller to press the bearing all the way and install the retaining ring. Reinstall the entire assembly in reverse order. Generously fill the bearing seat with grease. Close it with a plug placed on the sealant.
REPLACING THE FRONT WHEEL BEARING
REPLACING THE FRONT HUB BEARING
The hub is equipped with a double-row ball bearing, which does not require adjustment or lubrication during operation. When pressing out the hub, the bearing is destroyed, so press the hub out of the steering knuckle only to replace the bearing.
To press in the wheel bearing, use the appropriately sized mandrels from the kit. If there are no mandrels, you can use the rings of the old bearing.
To press in the wheel bearing, use the appropriately sized mandrels from the universal bearing replacement kit. If there are no mandrels, you can use the rings of the old bearing.
You will need: bearing puller, circlip puller, bit, hammer.
1. Loosen the front wheel hub nut (see “Removing and installing front wheel drives”).
2. Loosen the wheel nuts, lift the front of the car
and install it on supports. Remove the wheel.
3. Remove the front brake caliper (see “Replacing the front brake caliper”).
5. Disconnect the outer tie rod end from the swing arm (see “Replacing the outer tie rod end”).
7. Unscrew the hub nut and remove the steering knuckle and hub assembly.
To avoid damaging the inner wheel drive joint, secure the drive, for example, by securing it with wire to the front suspension cross member.
8. Clamp the steering knuckle in a vice as shown in the photo...
9. ...and knock the hub out of the knuckle with a hammer, using a mandrel of a suitable diameter.
10. Remove the hub. Most likely, the outer half of the inner bearing race will remain on the hub.
Once the hub is removed, the bearing is no longer suitable for reuse, so it must be replaced.
11. Universal puller...
12. ...remove the outer half of the inner bearing race from the hub.
13. Remove the bearing snap ring using a snap ring puller.
14. Install the bearing puller, press out...
15. ...and remove the bearing from the fist.
16. If a puller is not available, the bearing can be knocked out with a hammer using a mandrel of suitable diameter, since a pressed bearing cannot be reused.
17. Clean the parts and lubricate the inner surface of the knuckle socket and the outer surface of the hub with a thin layer of Litol-24 or similar lubricant.
18. Press the new bearing into the steering knuckle housing.
When pressing the bearing into the steering knuckle housing, force must be applied to the outer ring of the bearing, otherwise the bearing will be damaged.
19. Install the retaining ring.
20. Using a puller, press the hub into the support bearing, placing a support under the outer ring of the bearing.
If you do not secure the inner ring of the bearing with a support when pressing the hub, you can damage the bearing.
21. If you do not have a puller, press the hub into the bearing until it stops by carefully hitting the hammer through the mandrel, supporting the inner ring of the bearing with a stand.
22. Install the steering knuckle assembly and all removed parts onto the vehicle in the reverse order of removal.
Recommendations
Replacing wheel bearings may vary from vehicle to vehicle. Modern cars may be equipped with various easily damaged electronic devices that must be removed when replacing a bearing. Therefore, if you are not a highly qualified car mechanic, it is better to entrust this work to car service specialists.
It is also worth doing a wheel alignment after replacing the wheel bearing. An adjusted wheel alignment will improve the car's road holding on turns and straights, eliminate vibration, and also reduce tire wear and fuel consumption. Vibration may also occur due to a crookedly inserted bearing. To eliminate it, you need to knock out the bearing again and check the tightness of the wheel nuts.
How to properly press in a wheel bearing
At 145 thousand km, such a hum began that all passengers began to unmistakably determine that it was the front wheel hub making noise. But about which, right or left, opinions are divided. Unfortunately, hanging the wheels was not determined. When turning right, the noise disappeared, so one might think that the right bearing stopped humming as it unloaded. Based on this theory, it was decided to change the right one (before the replacement, I drove another 5,000 km, wishing the bearing a speedy death, but it still did not fall apart). Looking ahead, I will say that this decision was wrong, although not useless (the wear of the bearing raceways was already clearly visible). After replacing the right one the hum remained. I had to buy another bearing. After replacing the left one the noise disappeared. An autopsy showed that the noise disappeared when turning right, since the pitting was in the upper part of the outer raceway of the left bearing (and if there was wear on the inner raceway at the top, it would not make noise in the left turn). Conclusion: If hanging the wheels does not determine the specific culprit, then: 1. We change any! (budget option, maybe you can guess), 2. We change both. (especially if the mileage is more than 140,000 km).
So the actual replacement.
If you have hands, more free time than free money, and (or) no desire for car service specialists to study and break repairs for your money, you want to drive after replacement not only to the garage, you want to ruin PSA (since they stopped sell C5) you can replace it yourself. Remove the steering knuckle.
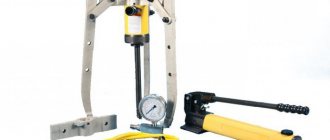
I recently shared with subscribers about refining a homemade hydraulic press
.
And also about how it was used to press out and press in the Ford hub. There were questions from subscribers and just guests about how to properly press the hub without damaging the bearing. I'm telling you. There are three options for pressing the hub into the fist: Method 1
: The simplest is to bluntly press the hub into the fist with a press. In this case, all the hydraulic pressure from the inner race of the bearing passes through the balls to the outer race. In this case, 99% of cases end in damage to the balls and cages and the hub will begin to rustle after 2-3 thousand km. This is usually done by those who press out the hub in this way.
For us, the creative and technically savvy, the third option is closer to the body. I’ll make a reservation right away. The idea is not mine. Somewhere, I saw something similar on the Internet. And I’ll upset some followers - you can’t do without turning. So, we need to make three parts. Two identical parts No. 1 of this plan
- How does the wheel bearing press tool work?
- 1. How are bearings pressed in?
- 2. Operating principle of the bearing pressing device
- 3. Selecting a device for pressing bearings
Bearings are an important part of any car.
As a rule, in a standard vehicle there are from 20 to 30 such parts, and in the most modern cars their number can reach 100 pieces. The most famous are wheel bearings, which, by the way, due to the quality of our roads, are the most loaded. Typically, these elements do not break at once, and this is preceded by many signs. If the vehicle owner notices at least some of them, then most likely the bearing will have to be replaced. The replacement procedure consists of two stages: removing the broken part or pressing out and installing a new one - pressing.
This article will focus specifically on the second stage, during which, most often, a special device is used that allows the required procedure to be performed as efficiently as possible.
How to press in a wheel bearing with your own hands
I recently shared with subscribers about refining a homemade hydraulic press
.
And also about how it was used to press out and press in the Ford hub. There were questions from subscribers and just guests about how to properly press the hub without damaging the bearing. I'm telling you. There are three options for pressing the hub into the fist: Method 1
: The simplest is to bluntly press the hub into the fist with a press.
In this case, all the hydraulic pressure from the inner race of the bearing passes through the balls to the outer race. In this case, 99% of cases end in damage to the balls and cages and the hub will begin to rustle after 2-3 thousand km. This is usually done by those who press out the hub in this way.