December 20, 2015 Tips for an electrician kmposter
Even if a man is not a professional craftsman, but simply, like a good owner, repairs everything in the house himself, he cannot do without a quality tool.
A large selection of grinders, screwdrivers and other tools is available on the website https://m-online.kiev.ua/category/158-bolgarki.aspx.
Angler anchor device
The armature of the angle grinder motor consists of a conductive winding and a magnetic circuit into which the rotation shaft is pressed. It has a drive gear at one end and a commutator with lamellas at the other. The magnetic core consists of grooves and soft plates coated with varnish to insulate them from each other.
Grinder anchor diagram
Two conductors of the armature winding are laid in the grooves according to a special pattern. Each conductor makes up half a turn, the ends of which are connected in pairs on lamellas. The beginning of the first turn and the end of the last are in the same groove, so they are closed to one lamella.
Collector lamellas
General instructions for disassembling an angle grinder
All angle grinders consist of two main parts: a plastic drive housing and a metal gearbox. In addition, for many angle grinders you can separately disassemble the rear handle, inside of which there is a power input, as well as control system units. To repair an angle grinder at home, you may need Phillips and flathead screwdrivers, wrenches and thin pliers. In addition, to check and repair electrical circuits, you will need a multimeter and tools for working with wires. Before disassembling the grinder, it is necessary to remove the cutting disc and protective casing.
How to check the angle grinder's anchor for serviceability
Types of armature faults:
- Breakage of current conductors.
- Interturn closure.
- An insulation breakdown to ground is a short circuit of the winding to the metal rotor body. Occurs due to the destruction of insulation.
- Wiring of collector terminals.
- Uneven wear of the commutator.
If the armature is faulty, the motor overheats, the winding insulation melts, and the turns become short-circuited. The contacts connecting the armature winding to the collector plates are unsoldered. The current supply stops and the motor stops working.
Types of armature diagnostics:
- visually;
- multimeter;
- light bulb;
- special devices.
Standard diagnostics
Before taking the diagnostic device, inspect the anchor. It may be damaged. If the wiring is melted, the burnt insulating varnish will leave black marks or a specific smell. You may see bent or crumpled coils or conductive particles, such as solder residue. These particles cause short circuits between turns. The lamellas have curved edges, called cockerels, to connect to the winding.
Cockerel lamellas
Due to disruption of these contacts, the lamellas burn out.
Burnout of the lamella
Other commutator damage: raised, worn or burnt plates. Graphite from the brushes may accumulate between the lamellas, which also indicates a short circuit.
Bent commutator plates
Possible malfunctions of the angle grinder armature
Anchors installed in grinders, electric drills and rotary hammers periodically fail. There are several common faults that people encounter most often:
- collector failure;
- short circuit between the winding turns of the unit;
- insulation breakdown;
- soldering the collector contacts;
- wear of studded bushing elements.
Additional Information! To determine what exactly is out of order, you will have to check the anchor at home with a tester.
How to check with a multimeter
- Set the resistance to 200 ohms. Connect the probes of the device with two adjacent lamellas. If the resistance is the same between all adjacent plates, then the winding is working. If the resistance is less than 1 ohm and very close to zero, there is a short circuit between the turns. If the resistance is two or more times higher than average, then there is a break in the winding turns. Sometimes when there is a break, the resistance is so great that the device goes off scale. On an analog multimeter, the arrow will go all the way to the right. But digital won’t show anything.
Diagnosis of the armature winding with a multimeter
- The determination of breakdown to ground is made in the absence of a winding break. Set the device scale to maximum resistance. Depending on the tester, it can be from 2 MOhm to 200 MOhm. Connect one probe to the shaft, and the other to each plate in turn. If there are no faults, the resistance should be zero. Do the same with the rotor. Connect one probe to the iron rotor body, and move the other along the lamellas.
Video: how the check is carried out
If you don't have a tester, use a 12-volt light bulb with up to 40 watts.
How to check the rotor of an angle grinder using a light bulb
- Take two wires and connect them to the lamp.
- Make a break on the negative wire.
- Apply voltage to the wires. Place the ends of the break against the collector plates and rotate it. If the light bulb lights up without changing brightness, then there is no short circuit.
- Perform a short circuit test to the iron. Connect one wire to the lamellas and the other to the rotor iron. Then with the shaft. If the light is on, it means there is a ground fault. The winding closes to the rotor housing or shaft.
This procedure is similar to diagnostics with a multimeter.
Checking an asynchronous electric motor
Checking the electric motor should begin with its visual inspection. When conducting an external inspection, special attention is paid to the shield. It should indicate the manufacturer and type of engine used.
Then you need to inspect the winding for damage. It may have visible dents or breaks. The rotor winding must be intact, without wires sticking out.
If no damage is found during the inspection, you will have to use measuring instruments. With their help, it will be possible to determine whether there are breaks or short circuits.
Checking with a short-circuited turns indicator (SCI)
There are anchors where the wires connected to the collector are not visible due to being filled with an opaque compound or due to a bandage. Therefore, it is difficult to determine the commutation on the commutator relative to the slots. An indicator of short-circuited turns will help with this.
X in the case
This device is small in size and easy to use.
IKZ device
First check the anchor for breaks. Otherwise, the indicator will not be able to detect a short circuit. To do this, use a tester to measure the resistance between two adjacent lamellas. If the resistance is at least twice the average, then there is a break. If there is no break, proceed to the next step.
The resistance regulator allows you to select the sensitivity of the device. It has two lights: red and green. Adjust the regulator so that the red light starts to light. On the indicator body there are two sensors in the form of white dots located at a distance of 3 centimeters from each other. Attach the indicator with the sensors to the winding. Rotate the anchor slowly. If the red light comes on, it means there is a short circuit.
Video: IKZ at work
Repair: Elimination of insulation breakdown
If the insulation breakdown was small and you found it, you need to clean the area of carbon deposits and check the resistance. If its value is normal, insulate the wires with asbestos. Apply quick-drying “Super Moment” type glue on top. It will seep through the asbestos and insulate the wire well.
If you still haven’t found the location of the insulation breakdown, then try carefully soaking the winding with impregnating electrical insulating varnish. Punched and unpierced insulation will be saturated with this varnish and become stronger. Dry the anchor in a gas oven at about 150 degrees. If this does not help, try rewinding the winding or changing the armature.
Diagnostics with an armature testing device (throttle)
The armature testing device determines the presence of an interturn short circuit in the winding. The inductor is a transformer that has only a primary winding and a magnetic gap cut out in the core.
Anchor testing device diagram
When we place the rotor in this gap, its winding begins to act as the secondary winding of a transformer. Turn on the device and place a metal plate, such as a metal ruler or hacksaw blade, on the anchor. If there is an interturn short circuit, the plate will vibrate or be magnetized towards the armature body due to local oversaturation of iron. Rotate the armature around the axis, moving the plate so that it lies on different turns. If there is no short circuit, the plate will move freely along the rotor.
Anchor testing device
Video: How to make a throttle with your own hands and check the anchor
General rules for repairing power tools
The safety rules for repairing an angle grinder are the same as for repairing any other power tool. Cleaning from dust, disassembling and assembling is carried out only with the device completely de-energized. Repair work must be carried out on a dielectric surface, and the power source must be equipped with a short circuit protection circuit breaker. It is strictly forbidden to manually turn the angle grinder spindle if the power supply is turned on. It is also prohibited to carry out test runs during or after repair with a cutting disc installed on the spindle.
How to repair an anchor at home
A third of screwdriver failures occur due to the anchor. With everyday intensive operation, malfunctions can occur within the first six months, for example, if the brushes are not replaced in a timely manner. With gentle use, the screwdriver will last a year or more.
The anchor can be saved if the balance is not disturbed. If during operation of the device you hear an intermittent hum and there is strong vibration, then this is an imbalance. This anchor must be replaced. And the winding and commutator can be repaired. Small short circuits are eliminated. If a significant part of the winding is damaged, it can be rewound. Worn and badly damaged lamellas should be sharpened, extended or soldered. In addition, you should not undertake anchor repairs if you are unsure of your capabilities. It is better to replace it or take it to a workshop.
Collector groove
Over time, wear from the brushes forms on the commutator. To get rid of it, you need to:
- Grind the commutator using cutters for longitudinal grinding, that is, through cutters.
Passing straight cutter - We also need a reverse cone for centering on the bearing. Make a hole in it up to 8 mm.
Reverse cone
- Since copper is malleable, adjust the machine to a speed of 600 to 1500 rpm.
- Primary feed in half divisions. When the cutter lightly touches the product, make a longitudinal groove of the entire collector. Based on the resulting shiny pattern, you will see the condition of the lamellas and all surface irregularities.
- If the collector is level, then the groove will be uniform.
- If there are holes, continue grooving until the surface is level.
- For the last pass, you need to move the cutter one-fourth from the division.
- To polish, take thousand-grit sandpaper and turn on the machine so that the armature rotates in the direction in which it rotates during operation.
Don't forget to clear the rotor of chips to prevent a short circuit.
Video on the topic
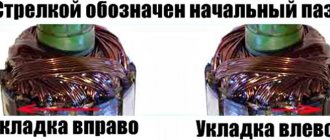
How to rewind an anchor
Before disassembling the armature, write down or sketch the direction of the winding. It can be left or right. To determine it correctly, look at the end of the armature from the commutator side. Wear gloves and take sharp wire cutters or a hacksaw. Remove the winding end parts. The collector needs to be cleaned, but it is not necessary to remove it. Carefully, without damaging the slot insulators, knock out the rods of the remaining parts of the winding using a hammer and metal chisel.
Video: Removing the winding
Using a needle file, without damaging the insulator film, remove the remaining impregnation. Count the conductors in the slot. Calculate the number of turns in the section and measure the diameter of the wire. Draw a diagram. Cut cardboard sleeves for insulation and insert them into the grooves.
Video: Winding left and right
After winding, weld the section leads to the collector cocks. Now check the winding with a short circuit tester and indicator. Proceed with impregnation.
Instructions for impregnation (taking into account the speed controller)
- After making sure that there are no problems, send the armature to the electric oven to warm up for better flow of the epoxy resin.
- After warming up, place the anchor on the table at an angle for better spreading over the wires. Apply resin to the frontal area and slowly rotate the anchor. Drip until glue appears on the opposite frontal part.
Impregnation at an angle
- Place the anchor horizontally and drip onto both frontal parts. Twist the anchor until it loses fluidity.
- Leave in a vertical position until complete polymerization.
Drying the anchor in air before polymerization
At the end of the process, lightly grind the commutator. Balance the anchor using a dynamic balancer and an angle grinder. Now make the final grind on the bearing. It is necessary to clean the grooves between the lamellas and polish the collector. Make a final check for opens and shorts.
The peculiarity of the winding for angle grinders with adjustable speed is that the rotor is wound with a power reserve. Current density affects the number of revolutions. The wire cross-section is too high and the number of turns is too low.
When not to check the anchor yourself
It is not always worth trying to check anchors yourself. The fact is that this is quite a difficult job. Therefore, it is better for people who have never done this before to call specialists.
Without theoretical knowledge and practical skills, you should not even try to disassemble the angle grinder. If done incorrectly, you can seriously damage the instrument.
Additional Information! If there is a warranty for the angle grinder, you need to contact the point of sale and show the manager the warranty card. He must pick up the instrument for repair or replace it with a new one.
How to replace an old gearbox with a new one
Grinders differ in size, power, and manufacturers, but the principle of component layout is the same. The new motor armature for the angle grinder is selected strictly in accordance with the model of your tool.
- After unscrewing all the fastening bolts of the casing, housing and gearbox, remove the gearbox with the armature from the housing. Usually the gearbox and the armature are rigidly attached to each other. To separate them, you need to disassemble the gearbox.
Gearbox with anchor
- Unscrew the mounting bolts.
- The rotor shaft is screwed to the gearbox housing with a nut. Unscrew it. Remove the gear.
- Next comes the bearing. To remove it, sometimes it is enough to knock on the gearbox housing with a wooden block. But more often than not, a stuck bearing cannot be removed without some tricks. Between the impeller and the bearing there is a plate, which is bolted to the gearbox with two bolts. To get to them, break off a piece of the plastic impeller or use a heated nail to burn two symmetrical holes. The second hole is necessary for balancing if you are not going to change the impeller.
- Unscrew both bolts, tap the gearbox housing with a wooden block, and the armature will detach from it. In this case, the bearing will remain on the shaft. Remove all bearings from the shaft using a puller.
Video: how to film and what difficulties may arise
Place the new bearing into the gear housing on the rotor side. Screw on the plate that caused the impeller to break. Insert the gear inside the housing and tighten the nut so that it fits into the grooves of the gear. Place the impeller on the new armature and insert the armature into the gearbox housing. Tighten the nut.
What to do if an armature malfunction is detected
If serious faults are discovered during diagnostics, there are two ways to solve the problem. The first is to rewind the elements. It is quite difficult to do this on your own; it is better to seek help from the appropriate centers.
It is worth noting that even after repair, the anchor can break quite quickly. Therefore, it is better to replace the broken part with a new one. Before choosing a replacement anchor, you need to make sure that it fully matches the angle grinder model.
How to “revive” a faulty device?
Repair of the electric motor armature begins only after full confidence in the malfunction of the unit. Scratches and chips on the lamellas are removed by circular groove of the surface. Carbon deposits and soot can be removed with cleaning agents for contact electrical connections. Broken bearings are repressed and replaced with new ones. It is important to balance the shaft during assembly.
Rotation should be easy and without noise. Damaged insulation is restored; ordinary electrical tape can be used. It is better to solder connections that cause suspicion. If there are problems with the armature coils, it is recommended to resort to rewinding, which you can do yourself.
If you don't have an ohmmeter?
If you don’t have a multimeter, you will need twelve volts and a light bulb for the appropriate voltage. Any car enthusiast will have no problems with such a set. The positive and negative terminals are connected to the plug of the electrical appliance. How to check
angle grinder anchor, starter. An incandescent lamp is placed in the gap. The result is observed visually.
The armature shaft is rotated by hand, the lamp burns without jumps in brightness. If attenuation is observed, the engine is faulty. Most likely, an interturn short circuit has occurred. Complete disappearance of the glow indicates a break in the circuit. The reasons may be non-contact of the brushes, a break in the winding, or a lack of resistance in one of the lamellas.
Diagnostics of internal parts
The electric motor should not have carbon deposits or dark spots similar to the consequences of overheating. The surface of the contact parts and the gap area should not be dirty. Small particles reduce and increase current. Do not disassemble devices with a plug connected to the network for safety reasons.
It is recommended to film the disassembly process to eliminate complications during the reverse process. Or you can write down each step of your actions on a piece of paper. Some wear of brushes and lamellas is allowed. But if scratches are found, you should find out the cause of their origin. Perhaps this was caused by a crack in the case, which can only be noticed under load.
Restoration of coils
You can rewind the armature of an electric motor in a garage, you just need to be careful when applying each turn. Copper wiring is selected similar to the wound one. The cross-section cannot be changed; this will lead to a violation of the engine speed limits. Dielectric paper will be needed to separate the windings. The coils are finally filled with varnish.
You will need a soldering iron and skills to use it. The joints are treated with acid, and rosin is used to apply tin-lead solder. When dismantling the old winding, count the number of turns and apply a similar amount of new winding.
The body must be cleaned of old varnish and other inclusions. A file, sandpaper or torch is suitable for this. Sleeves are made for the anchor; the material is electrical cardboard. The resulting blanks are placed in the grooves. Wound coils should be made with right-hand turns. The terminals on the collector side are rewound with nylon thread.
Each wire is soldered to the corresponding lamella. The assembly should end with regular measurements of the resistance of the contact connections. If everything is normal and there are no short circuits, you can check the operation of the electric motor under voltage.
Source
How is a fault diagnosed?
Checking the motor armature begins with identifying the fault itself. Complete breakdown of this unit occurs due to scattered commutator brushes, destruction of the dielectric layer between the plates, and additionally through the electrical circuit. If sparking passes inside the device, wear or damage to the current collectors is also called.
Sparking of the brushes begins due to the appearance of a gap at the point of contact with the commutator. This is preceded by a fall of the device, a high load on the shaft when jammed, and additionally a violation of the integrity of the solder on the winding terminals.
A malfunction on a running electric motor manifests itself in typical conditions:
- Sparking is the main sign of a malfunction.
- The hum is not friction when the armature rotates.
- Noticeable vibration during operation.
- Changing the direction of rotation when the armature passes a trajectory of less than a revolution.
- The appearance of a smell of melting plastic or strong heating of the case.
Possible reasons
Factors causing stator failure:
- power surge;
- water ingress;
- overload and resulting overheating;
- sudden pulling of the cord from the outlet.
Signs by which you can understand that the stator is faulty:
- There is a smell of burnt insulation.
- The case is overheating.
- Smoke appears.
- Shaft rotation slows down or stops.
- The shaft spins spontaneously, and the tool suddenly gains maximum speed.
The winding wires are covered with a protective layer of insulating varnish. When overheated, it burns and collapses. This causes a short circuit in the turns. The varnish emits a specific smell. A short circuit in just one of the wires completely disables the angle grinder.
Rules that will help avoid overheating of the angle grinder motor:
- Do not turn off the device immediately after operating at reduced speeds, but after about one minute.
- When operating under load at low speeds, take frequent breaks.
You can often avoid replacing a faulty stator by rewinding its winding. You can do the rewinding of a damaged stator coil of an angle grinder yourself, but it is still recommended to entrust this work to a specialist.