Characteristics of the Huter DY3000L gas generator
Here are a brief summary of the parameters of this gasoline electric generator that interest us as electricians: Output power - 2500 VA (taking into account the power factor and reserve - we take 2 kW), start - manual. In principle, you don’t need to know anything more from the electrical side.
The remaining parameters of the generator can be found in the instructions.
The instructions for the generator, as well as something else, can be downloaded by reading the article to the end.
The main power consumers are the heating system (about 300 W, in winter it is the most strategically important consumer, for which the generator was bought), TV (100 W), refrigerator (300 W), lighting (300 W). Total - we fit perfectly into 1.5 kW. To power such a load, this generator is quite enough.
The house also has a 2.2 kW electric heater and a washing machine, but I was given my word of honor that they would not be powered by a generator.
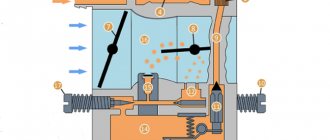
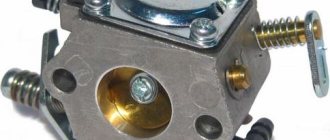
Adjusting the carburetor of a gas generator
It often happens that a gas generator has poor mixture formation.
It is determined by the following criteria: ● Problem starting the device;
● Smoke appears from the exhaust pipe;
● The device loses speed at idle and corrects it using the throttle valve.
If your generator breaks down, renting a gas generator during repairs can be a useful service for users.
If you have knowledge about how carburetors work, you can correct the situation yourself:
1. The carburetor must be disassembled and the channels, fuel nozzle and emulsion tube must be blown out with compressed air. After this, the carburetor can be assembled;
Generator design
The most important and capricious part of a Huter gasoline generator, like any other, is its starting system. The fuel valve, the air damper, the spark plug, the oil and gasoline levels - everything must be in the right position and normal.
What interests us is the engine operation switch (closed when turned off), AC and DC circuit breakers.
Below are a few photos of the electrical insides of the Huter 2500l generator:
1_wiring diagram Huter DY3000L_diode bridge and voltmeter
We see a KBPC3510 diode bridge with 35 Amperes and 1000 Volts. With a declared charge current of no higher than 9A, a maximum voltage of 14V and a circuit breaker current of 10A, the diode bridge will work without problems.
2_ wiring diagram of the Huter DY3000L gas generator _output terminals and protection
The second photo shows an alternating voltage circuit breaker, on which there is a sticker with information that its rated current is 12A, operation current is 15A. On the right is a 10A DC thermal relay.
Common faults
If we talk about the most common malfunctions of electric generators of any type, we can name the following problems:
- contamination or failure of spark plugs , which is reflected in unstable operation of the generator and difficulty starting it;
- carburetor clogging : too high fuel consumption, instability of operation in the presence of a permanent load, difficulty starting the device;
- a breakdown in the ignition coil: the gasoline generator cannot be started, there is no spark;
- problems associated with the starter: biting and breaking of the cable or destruction of the ratchet mechanism;
- violation of valve clearances - in this case, there is too much noise during operation and difficulty starting the gas generator;
- wear of brushes on synchronous models causes the device to not produce output current;
- a broken speed controller causes them to float and fail to operate when the load changes;
- wear of the generator rotor and crankshaft bearings causes oil leakage and increased noise during operation;
- Wear of the cylinder and piston rings causes excessive oil consumption and makes it difficult to start the engine if it is cold.
Huter gas generator diagram
Let's look at the electrical circuit of the Huter DY 3000L gasoline generator, which I took from the instructions:
Electrical diagram of a single-phase gas generator Huter
Briefly, how the gas generator circuit works. Alternator A2 is manually spun by a cable, ignition coil A5 produces a spark on spark plug F1, which starts the gasoline internal combustion engine. There will be no spark if switch SB1 is closed - the spark will be shorted to the housing.
Two output voltages of the alternator are generated - coil L1 220V (supplied through QF1 to the 220VAC output) and coil L2 - 12V (supplied to the output via the diode bridge and QF2). There is no direct current protection against short circuit; all hope for a short circuit is a large voltage drop.
You can monitor the oil level using the HL1 indicator, and the voltage level using the PV1 dial gauge.
Coils L3 and L4 are responsible for the correct operation of the alternator and the stability of frequency and voltage.
Characteristics of the Huter DY3000L gas generator
Here are a brief summary of the parameters of this gasoline electric generator that interest us as electricians: Output power - 2500 VA (taking into account the power factor and reserve - we take 2 kW), start - manual. In principle, you don’t need to know anything more from the electrical side.
The remaining parameters of the generator can be found in the instructions.
The instructions for the generator, as well as something else, can be downloaded by reading the article to the end.
The main power consumers are the heating system (about 300 W, in winter it is the most strategically important consumer, for which the generator was bought), TV (100 W), refrigerator (300 W), lighting (300 W). Total - we fit perfectly into 1.5 kW. To power such a load, this generator is quite enough.
The house also has a 2.2 kW electric heater and a washing machine, but I was given my word of honor that they would not be powered by a generator.
Generator design
The most important and capricious part of a Huter gasoline generator, like any other, is its starting system. The fuel valve, the air damper, the spark plug, the oil and gasoline levels - everything must be in the right position and normal.
What interests us is the engine operation switch (closed when turned off), AC and DC circuit breakers.
Below are a few photos of the electrical insides of the Huter 2500l generator:
1_wiring diagram Huter DY3000L_diode bridge and voltmeter
We see a KBPC3510 diode bridge with 35 Amperes and 1000 Volts. With a declared charge current of no higher than 9A, a maximum voltage of 14V and a circuit breaker current of 10A, the diode bridge will work without problems.
2_ wiring diagram of the Huter DY3000L gas generator _output terminals and protection
The second photo shows an alternating voltage circuit breaker, on which there is a sticker with information that its rated current is 12A, operation current is 15A. On the right is a 10A DC thermal relay.
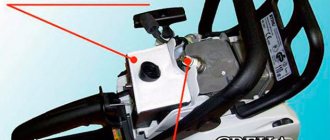
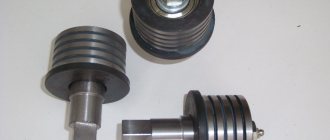
3_ wiring diagram Huter DY3000L _operation switch
The third photo shows the engine switch. I will use the wires to it to automatically stop the generator in the event of voltage coming from the city.
And the generator is turned on (started) manually, with the help of that puller, or, to put it correctly, a manual starter cable.
The model in question does not have autostart. X model has a battery-powered electric starter, where automatic starting is possible.
How to change brushes on a generator? It’s shameful to do this”
How to change brushes on a generator?
It’s not shameful to do this. How to change the brushes on a generator
is mainly of interest to novice drivers, since they have practically no experience in servicing their car, and this procedure is accessible to inexperienced owners. To carry it out you do not need any special devices or tools. All you need is a wrench or two, a set of screwdrivers, and hands that can hold the tool properly.
The brushes, which will be discussed below, are made from graphite; they look black, so you can hear them sometimes called carbon. They find their application in automobile and other generators, electric motors and other similar devices.
Graphite does not have good abrasion resistance, so during production they are impregnated with special compounds to increase their service life.
Such devices are always equipped with two brushes, which ensure its functionality. One brush is supplied with voltage from a relay that regulates the amount of voltage generated by the generator, and the second connects the armature to the vehicle’s ground. During the operation of the generator, their inevitable wear occurs, so periodic replacement of these parts is required.
As a rule, when carrying out regular maintenance, no one pays due attention to the brushes. The car's operating instructions recommend checking their condition when the car is driven after approximately 50-60 thousand kilometers, or after four years of operation of the car. It is impossible to check the condition of the brushes on some car models without removing the generator, therefore, in the case where there are no obvious signs of wear, dismantling this device is necessary.
The following signs of malfunction may indicate the need for replacement:
- Arbitrary shutdown of electronic devices in a car while the engine is running, when this happens frequently and the reasons for this phenomenon are unclear;
Poor lighting when traveling at night;
- does not correspond to that recommended by the car manufacturer, which leads to a decrease in battery capacity.
Huter gas generator diagram
Let's look at the electrical circuit of the Huter DY 3000L gasoline generator, which I took from the instructions:
Electrical diagram of a single-phase gas generator Huter
Briefly, how the gas generator circuit works. Alternator A2 is manually spun by a cable, ignition coil A5 produces a spark on spark plug F1, which starts the gasoline internal combustion engine. There will be no spark if switch SB1 is closed - the spark will be shorted to the housing.
Two output voltages of the alternator are generated - coil L1 220V (supplied through QF1 to the 220VAC output) and coil L2 - 12V (supplied to the output via the diode bridge and QF2). There is no direct current protection against short circuit; all hope for a short circuit is a large voltage drop.
You can monitor the oil level using the HL1 indicator, and the voltage level using the PV1 dial gauge.
Coils L3 and L4 are responsible for the correct operation of the alternator and the stability of frequency and voltage.
How to Remove the Rotor from a Gasoline Generator
How to remove a gas generator rotor
Making a rotor ejector for gasoline generators from a rod or thick-walled tube with a diameter of 8 mm.
how to remove the rotor and stator of a Skiper LT 3900B generator
how to remove the rotor and stator of Skiper LT 6500 EB 4
Power station 3000 W! Generator replacement. (alterator)
An extremely rare operation by definition, they don’t fire often. But specifically here the winding is 3-phase, and how is it.
How to disassemble a gas generator.
Chinese gas generator 1kW. I won’t describe the complete disassembly, just the main point of removing the anchor.
Analysis of the FIRMAN SPG6500E1 generator part 3
Disassembling the FIRMAN SPG6500E1 generator - part 3 (removing and disassembling the alternator)
We easily and safely remove the rotor from a generator or power plant. How to remove the generator rotor
We remove the rotor from a powerful power plant, a welding generator. Or how to remove the rotor from a generator. Very frequent
Removing the generator rotor without a puller
Our VKontakte group: Remove the generator rotor without a puller and remove the crankshaft. Also.
How to check the armature (rotor) of a 5.5KW generator. Check 5.5kW generator armature.
On the channel I showed how to check the stator windings of a generator, and now I’ve expanded this topic with a video about testing.
How to remove a generator rotor (Experiment)
Due to the fact that for some reason many people cannot remove the generator rotor without damage, as I described here.
Analysis of the FIRMAN SPG6500E1 generator - part 1
Complete disassembly of the FIRMAN SPG6500E1 gas generator with comments from the master - part 1 (removing the tank, air housing.
Analysis of the FIRMAN SPG6500E1 generator part 2
Disassembling the FIRMAN SPG6500E1 gas generator with comments from the master - part 2 (removing attachments, protective.
How to remove the generator rotor
I continue to disassemble the engine.
How to remove a generator rotor in 2 minutes
How to remove a generator rotor, how to remove any generator rotor using scrap materials! I'M IN CONTACT.
The diesel power plant does not start. Dismantling a diesel generator.
Disassembling a diesel generator is easy. How to remove the armature rotor from the generator? A hammer and a piece of wood! Parts list
How to remove the generator and fill the power plant with oil! Honda GX390 engine repair
In principle, pass-through diagnostics of a gas generator! Honda engines are always a pleasure to repair!) By the way, I didn’t.
removing the anchor from the power station diesel generator ud186 176f 188f
Vertical generator. How to remove the rotor.
A short video on how to remove the rotor from a vertical generator. We are sorting out the rubble of equipment that is not.
How is the generator engine lubricated? Let's look at the answer.
How to remove the generator armature
Someone asked in the comments how to remove the anchor from the crankshaft. So, I decided to make a video on this topic. Ways.
Do-it-yourself repairs. Gasoline generator. Disassembling the gasoline generator. Current generator
In this video I will show and tell you how to repair a gas generator with your own hands. In this repair, the gene.
Removing and installing the rotor. Replacing a generator on a motorcycle Minsk. Chinese generator test
Support the project - Filming and editing - .
How to remove a generator rotor, the easy way, SUZUKI YAMAHA HONDA, KAWASAKI
Inverter gas generator repair
This video was processed in YouTube Video Editor ()
Alternator repair Mess alte, stator rewinding
Repair of generators in a service center in Kyiv We are at.
Chinese generator 2хт 650 W (analysis, defect detection)
The video is not educational in nature and is amateur content.
The gas generator does not produce voltage
Repair and sale of generators, UPS (uninterruptible power supplies), voltage stabilizers in a service center in Kyiv.
Replacing the gas generator crankshaft oil seal #Chainsaw repair. Important little things
Also visit my website: where all my publications are collected.
Repair of gasoline generator 3000 W
Based on the customer's complaint, namely: the gasoline generator does not start, it sneezes, and a breakdown of the gasoline valves was discovered.
GENCTAB generator repair, review and features
Repair of generators in a service center in Kyiv We are at.
How to remove a generator rotor (magnet) on a scooter / homemade puller
How to remove the stator (rotor) of the generator and get to the generator and possibly change it? Many people even...
REPAIR OF GENERATOR 9 HP Engine 186FAE Jammed Repair of diesel generator 9 HP
REPLACING THE FLYWHEEL CONTINUED:.
How to fix the rotor to unscrew the bolt
We fix the rotor in order to unscrew the bolt with our own hands, using available tools and means.
DIY generator rotor puller in 5 minutes.
Unfortunately, we were unable to film this generator, not just with this puller, but even with the factory one.
Assembly and installation of the Zongshen engine on the generator. Part 1.
The procedure for assembling and installing the Chinese Zongshen engine on a generator. www.zongshen.pro.
Generator rotor repair.
OVER 300 VIDEOS HERE IN ONE CLICK - .
How to remove a honda dio 34 alternator magnet
How to remove an anchor from a generator without a puller
How to remove an armature from a generator without an electronics puller on a biglion.
How to disassemble the Kamaz generator rotor.
At the request of subscribers, I filmed a video in which I will show how to disassemble a car generator rotor, for example.
Checking the alternator windings. Generator 5KW. Checking the alternator windings. Generator 5kW.
At the request of one of the channel viewers, I am making a video on how to check the alternator windings on a gasoline engine.
Replacing the AVR on the generator
Automatic voltage regulator (AVR) for generator 2-2.5 kW - .
Review. Gasoline generator, stator replacement.
Since a lot of gasoline and electric tools have appeared on the market, gasoline generators are simply necessary.
Troubleshooting methods
Now let's talk about how to repair the device in question yourself if the most common problems occur.
Dirty air cooling fins
One of the fairly common problems that can arise when working with a gasoline generator is dirty air cooling fins. The reason for this could be two things. In the first case, we are talking about the fact that the device has not been used for a long time; dust has settled on it and got inside. Naturally, when the device is actively operating, the system will overheat, which will sooner or later simply burn out.
The solution to this problem can be found in any instruction manual for any model of gasoline generator.
It can also appear for another reason - the use of low-quality fuel can cause carbon deposits to appear on various types of filters and on the cooling mechanism of the device as well. It can be eliminated very simply - the air cooling fins should be very carefully wiped with a cloth to remove dust and dirt. If you wish, you can do this without disassembling the device, but it would still be better to disassemble it, remove the necessary part and thoroughly clean it, and then install it in its original place.
Problems with the ignition system
If there is a problem with the ignition mechanism, which is expressed in increased engine noise during operation or difficult starting of the generator, then this problem must be looked for either in the operation of the carburetor or in the ignition mechanism. Despite the interconnectedness of the two systems, solving problems with them should be considered separately. In this case, you will first need to unscrew the spark plug and inspect its condition.
More precisely, you should look at the carbon deposits that should form on its electrodes.
- If it is extremely dense and dry and black in color, then this indicates that a rich mixture is used. This means that the problem is either the carburetor or a clogged air filter.
- If the carbon deposits are black, but oily, this means that the piston rings are very worn out, and the oil ends up in the combustion chamber, where it should not be.
- If the carbon deposits are white, this means that the mixture is extremely lean, and most likely the carburetor is faulty.
- Brown soot with a brick tint indicates that everything is fine with the engine, while soot that is red or green-red in color indicates the use of low-quality fuel.