Welding equipment today comes in many varieties. But inverter devices have gained the greatest popularity among home DIYers due to their compactness and versatility. A welding inverter is equipment that allows a master to perform various types of welding work. But to carry them out efficiently, it is not enough to have an expensive unit; you also need to learn how to use a welding machine.
Installation and connection of the unit
To use an inverter efficiently and safely, you first need to properly prepare it for operation. This process is carried out in several stages. The first task is to install and connect the unit. Installation of the inverter must be carried out according to certain rules:
- the unit must be placed so that it is at a distance of at least 2 m from walls or any objects;
- the device must be grounded;
- the welding location must be chosen so that it is away from flammable objects;
- It is recommended to cook either on a free area or on a metal table.
The inverter can be connected both to a household network (220 V) and to a network with a voltage of 380 V, which is usually used in production. If you plan to use the unit away from electrical networks, then it can be connected to a generator, diesel or gasoline.
Electrical connection
Connecting a welding machine to a household electrical outlet often causes problems. The reason for their occurrence may be old wiring or insufficient diameter of its wires. Typically, wiring is designed for current up to 16 A. And since all switched on devices in the house can exceed this value, circuit breakers (automatic circuit breakers) are installed for safety reasons. Therefore, when connecting, you need to know the power of the welding machine so that it does not trigger the machine.
Connecting the inverter to a household network
You should also pay attention to network sag. If, when you turn on the inverter, you notice a decrease in voltage in the electrical network, this indicates an insufficient cross-section of the wires. In this case, it is necessary to measure to what values the voltage drops. If it drops to values below the minimum values with which the inverter can operate (indicated in the instructions), then the device cannot be connected to such a network.
Using an extension cord
The network cable connected to the inverter meets all power requirements and does not cause connection problems. But if its length is not enough, then you should select an extension cord with a wire cross-section of at least 2.5 mm2 and a length of no more than 20 meters. Such parameters of the extension cord will be enough for the inverter to operate with a current of up to 150 A.
It should be remembered that when connecting the device to the network through a carrying case, the remaining part should not be kept wound up, since when the unit is turned on, it will turn into an inductor. As a result, the conductors will overheat and the extension cord will fail.
Connection to generator
In cases where it is not possible to connect the device to the mains, you can connect it to a generator that runs on either gasoline or diesel fuel. Gasoline power plants are the most widespread. But not all of them are suitable for connecting welding machines. In order for the inverter to operate effectively, the generator must have a power of at least 5 kilowatts and produce a stable output voltage . Voltage fluctuations can damage the welder.
You should also consider what diameter electrode you will be working with. For example, if the electrode has a diameter of 3 mm, then an operating current of about 120 A with an arc voltage of 40 V will be required. If we calculate the power of the welding inverter (120 x 40 = 4800), we get a value of 4.8 kW. Since this will be the power consumed, a power plant capable of producing only 5 kW will operate at the limit of its capabilities, which will significantly reduce its service life. Therefore, the generator must be selected with some power reserve, approximately 20-30% higher than that consumed by the inverter.
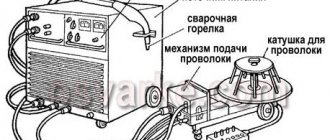
Inverter design for welding
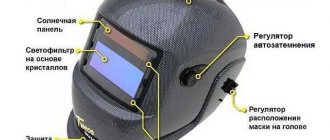
In order to understand how to properly use a welding machine, a novice master should familiarize himself with the design of the inverter.
The welding inverter is a metal box with internal components, a total weight of about 7 kg, which is equipped with a handle and a shoulder strap for ease of carrying. The housing of the welding inverter may contain ventilation holes that promote better air outflow when cooling the unit. The front panel has buttons for switching the operating state, knobs for selecting the required voltage and current, outputs for connecting work cables, as well as indicators indicating the presence of power and overheating of the inverter during welding. The cable for connecting the device to the power supply is usually connected to the connector located on the back of the inverter.
Welding inverter design
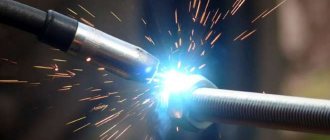
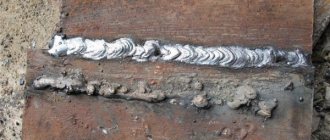
When the electrode comes into contact with the metal plates being welded during welding, a high-temperature arc is formed, as a result of which both the elements of the welded rod and the metal of the welded joint melt. The bath formed in the arc area by the molten metals of the plates and electrode is protected from oxidation by a liquefied coating of the electrode. After complete cooling of the metal, the upper surface of the seam, protected by electrode coating during welding, will turn into hardened slag, which can be easily removed by light mechanical action (for example, tapping). It is important to maintain the same distance-gap between the metal of the welded joint and the electrode (arc length), which will prevent its extinction. To do this, the supply of the electrode to the fusion area must be carried out at a constant speed, and the guidance of the welding rod along the weld joint must be smooth.
Welding arc
Connecting welding cables
There are 2 terminals on the front panel of the inverter, next to which there are markings in the form of “+” and “-” signs. Welding cables are connected to these terminals, one of which has a metal clip (clothespin) at the end, and the second has a holder for the electrode. Both cables can be connected to both terminals, depending on the welding method, which will be discussed later. After connecting the cables to the machine, one of them, which has a clothespin, is connected to the welding table or to the workpiece.
In some cases, standard cable lengths may not be sufficient, for example when working at heights. In such situations, the question arises: is it possible to extend the welding cable? Professionals do not advise doing this, especially if it concerns an inverter device. This fact can be explained by the fact that each cable has certain resistance characteristics. Therefore, “leaks” of voltage and current along its entire length are inevitable. Therefore, the longer the cable, the more the voltage sags.
If you try to compensate for the loss of voltage and current by adding values on the unit panel, then this measure will most likely damage the inverter electronics. It turns out that it is easier to bring the device closer to the welder’s workplace than to spend a considerable amount on repairing the unit after lengthening the cables.
Preparing to use an inverter
When you turn it on for the first time, as well as when moving the welding inverter to a new place of work, you must check the insulation resistance between the housing and live parts, and then connect the housing to ground. If the inverter has been in operation for a long time, before starting welding, it is necessary to inspect it for dust accumulation in the internal space. In case of increased dust content, all power elements and welding control units should be cleaned using compressed air with moderate pressure. For unhindered operation of the device’s forced ventilation system, a free space of at least half a meter must be created around it. It is prohibited to weld with inverter welding devices near places where grinding and cutting machines operate, as they create metal dust that can damage the power part and electronics of the inverter. If welding work is carried out in an open space, it is necessary to protect the device from direct exposure to splashes of water and sunlight. The welding inverter must be installed on a horizontal surface (or at an angle not exceeding the value specified in the passport).
External inspection of equipment
An external inspection of the welding inverter is carried out by the welder himself before the start of each work shift. During this procedure, the condition of the insulating sheaths of the welding and supply cables is first checked and, if necessary, they are replaced or repaired. Next, the electrode holder and the ground cable clamp are checked, as well as the condition of the plugs and sockets for connecting to the welding inverter. The next step is to inspect the welding control panel for the integrity of toggle switches, switches, buttons and indicators. In addition, the overall dust content of the device is determined and, if necessary, it is cleaned.
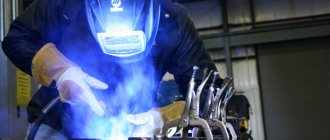
Use of protective equipment
When carrying out welding work, the greatest danger is the possibility of electric shock, burns from flying drops of molten metal and light exposure to the retina of the eye from the radiation of an electric arc. In addition, mechanical injuries and gases released during the welding process may enter the respiratory tract. Therefore, any novice welder who decides to master a welding inverter, in addition to the machine itself, is required to purchase a set of personal protective equipment, as well as carefully study the safety rules when performing welding work. The standard set of welder protective equipment includes a mask and spark-resistant gloves, as well as overalls and shoes made of non-flammable and non-melting materials. In addition, during welding with an inverter, a special respirator may be required, and the cleaning of workpieces and seams must be done using safety glasses.
Setting up the device
The quality of welding work depends on whether the welding inverter is adjusted correctly, especially with regard to the correct choice of electrodes. You should also consider:
- weld depth;
- location of the seam in space (vertical or horizontal);
- brand or type of metal being welded;
- metal thickness, etc.
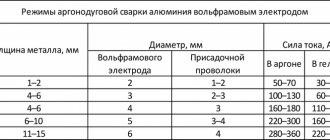
You should know that corresponding electrodes are produced for each type of metal. Electrodes with a diameter of up to 5 mm can be used with inverters. But for each thickness of the equipment it is necessary to select the corresponding welding current strength. To properly set up the welding machine, you can use the table below.
For example, if you have to weld 5 mm thick mild steel with an inverter, then you should select a 3 mm electrode, and set the current on the machine to 100 A. After test welding, the current can be adjusted, that is, reduced or increased.
How does an inverter device work?
The operating principle of inverter equipment compares favorably with the design of classic transformer units. The operation of the devices is based on the principle of phase shift of voltage, which increases the frequency and strength of the welding current in a cascade manner.
Although the inverter itself is a rather complex electronic device, you can learn how to weld using inverter welding quite quickly if you wish.
The basics of inverter welding are as follows:
- Alternating current is supplied to the inverter input from the normal electrical network. It is converted into alternating voltage by a rectifier operating on the basis of a diode bridge;
- The direct current coming out of the rectifier is supplied to the inverter unit, which acts as a generator of high-frequency electrical pulses. Power transistors that close and open at high frequencies, combined into a separate unit, convert direct current into alternating current, the frequency of which is significantly higher than that supplied from the electrical network;
- the resulting alternating current is supplied to a transformer, in which its strength increases and the voltage decreases. Thanks to the regulation of current parameters by a transformer, the device is small in size, which significantly reduces the weight of the entire unit;
- The alternating current converted to the required parameters by the transformer enters the rectifier. There it once again turns into a permanent one, necessary for welding.
Good to know! With a power of 160A, inverter welding works with a transformer whose weight is only 0.25 kilograms, while previously used devices weigh up to 18 kg or more.
Although at first glance the principle of operation seems complex, all processes in it occur automatically. Therefore, no difficulties arise in the work process. In addition, there is a lot of material in the public domain on the Internet from which you can learn how to properly weld with inverter welding for novice craftsmen.
Safety precautions when working
The established safety rules, one might say, were written in the “blood” of the victims, and therefore it is strictly forbidden to neglect them. The health and life of not only the welding equipment operator, but also the people around him depends on their compliance. So, the safety rules include the following.
- Before starting work, you should check the integrity of the insulation on all wires and cables connected to the device. It is also necessary to check the serviceability of the equipment, namely, make sure that the open circuit voltage is zero. In this case, there must be a working system that turns off the voltage on the electrode when the device is idle.
- Before connecting the equipment, you should check the electrical network under load (measure the sag range).
- To protect the retina of the eyes from ultraviolet radiation arising from the burning of a welding arc, it is necessary to use a protective mask (shield) or special glasses. Not so long ago, welding masks and glasses with “chameleon” glasses appeared on sale, which automatically darken when exposed to bright radiation. Not only the welder, but also his assistant should wear glasses or a mask.
- If welding work is carried out indoors, then to protect the respiratory system and prevent poisoning by harmful gases, respirators with replaceable cartridges or masks through which purified air is forcedly supplied are used.
- To protect hands from metal splashes, use special gloves - welder's gloves.
- To protect the body, overalls, jackets and pants made of fire-resistant fabric are used.
- To protect your feet, you need to wear high boots to prevent metal sparks from getting into them. Boots must be covered with pants.
- The workplace should be well lit.
- There should be a rubber mat or wooden flooring under the welder's feet to prevent a person from receiving an electric shock.
- There should be no foreign objects around the workplace that could cause a tripping hazard.
- Sand and a fire extinguisher should be located near the workplace to timely extinguish the source of fire.
- Grounding the welding machine is mandatory.
If the safety rules have already been studied, then you can begin to familiarize yourself with how to properly work with electric welding.
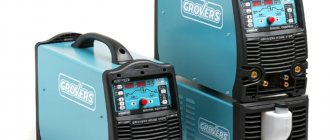
Equipment. Inverter welding machine.
Heavy transformers with generators for welding work do not fully meet modern requirements, and for the most part are a thing of the past.
We will look at the process of manual arc welding using an inverter-type welding machine. An inverter welding machine is a compact semiconductor device with control and protection systems.
Advantages of an inverter welding machine in comparison with transformers and generators:
- low weight and dimensions;
- less electrical energy consumption;
- smooth adjustment of current strength;
- arc stability when welding at low currents;
- low spattering of electrode metal during welding.
Inverter machines differ in the maximum current strength and, accordingly, in the diameter of the welding electrodes used, which can be used to weld with this device. Also the most important parameter characterizing the inverter is the switching duration or PV%.
The higher the percentage of PV, the longer the device can cook without stopping. A value of 100% corresponds to 10 minutes of continuous operation of the device at maximum current. Let's give an example if the duty cycle is 80% for an inverter with a maximum current of 120A. This means that it will be possible to carry out the process for 8 minutes continuously, with a current of 120A. If the current is below the maximum, then the device will be able to cook longer without interruption. If you need to weld long seams or thick metal more than 10 mm, you need the PV to be 80% or more.
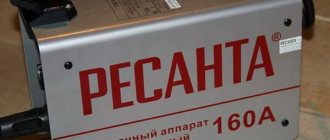
If it is boring for a home, garage, cottage or for training, then you can use PV 40 - 70%. Most welding inverters (Resanta, Svarog, Esab, Fubag and others) have these PV parameters.
Some recommendations for choosing an inverter for welding.
You should not buy an expensive welder for training. After all, continuous cooking for more than 5 minutes will not work as the electrode will simply burn out. For most welding tasks, electrodes with a diameter of no more than 5 mm are sufficient; based on this, the appropriate inverter is selected.
Choosing the brand of electrode is the topic of a separate article. You can find it here. In the meantime, buy the simplest and cheapest ones.
The diameter of the selected electrode depends on the thickness of the product being welded. Approximately equal to it, or slightly less. It is better to learn to weld with welding electrodes with a diameter of 2.5 mm - 4 mm, with a basic coating.
Welding electrodes must be stored in a dry and warm place, in a hermetically sealed container.
A welding helmet is one piece of equipment that you should not skimp on if you are going to practice professionally and preserve your eyesight. A good mask with a substitute will serve you for many years. The sales consultant in the store will help you with the right choice. It's better to pay a little more and get the Maxa Chameleon, which automatically dims. This is convenient; you can see where the electrode is before the process begins. A regular mask with a dark glass filter will not provide this opportunity. Another advantage of the chameleon is that you can beat off slag without a shield. The mask itself will be used instead.
When performing welding work, you will need auxiliary tools and materials:
- Electric angle grinder (“grinder”) with a set of cutting or grinding discs. With its help, the surfaces to be welded are prepared, as well as the finished seam.
- Hammer for removing scale.
- Metal brush, for cleaning surfaces from metal splashes and scale residues.
- Means for degreasing welded surfaces.
- Wiping material (rags).
Be sure to take care of your safety, as well as your equipment; for this you need:
- Fully enclosed overalls made of fire-resistant material;
- boots with rubber soles;
- thick leather or suede welding gloves (gaiters);
- safety glasses for working with a grinder or a protective shield;
- protective gloves for working with power tools;
Polarity selection
It is no secret that the process of metal melting occurs due to the high temperature of the electric arc that occurs between the material being welded and the electrode. In this case, the cable with the electrode holder and the ground cable (with a clothespin) are connected to different terminals of the device. To connect the cables correctly, you need to understand in what cases they are swapped.
When welding with an inverter or any other welding unit, direct and reverse polarity is used for connecting cables to the machine. Direct polarity is usually called a connection when the cable with the electrode is connected to the minus, and the metal being welded is connected to the plus.
This connection method allows the metal to warm up well, which results in a deep and high-quality seam. The direct polarity method is used when welding thick metal products.
Reverse polarity involves connecting the electrode cable to positive and the ground cable to negative.
With this connection, the metal heats up less, and the seam becomes wider. Reverse polarity is usually used when welding thin metal products to prevent through burning of the part.
What is a welding inverter and how does it work
This device was called an inverter because it converts alternating current of a 220 V network with a frequency of 50 Hz into high-frequency oscillations, and then into direct current. At the same time, the device has a high efficiency: about 85-90%, and even under fairly heavy loads the counter “winds” a little. In any case, you won’t have to pay crazy bills. The consumption will be slightly higher than without welding, but not by much.
This small box is an inverter welding machine
Most inverter welding machines operate from a 220 V household network (there are also devices from 380 V). And this is one of their advantages. Moreover, they have practically no effect on it, i.e. do not reduce tension. Rest assured about your neighbors: they won’t even know that you are welding. The second important advantage is that they can work more or less normally at reduced voltage. Of course, you need to look at the specifications, but at 170 V, most of them still allow you to work with a 3 mm electrode. This is very important especially for rural areas, where low voltage is the norm rather than the exception.
What’s also good for beginners is that it’s easier to get and hold an arc when using inverter welding. And in general, according to many, it cooks “softer” and has a “lighter” arc. So if you want to learn how to cook, try inverter welding first.
Read about choosing welding inverters for your home and garden here.
Welding current selection
The welding current is selected taking into account the thickness of the metal to be welded and the diameter of the filler. To simplify the calculations, you can use the table that was given above in the section that discussed setting up the unit. Also, when choosing the optimal current strength, you should remember the rule: the higher the current strength, the deeper the seam is, and the faster the electrode can be moved. Therefore, it is necessary to achieve an ideal ratio between the speed of movement of the additive and the current strength so that the seam has the required convexity and depth sufficient for good welding of the edges of the parts.
Advice! After connecting new cables to the machine that do not exceed the recommended length, you need to measure the welding current to find out its value and adjust it if necessary.
Safety precautions
Before starting home welding, the electric welder needs to take care of safety precautions:
- wear a protective suit made of durable, high-density natural fabric that is not subject to fire and melting when sparks hit it. The suit should cover the neck area and have sleeves that fasten tightly at the wrist.
- protect your hands with mittens made of rough fabric;
- wear comfortable leather shoes with thick soles;
- Protect your eyes with a welder's mask with a light filter that depends on the current strength during welding.
The place where welding will be carried out must also be carefully prepared:
- a wooden flooring has been laid, which performs a protective function against possible electric shock;
- the welding site is cleared of anything unnecessary (to prevent welding splashes);
- lighting must be of high quality;
- The welder's movements should not be constrained.
What is a weld pool
A weld is a joint that is formed when metal is heated to a molten state. The welding process is carried out using an electrode, which consists of two parts.
- The core, which is a metal rod.
- A special coating that prevents oxygen from entering the weld pool. All electrodes are made of metals with high current conductivity. This is necessary so that the electric current is directed precisely to the place of the welded seam.
Although the electric welding process itself is quite complex, in general it can be represented as follows.
- The electrode makes contact with the surface to be welded;
- Under the influence of high temperatures, the coating of the rod begins to melt.
- This process is accompanied by the release of gas, which limits the flow of oxygen to the area being welded;
- The molten coating remains on the surface of the seam and protects it from oxygen after the work is completed. This molten layer is called slag.
Metal welding itself is a very complex process. When carrying out it, you need to know many subtleties. The quality of the seam depends on a number of factors. One of them is that both parts to be welded must be evenly heated to the same temperature. Metal deposition should be carried out so that the roller melts evenly in different directions. In addition, you need to take into account the fact that the electrode melts during welding and the arc constantly moves towards the seam. Therefore, you need to constantly bring it slightly closer to the details. Making a wide seam also has its own specific features. To do this, you need to learn how to weld in circles or zigzags.
Options for moving the electrode during welding
Step-by-step instructions for welding with an inverter for beginners
To master welding with an inverter, a novice welder needs to learn some basics of welding technology and master the basics of welding with stick electrodes. In addition, you definitely need to understand the maximum capabilities of the electrical network at home or cottage, as well as decide on the equipment of the welding site and connecting the power cable to power the inverter. To learn how to weld sheet metal and structural steel of small thickness with piece electrodes using an inverter, it will be enough to purchase a pack of electrodes with a basic coating of Ø 2÷3 mm. You will also need a metal brush to clean the weld seams and surfaces of the workpieces being welded.
Current setting
Correct selection of the current value of the welding inverter is the key to the quality of the weld. In order to select a value corresponding to the thickness of the metal and the diameter of the electrode, it is best for a novice welder to use the corresponding table from the inverter passport. After this, you need to turn on the device’s power switch, and then, by turning the regulator, set the required current value. For some devices, the scale of its values is marked on the front panel of the inverter along the arc of rotation of the regulator, for others it is displayed on a digital indicator (see photo below).
In any case, this will be an approximate value, so it is quite possible that the current strength for good penetration will have to be adjusted during the process of making test welds.
How to connect the electrode
At one end of any piece electrode, 20÷30 mm of the internal rod are free of coating. With this part it is fixed in a holder (holder), through which welding current is supplied to it. Currently, the most common are clamping holders (“clothespins”) with the inside of the jaws shaped to fit the electrode rod. These devices are distinguished by their convenience, high speed of replacing cinders with new electrodes and their rigid fixation.
Ignition of the arc
Traditionally, two methods are used to ignite the welding arc. The first involves lightly touching the metal surface with the end of a vertically held electrode and then moving it back a few millimeters (see left figure below). In the second, its movement is similar to the movement of the head of a match along the side of the box, which is why it is called “striking” (see right figure below).
When using an inverter, ignition of the electrode is greatly facilitated by the presence of a special “hot start” function in these devices, which, when touching the metal, produces a current pulse of increased power, and when an arc occurs, returns the current value to the nominal value.
Movement and tilt of the electrode during welding
When welding with an inverter, the movement of the electrode along the surfaces being welded is carried out in the same way as when using other manual welding technologies. And there are also three main types of its inclination in relation to the straight line of movement (see figure below). Most welds are made at an angle forward. This is the most common welding technology and is best for beginners when learning to inverter welding. When working in confined spaces and welding hard-to-reach places, welding with a perpendicular position of the electrode is used. It requires high qualifications and is not suitable for training beginners, even though the inverter functions can compensate for some of their mistakes. Welding of corner and butt joints is most often performed by welding with an angle back.
Arc Gap Control
An electric arc occurs in the gap between the end of the electrode and the plane of the workpiece. The uniformity and quality of the weld largely depends on the correct selection and maintenance of the required size of the welding arc during welding with an inverter. In accordance with welding technique recommendations, ideally its size should not be larger than the diameter of the electrode. But it is very difficult to constantly maintain such a distance, so an arc that does not exceed the diameter by more than one to two millimeters is considered acceptable.
Welding process using an inverter
Before starting welding work, it is necessary to prepare the parts. They must be thoroughly cleaned of paint, dirt and rust. After this, remove grease or paint stains from the edges using a solvent.
Before starting welding work, it is necessary to adjust the current strength. You can try a test weld. If the roller turns out blurry, then the current strength must be increased. When the roller becomes so large that it becomes difficult to move the electric holder, the current decreases.
If old electrodes are used for welding, they must be dried before starting work. They should be kept for a couple of hours at a temperature of about 2000 degrees. You can use special stoves for this.
You can light an arc in the following ways:
- using a method similar to lighting matches;
- Tap the end of the electrode several times on the metal being welded.
For those who are just starting to weld, you can first mark a line on the metal and then draw a seam along it. You just need to make it clearly visible. After this, you can light the arc and bring the electrode to the beginning of the intended seam. Here the metal begins to melt and become covered with slag. This is what the weld pool looks like, which needs to be moved along the seam markings. This must be done at a certain angle. There are two differences in running a seam at an angle: forward or backward. The first method is ideal for thin metals, as it allows welding with the lowest heat. For thick metals, the second method is used.
Welding lesson. How to weld metal with an inverter.
As soon as the arc starts to ignite. Let's start training with the following exercises.
Down position
1. Circular movements on a thick horizontal plate, pass after pass, with an inclination angle of 45°, looking back. You need to pay attention when the electrode runs out. You should go back a little on the seam to avoid creating a crater. Light the arc in the center of the ring, go back a little and continue the circular movement. Below is a video on how to learn how to properly weld with a welding inverter.
Vertical position
2. The “vertical” seam is first worked on a plate set at an angle of 45°. We start zigzag movements from the bottom and move up. The distance to the electrode is approximately 2 mm, the angle of inclination is backward. At the top of the plate, we stop the process and go through the zigzag again to deposit additional metal on the edge. Next - video lessons on how to learn manual arc welding for beginners.
3. A true vertical seam on a vertically mounted plate. The same zigzag movements with the electrode. The exercise is difficult, and usually you can’t do it right away.
Horizontal seam.
4. Horizontal weld on a vertically mounted plate. Perform circular oscillatory movements and cook in a backward direction. The first roller is at the junction with the horizontal plate, then up, roller after roller. To get a better “horizontal”, you can first draw it with chalk.
Vertical seam with a tear.
5. Vertical tear-off weld , the initial position of the plate is at an angle of 45°. We light an arc from the bottom of the plate, left, down, right, up, left, back to the middle - we draw such a closed oval. We tear off the electrode, move up, make an oval again, tear off, up. So until the end of the plate.
6. Vertical pull-out weld on the plate. The same oval oscillatory movements, when performing which, if possible, it is better to rest your hand on a table or something. The final “outer” seam is the most difficult; the metal can overheat and leak. Therefore, we take a longer pause after the takeoff.
Of course, these exercises are not all that exist for novice welders.
On our website, in addition to them, you can familiarize yourself with the following materials:
- electric welder manual welding training program;
- how to learn how to cook using inverter welding, tips for beginners and others.
A good criterion for the quality of a weld is its beauty. If the weld is beautiful, then there is a high probability that there are no voids inside it and the weld is filled evenly.
What is arc gap
The arc gap is also known as the arc length. This is the name of the gap that occurs between the material being welded and the electrode. Experienced welders claim that to obtain a high-quality weld, it is necessary to constantly maintain this gap at a constant level. There are three types of arc.
- Short arc. An arc gap of 1 mm, at which the metal is heated in a small zone. Due to this, the weld becomes convex. Because of this, a defect known as an undercut can form at the junction of the seam and the product. It is a shallow groove running along the seam itself. Undercutting has a negative impact on the quality and strength of the seam.
- Long arc. It is very unstable and poorly protected from exposure to air. A long arc does not heat the metal well enough, resulting in a weld that is not very deep.
- Normal arc. If you ensure a normal gap during welding, you get a high-quality, well-welded seam. A normal arc gap is considered to be a gap of 2-3 mm.
How to choose the right electrode
The diameter of the electrode is selected in accordance with the thickness of the metal being welded.
In addition, the value of the welding current depends on this parameter, which is limited by the design features of a particular inverter. As the electrode diameter increases or the welding current decreases, its density decreases, which makes the arc unstable and can lead to various defects. The size range of electrode diameters for manual welding is discrete, so usually the current value is selected from the table range for a specific electrode using a sample method (see table below). In order to correctly weld various types of metals using an inverter, you need to understand the types of electrode coatings. Each of them is designed either to work with specific groups of metals and alloys, or for welding with a specific spatial orientation.
Purpose, diameter, coating composition, orientation and a number of other parameters are included in the standard marking of electrodes.
Welding thin metal
In a private house or country house, thin elements are usually welded. The work must be done carefully, since with insufficient experience you can easily burn through the metal. Therefore, it is better to practice on products of greater thickness before important welding. After this, you can try to weld thin metal. In this case, you should be guided by the following tips.
- When welding products, it is necessary to adjust the minimum recommended amperage.
- You need to cook with an angle forward.
- Work must be carried out with reverse polarity.
- To reduce the deformation of parts when heated, it is recommended to secure them with a vice or clamps.
- If elements longer than 50 mm are joined, then tack welding must be done first.
Peculiarities
The rules for welding thin metal using an inverter apparatus differ significantly from those recommended for thick-walled products. First of all, the difficulties caused by the specific behavior of the metal under the influence of electrical forces are taken into account. However, the technology also has its advantages. Let's look at these nuances in more detail.
Difficulties
When welding two metal workpieces with a thickness of 2-3 mm or less using an inverter, the following series of specific difficulties arise:
- A thin metal product burns out when overheated . For this reason, the docking procedure should be carried out as quickly as possible, but without compromising quality. During prolonged processing, the workpiece, if it does not burn out, will become distorted. Therefore, the electrode must be carried out exclusively in the direction of the seam - without the slightest deviation.
- The current parameters must have a minimum value. As a result, the arc becomes short. The slightest increase in distance leads to its extinction. In some cases, it may not ignite for a long time. Under such conditions, a welding machine with an open voltage of at least 70 volts and the ability to gradually change the current strength, starting from 10 amperes, is selected.
Responsible welding of thin-walled products Source aqua-rmnt.com
- Warping due to excessive heat. The slightest increase in temperature will cause the sheet to bend. The best way to prevent this is to carefully select welding parameters and control the degree of heat. In addition, if the situation allows, then special heat-removing materials are used, carefully placed at the bottom of the seam.
- Lack of penetration on the front side and sagging on the back side. These defects are often characteristic of welding thin metal with an inverter for beginners. If all of the above disadvantages can be neutralized to one degree or another by the correct selection of parameters, conditions and tools, then these two completely depend on the skill of the master. Unwelded or missed spots are often the result of the welder’s haste; leaks, on the contrary, are due to excessive effort. In both cases, you need to adjust your technique.
Important! To obtain a high-quality weld, the connection of the edges of the workpieces must be as tight as possible - without the slightest gap. To do this, before welding, they are carefully freed from rust, cleaned and, if necessary, trimmed.
High-quality seam on tank metal Source stroychik.ru
See also: Catalog of companies that specialize in complex installation of internal engineering systems
Advantages
Inverter welding is the best, modern and affordable way to weld thin metal. If all the technology conditions are met, the seam turns out to be of very high quality, durable, airtight, durable, and invisible during subsequent finishing and coating. With its help, it is possible to weld thin-walled structures for various purposes - for example, car bodies and parts, containers, pipes. The only common drawback of inverter welding technologies is instability at negative ambient temperatures.
Galvanized welding
There is only one way to weld thin metal with a 3 mm electrode when the workpieces are coated with a layer of zinc, this is inverter welding with preliminary cleaning of the surface layer at the joint. The procedure is performed using several methods:
- Mechanical. For this purpose, grinding machines, abrasive wheels, brushes with steel bristles, and sandpaper are used.
- Heat treatment by welding. The zinc layer is burned out by a double pass of the electrode along the entire trajectory of the weld, followed by obligatory beating of the resulting slag.
Rules for maintaining the electrode when thin-walled welding Source stroy-podskazka.ru
Another feature of welding galvanized products is the need to create a double seam:
- The first pass is performed with a rutile electrode with the lowest amplitude.
- The second pass is finishing, facing. It is carried out using a main electrode with a weld width equal to 3 times the diameter of the tool.
Note! Removing galvanization by electric welding is accompanied by an increase in the temperature of the metal at the point of contact with the electrode to almost 1000°C. Under these conditions, zinc oxidizes and evaporates, creating toxic fumes in the air. Therefore, it is permissible to perform the procedure only in a well-ventilated area or outdoors.
What novice welders need to know
If you have virtually no experience in welding, but the work needs to be done, then you need to remember the following nuances.
- The seam will be of high quality, well-welded, and no burns will appear on the metal if you constantly monitor it. Therefore, it is recommended to arrange the parts to be welded in advance so that it is convenient to observe the welding progress.
- The simplest option is welding in the lower position. Beginner welders should start with this one. Then you can move on to the circular joints, and after them to the vertical ones. The latter are the most difficult to perform.
- For convenience, it is better to make overlapping joints. If you weld joint to joint, you can accidentally weld to the table on which the elements lie.
- If defects appear during work, they must be removed. To do this, the problem area is additionally boiled or first selected using a grinder, and then fused again.
- If you have to weld thick parts, then for complete penetration it is necessary to chamfer the edges. The gap between the edges depends on the thickness of the elements, but should not be less than 0.5 mm.
How to hold the electrode correctly and make a seam
Inverter welding gives good results if you master the correct electrode holding. There are several positions and techniques here. It is possible to make a seam, positioning the electrode at 90 degrees relative to the surface, only in rare cases where there is limited space for bending by hand.
The optimal tilt of the filler element is 45 degrees from the plane. This creates a directed movement for the release of molten iron and facilitates the removal of slag. You can sew a seam from left to right and vice versa, depending on the convenience of the user. A trajectory away from you or toward you is allowed. The movement is always carried out in the direction of the inclination of the electrode, when good penetration is necessary. Leading at an angle forward is used only for thin metal and wide seams.
A distance of 3-5 mm must be maintained between the tip and the part. It must be stable. If this gap is reduced, the filler element will often stick. When removed by 6-10 mm, the arc dissipates and stops fusing metal.
To create a beautiful seam in the lower position, several techniques of oscillating movements with the tip of the electrode are used. It can be:
- "lying" eights;
- crescents;
- zigzags;
- spirals;
- triangles;
- double eights;
- repeating rectangles.
The width of the shapes determines the outer boundaries of the seam. The method of movement is selected taking into account the connection parameters (where more filler metal is needed at the edges or in the middle of the weld). But this can be realized in the lower position, when slag and steel do not actively drain.
Useful inverter functions for beginners
It is easier for beginners to get comfortable with inverter welding if they use machines with additional functions:
- Arc force will prevent the electrode from sticking when welding thin steel. This mode automatically adds 10% of the set current when the equipment “feels” a reduction in the distance between the surface and the electrode.
- Hot start promotes instant ignition of the arc without preliminary tapping on the rough material. Maintaining a high open circuit voltage while the contacts are open improves overall performance.
Welding with an inverter allows a beginner to repair many elements on his own. By mastering the machine settings and applying tips on seam making techniques, you can quickly learn how to weld with this compact machine.
Common defects in inverter welding among beginners
When welding with an inverter, all beginners make defects. Knowing the main ones will help you not to get upset and work on your mistakes in order to quickly master the skill. Common errors and their causes include:
- Cracks are formed due to improper selection of electrodes. The chemical composition does not combine well with the materials being welded, which leads to the formation of cold and hot cracks. The problem can be solved by carefully reading the packaging, which indicates which steels the filler element is intended for.
- Burns are holes in plates and other parts. They occur as a result of excessive current and slow arcing. Here you need to set the current according to the table above and make the seam faster.
- Lack of penetration is clearly missing areas where the filler metal lay on top and did not melt through. This connection is easy to break and is not airtight. The reason is the low current strength and fast wiring of the seam. The problem can be solved by correct device settings and calm management.
- Pores are formed due to the interaction of the weld pool with the environment. The reason may be poor electrode coating or that it is damp. This can be solved by calcining the filler materials in a furnace or other device at a temperature of 170 degrees. Pores can also appear in strong winds at the welding site outdoors, so it is necessary to install a barrier shield.
- The uneven shape of the seam is expressed in tubercles, rough scales and differences in width. This is a consequence of poor mastery of oscillatory movements and can be corrected by training.
OCCUPATIONAL SAFETY REQUIREMENTS BEFORE STARTING WORK
2.1. Check the availability and serviceability of personal protective equipment, put on them and the required protective clothing and safety shoes, and put everything in order. 2.2. Overalls must be fireproof, dry, clean, without pockets, trousers - without cuffs, safety shoes - with insulating soles and iron toes. 2.3. Fasten the overalls with all the buttons, avoiding hanging ends of the clothing, tuck your hair under your headdress, and lower your trousers over your shoes. 2.4. Do not pin your clothes with pins or needles, do not keep sharp, breakable objects in your pockets. 2.5. Receive an assignment from the manager to perform work with the welding machine and instructions on the conditions for its implementation. 2.6. Place the device on a flat surface and take measures to prevent it from tipping over. 2.7. Carry out an external inspection of the device and ensure the serviceability (integrity) of its main elements: housing, network cables, electrode holder, terminals, etc. 2.8. Prepare the welding machine for operation, connect the necessary cables and other equipment in accordance with the manufacturer’s operating instructions. 2.9. Connect the welding machine to the network. The connection must be made by an employee with an electrical safety group of at least III. 2.10. When connecting equipment, grounding should be done in accordance with the Rules for the Technical Operation of Consumer Electrical Installations. 2.11. Check the availability and suitability of welding electrodes and their sufficient quantity. 2.12. Install the electrode into the electrode holder, first making sure that the power source is turned off. 2.13. Check the operation of local exhaust ventilation. Ventilation should be turned on at least 5 minutes before starting work. 2.14. Check the availability and serviceability (integrity) of tools, equipment, and necessary accessories. Convenient to place them. 2.15. Prepare the protective equipment and devices necessary to perform the work. 2.16. Prepare the workplace for safe work: - inspect it, remove all unnecessary objects without blocking the passages; — check approaches to the workplace and evacuation routes for compliance with labor protection requirements; — check the presence and serviceability of fences and safety devices; — check the presence of signaling devices; — remove all flammable objects and materials from the welding area; — check the availability of fire-fighting equipment and first aid kits; — establish the sequence of operations. 2.17. Check by external inspection: - absence of hanging bare wires; — sufficient lighting of the workplace; — reliability of closing of all current-carrying and starting devices of the equipment; — presence and reliability of grounding connections (no breaks, strength of contact between metal non-current-carrying parts of the equipment and the grounding wire); — absence of foreign objects around the equipment; — condition of the floors (no potholes, uneven surfaces, oil stains, etc.). If the floor is slippery, it must be wiped or sprinkled with sawdust. 2.18. Carry out a test run of the welding machine, making sure that all its components are working properly and that the welding cycle can be adjusted. 2.19. Report all detected malfunctions of equipment, inventory, electrical wiring and other problems to your immediate supervisor and begin work only after they have been eliminated. 2.20. Work on the welding machine must be organized in accordance with the requirements of current technological documents (norms, instructions, regulations) approved in the prescribed manner. 2.21. It is prohibited to start working on a welding machine if there are the following violations of labor protection requirements: - the absence or malfunction of the protective shield, welding wires, electrode holder, as well as personal protective equipment; — absence or malfunction of grounding of the welding transformer housing, secondary winding, welded part and switch casing; — insufficient lighting of workplaces and approaches to them; — absence of fences for workplaces located at heights and equipped access systems to them; — fire and explosion hazardous conditions; — lack of exhaust ventilation when working in enclosed spaces.
GENERAL OCCUPATIONAL SAFETY REQUIREMENTS
1.1. This Instruction provides basic labor protection requirements when working on an inverter welding machine for electric arc welding (hereinafter referred to as the welding machine). 1.2. When working on a welding machine, you must perform your duties in accordance with the requirements of these Instructions. 1.3. Persons at least 18 years of age who have passed a mandatory preliminary medical examination in accordance with the order of the Ministry of Health and Social Development of Russia dated April 12, 2011 No. 302n (Appendix No. 1, clause 1.1.4.8 (Welding aerosols), clause 3.3 (Ultraviolet radiation) are allowed to work on a welding machine ), introductory and initial workplace safety briefings, training in safe methods and techniques for performing work, on-the-job training and testing of knowledge in the prescribed manner and having received permission to work independently. 1.4. When working on a welding machine, the employee must undergo training in labor protection in the form of: introductory briefing, initial briefing at the workplace, repeated briefing, unscheduled briefing, targeted briefing and special training within the scope of the training program for the profession, including labor protection issues and requirements of job responsibilities in the profession. 1.5. Introductory briefing is carried out by a service employee labor protection or the employee replacing him, with all those hired under a program approved by the employer and agreed upon with the trade union committee or other representative body of workers. 1.6. Initial briefing at the workplace is carried out by an official determined by order individually before the start of the employee’s production activities under the occupational safety program for the profession. 1.7. Repeated instruction is carried out according to the initial instruction program once every six months by the immediate supervisor of the work individually or with a group of workers of similar professions, including combined work. 1.8. Unscheduled briefing is carried out by the immediate supervisor of work when there is a change in instructions on labor protection, technological process, technological equipment, at the request of supervisory authorities, etc., which determine the scope and content of the briefing. 1.9. Targeted instruction is carried out by the immediate supervisor when performing one-time work that is not related to the direct responsibilities of the employee by profession. 1.10. Before being allowed to work independently, an employee must undergo an internship under the supervision of an experienced worker (for 3-14 shifts, depending on length of service, experience and the nature of the work). 1.11. When working on a welding machine, a worker may be exposed to dangerous and harmful production factors: - a dangerous level of voltage in the electrical circuit, the closure of which can occur through the human body; — increased level of electromagnetic radiation (pulse); — increased content of harmful vapors and aerosols in the air of the working area; — intense radiation from the welding arc in the optical range (ultraviolet, visible, infrared); — intense thermal (infrared) radiation of welded products; — sparks, splashes and emissions of molten metal and slag; — increased surface temperature of equipment, workpieces and parts; — increased noise level in the workplace; — increased level of local vibration; — sharp edges, burrs and roughness on the surface of workpieces, equipment parts and tools; — flying fragments from the working parts of the equipment in case of their possible destruction, deformable material and scale; — insufficient illumination of the working area; — static load on the shoulder girdle; — physical overload; - fire and explosion hazard. 1.12. Sources of harmful and dangerous production factors: - faulty production equipment or its improper operation; — faulty electrical equipment or improper operation; — sharp edges, burrs and roughness on the surface of equipment and tools; — absence, malfunction, improper use of personal protective equipment; — absence, malfunction, improper operation of lighting devices; — non-fulfillment or improper fulfillment by an employee of a job description, labor protection instructions, internal labor regulations, local regulations regulating the procedure for organizing labor protection work, and working conditions at the site. 1.13. When working on a welding machine, the employee notifies his immediate supervisor about any situation that threatens the life and health of people, about every accident that occurs at work, about a deterioration in his health, including the manifestation of signs of an acute disease. 1.14. When working on a welding machine, the employee is provided with special clothing, safety shoes and personal protective equipment in accordance with current standards. 1.15. Issued special clothing, special shoes and personal protective equipment must correspond to the nature and conditions of work, ensure labor safety, and have a certificate of conformity. 1.16. Personal protective equipment for which there is no technical documentation is not allowed for use. 1.17. Personal clothing and workwear must be stored separately in lockers and a dressing room. It is prohibited to take protective clothing outside the enterprise. 1.18. When working on a welding machine, the employee should: - perform work that is part of his duties or assigned by the administration, provided that he is trained in the rules for the safe performance of this work; — strictly follow the operating rules of the welding machine established by the manufacturer; — correctly use workwear, safety shoes and other personal protective equipment (gloves, protective mask, welding helmet, earplugs, etc.); - be attentive, do not be distracted by extraneous matters and conversations; — when working together, coordinate your actions with the actions of other workers; — having noticed a violation of labor protection requirements by another employee, warn him about the need to comply with them; - keep the workplace tidy and clean throughout the working day, avoid cluttering the approaches to the workplace, use only designated passages; — know and strictly comply with the requirements of labor protection, fire safety, industrial sanitation, Rules for the technical operation of consumer electrical installations; — comply with the requirements of this Instruction, other local regulations on labor protection, fire safety, industrial sanitation, regulating working conditions and the procedure for organizing work at a specific facility; — timely and accurately comply with internal labor regulations, observe labor discipline, work and rest regime; - observe the established working hours, regulated breaks in work; - strictly carry out, within the established time frame, the orders and instructions of the enterprise management, officials responsible for the implementation of production control, as well as instructions of representatives of state supervisory authorities; — apply safe work practices; - treat the employer’s property with care; - be able to provide first aid to victims, use fire extinguishing equipment in the event of a fire, call the fire department. 1.19. Smoking and eating are permitted only in areas specially designated for this purpose. 1.20. Persons who violate the requirements of this instruction may be held accountable in the manner prescribed by the legislation of the Russian Federation.