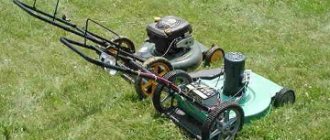
Many people have old cylindrical washing machines in their attic or closet. If you don’t personally have it, then there will be neighbors who will be ready to sell it for pennies, because modern automatic ones are in fashion and have become widespread. In addition to the washing machine itself, for the concrete mixer you will need:
- pipe scraps of 1″ or a metal corner with a size of 30×30 mm;
- roulette;
- chalk for marking;
- welding machine;
- bearings;
- bendex and flywheel gear;
- Bulgarian;
- drill;
- wheels from a wheelbarrow or small bicycle.
For each individual project of a concrete mixer for mortar, which will be done with your own hands according to the given diagrams from a washing machine, specific components may be needed. They will definitely be mentioned separately. Most concrete mixers for mortar that are commercially available and that are assembled independently use a mixer-gravity type of mixing. It implies the presence of blades in the concrete mixer container, which facilitate better penetration of various components when tipping.
More expensive industrial versions of concrete mixers use vibration waves. This type of concrete mixer for mortar is considered the most effective, since the mortar is elastic and homogeneous. But not all manufacturers use it due to high energy consumption. Gravity concrete mixers for mortar are considered the simplest and cheapest to manufacture. They often take the form of a cylinder that rotates vertically around its axis. The solution is mixed under its own weight without the help of any additional devices. An example of how such a concrete mixer works can be seen in the video.
Why is a concrete mixer made from a washing machine?
From the point of view of expediency, the working capacity of a homemade concrete mixer in the shape of a cylinder is most convenient for mixing and unloading ready-made concrete: there is no unused solution left in the corners of the tank, which builds up over time, reducing the internal space.
To prevent the concrete mass from pouring out of the tank during the mixing process, one plug on the drain hole is enough, which is practically only possible using the body of a simple washing machine when making a concrete mixer using a homemade method.
The motor is one of the most vulnerable parts of the concrete mixer, since the mixing cycles are quite long. Older washing machines are equipped with a fairly powerful motor that will not overheat the first time you use it. In addition, if you use the entire washing machine as a concrete mixer, the electrical parts of the motor will remain protected from the ingress of random particles and there will be no need for additional protection.
What are concrete mixers used for?
If no financial restrictions are foreseen, a ready-made solution can be purchased. However, the final volumes may differ from those planned, and the concrete solution without mixing has the property of “setting.” Of course, the easiest way seems to be mixing concrete on any level area with a shovel type. However, only a small amount of liquid cement mixture can be prepared in this way alone; the quality of the finished product does not always meet the requirements, and the time spent is not comparable to the labor investment. The process is optimized by mechanized devices - concrete mixers .
From a milk flask
The simplest manual concrete mixer can be made using an ordinary metal flask (milk used to be sold in these). You will also need pipe cuttings or other scrap metal. The design is simple, such a concrete mixer can be built with your own hands in a couple of hours. The main thing is to weld the frame. Assembling the concrete mixer itself will take a couple of tens of minutes.
Design of a manual concrete mixer made from a milk flask
You make a frame and bend a handle from a round pipe. In the upper part of the frame, weld two water couplings (for example). Their internal diameter is slightly larger than the diameter of the pipe used for the handle. The pipe is passed through the flask and welded to the body.
How to find the center of gravity
In order for the barrel to spin easily, you need to find the center of gravity. To do this, you can put it on some thin object, and move it forward/backward to find this very center. This is where you will need to pass the handle. Having passed the handle, it is attached to the walls of the case. This is where complications can arise: flasks are usually made of aluminum alloy, and the handle may be made of steel.
It will not be possible to connect them by welding. The only available solution is cold welding. He is quite real. The remaining modes - with bimetallic gaskets or argon-arc welding at home - are not implemented. Another way out is to weld plates onto the handle, which are riveted to the sides of the flask.
To prevent the handle from playing too much and falling out during operation, nuts are welded to it on both sides of the coupling.
In general, this is all about making a manual concrete mixer with your own hands. For one batch in a 40 liter can you can get 2.5-3 buckets of solution. For use in a country house or on a plot near a house (without construction) it is more than enough.
READ MORE: Where to fill the air conditioner in the Atlant washing machine - Call a technician: 8 (495) 772-76-52
If there is no can, you can adapt a barrel (thick-walled). Then the problem with welding the handle disappears, but you will have to come up with a system for fixing the lid. You can make something similar to the one that the can has.
The video shows an example of a handmade homemade concrete mixer made from a milk flask. The design is a little different, but not too different. There is an interesting idea - dividers are welded to the pipe inside the container, which speed up mixing.
Assembly options
It is not always possible to find a suitable motor or gearbox for making a driven concrete mixer from a washing machine. It may not be required due to small production volumes or lack of electricity at the construction site. It is for such situations that you can use a small concrete mixer to prepare a mixture that one or two people can spin. If you have a good engine from a washing machine, you can make a concrete mixer for mortar with a drum arrangement:
- vertical;
- horizontally.
The vertical version of the concrete mixer for mortar implies a stable, fixed position of the drum. In such a concrete mixer, only the blades that are located inside rotate to prepare the solution. This type of solution preparation is called forced. The horizontal method of positioning the concrete mixer drum has its advantages. It rotates and has an inclined design, so the solution is unloaded in a few touches. Also, depending on the choice of inclination angle when preparing the solution, you can increase or decrease the total volume.
Manual concrete mixer from a washing machine
When rotating the concrete mixer drum when preparing the mixture, an important task is to achieve stability. Dissonance can be introduced by the components of the solution themselves, which constantly shift the center of gravity when thrown. That is why it is necessary to take care of a high-quality base or frame for a concrete mixer from a washing machine. The most stable geometric figure is the triangle. It is he who can withstand significant loads and maintain its position unchanged. Several triangles will be placed in the base of the concrete mixer for the mortar.
The advantage of a concrete mixer for mortar, which is assembled independently from a washing machine, is the individual selection of height. You can create a concrete mixer design that will best suit your height without having to work too hard. Therefore, it is worth taking a tape measure and roughly estimating at what height the lowest point of the washing machine barrel should be. For an average person with a height of 180 cm, this figure will be in the range from 50 to 80 cm. This is exactly what the sides of the triangle should be. Four identical pieces are cut. For stability, the base of the triangle should be 60 cm. You will need 2 such segments. Two triangles are assembled from a prepared corner or pipe using a welding machine.
Now they need to be secured together to form a monolithic structure. The distance between them will depend on the diameter of the washing machine drum. If it is 60 cm, then a gap of 5 cm will need to be made on each side. That is, the triangles must be placed at a distance of 70 cm from each other. Two 70 cm sections are welded in pairs to the lower corners. Two small jumpers are made in each triangle 10 cm below the upper corner. Two pipes are welded to them. An axis is installed in them, which will serve to tip the washing machine tank. Additionally, a rectangle with sides 68x60 cm is made. It is fixed to the axis.
In the free position, the rectangle is tilted. Two wheels from a wheelbarrow for transporting boxes are welded to its upper part. They will hold the washing machine barrel in front. At its lower part there is another triangle. It will act as a support, and at its upper point the axis for the concrete mixer tank will be fixed, on which it will rotate. To do this, a pipe is welded to the top, and two bearings are inserted into it. The bearings hold the axle, which is connected to the tank.
The connection unit for the washing machine tank is implemented in this way. A piece of reinforcement that is inserted into the bearings is welded to a circle of sheet material. It turns out to be a shaped metal umbrella. In the round part, holes for bolts are drilled around the perimeter every 15 mm. Through these holes it is attached to the washing machine tank. To prevent water from leaking out through the cracks, you will need to make rubber gaskets. After everything is assembled, a handle is welded to the axle on the other side of the bearings. Also, clamps are welded onto it, which will prevent the axis from moving. An example of such a design can be seen in the photo.
Wheels are attached to the two corners at the bottom, which will make it easier to transport the concrete mixer for mortar around the work site. Additionally, it is worth installing a latch that will hold the washing machine tank in a vertical position. Blades are fixed inside the concrete mixer barrel, which will facilitate high-quality mixing of the solution. You will have to strain your hands a little when rotating the handle and drum of the concrete mixer, but if everything is well balanced, then there will be no special problems, and the result will please you.
Horizontal concrete mixer
A horizontal concrete mixer has much in common with the manual version. The frame for it is made in the same way. The only difference between such a concrete mixer for mortar will be the presence of an electrical unit with a motor. To implement it, you can use several possible methods. One is to use a bendex gear, a flywheel and two pulleys of different sizes. The latter can be used from those that were in the washing machine.
Instead of the metal umbrella that was used for the previous version of the concrete mixer, it is necessary to attach a metal rod to the large gear from the flywheel. A small bendex gear is attached to a metal rod. At a short distance from the flywheel, a pipe into which the bearings are inserted is welded onto the bar on which the barrel from the washing machine is attached. A rod with a small gear is inserted into the bearing. On the other hand, it should protrude enough so that a large-diameter pulley from a washing machine can be mounted on it. The motor from the washing machine is fixed in such a position that the belt, which will be located on the small pulley and the large pulley, moves without distortion.
The belt is installed in its place. The electrical part of the concrete mixer for the solution is connected. To start the concrete mixer, you can use the starter switch or use the timer that was in the washing machine, if it is in working order. With this assembly method, you will get approximately 100 drum revolutions per minute, which is quite enough. The upper part of the drum from the washing machine can be slightly narrowed so that the solution does not spill out of it during rotation. To do this, you can weld a small neck or make triangular slits, bend the resulting petals and weld the seams.
Note! Instead of gears, the unit for transmitting motion from the engine in a concrete mixer for mortar can only be assembled on pulleys. If you select them in different sizes, then it will be possible to regulate the speed by moving the belt, as is done in a lathe. In this case, instead of gears, two pulleys are fixed. A large pulley is attached to the tank from the washing machine, and a small pulley is attached in place of the bendex. Additionally, another belt is installed and the structure is ready for use. This option is safer, because the gears cannot bite.
Vertical concrete mixer
The vertical concrete mixer for mortar is a rather interesting design. It will come in handy when necessary to mix liquid solutions and mixtures that are more often used for putty and plaster. Making such a concrete mixer is simpler in some ways, but there are also some nuances. The frame of the concrete mixer is made rectangular. In such a concrete mixer there is no need for an inclined structure, since the solution will be removed from below. Next to the hole for the activator, another semicircular one is made, which will be closed with a flap. You can see what it looks like in the photo below.
A handle is attached to the outside of the concrete mixer drum, which will allow you to move the shutter. The solution will easily be poured into some container, for example, a bucket. There is no longer any need to make the top hole of the concrete mixer, since nothing will spill out. Making a frame for a concrete mixer is very simple. It is necessary to make a rectangle from a metal pipe, corner or square using a welding machine. Its width should be such that the drum can stand on it without any problems and not fall through. Additionally, two crossbars are made from the same material under the drum. Legs are welded to each corner of the rectangle for stability. To make the design more reliable, the sides of the rectangle with a smaller size can be moved out further so that the legs stand wider.
The hole in the tank from the washing machine, which was used to install the activator, is welded shut. There remains a small hole for the long shaft. The latter can be made from durable reinforcement with a diameter or from a pipe. A bearing is installed below the hole in the concrete mixer tank and secured to its walls. A shaft is inserted into the bearing. To prevent solution from the tank from getting into the space between the balls, they are tightly closed with rubber pads. The shaft is mounted in its place. A large gear from the flywheel or a pulley with a large diameter is welded to it from below.
The concrete mixer motor is installed in the same way as in the previous version, but with the pulley down. If the motor power is sufficient, then there is no need for intermediate units and you can connect the pulley on the tank and the engine with a belt. If gears are used, you will need to use an intermediate unit, which will ensure the transmission of rotation from the pulley to the gear from the bendex. Inside the tank, blades are mounted on the shaft following the example shown in the photo.
Making a homemade concrete mixer
To make a good concrete mixer with your own hands, it is important to understand the requirements for a unit of this kind. These include:
- uniformity of work,
- stability and safety of operation,
- mobility reserve,
- Convenience of unloading the finished cement mortar.
If, as a rule, no questions arise regarding most items on this list, then the reserve of mobility can be appreciated after large-scale work has begun: it is easier to spend a little time putting a self-made concrete mixer on wheels than to tie labor operations to the location of a stationary monument of a much-needed apparatus.
To meet the requirements for a concrete mixer, pre-stocked consumables and tools should serve.
In addition to the used washing machine, you will need:
- grinder saw;
- machine with electrodes for welding;
- corners 45 mm on each side;
- drill;
- soldering iron;
- wide metal strip;
- wheels.
If necessary, the corners are replaced with channels, and a hacksaw for metal will cope with the functions of a “grinder”. You may also need bolts and nuts and a couple of wrenches.
Purpose of the equipment
The working process is that the device mixes the solution to give it the desired consistency.
Cement, water and sand, to which other fillers used in concrete production may be added, are poured into a tank and mixed. In addition, with the help of a concrete mixer you can maintain the quality of the mortar mass during construction work. After all, concrete has the property of settling, which has a negative impact on its quality. And the work of a concrete mixer will help maintain concrete in the desired condition, preventing water from rising up and fillers from sinking to the bottom, turning into a set of materials laid out in layers.
In order not to waste money, many make such faucets themselves. Let's look at how to construct a concrete mixer from a washing machine with your own hands, constructed on a summer cottage.
Nuances you need to know about
Many craftsmen make a number of mistakes when creating a homemade concrete mixer. It’s better to find out about them in advance so that you don’t have to redo the work later.
- Use only high-quality containers. Make sure that it is not full of holes, rusty, or damaged.
- Follow the instructions strictly. Any deviation from the instructions will result in inconsistency of actions, which will affect the quality of the unit.
- Do not weld metal frames to cast iron under any circumstances - this is a complex and unreasonable job.
- Do not overload homemade concrete mixers. Stick to the selected volume, otherwise the device will soon become unusable.
READ MORE: TOP 7 best mobile air conditioners: rating, reviews
As you can see, making a concrete mixer with your own hands is not so difficult. This will save you money on buying things you need in your household. The main thing is to have the necessary minimum of building materials and tools at hand. With proper care, the concrete mixer from the washing machine will serve you well; believe me, you will use such concrete mixers for a really long time. It’s better to get to work with an assistant - extra hands never hurt!
How to make an inexpensive concrete mixer from a steel barrel and an electric motor from a washing machine
When building the bathhouse, I mixed concrete by hand in a trough. This method is suitable for small volumes, but not for building something larger. Too much effort is wasted on “hand-to-hand” mixing of concrete. I didn’t want to buy an expensive concrete mixer, but spending money on a cheap but short-lived one would be a waste of money. I looked on the Internet what homemade concrete mixers are made from. I liked a couple of mobile structures made from ordinary 200-liter metal barrels. I bought a used oil container at a car depot and, based on it, profile pipes, a Bendix with a crown from a Volga, and an old engine from a washing machine, I assembled a cheap concrete mixer.
The following is placed in the concrete mixer:
- 4 buckets of enriched sand and gravel mixture;
- 1 bucket of cement;
- 1.5 buckets of water;
- 1 bucket of sand.
Read also: Corner paint roller
Close-up of a concrete mixer drive.
The drive is protected by a tin cover.
The second concrete mixer, made from what was at hand, was made by AfanasievichRUS.
I didn’t want to spend 12 – 25 thousand rubles on buying a concrete mixer. and made it myself from various rubbish, a barrel and an electric motor from a washing machine. I have been using a homemade concrete mixer for several years now. In principle, everything suits me. The metal of the barrel is of course thin, but everything can be fixed by welding. Blades for stirring the mixture are welded inside the barrel. To make a concrete mixer I needed:
- two hundred liter barrel;
- engine with a power of 0.45 kW at 3400 rpm;
- pulley from the seeder;
- a wheel from a children's bicycle;
- rim from a bicycle wheel for adults;
- chain from an Izh motorcycle;
- bearing with bushing from the rear wheel of an Izh motorcycle.
We invite you to watch a video showing the operation of this concrete mixer.
One option is to use an old washing machine
Believe it or not, it makes a good mixer for concrete mortar, the performance of which is quite acceptable in home construction. For this, various models of machines are suitable, in which the activator element is located at the bottom of the body.
But you still have to work hard - we remove the activator, and in its place we install a new shaft of a suitable size. On the threaded part that goes into the washing tank, brackets in the form of U-shaped shapes, made of metal strips turned in the form of blades under a straight line, are fixed to the nuts angle.
Another important element is the motor from the washing machine. It can be used as a motor for another container. For assembly work you will need:
- old top-loading washing machine;
- Bulgarian;
- welding machine;
- soldering iron and electric drill;
- metal corners, maybe old ones;
- small wheels.
Having prepared the base, you should check it for strength and stability. If there is no old metal, use wooden beams fastened together with tenons or self-tapping screws. Consider arranging rotary mechanics, with the help of which it will be easy to control the kneading container.
How to assemble a concrete mixer with your own hands
Base
The reliable base of the concrete mixer ensures the stability of the container during operation: it should not wobble or fall, jeopardizing other structural elements.
Therefore, a strong metal frame is preferable, which is coated with paint before starting work on concrete mixers to prevent corrosion. The frame must be assembled from its inside. First you will have to cut off several parts from the corner (channel). The determining factor in the size of the cut should be the size of the future capacity. sizes are standard :
- 55 cm −2 pcs.,
- 70 cm – 1 piece,
- 78 cm – 1 piece,
- 80 cm – 1 piece,
- 81 cm – 1 piece,
- 85 cm – 1 pc.
Sections of 70 cm and 78 cm, together with 55 cm, make up a rectangular welded frame. A couple more parts are attached in accordance with the size of the engine - it is attached to the frame in the same way. The angle of inclination of the container for mixing concrete is taken into account in advance. It is most convenient if this angle is about 30 degrees.
The gearbox mounting shelves are cut off from the corners and then welded to the legs of the frame, making sure that the container shaft and the gearbox shafts lie in the same plane. After this, holes are made in the shelves that will be needed for the connection bolts. The gearbox pulley and the motor pulley must also be located in the same plane to avoid engine overloads. The motor of a homemade concrete mixer is removed from a used washing machine.
For reasons of safety and convenience, a package-type switch is installed on a self-assembled concrete mixer, which is usually connected through a capacitor.
The outer base is made in a similar way. It would be good if it had a handle for tipping over the tank with cement mortar. A channel or a piece of pipe can play this role.
Sometimes a rotating mechanism is installed from two gears, one of which has a wheel or rotary handles. In addition, it would be useful to make clamps that limit the wheel to two positions: kneading and unloading. When the wheel is turned, the tank gear turns it, causing the solution to flow out.
Wheels
The wheels are attached to the bottom of the frame on a rod or piece of fairly thick reinforcement. The ends of the metal rod are ground to avoid potential injuries from nicks.
Working capacity
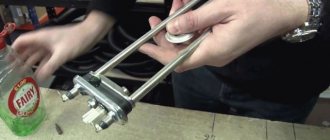
The tank is removed from the unit and a plug is placed on the drain hole. The activator mechanism is dismantled, and a shaft of a suitable size is installed in its place. In advance, blades are welded onto the shaft, which should also be made from a metal strip.
To achieve symmetry of the shaft blades, they are also attached to a metal strip. The symmetrical arrangement ensures that the concrete mixer tank does not skew and ensures stable operation of the motor.
The container, together with the gearbox and motor, is fixed on the frame . The gearbox is connected to the engine using a belt drive. A self-assembled concrete mixer mounted on wheels is ready for work.
Advantages and disadvantages of the design
At home, especially in summer cottages, work always involves mixing the solution. Making a homemade device for mixing concrete has its advantages:
- a homemade concrete mixer is cheap;
- The size of the device can be manufactured to any parameters;
- The concrete mixer is easier to repair because it is made by hand.
In addition to the positive aspects, there are also disadvantages. These include:
- high production time costs;
- skills required to handle iron;
- To make a manual concrete mixer, you need a drawing. You need to have an understanding of design.
The principle of operation of devices with various methods of mixing concrete
The preparation of concrete can be carried out using shaft blades in a container fixedly placed on a support in a horizontal or vertical position.
But to make it more convenient to work, the barrel for mixing concrete is located on a hinged support so that the prepared concrete can be poured out on its own. True, this is also possible in a permanently installed barrel, if there is an option for tilting it.
The forced option is effective in terms of the quality of concrete preparation, and it is used quite often. But sometimes difficulties arise with it if components of large fractions are used to prepare concrete.
Note that a homemade structure for preparing concrete can work on the gravitational principle, you just have to tightly close the container and set it in motion manually.
Homemade manual concrete mixer
It won’t be difficult to make a manual concrete mixer from a barrel with your own hands. The drawing is prepared at the preliminary stage. Then you will need materials:
- a barrel with a volume of 100 or 200 liters, which acts as a pear;
- corner for the bed;
- 2 pieces of bearings;
- steel pipe;
By selecting such materials, you can make a simple concrete mixer without an electric drive.
The homemade technology is as follows:
- A rectangular hole for the lid is cut in the middle of the barrel. Corners are welded on the inside and rubber is laid for tightness.
- Powerful hinges are welded on and the lid is installed.
- Blades for mixing the solution are welded from sheet metal 2-3 mm thick on the inside of the barrel.
- Hubs with bearings are installed in the center and an axle is inserted.
- The structure is mounted on a metal base.
- A handle for rotation is screwed onto the side. If you install them on 2 sides, then two people can work at the same time.
READ MORE: Foundation insulation with penoplex technology step by step, how to properly insulate the foundation of a private house, penoplex, basement insulation
https://www.youtube.com/watch?v=X5N0NeyQBe4
A homemade concrete mixer made from a barrel can be painted on the outside. There is no point in doing this from the inside. The concrete will peel off all the paint.
How to make a cheap sifter for sand and crushed stone from a concrete mixer
сhichicFORUMHOUSE user
I don’t have much space on my site, so when I brought in sand and crushed stone, they were dumped into one pile. Over the course of several years, they got mixed up. I didn’t want to sift through this volume manually. So I made a sifter out of a concrete mixer.
We'll tell you how to make this necessary household device:
- Take two strips of galvanized metal 100 and 200 mm wide.
- Bend a strip 100 mm wide and tighten it with bolts around the neck of the concrete mixer.
- Bend a 200 mm wide strip into a ring and secure the ends with rivets.
- Cut the mesh with a 6 mm mesh to the diameter of the ring with an overlap. Bend the ends and secure them with rivets to the ring through a metal tape.
It turned out to be a large sieve.
For ease of operation, screw the handles onto the sieve. Insert the sieve into the concrete mixer with the mesh side down.
Turn on the concrete mixer and sift through the bulk materials. Then stop the concrete mixer and only then remove the sieve !
The sifted sand and stone dust remain in the “pear”.
Finished products.
сhichicFORUMHOUSE user
I liked the homemade product. I plan to buy a mesh with a mesh of 4 mm and 8 mm and make two more sieves for different jobs.
User recommends:
- Do not sift the bulk until the concrete mixer is fully loaded. It is enough to sift 8 shovels and immediately pour the contents of the concrete mixer into the bag. If you fill the entire “pear” with sand, it will be compressed at the bottom into a dense mass. It is inconvenient to pack it in bags.
- If during operation you need to stop the concrete mixer filled with concrete and then turn it on again, then turn the “pear” so that its mouth is directed upward. Only then start the concrete mixer and turn the “pear” at the desired angle for normal mixing of the mixture. This will reduce the load on the motor and drive, and they will last longer.
Another design of a sifter for bulk building materials from Vitek.
A simplified version of the concrete mixer design
It is not necessary to remove the tank and motor from a washing machine that is not too worn out and has a safety margin. The drain hole is sealed, the stirrer blades are installed in place of the activator. In this case, the device body itself serves as the working capacity. However, there is no turning mechanism in this version of the homemade concrete mixer, so you will have to unload the solution manually. But other elements of the device are protected by the case, which increases the reliability and durability of the structure.
A homemade concrete mixer is not as difficult to make as it might seem, especially since there are enough videos on the global network demonstrating step by step how to make a concrete mixer with your own hands. With some manual skills, time and tools, it is quite possible to make a worthy analogue of a purchased concrete mixer.
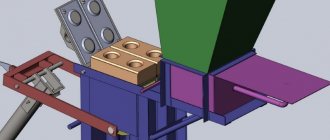
Sequence of installation work
First of all, a durable and comfortable frame is prepared from steel corners. The entire structure of the concrete mixer must be stable and easy to move to the desired location. The recommended option for the frame base is the “Swing” option. This element performs three functions - it is a powerful base that can withstand significant loads, it moves the concrete mixer without much difficulty, and it makes it possible to quickly remove concrete from the container when it is ready for use.
The working algorithm looks like this:
- Two pieces of sixty centimeters long are cut from the metal corner. They will be the bases for a pair of triangles;
- From the same corner we cut off four segments of eighty centimeters each - the hips of the triangles. Now you can fold two identical geometric shapes and securely connect the corners with a welding unit;
- we install both triangles in parallel, overlap and weld a couple of fifty-centimeter-long pieces of angle iron onto the hips to create a stable structure;
- on a pipe with a diameter of 3 cm, cut the ends so that the workpiece lies strictly at the upper corners of the triangles;
- on each vertex of the triangles we weld one nut, the diameter of which exceeds the same parameter of the pipe by 1 mm;
- the pipe is inserted into the nuts, the ends are pressed in so that it has the opportunity to rotate freely and there is no chance of slipping out. At this point, half of the frame base (lower part) is ready;
- the upper part of the frame, to get a swing, is prepared from corners 140 cm long, laid parallel at a distance of forty centimeters;
- we prepare three pieces of corner 400 mm each, we make the connection according to the ladder principle;
- On the prepared structure we find the middle, apply this part to the tube across, and weld tightly. The final result should be a swing.
Thus, we have prepared the basis for the future concrete mixer. Now it’s time to install the container in which the concrete will be mixed. At one end of the ladder, we lay the barrel so that the main part of the body rests on the steel corners, and we secure it securely by welding. Please note that the bottom of our container should be directed towards the top of the triangles.
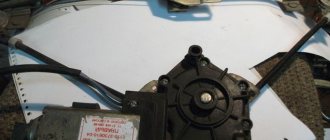
Many people recommend using an Oka washing machine as a container for concrete, because it contains an activator that can mix concrete. However, before using the concrete mixer, the activator will have to be upgraded by removing the plastic element:
- we prepare a pair of steel strips measuring 50 by 4 by 900 mm in width, thickness and length, respectively;
- from each we bend an oblong bracket;
- We pass the pre-prepared axle through the activator thread so that one end protrudes five centimeters into the washing machine tank. A nut of suitable diameter is put on it;
- in the central parts of the brackets, we drill holes along the diameter of the axis, put the brackets on the end that looks out in the tank;
- The staples should be positioned in such a way as to form a cross, put a nut on top and weld it to prevent it from slipping off.
If you grab the axis of a homemade concrete mixer from the opposite end, you can check how well the mechanism designed for mixing concrete rotates. If all assembly rules are followed, the blades will rotate synchronously in a circle in the container. In order for the concrete to be mixed efficiently, the ends of each bracket should be unscrewed half a turn in a spiral using pliers.
Now it’s time to connect the electric motor from the washing machine to the free end of the axle, if your plans did not include a manually driven concrete mixer. You can do this work with your own hands, but you will have to understand the principle of connecting the engine to the electrical network.
Its installation does not end with connecting the engine; it should be fixed on the frame of a homemade concrete mixer and a casing should be installed to protect it from moisture. In the corner of the ladder we drill holes for fasteners intended for fixing the engine. There are mounting holes in the motor housing that should be aligned with the drilled ones, insert the bolts and tighten the nuts. To make a protective casing, it is best to use an old car inner tube.
The electric motor from the washing machine is mounted on the frame part in such a way that the pulley does not reach the tip of the axle two to three centimeters. To connect these elements you will have to use a flange:
- We put a piece of pipe with a diameter of 32 mm with one end on the axle, and the other on the pulley of the electric motor;
- on each side we drill holes with a diameter of 4 mm, passing through both the flange and the pulley with the axle;
- We thread suitable size bolts through the prepared holes and screw on the nuts.
The connection between the motor and the axle is completed, all that remains is to connect it to a 220 V electrical network and check the concrete mixer in action by preparing a test batch of concrete.
Please note that if the electric motor is connected not through the central axis, but directly to the shaft, then the container will not be able to tilt. In this case, unloading of concrete will have to be done manually.
Device with motor and gearbox
The design of a homemade concrete mixer with a washing machine engine consists of 3 components: a motor, a container and a base.
Milk cans are used as containers. If a larger size concrete mixer is planned, then a washing machine tank is used. To manufacture a forced-action concrete mixer, a motor is installed, which is taken from the same washing machine.
Before you start assembling a concrete mixer with your own hands from a washing machine, you need to prepare the following materials:
- capacity. A washing machine drum is used for this purpose;
- motor from the same washing unit;
- metal corner 50×50 mm. It is needed for the future base of the device;
- 2 wheels from a wheelbarrow. They must withstand the heavy weight of the equipment;
- hardened steel wheel metal rod as axle;
- strips of metal 50 mm wide and 4 mm thick;
- pipe with a diameter of 30 mm.
The advantage of an old washer
Of course, not every washing machine is suitable for solving this problem. Models released over the past 10-15 years do not meet technical requirements. Here you will need older washing machines, like the legendary “Kyrgyzstan”. Why?
There are several factors that explain the choice of such washing machines:
- their ideal cylindrical tank is perfect for mixing the mixture, and the absence of internal protrusions and holes greatly simplifies the preparation of concrete at home, reducing the consumption of materials;
- old models were made of high-quality alloys that ensured strength, durability, and wear resistance, and that is why they are highly valued among craftsmen;
- The electric motor of such models is powerful and durable, allowing you to work with a large amount of solution without the risk of breakdown.
When choosing a washing machine to make a small concrete mixer, make sure that the equipment is in good condition . There should be no traces of corrosion, holes, cracks and all kinds of defects, and a working motor is the main requirement. Of course, if desired, the engine can be replaced with another one, but this takes a lot of time and entails additional costs.
The very shape of the internal tank of the washing machine favors mixing concrete, as well as unloading the finished solution into a container. The cylinder does not have sharp corners in which concrete would accumulate and harden (otherwise such a device would not last long).
The motor of old washing machines copes well with large and prolonged loads that inevitably arise when mixing concrete. The design of such devices itself is well protected for safety purposes, and therefore no additional work is required to protect the motor.
Another advantage of a homemade concrete mixer is ease of maintenance and repair. If a modernized washing machine breaks down, it can be easily repaired and will not require expensive spare parts.
Each master can adapt the device to suit himself. This makes the upgraded washing machine convenient, practical and very effective when mixing concrete. If desired, the equipment can be disassembled for easy storage, and it does not take up much space in the garage or storage room.