Instructions for setting up a manual wood planer
Before planing, it is mandatory to set up a hand plane, as well as a sherhebel and a jointer. The plane is placed with the plantar side up and it is analyzed at what distance the knife cutter is set and whether it is skewed.
The edge of the cutter on a jointer and a hand plane should have an elevation of up to 0.3-0.5 mm, without clearly visible distortions (parallel to the plantar surface); for scherhebel this parameter is 0.3 cm.
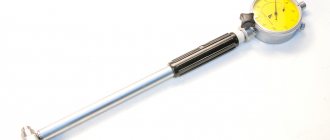
The elevation of the protrusion of the edge part above the plantar area of the instrument is measured approximately using a ruler. Or they give an estimate by eye. But greater accuracy in measuring the placement of the cutting edge is provided by a specialized device with an indicator.
For error-free installation and fixation of the blade, disassemble the plow.
Disassembly of plows equipped with wooden blocks and a wedge-shaped knife mount is carried out in the following order. In one hand, a plane is held by the block on the left, while with the right hand, with a slight force, blows with the corresponding devices are performed on the block from the back side until the wedge falls out. After that, they hammer the wedge in and watch how the blade will be positioned.
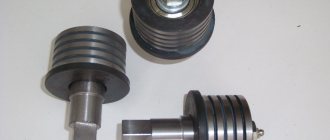
Please note: a jammed knife will move slightly with the wedge. For this reason, the edge of the blade is set in advance to a slightly reduced height. It is removed from distortions by tapping the ends with a hammer. There are a sufficient number of plows with a metal block. And one of them is presented here.
Setting up a hand plane, in particular its assembly and disassembly, is carried out using screws. There is a groove on the knife that adjusts the height of the blade edge. The adjusted cutter is secured with a screw.
Using the working edge, the chip breaker is adjusted at a distance of 3-5 mm from the edge of the knife cutter and secured by screwing in the screw. The main function of a chipbreaker (also known as chipbreaker) is to break chips. This eliminates the need to independently tear off chips from the surface being cleaned.
Equipped with a chipbreaker reduces the likelihood of unevenness in the wood being processed. Knives with chip breakers must provide a gap from the edge of the knife cutter to the edge of the chip breaker of about 1-4 mm (depending on the properties of the wood and the thickness of the chips). Cleaning a clogged tap hole (bottom hole) is done by pushing a thin sliver or pulling the chips upward. If these cleaning methods do not give the desired result, then the plow is disassembled.
Hobby: how to choose a hand plane and set it up for work
What man doesn't love making things with his own hands? This is a process comparable to meditation, and for the result to be no less pleasant, it is important to select a tool and have everything you need at hand. Today we'll answer some of the most common questions about how to complete your home toolkit, and we'll be talking about the old trusty hand plane.
The main one is plane No. 4 (the plane number is usually indicated on the tool itself). The number 3 plane is practically the same and is usually considered a beginner's or women's plane, so its presence in the master's home set, by and large, is not entirely necessary.
Starting from number 5, it’s not quite planes in their pure form, but rather semi-jointers, which usually include tools with a sole up to 60 cm. Number five is quite versatile and is suitable for a variety of tasks, for which English craftsmen, for example, They gave him the name Jack (Jack in English folklore is considered a jack of all trades). Its fundamental difference from the “four” is the longer sole. “Six” is a semi-jointer that already has all the features of a jointer, for example, a wide, long sole. It is usually used to level large surfaces when it is required that it be level, but perfection is not needed. If the strength and weight are enough, choose number 6, otherwise take the “five”.
There are also numbers 7 and 8, but their presence in the home set is at the discretion of the master. “Seven” is still a full-fledged semi-jointer, and “eight” is such a specific tool with a large and long sole for craftsmen with great strength and weight.
If you move in the other direction from the main plane No. 4, then the next plane you need in your set is the so-called end plane, the smallest of the entire family. Its sole is 2 times smaller than that of the “four”, it easily fits in one hand. The main advantage of this plane is precisely its ergonomics - the fact that it fits so comfortably in the hand, while the master’s hands are as close as possible to the area of action of the tool. The closer, the more accurate the movements.
Thus, the minimum set of hand planes for a home craftsman would be a set consisting of a “four”, an end plane and a number 5 or 6 - depending on your personal preferences. The remaining intermediate options are purchased as needed and depending on the work performed. Now let's move on to the setup.
How to set up a plane for work
When buying a new plane, don’t be lazy and immediately buy a screwdriver for it. There are 2 screws on the plane that are involved in setting up the tool - the corresponding slotted screwdriver should be selected. Preference should be given to screwdrivers with a short handle - they will be more convenient to adjust.
When buying a plane, make sure that the so-called eye does not dangle. Then, at home, you need to tighten all the screws on the instrument, since they could have become loose during transportation and storage of the product - due to temperature changes, shaking, etc. The most popular now are double hand planes designed for fine planing. Their knife consists of two parts - the knife itself and the chipbreaker, the gap between them needs to be adjusted so that it is minimal, about a millimeter.
And one more trick in setting: the top screw of the plane, which controls the eccentric, or latch, must be tightened so much that the latch is done with force, but with one finger. If you do not tighten it enough, then the plane knife, or as it is popularly called, the piece of iron, will crawl inside during operation and will cease to perform its function. If you tighten this screw, as many people like to do, then adjusting the knife will become more difficult, and you need to adjust it after adjusting the screws, when the plane is already in a state ready for work.
To adjust the knife, you need to use the latch to adjust it so that it protrudes from the hole in the sole by 1-2 millimeters. Usually the knife is first set with a small margin, its shoulders and angle are adjusted, and then it is gradually removed, visually leaving the desired protrusion. To do this, in each subsequent position you need to look along the sole of the plane until you reach the required 1-2 millimeters of the length of the knife looking out from the opening of the sole.
source
Safety rules for repairs
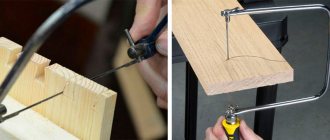
- It is unacceptable to push out chip debris from the edge of the cutter. This can cut the skin on your hand.
- Set up a hand plane by placing it on the workbench exclusively with the blade facing away from you.
- The tool is passed with the blade towards you.
- It is unacceptable to drop the plane knife.
Study the instructions and repair your hand tools according to the rules. At the same time, do not forget about safety. Good luck.
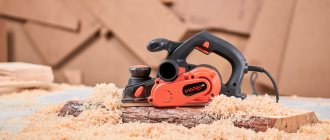
Despite the wide range of electric planers offered by stores, ordinary hand tools are still quite popular among carpenters. The fact is that with their help, wood processing can be done somewhat better. Most often, modern carpenters have both types of planes in stock. Electric is used for the initial processing of workpieces, and manual is used for finishing them.
Safety regulations
Be careful when working. Follow a few simple rules.
- Pay close attention to the quality of the workpiece. Working on wet wood is not recommended.
- Do not push out chips with your hands . This can cause you to cut yourself or get a splinter.
- Before planing, you need to set up the tool on a workbench ; you need to place it on its side with the blade in the opposite direction from the worker.
- You need to pass the tool to another person with the blade facing you.
- Dropping the tool is not recommended.
To learn how to put a hand plane into working condition, see the following video.
Source
Design Features
To know how to choose a good hand plane, you should have an understanding of its design. Such instruments consist of the following main parts:
Frame. This structural element is most often made of wood. It is in it that all the main components of the plane are attached.
Knife. Sharpened at a certain angle.
Read also: Grinder with soft start and speed controller
Clamp. Can be made from different materials. This can be a metal plate or bar.
Chip breaker. Installed slightly higher than the knife. As you can already judge from the name of this element, it serves to break chips and guide them.
Adjustment screw. This structural element is responsible for changing the position of the knife relative to the surface being processed.
All universal hand planes for wood have this design. The basic elements described above are also present in other, specialized varieties. On the body of any plane, among other things, there are two handles.
What to look for when choosing
The main element of the planer design is the knife. It is its quality that you should pay attention to first. This element must be made of high quality steel. In this case, the plane can be used for as long as possible without the need for sharpening. Of course, it is visually difficult to determine how well the material was chosen for the plane knife. Therefore, first of all, you should pay attention to the reputation of the manufacturer.
Of course, the cutting tool should never wobble. When purchasing, you should also check the front handle. It must also hold tight. In addition, when choosing a plane, you should pay attention to the size of the handle for the right hand. The length of this element varies. A tool with a small handle may simply not be suitable for a person with large hands.
Varieties
Of course, you should choose a hand plane based on the specific purposes for which it will be intended. There are several types of planes on sale today. The most popular are:
Universal. This is a regular plane that can be used to do most carpentry work.
Jointer. The body of this instrument is longer than that of a conventional one. A jointer is used to process large workpieces.
End plane. The knife of such a tool is located at a flatter angle. This allows high-quality processing of end grain fibers.
Zenzubel. A plane of this type is used mainly for making various kinds of carpentry joints and folds.
Reviews of plane brands
Carpentry tools of this type are sold on the modern market from different manufacturers. Many brands are of very good quality. For example, planes from companies such as Bailey and Handyman have earned good reviews from craftsmen. Bailey tools are valued primarily for the excellent quality of their knives and long service life. Sharpening the knife of a hand plane of this brand is done quite rarely. Sometimes there are comments that mention the build quality is not very good. But even if any shortcomings are found in the purchased tool, they can usually be easily and quickly eliminated, and on your own. Handyman planes, judging by the reviews, are also convenient and reliable. Their only drawback is their not very neat design.
Experienced craftsmen do not advise purchasing Groz brand products (India). Despite the fact that the products of this brand are classified as expensive, judging by the reviews, they are not of particularly good quality. Their build quality is simply disgusting, and at the same time it is inconvenient to work with them.
How to use
Hand planes for wood are simple in design and quite easy to use. The main thing is to do the work smoothly, without jerking. This is especially true for very long workpieces. If this condition is met, the surface of the finished product will be very neat and smooth. When planing, you should stand to the side of the workpiece, with one foot forward.
The top and bottom surfaces of the products are very easy to process. It is somewhat more difficult to do work on the edges. In this case, it is important to secure the knife very firmly. Under no circumstances should it vibrate in the block. Edges should be planed exclusively in the direction of the grain.
There is also a technique that allows high-quality processing of very wide workpieces. In this case, the product is first planed diagonally, adhering to the direction of the fibers. Next, the plane is checked for evenness using a special ruler. At the final stage, finishing is carried out. In this case, a thin layer of chips is removed from the workpiece parallel to the edge.
How to sharpen a knife
Of course, a hand plane, like any other tool, requires some care. No matter how good the steel the knife of this tool is made of, sooner or later it will still become dull and will have to be sharpened. Most often, this procedure is performed on a special stone called a touchstone. The latter is pre-wetted with water. When sharpening, it is advisable to moisten the knife itself. You should press it against the stone as tightly as possible.
Read also: Is it possible to connect running lights to the dimensions
The sharpening angle of a hand plane may vary depending on the model. Most often this figure is 30 degrees. When working on a whetstone, you usually just pay attention to how the blade was originally sharpened.
Sometimes experienced carpenters sharpen a plane knife on a wheel. In this case, it should be pressed not against the edge, but against the side surface. When using a wheel, you can also get a pretty high-quality sharpening. It will be very convenient to use a hand plane with such a knife. But only if you use an abrasive fine-grained abrasive wheel. After sharpening on such a tool, finishing is usually done. This procedure is performed either on a piece of sandpaper mounted on a table or on a block. Checking the quality of sharpening is quite easy. To do this, you just need to carefully examine the blade. If it does not shine, then the knife is sharp enough to be used.
Sharpening electric planer knives at home
With regular use of an electric planer for processing wooden surfaces (planing, quartering, chamfering), its cutting edges become dull. If the knives are intended for repeated use, then you can sharpen them yourself. Sharpening is carried out according to the same principle as with hand planes. The differences are only in the number of cutting edges that need to be sharpened.
You cannot use power tools with dull blades for the following reasons:
- the load on the electric motor increases, as a result of which its wear accelerates;
- The quality of surface treatment of lumber is significantly reduced.
Specialists from service centers or special workshops will help you sharpen the cutting edges of working attachments correctly. If it is not possible to turn to professionals, then you can do all the work at home. To sharpen your blades yourself, you can use the following tools:
- knife sharpening machine;
- an ordinary whetstone (abrasive stone, whetstone);
- emery;
- metal file;
- grinding wheel.
You will also need a special clamp to hold the piece being sharpened.
Sharpening a blade using an abrasive stone is done as follows.
- Remove the working attachments that need to be sharpened from the electric planer drum.
- The knives are secured using special screws in the clamp so that their cutting edges lie in the same plane.
- The fixed blades, with light pressure, move smoothly along the surface of the abrasive, ensuring that they are sharpened at the same time.
- Inspect the sharpened parts for deviations, repeating the entire process if they are detected.
- Check the sharpness on any piece of board.
- Install the knife plates on the drum, adjusting their position.
Before performing work, it is recommended to pre-moisten the abrasive stone with water. It should be taken into account that coarse-grained abrasive is intended for primary processing, and fine-grained abrasive is intended for finishing. It is recommended to maintain the original sharpening angle of the blade (approximately 30 degrees).
The considered manual method is well suited for sharpening. If the edges are very dull or have jagged edges, then we sharpen them on a machine. When doing this, you should be careful not to remove excess metal from the blades.
With your own hands, all actions should be carried out carefully, carefully handling the blades to avoid injury. High quality sharpening will come with experience and skills.
The condition of the electric planer knives - their adjustment and sharpness - should be checked before starting to process lumber. Not only the quality of planing, but also personal safety depends on this. All operations for replacing, sharpening, and adjusting working attachments must be performed only with the power tool disconnected from the mains. To give initial sharpness to the cutting edges, it is enough to use a regular whetstone.
Today on the construction market there is a huge number of machine tools and devices that speed up and simplify work. These include an electric planer, because it is often used in construction or repair.
Every tool, be it a woodworking machine or an ordinary plane, has some additional elements in its configuration; for a plane, these are considered to be knives. If the blades begin to peel off layers poorly, this means that they have become unusable and need to be sharpened properly.
However, before disassembling the tool, you should figure out how to align the blades on an electric planer. Before adjusting the knives on an electric planer, you need to learn how to disassemble the device.
How to set up a hand plane correctly
To perform this procedure you will need a special screwdriver. Such tools are designed specifically for setting planes. Their distinctive feature is their large width and short length. The main purpose of setting up a plane is to set the amount of blade protrusion above the surface of the sole. If the knife protrudes too far, the plane will begin to remove very thick chips. A slightly exposed blade will simply slide across the surface of the wood.
For initial processing of workpieces, the knife yield should be about 0.5 mm. If the plane is to be used for finishing, the blade should protrude slightly less over the sole.
Stages of preparing the tool for work
To prepare the plane for work, you need to do the following:
- adjust the knife extension;
- adjust the position of the chip breaker (if equipped);
- adjust the mouth gap.
The overhang of the knife affects the thickness of the chips removed, the speed of work and the cleanliness of the resulting surface. For rough processing it should be about 0.5 mm, for finishing it should be less. The process of setting up a metal plane is not difficult, but it varies greatly between models. In any case, the adjustment is made by rotating the adjusting screw. Typically the screw has a left-hand thread, and when rotated clockwise, the overhang increases.
How to store it correctly
Experienced craftsmen believe that a knife for a hand plane becomes dull, for the most part, not even during operation, but because of improper storage. After finishing planing the workpieces, this tool should be cleaned of chips and placed in a box specially designed for it. In this case, the position of the tool should be such that the knife blade protruding from the body is not at the bottom, but at the side.
If the hand plane is going to be stored for a very long time, it must be disassembled and thoroughly cleaned before putting it in the box. Knives and other metal parts should be wiped with an oiled rag.
Today on the construction market there is a huge number of machine tools and devices that speed up and simplify work. These include an electric planer, because it is often used in construction or repair.
Every tool, be it a woodworking machine or an ordinary plane, has some additional elements in its configuration; for a plane, these are considered to be knives. If the blades begin to peel off layers poorly, this means that they have become unusable and need to be sharpened properly.
However, before disassembling the tool, you should figure out how to align the blades on an electric planer. Before adjusting the knives on an electric planer, you need to learn how to disassemble the device.
How to replace knives on an electric planer
To remove old bits, you need a set of wrenches. A screwdriver may also come in handy.
- turn the drum of the electrical appliance so that the bolts become accessible;
- loosen the fixation;
- remove the working attachment;
- insert new blades into the vacated grooves;
- secure them with bolts.
Important! To avoid imbalance, all cutting parts must be replaced at once. It's time for adjustments
To do this you need a complete hexagon and a metal ruler
Now it's time for adjustment. To do this, you need a complete hexagon and a metal ruler.
How to adjust electric planer blades:
- Place the instrument on the table so that its drum faces upward.
- If necessary, wipe off resin from cutting accessories.
- Set the minimum planing depth.
- Place the blade in the slot between the soles.
- Place a ruler on the back plate.
- See if its edge touches the consumable. If not, raise the bar. To do this, you can slightly loosen the fasteners using the hexagon from the kit.
- Tighten fasteners.
All this needs to be done for each nozzle. For balance, the distance between the knives should be the same.
Correctly sharpening the knives of an electric planer yourself is not so difficult. If the situation is not critical, you can do everything manually using a sharpening stone. If the blade is completely dull, a special device is needed. You can purchase it or make it yourself.
Installation recommendations
The blades are located on the rotating drum of the tool. Their purpose is to remove the top coating of wood during processing. The planer design can be equipped with one or a pair of knives. The last cutting parts are rotatable.
If any side becomes dull, the position of the blade can be easily changed. These parts are typically made from tool steel alloy or tungsten carbide. Steel knives can be sharpened repeatedly on a manual or automatic sharpening wheel.
Knives for electric planes are classified according to their shape:
- Rounded - used for processing wide surfaces, because the transitions should be as smooth as possible.
- Direct ones are designed for processing small products and in the process of selecting quarters.
- Wavy (curly). Such blades are used to age the material.
Before working at home, you should make sure that the knives are installed and adjusted correctly. If there are any errors, then certain actions should be taken. The cutting edge of the part should be positioned strictly parallel to the bottom of the electric planer and protrude slightly upward. Correct adjustments can be determined by visual inspection of the instrument.
As a rule, the cutting edge of the blade should protrude about half a millimeter above the sole of the device. Sherhebel, which is used for roughing, should be produced no less than one millimeter. In this case, there will be no problems with adjusting the knives of the electric planer. To do this, you simply need to turn the large and small screw in different directions until the working part is in its intended place. The screws are located on the back of the platform.
Read also: Water level float switch for pump
After all the necessary manipulations have been performed, the blade is placed in the plane and secured with fasteners. If the tool is completely new, then its blades are already adjusted, but after using it the settings become a little off. Therefore, even if you have not worked with the tool much, it is still advisable to adjust it in advance. It should also be remembered that after adjustment, the operation of the plane should be checked on some unnecessary part.
What does the market offer?
Imported models, for example, from Skil, are equipped with standard blades measuring 82 millimeters. If you choose both reliable and cheap options, then you should pay attention to Zubr products. These blades are made from strong carbon steel. They are considered universal because they fit almost all models.
Standard parameters of knives are 82×5.5×1.2 mm . Currently, products from a variety of manufacturers are on sale. The cost of knives is directly dependent on the manufacturer. For example, Bosh products cost twice as much as blades from the brands “Stayer”, “Bison”, etc. However, their quality also differs.
There are also individual knives. For example, electric planers “Baikal” and “Interskol” have individual cutting elements. Their parameters determine unique properties.
This type of knives is often one centimeter wide, and their length varies from 82 to 102 millimeters. If the product suddenly becomes dull, you can sharpen it with your own hands using a sharpening wheel and a shaft.
Installing knives on an electric planer
Blades for an electric planer require a special approach, that is, increased demands are placed on them. If the cutting elements become less sharp, this can be determined visually, in the light. You need to carefully inspect the chamfer. If a sanded strip the thickness of a thread has formed at its end, then the knife has become dull. The sharpening angle of the plane knife is 30 degrees. Now in stores you can find tools with rotating knives, which is very convenient, because if one of the blades becomes dull, you just need to turn it over.
In an electric planer, the cutting parts are placed in a special holder , which is located in a groove and pressed with three nuts. To remove the element, you just need to loosen the nuts and unscrew the screws.
Then you need to select a drift that matches the dimensions of the product and is used to knock out the groove. Then comes turning over or replacing the part, which is put in its place. In this case, it is necessary to ensure that the product fits strictly parallel to the knife holder.
When replacing, you need to align the blades on the tool, adjust their height and tighten the nuts. In this case, an identical gap must be maintained, otherwise you may encounter the problem of shaft unbalancing.
After properly sharpening or replacing the blades, you should immediately try them on some unnecessary board.
Algorithm for replacing knives on an electric planer
To remove the knives from the electric planer and replace them with new ones (or properly sharpened ones), you will need a set of wrenches, and also, in some cases, a screwdriver. There is no need to completely assemble and disassemble the electric plane to change working attachments. Replacement is performed in the following sequence:
- rotate the drum, placing it in such a position to gain access to the knife mounting bolts;
- loosen, but not completely, these bolt clamps;
- remove the working attachment manually or using a flat screwdriver;
- the rest of the blades are treated in a similar way;
- place new knives in the sockets, securing them with bolts;
- put them in the correct position.
The main point is the need to place the blades exactly in the sockets and securely fix them so that they do not fall out while using the tool. Due to the fact that different models of electric planers may have different attachments for working attachments, it is recommended that you first read the operating instructions for the equipment you are using.
When there are two cutting attachments installed on the drum of an electric planer, both need to be changed at once. This will prevent the occurrence of an imbalance, which results in a decrease in the quality of lumber processing and failure of the electric planer.
Safety requirements
If you use the tool correctly, you can quickly and efficiently complete a fairly large amount of work. However, if you do not adhere to safety requirements, you can suffer significant injuries.
- Before work, the workpiece must be securely fixed, otherwise it may move or even fly off during work.
- During the technical inspection of the blades and their adjustment, the electric planer must be de-energized by unplugging the cord and plug from the socket, because accidental starting can lead to very unfavorable consequences.
- You need to start processing only after the knives have started and warmed up, that is, the cutting elements must accelerate to the required speed.
- The instrument must be placed exclusively on its side.
When working, avoid bending or tangling the cord that supplies power. Electrical insulation and integrity are also required.
How to set up a hand plane (video)
The HeARTwood channel, in preparation for an interesting project that many of you will enjoy, made a video lesson on how to set up and prepare a hand plane for use.
This is an ordinary Chinese, as it is called, Raftul, nothing remarkable, of course it is good to plan, it is pleasant to hold in your hands, but nevertheless, such a tool needs to be adjusted and brought to mind.
And today’s video will be devoted to what needs to be done to bring such a purchased plane into working condition so that it can work normally and comfortably.
Browse products for inventors. Link to the store.
I bought it for pennies, I was literally surprised, because the first thought arose that either a zero on the back or a one or two on the front was lost, but nevertheless I specifically kept the receipt, the real cost of this plane is 813 rubles.
This Chinese store is a haven for woodworkers.
DIY electronics in a Chinese store.
Such a tool is already obviously good, if only because for such a price, even if it suddenly did not live up to your expectations, you did not give a bag of money for it. 813 is not that expensive. If you look at branded planes, the price goes for 20-30 thousand.
And it should be noted how expensive ones differ from cheap ones. First of all, geometry. Naturally, the smoother it is, the better the surface it gives, the second is the quality of the materials used, the blade itself, how good the steel is, how well it holds an edge, the quality of the threaded connections, the quality of the milling cutter, etc.
But the most important parameter, if we talk about cheap planes, for example, is the base material. This base is ordinary gray cast iron, just a living example.
Here is the very first iron plane, in those ancient times, when I bought it, our traders literally brought all the garbage from China, literally all the trash, things that the Chinese even disdain to buy for themselves.
This took quite a bit of work. Everything about it was crooked - from all sorts of threads, adjustments, the only good thing was that it was made of iron, and that the steel of the cutter was quite good. The steel holds an edge well, but everything else leaves much to be desired.
After I brought the tool into working condition, I worked with it a lot on different types of wood, most often during the work the tool does not move straight, but slightly obliquely. That is, these are his main working movements, so that there are fewer chips on some problematic wood.
And due to the fact that the plane moved diagonally, at an angle to the working surface, the sole of the hand tool was worn out, became a propeller, part was wiped out, and other parts remained convex. Naturally, after this he began to write propellers, that is, it was impossible to plane them - here is a living example of the fact that the base is not made of good material. For more information about setting up the plane, watch the video from minute 5. How did it all start, why was this video tutorial made? Here one thing clings to another, another to a third, etc. Along the chain. You can’t just take it and make a master class; first of all, you need to make a special hammer for profiling metals. You can go to the store and buy such a hammer for around 1,500-2,000 rubles with a smooth spherical striker. After weighing all the pros and cons, I decided that it was better and easier to do it myself, so I went to the store and bought a Soviet hammer. We will make a special one from it with a spherical striker on one side and a sharp striker on the other. And in order for it to have a finished look, it is necessary to make a beautiful handle, because it is pleasant to work with a beautiful tool. This is why the plane needed to be adjusted.
About burrs in another article.