Screwdriver chuck: description, function
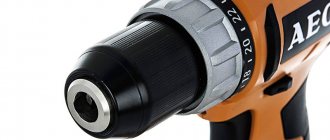
The cartridge is a metal cylinder with a cavity inside, equipped with a ring and a control sleeve. It is fixed to the shaft. With its help, the drill or grinding attachment is securely fixed in it for further work. The fixation of the working part of the tool (drill) is ensured by the thread. The drill is tightened in two ways. The first method is to tighten it with a special wrench; in the second method, the drill is tightened when the chuck is rotated in the direction opposite to the axis of rotation of the drill.
Repairing a screwdriver with your own hands when the chuck runs out
The main culprit for this problem is the screwdriver gearbox. To make sure of this, you need to remove it by dismantling it in the above manner. This particular breakdown may indicate several problems in the gearbox, which we will indicate below. The reason may be:
screwdriver chuck repair
- violation of the gearbox shaft geometry;
- production of gears;
- malfunction of the shaft support bearing;
- wear of the pins securing the satellites of the planetary gear.
The above parts are produced only in factories, so you won’t be able to make them yourself. All you have to do is purchase them and replace the broken ones.
How to disassemble a screwdriver chuck
Despite the fact that today there are many models of screwdrivers on the market, they have the same general approach to removing such an element as a cartridge. Now we will briefly describe it.
In order to unscrew it, you need to remove the screw securing it to the shaft. It is located inside the cartridge; the screw should be rotated clockwise. After you have unscrewed the screw, you should jerk the cartridge in the opposite direction.
Attention! If you try to unscrew it manually, you must set the drill to second speed if it is two-speed. When purchasing a tool, it is advisable to lubricate the screw with machine oil. In some cases, when this element does not want to give in, then you should put the tool on first speed, hold it in your palm, and turn the reverse to the left. The cartridge should come off the thread easily.
How to replace a screwdriver chuck
It will not be easy for an untrained user to replace it, since without the help of a special tool you will not be able to do it with your bare hands. There are two ways in which it can be removed, and we will consider them further in our article. In order to change it, you should pay attention to the actions that we described in the article above. Dismantling is performed with the following tools:
- A hex key is usually a 10mm L-shaped metal rod. Its short part should be fixed in the chuck, the long part should be rested against something, for example, a table. We turn the cartridge, and then remove it by turning the key.
We looked at the dismantling method using a key. The method to remove the element manually is described above.
Repairing a screwdriver with your own hands when the chuck is loose
A small play within 1 mm usually does not create visible problems during operation. If the value is larger, you should pay attention to the condition of the gearbox. So, the procedure is as follows:
- Unscrew the bolts securing the top cover of the tool. Let's take it off.
- Unscrew the electric motor from the gearbox. We inspect the fastenings.
- Let's disassemble the gearbox. Often the cause of failure is a malfunction of the bushing located inside. It is possible to remove the bushing using the steps described at the beginning of the article (see how to remove the cartridge manually). The bushing is easily pressed out by hand.
- We are replacing the bushing. Then we assemble everything in the following sequence: bushing, shaft, bushing bearings, retaining ring. Lubricate the rubbing parts.
- After this, we assemble the gearbox in reverse order. We attach it to the electric motor.
- Assembling the screwdriver body.
Features of removing bits when they jam on screwdrivers from different manufacturers
Basically, all models of screwdrivers are quite similar, so the methods for removing a bit when jammed are similar.
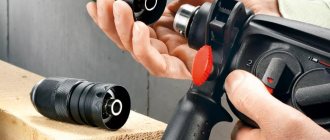
- Bosch. In Bosch screwdrivers, you can get the bit using two keys after pre-lubricating the chuck.
- Makita. The tools of this company are reliable and have a long service life. The bit jamming occurs, as a rule, as a result of debris getting into the chuck. In this case, you can solve the problem by pouring lubricants into the inside of the cartridge. If there is no result, other methods are used.
- Interskol. Products manufactured under this brand work well and last a long time and rarely break down. It is easy to remove a jammed bit using the methods described.
- Other manufacturers. There are many instruments on sale from different brands - Metabo, Whirlwind, DeWALT, Diold, Caliber, Hammer. There are as many ways to remove the bat when a problem occurs as with other models. It is permissible to try all methods to cope with the problem.
How to unlock a jammed screwdriver chuck
When the described problem occurs, a logical question arises about how to remove the drill from the screwdriver when the element is jammed.
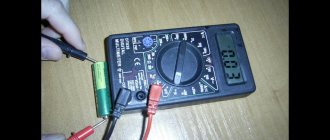
At the first stage, professionals recommend pouring universal lubricant like WD-40 into the inside of the chuck (touching the surface of the cams). You can also use kerosene or machine oil instead. It is recommended to use such solutions in any case of jamming.
Jamming often occurs due to improper use
After 10-15 minutes, the cartridge and jaws must be carefully tapped through the gasket with a regular or rubber hammer. Typically, the grip loosens and the drill comes free.
If this does not happen, then you can slightly warm up the cartridge with a hairdryer and try to remove the bit again. The method is suitable for owners of screwdrivers with standard and quick-release fasteners.
You can also remove a jammed bit using two adjustable wrenches. After the lubricant is added inside, fairly simple steps are performed:
- The first key is used to compress the base of the cartridge,
- Second, carefully rotate the upper part.
It is recommended to place soft spacers between the parts so as not to damage them while they are being unscrewed.
READ How to Change Brushes in a Screwdriver
Attention! In some cases, dealing with jamming is quite simple - it is necessary that the cartridge cools down well after work. As a result, the cams will open and the bit will come out easily.
There is another method by which you can cope with a similar problem. It is necessary to completely immerse the tool in a container with machine oil (even vegetable oil will do) or gasoline for one hour. After this period of time, remove the product and use the described methods to remove the bit from the clamp.
If you cannot carry out the procedure yourself, then it is better to contact a specialist so as not to damage the instrument.
There are several methods for removing the drill from the chuck.
Repair methods
Experts recommend, regardless of the reason why the screwdriver jams, what to do first: introduce universal lubricant such as WD-40 into the internal cavity of the chuck, including the surface of the jaws. After 10-15 minutes, use a rubber hammer (or a regular one, through a gasket) to tap the cartridge and jaws with moderate force.
If the bit is jammed in the chuck of a Bosch, Texas, Praktika, etc. screwdriver, then (after lubrication) the use of two adjustable wrenches effectively solves the problem. One clamps the base of the cartridge, the other carefully rotates its upper part. To avoid damage to the surface and the unit itself, soft but dense pads such as leather should be used.
If your efforts lead to nothing, workshop specialists will be able to restore the functionality of the tool with minimal financial costs and extremely quickly.
What is a screwdriver? Essentially, this is the same drill, but a screwdriver differs from it in that it has a lower rotation speed of the chuck and, at the same time, greater torque.
Another difference is that while on a drill the rotation speed can change smoothly, on a screwdriver, as a rule, “fixed” rotation speeds of the chuck are set. This is due to the “slip” function of the screwdriver chuck: when the screw is tightened, the chuck stops rotating, although the motor is still running. This function allows you not to tear off the splines and not “drive” the screw inside.
Different types of speeds are designed for specific types of work and materials, as well as the “drilling” mode. Just like a drill, a screwdriver has a reverse function. The design features of the screwdriver allow it to perform a wide range of jobs: tightening and unscrewing screws and self-tapping screws, screws and nuts, drilling soft materials.
Using a screwdriver, for example, in the production of plasterboard partitions or when assembling furniture, increases the speed of work significantly. Therefore, a screwdriver is rightfully considered one of the most common tools in any craftsman’s kit.
The designs of all screwdrivers are approximately the same. They are quite light and have a “pistol” handle, designed for working with the tool with one hand.
Why can a bit get stuck in a screwdriver?
Whether the tool is expensive or cheap, jamming of the clamping device is not uncommon. This happens in several cases:
- When you try to use a drill of the largest allowable size, the chuck jaws are moved to the maximum value, after which it is often impossible to compress them normally.
- A jammed drill or bit cannot be removed because the jaws cannot be opened - in most cases due to their uneven compression.
- The jaws may jam due to free movement during compression and expansion. This is due to debris, shavings, and scale that have gotten inside and fall under the shaped parts of the cams.
Unfortunately, in such situations it is impossible to work with a screwdriver, despite its working order. You can cope with the problem yourself; in severe cases, it is better to contact a specialist service center.
The screwdriver chuck does not clamp the bit
Any screwdriver user has encountered a problem such as the chuck jamming. It is constantly exposed to vibrations, dynamic and shock waves. Metal shavings, small mechanical particles, and dust get into the screwdriver This article will talk about how to open a jammed screwdriver chuck.
The chuck is the fastener where the drill is fixed. Typically, standard drills are equipped with a cam type.
Cases when the screwdriver fastener jams:
- The cams do not move, and it is impossible to remove a clenched drill or bit. During this, the cams are compressed unevenly, which makes it difficult to secure the drill.
- When using a drill that is too large, the cams are expanded to the maximum, as a result of which it is not possible to bring them together by applying great force.
In rare cases, the jaws jam while they move freely when unclenching or compressing - in most cases this is caused by particles of debris, shavings, okalina and others that have fallen under the figured part of one of the cams.
Professionals advise, first of all, to fill the inside of the cartridge, which includes the surface of the cams, with universal lubricant such as WD-40. This is recommended for any cause of jamming. After ten to fifteen minutes, tap it and the cams with moderate force with a regular hammer through the gasket or rubber.
From such vibration he will loosen his grip and free the instrument. If necessary, after introducing universal lubricant, the cartridge can be warmed up a little with a hairdryer. In addition to WD-40 lubricant, you can also use machine oil.
One way or another, it takes time for the liquid to penetrate deep enough inside, where the point of contact with the drill is located. This method is suitable for owners of both standard fasteners and quick-release fasteners.
If the bit jams, then after lubrication the problem is quickly solved by using 2 adjustable wrenches.
With the help of one, the base of the cartridge is compressed, and with the other, its upper part is carefully rotated. To avoid damaging the surface and the assembly itself, it is recommended to use soft and dense pads like leather.
In addition, in order to open the cartridge, it is necessary for it to cool. In some cases, this action alone is enough for the cams to release the drill and it can be removed.
The last method is to completely immerse the drill in machine or vegetable oil for one hour. If it is not available, you can use gasoline. By combining the above methods, you will be able to get it much faster.
If the problem cannot be solved on your own, you should seek the help of competent workshop specialists who will fix the problem in a short time.
And what methods do you know for clearing a jammed cartridge from a screwdriver?
Did you like the article? Subscribe to us in Yandex Zen. By subscribing, you will be aware of all the most interesting news. Go and subscribe.
Today, such a tool as a screwdriver is used by many, so it is not surprising that there is a high demand for them. Very often the device breaks down, and the buyer rushes to a repair shop, paying money for repairs. You don’t always want to do , of course, so in our article we will help you become more familiar with the design of a screwdriver. You can deal with some problems on your own.
We will look at various cases of screwdriver breakdowns, namely: we will deal with the most common breakdowns of such an important part of the tool as the chuck.
Do I need to repair a screwdriver if a bit is stuck there?
Regardless of what model of screwdriver (Makita, Bosch or Metabo), at the initial stage you can try to get the bit yourself. You need to pull out the element very carefully so as not to damage the remaining parts.
Before removing the bit from the screwdriver, it is recommended to carefully inspect the tool. If necessary, you should clean it, and then try to remove the stuck bit. As a rule, with a similar problem, the screwdriver remains in working order, so it does not need a complete repair.
You should always inspect the tool before use.
You will have to take the tool to the workshop if you cannot remove the element yourself, and further attempts may cause damage.
With keyless chucks, removing and inserting drill bits is fairly easy. In such devices, the sleeve operates by manual rotation. To prevent the cams from tightening too much, they are often equipped with locking elements.
Experts recommend that before installing the selected bit in its place, make sure that the tool is working. It is necessary to turn off the product from the network.
Attention! The jamming of a bit in a screwdriver chuck most often occurs due to the fault of the owner. To prevent this from happening, it is recommended to regularly service the tool and monitor its condition.
It is absolutely important to check that there is no debris stuck in the cartridge and to clean it in a timely manner. When working, you need to ensure that the product does not overheat and give it time to cool. If necessary, additional diagnostics are carried out in order to identify possible problems in a timely manner.
In difficult situations, it is not recommended to disassemble it yourself, otherwise you can completely damage the instrument. It is better to contact specialists to do the work.
How to change a drill bit in a drill - we can do it ourselves!
It is not always possible to remove a drill from the chuck in the usual way - as a result of heavy load or improper fixation, it can jam the chuck. How to get a drill out of a drill without damaging the fastener and the tool itself? First of all, try to cool the cartridge thoroughly. Sometimes this is enough for the cams to release the drill a little and you can pull it out.
The most proven method for removing a stuck tool is to tap the cams.
. To do this, the free end of the drill is fixed in a vice, a wooden strip is applied to the chuck, through which tapping is carried out. This vibration can cause the chuck to loosen its grip and release the tool. This method will be useful for both owners of classic fasteners and owners of quick-release fasteners. Sometimes removal becomes possible after lubricating the drill with machine oil or the popular WD-40 lubricant.
The latter method is better, because thanks to the spray, the substance will quickly reach the desired points of contact between the drill and the chuck. In any case, after lubricating you will need to wait a little for the substance to penetrate deeper. Sometimes, in particularly difficult cases, the problem is solved only after dipping the entire cartridge in machine or vegetable oil. If neither one nor the other is at hand, you can make a “bath” for your drill from gasoline. You need to keep the cartridge in the liquid for at least an hour. By combining methods, you will be able to remove a jammed drill even faster.
How to choose the right new cartridge
Ideally it should be the same as the old one. If you cannot find the same one, you need to look for a model with the same parameters - shape, size, principle of operation. All products are standardized, but despite this it is easier to combine spare parts produced by the same manufacturer.
When selecting, you can be guided by other principles. If the tool is used frequently, you need to decide what is more important - the convenience and speed of changing the working part or the reliability of the connection. In the first case, a quick-release cylinder is suitable, in the second - a cam cylinder, fixed with a key.
It is important not to make mistakes. The easiest way to look for the right part is to have a tool and a sample of an old sleeve with you. How to change the chuck on a screwdriver should be written in its instructions. For connection, threads on the body and shaft or a Morse taper are used.
For detailed instructions on disassembling the screwdriver, see the video.
How to disassemble a screwdriver chuck
To get inside, you need to remove the plug. On a plastic case, it can be easily removed - just pry it off with a sharp object. On metal it is knocked out with a hammer. To do this, hit the base of the clamping sleeve, being careful not to damage it. To get to it, insert a large diameter bolt between the cams, then move them so that the bolt is perpendicular to the base, but can still move freely up and down. The head protruding above the surface is hit with a hammer.
Threaded connection
To work, you will need an L-shaped ten-millimeter hexagon. It is inserted into the cams, clamped tightly and turned. It is more convenient to fix the hexagon in your hand or on a support and turn on the engine at low speeds. It should only work for a small fraction of a second. This is usually enough to loosen the connection and allow the sleeve to be removed without difficulty. If the method does not work, the tool must be disassembled to approach the connection from the other side.
How the cartridge works
- Cam - fixation occurs using an L-shaped key inserted perpendicularly.
- Quick-clamping - to fix it, you need to clamp one cylinder of the body with your hand, rotating the other cylinder around its own axis.
Cam ones are less convenient, but provide a more reliable connection. When the key is rotated, the adjusting sleeve compresses the steel jaws until they close.
Quick-release fasteners tighten faster. They do not require a key.
Types of quick-clamping structures
- Single-coupling - one hand is enough to install the bit, since one of the parts of the body is fixed automatically.
- Double-clutch - both parts are movable, and one of them must be held with your hand so that it does not rotate.
If you need to replace the chuck on a screwdriver, please note that single-socket chucks are used only on tools with locking devices.
The material is plastic or metal. Plastic products are less reliable, but they are more convenient to work with because they weigh less.
How to repair?
It is not always necessary to immediately change the cartridge to a new one. Sometimes basic repairs can help, for example when a screwdriver hits. Let's look at the main problems and ways to fix them. For example, the device jams. This happens because the cams simply stop clenching after a while. To solve the problem, you can use one of the options:
- press the cylinder and hit it hard against a wooden object;
- clamp the device in a vice, and clamp the cartridge using a gas wrench, then rest the screwdriver against some surface and turn it on;
- Lubricate the cartridge well.
Another common problem is chuck spinning. One of the reasons may be that the teeth on the fixation coupling have simply worn out. Then you should dismantle the coupling and make holes in the place of the worn-out teeth, then screw in the screws and remove the parts that will protrude using wire cutters. All that remains is to return the cartridge to its place.
How to remove and change the cartridge
You need to understand how to remove the chuck from a screwdriver even if repairs have not yet been made and are not expected.
The procedure must be performed periodically for routine cleaning and lubrication.
This will increase the service life of the tool.
There are various ways to remove the clamping device.
The method depends on the manufacturer of the screwdriver and the specific type of model.
READ How to cut interior ceiling plinth
Below we will look at how to remove the Bosch and Makita cartridge.
Using the example of these brands, it will be possible to handle tools from other manufacturers - remove the cartridge “Interskol”, “Metabo”, “DeWALT”, “Zubr”, etc.
It must be remembered that we remove the cartridge only from a cooled tool.
Correctly removing a heated element will be more difficult, since the rotating parts are firmly fixed in the socket for a long time.
First, let's look at how to unscrew a cartridge with a fixing screw.
To do this you will need a hexagon of the appropriate size.
A diagram describing how to change the cartridge with this mounting method:
- unscrew the screw clockwise (if the part has a left-hand thread); To do this, open your fists to the maximum;
- insert the key into the cams and turn it sharply counterclockwise; for this you can use help - for example, a hammer;
- unscrew the cartridge.
Read more about how to replace a cartridge with a different type of mount.
How to replace the chuck - updating the drill
In most cases, it is the cartridge that becomes unusable first in a drill. It is difficult to dismantle it at home, but it can be done! The fastener is screwed onto the spindle itself, but in addition it is also secured with a bolt with a left-hand thread. In order to get it out, you need to completely release the cartridge - it is inside. The whole difficulty of unscrewing it is that many people do not know about the left-hand thread, and when trying to unscrew it, they twist it even more, tear off the cap and ultimately take it to the service center.
By unscrewing the bolt, you can also unscrew the cartridge itself, although this is not so easy to do. Some models have recesses at the base of the thread for a wrench - in this case, you can lock the spindle and unscrew the fasteners using a lot of force. The real difficulty comes when there are no wrench cuts. You will have to remove the housing cover to fix the spindle inside the drill. Difficult, but doable.
Removing a cartridge is one thing. Finding a new one is completely different. In addition to the drill clamping methods described above, different chucks also have different threads! The surest way not to confuse anything is to take an old cartridge with you and show it to the dealer, or how to choose a suitable one based on the layout. When you have mastered this task, all that remains for you is to screw the chuck onto the spindle and screw in the bolt, which in our case is screwed counterclockwise.
It has long been no secret that it is most convenient and quickest to unscrew and tighten self-tapping screws using a screwdriver.
Any tool tends to wear out and fail. This is especially true for moving and frequently used parts. In a screwdriver, this component is considered to be the chuck. An element that is completely out of order should be replaced. But first you need to understand how the cartridge is removed. To do this, you need to find out a little about the technical properties of the device. To carry out repair work you will need a hammer, a screwdriver, a vice and some keys.
Bosch PSB 1800 Li-2 chuck does not clamp the drill. We treat quickly. pay little
In most cases, cartridges are attached to the shaft using the following methods:
- By means of a Morse taper
- Threaded method
- With fixing screw
The Morse cone is one of the easiest and most convenient methods, which began to be used in the 19th century. The shaft plane is processed in the form of a cone with assigned parameters. A similar cone is located in the middle of the cartridge. When they are combined, a quick and strong connection of the component parts occurs.
The next method is equipped with a thread, which is cut on the edge of the working shaft of the power tool.
The fixing screw is used to additionally connect the screw-in chuck to the shaft. Typically, the screw has a head for a Phillips screwdriver, also with a left-hand thread. You need to unscrew the jaws of the cartridge as much as possible to see it.
How to determine the fastening method
Before figuring out how to remove the chuck from a screwdriver, you need to determine the method of fixation.
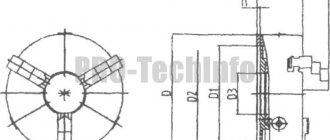
A tool that uses a clamping device with a Morse taper fastening type may be marked B10, B12, B14, etc.
According to GOST, there can be 9 standard sizes - from B7 to B45.
Next to it, in millimeters, the range of diameters of the shanks of fasteners that are suitable for fastening in this screwdriver is indicated.
The screwdriver chuck with a threaded fastening has a different marking.
On domestic models you can find the type designation 1.0-11 M12x1.25.
The numbers before the letter indicate the permissible shank size, the rest - the thread size.
Foreign screwdrivers use the inch designation.
For example. the part can be marked as follows: 2-13 mm ½-20 UNF.
Here the first numbers are the diameter of the bits, the fraction is the diameter of the thread in inches, 20 is the number of threads in each inch.
Determining the mounting method
Note that fastening is carried out by three methods:
- Morse taper;
- using a fixation bolt;
- thread.
The Morse cone got its name from the name of its creator, who invented it in the 19th century. The connection is made by interlocking the parts of the cone with the hole and the shaft due to the identical cone shape. This type of fastening is used in a variety of cases due to its reliability and simplicity.
In the case of threads, they are usually cut into the chuck and shaft. And the alignment is carried out by screwing it onto the shaft.
The last option is an “improved” threaded mount. To make the connection as reliable as possible, it should be fixed using a bot. Usually the screw is taken under a Phillips screwdriver with a thread on the left. The screw becomes accessible only when the cams are fully opened.
If we talk about determining the fastening method, then this usually happens during a visual inspection. For example, the markings on a Morse cone are usually 1-6 B22. In this case, the first numbers will be the diameter of the nozzle tail that is used, and the second number will be the size of the cone itself.
In the case of a threaded connection, an alphanumeric designation is also available. For example, it will look like 1.0 - 11 M12x1.25. The first half indicates the diameter of the nozzle shank that is used, and the second indicates the metric size of the thread. If the screwdriver is manufactured abroad, the value will be indicated in inches.
Methods for removing the cartridge
To remove the cartridge you need to know how it is secured.
If you need to replace the chuck in a screwdriver with Morse taper type locking, you need the help of a hammer.
The last thing to knock out is the shank from the housing socket.
In this case, you need to take a radical path:
- disassemble the screwdriver ;
- we take out the shaft with gearbox and chuck;
- Using a pipe wrench, unscrew the clamping cylinder.
In rare cases, the sleeves may have wrench-type recesses.
This simplifies the task, but it is better not to count on it.
Types of cartridges
Screwdriver clamping devices are divided into:
The difference lies mainly in the fact that self-clamping models fix the products automatically.
If the tool has a locking mechanism, single-clutch cylinders can be used.
If there is no blocker, you will have to use a two-clutch type.
How to remove a jammed chuck from a Makita Cordless Screwdriver / Metabo Diagnostics
Elements with one coupling can be clamped with one hand.
To work with another type, the participation of both hands is required.
Quick- and self-clamping models are intended mainly for modern tools.
Models with automatic clamping are convenient for those who need to quickly and often change different attachments.
Key options are less convenient, but more reliable. They clamp better and are more resistant to shock loads.
If the cylinder will be used intensively, it is recommended to choose a screwdriver with a key.
How to disassemble a screwdriver chuck
To perform this operation, you need to remove the plug at the base.
It is enough to pry off the plastic part with a knife.
The metal one can be knocked out with a heavy object by hitting the base of the clamping sleeve.
- take a large bolt and insert it into the cylinder, after which it is slightly centered with a small clamp of the cams; in this case, the head of the bolt protrudes a couple of centimeters above the sleeve;
- hit the bolt with a hammer.
After this, the most interesting part remains - disassembling the cylinder itself.
It is necessary to divide it into its component parts - sleeve, base, washer, bearing and nut.
The design may be slightly different, but in general the part consists of these elements.
In rare cases, it is impossible to disassemble the cylinder without damaging it and being able to reassemble it in the same form.
But if the design suggests such a possibility, then you can use the following method.
Instructions on how to disassemble the cartridge in the simplest and most effective way - using a hammer drill:
- some kind of adapter is inserted into the hammer drill; the role of the latter can be played, for example, by a broken drill with a diameter of 10-12 mm;
- put the cartridge on the adapter with the back side - the one opposite the cams;
- remove the cams and rest the cylinder against a hard surface, but always through a shock-absorbing buffer (rubber, foam, etc.);
- turn on the hammer drill in impact mode.
Thanks to vibration, we disassemble the cartridge in a matter of seconds.
As a result of manipulations, the sleeve flies off the cylinder, exposing other parts.
After cleaning, the elements are easily put back together.
It is important not to mix up the cams - although they are similar, during the operation of the tool the parts grind in and require correct assembly.
Some complex designs require sawing of the coupling.
After maintenance or repair work, the halves are assembled using a makeshift “tire”.
But in most cases, the indicated method - using an impact drill or hammer drill - works.
DIY screwdriver chuck repair
This is a moving element of the tool, which consists of many rubbing parts. During operation, it is subject to wear resulting from the action of friction forces, impact forces and other factors. The chuck's runout and excessive play can frighten an inexperienced craftsman. In some cases, it is not always possible to allocate the time or finances to contact a repair shop. Therefore, we will look at how you can do it yourself when repairing various tool malfunctions.
Sources:
https://www.ivd.ru/stroitelsTVo-i-remont/instrumenty/kak-snyat-i-razobrat-patron-shurupoverta-51481 https://booktube.ru/patron-shurupoverta-ne-zazhimaet-bitu/
How to remove a cartridge with a threaded connection
Let's look at how to remove a chuck from a screwdriver, in which the cylinder is attached to the spindle using a thread.
- unscrew the threaded fastener using an L-shaped hexagon;
- insert the key (usually 10 mm) with the short part into the cylinder and securely fix it with cams;
- the screwdriver on and off at low speeds ; in this case, the free part of the hexagon should hit the support.
As a result, the threaded fixation will loosen and the clamping cylinder can be easily removed from the spindle.
If the mount is very strong and all three methods do not work, then you need to disassemble the tool.
How to remove the sleeve in this case is described above.
Situations requiring disassembly of a drill or screwdriver arise when preventive maintenance is neglected - routine removal and cleaning of the “clamp”.
In addition, it is recommended to rest the instrument at least every 15 minutes.
Then the repair can be postponed, and unnecessary difficulties with removing the clamping device can be saved.
Screwdriver chuck thread
Structurally, this movable element is fixed in the tool body in three ways:
- Fastening using Morse taper.
- Carving.
- Securing the set screw.
Fastening using a Morse cone has been known for a long time and consists of the following. The shaft has the shape of a cone, repeating the contours of the surface inside the cartridge - the same cone. By combining them in a certain way, a reliable connection is obtained.
Connecting the shaft to the chuck using a threaded connection consists of having a thread at the end of the shaft onto which a chuck with the same thread can be freely screwed.
READ Keyless Chuck For Drill Which is Better
The fixing screw is most often used as an additional fastener. Its head has notches for a Phillips screwdriver, as well as a left-hand thread. You can see this screw by unscrewing the cams that cover it.
To find out what kind of mount your tool has, you need to carefully inspect the body of the tool. Each type of fastening has its own designation.
For example, this: 1–6 B 10 will mean that the cartridge is secured using a Morse taper of size B10, and nozzles with a shank diameter of 1 to 6 mm can be used for it.
If you have the following entry: 1.0–11 M 12 x 1.25, you will know that you should use nozzles with shanks from 1 to 11 mm; the metric thread has a cross-section of 12 x 1.5 mm. Foreign manufacturers use indicators in inches, for example, 1.0–11 ½ – 20 UNF.
In this article, we examined the main problems that arise during the operation of the tool, and paid attention to such a critical component in the design of a screwdriver as the chuck . At the same time, we figured out how it is attached to the design of the screwdriver, gave some tips on how to repair it yourself, and also tried to outline ways to solve repair problems.
How to replace the chuck - updating the drill
Most often, the cartridge is the first to become unusable in a drill. It is not easy to dismantle it at home. but probably! The fastener is screwed onto the spindle itself, but in addition it is also secured with a bolt with a left-hand thread. In order to get it, you need to completely open the cartridge - it is inside. The whole difficulty of unscrewing it lies in the fact that many do not know about the left-hand thread, and when trying to unscrew it, they twist it even more, tear off the cap and eventually take it to the service center.
By unscrewing the bolt, you can also unscrew the cartridge itself, although this is not so easy to do. Some models have recesses at the base of the thread for a wrench - in this case, you can fix the spindle and unscrew the fasteners using a lot of force. The real difficulty comes when there are no wrench cuts. You will have to remove the housing cover to secure the spindle inside the drill. Difficult, but doable.
Removing a cartridge is one thing. Finding a new one is a completely different matter. In addition to the methods for clamping the drill, which are described above, different chucks also have different threads! The surest way not to confuse anything is to take an old cartridge with you and demonstrate it to the seller, or choose the right one based on the layout. When you have completed this task, all that remains for you is to screw the chuck onto the spindle and screw in the bolt, which in our case is screwed counterclockwise.
Screwdriver battery - How to charge correctly It is impossible to imagine # in cases where these same teeth are missing, charging the battery for a screwdriver is a common process. Just insert the battery into the standard device and wait for the green LED to light up instead of the red one. Next, take out the battery, you can work. And there is a lot of noise in the works.
What repair would be complete without a good drill and a set of drill bits! However, even the most reliable tool can jam during operation. Don't rush to panic! We will teach you how to change the drill bit in a drill and correctly diagnose other breakdowns.
Morse taper
In this case, the shank is knocked out of the conical hole using a hammer. If this cannot be done, you will have to disassemble the tool and remove the shaft with the chuck from it. You will then need to remove the clamping cylinder with a pipe wrench. Conventional nuts are rarely used on this unit.
Why doesn't the screwdriver work?
Furniture repair or installation is in full swing, but the screwdriver has stopped working... Let's look at the main causes of breakdowns and how to repair a screwdriver with your own hands (the video will also help us with this).
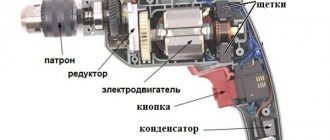
To answer the question why a screwdriver , and how to repair it, you need to have an understanding of the design of a screwdriver, its main components, among which are the following: gearbox, reversing device, electric motor, speed controller and, if the tool is autonomous, a battery (rechargeable battery battery).
Is the cartridge jammed? How to unclamp drill chuck without tools and replace
Moreover, both expensive and cheaper screwdrivers are based on a similar device, differing from each other in the presence of certain advanced options. a screwdriver does not work , which almost all models suffer to one degree or another:
- The first thing you need to pay attention to is the serviceability of the battery or a breakdown of the electrical cable from the network (mains screwdriver ).
- Failure of the tool start button.
- Engine speed is not regulated or poorly regulated.
- Impossibility of reverse switching.
- Chuck runout.
- The electric motor does not rotate.
How to remove free play of the chuck in a screwdriver \ The chuck is loose \ Tool repair \ Brest
Let's not forget to share the videos!) Enjoy watching!) My affiliate program on You Tube:.
Alex Pushkin Hace 3.5 meses
There's no need to jump from 5th to 10th. The whole point of this video is 7:02, loosely tightening the cartridge . So little else Is the cartridge fully tightened? And, again, what prevents the cartridge from tightening during operation?
The cartridge is fully tightened, pressed with an external screw. This is enough, you can put it on the thread locker. Try it yourself, everything will work out.
Sergej J So far it hasn’t helped, I have a Metabo powermax, everyone is happy with it, the drill is smooth when scrolling, but when you drill, it squeaks a little. And in addition, there is a certain weakness of this instrument.
I have an IS530ER drill, it’s a pleasure to drill with, it’s very powerful, but a little heavy. And with this Metabo, even 0.6 tin is difficult to drill due to matting. If you press.
Of course, the drill will break. The shurik itself quickly heats up.
Thank you for sharing your finds with people! I just need to find more. Since the screwdriver is new and there is no wear, and also the cartridge has nothing to do with it. My cartridge is removable. and under it is an ordinary 6.35mm hexagon.
And the situation is saved only by the curved bit holder from falling. It turned out to be exactly the same angle and I’m putting it in one position for now. free play is completely lost. The truth about drilling is, of course, the same ambush. So as Nikulin said
The method is suitable for screwdrivers in which the chuck is threaded onto the spindle, but for you I figured out something like the Makita TD0101F 230 W with a hexagon instead of a chuck. Buy a thin, even drill with a hex shank and check it.
Try to clamp your own chuck into the drill and find out exactly how it will spin or hit.
I have a small chuck with a hex shank, used for clamping drills smaller than mm, so it turned out to have a bent axis with a thread that is screwed into the chuck itself and the hexagonal part is even.
I also have 2.7 Shurik. networked and battery-powered. For battery-powered ones, in general, everything costs clearly, that is, there are no gaps anywhere, alas, it hits, ska (I’ll try it your way, thanks.
I tried drilling at home. with millimeter runout of drills and bits. The screwdriver drilled and tightened. but I was aware. that the cartridge is defective.
Apparently, the method works, but sometimes for me. didn't help. Apparently the bushing in the gearbox is broken(
If the bushing is broken, the shaft itself will swing from side to side; you can simply check this by shaking the shaft with your hand. If the shaft does not wobble, and this method did not help, then you may have gotten a crooked cartridge. All that remains is to test and change the cartridge.
Screwdriver motor speed cannot be adjusted
The lack of adjustment of the screwdriver motor speed significantly reduces the convenience of working with the tool, and also makes it impossible to perform high-quality work. The regulator is located in close proximity to the start button or is made as one piece with it, however, the speed control transistor is attached to the electric motor where it is cooled through the radiator grilles.
Location of the electric motor speed controller (7)
As practice shows, if such a problem occurs, it would be more correct to replace the speed controller completely with a new one. Fortunately, they are on sale and are relatively inexpensive. All attempts to repair it led to the same conclusion unless, of course, you are an expert in electrical engineering.
Screwdriver reversing switch
The reversing switch of a screwdriver plays an important role when performing work on screwing in self-tapping screws, as well as removing them when necessary. The electric motor reverse circuit is located in the same housing with the speed controller, and the speed redirection switch button itself is located in a convenient place on the handle.
Start and reverse button located next to each other
Switching is carried out by changing the polarity at the terminals by moving the reverse button. Repairing the entire reverse circuit, including a PWM generator located on the board, comes down to cleaning the switch contacts and replacing the reverse circuit with a new one.
Sources:
https://domzastroika.ru/instrumenty/zaklinilo-bitu-v-shurupoverte-kak-vytaschit.html https://www.ivd.ru/stroitelstvo-i-remont/instrumenty/kak-snyat-i-razobrat-patron -shurupoverta-51481 https://instrumentn.ru/shurupoverty/kak-snyat-patron-s-shurupoverta https://svoumirykami.ru/kak-ustranit-bienie-patrona-v-shurupoverte.html