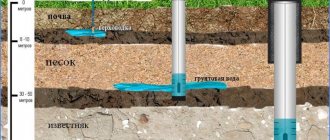
Drilling a well for watering a garden or other needs at a seasonal summer cottage can be done with your own hands. For these purposes, it is enough to break through to the aquifer, which lies at a shallow depth (drilling for “sand”), the main thing is that there are no layers of rock in the soil.
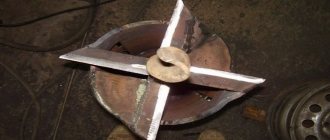
DIY spiral drill
Do-it-yourself spiral drill - diagram
Making such a drill with your own hands is a task for a professional. It is quite difficult to weld a steel spiral correctly at home. This process requires heating a strip of tool steel, twisting it into a spiral of the required diameter, hardening the part, and welding it to a rod. Such a task can only be performed efficiently in production.
Experienced craftsmen have simplified the technology. Assembling a drill begins with creating blades for crushing rocks. To do this, use several steel discs 10–15 mm thick into two semicircles. Most often, four disk elements are cut out of a steel sheet with a radius of 15 cm according to the pattern, and holes with a radius of 2.5 cm are cut into them. Radial cuts are made in the metal rings and their edges are shifted so that they overlap each other. The lower edges of the blades - the blades - are sharpened and hardened. This will help reduce the time spent drilling a well.
Further work on creating the tool is as follows:
- A handle is attached to the rod.
- The other end is sharpened and hardened.
- Finished parts made from steel rings are welded to the rod.
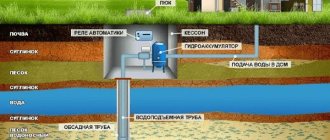
Spiral drill (auger) - device
Attach the blades at a distance of 20 cm from the sharp tip at an angle of 40° to each other - first the lower part, then the rest in succession. It is necessary to weld the blade elements with an overlap along the cut of the rings or end-to-end.
There is also a modified version. Such a drill is equipped with steel plates: they are welded between the turns of the spiral. This helps to cut off the roots of the bushes and reduce the risk of collapse of the well walls by compacting them with additional plates. You can modify this way not only a hand-made instrument, but also a purchased one.
Methods for connecting drill pipes
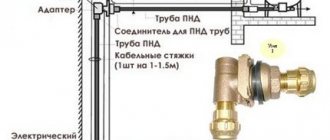
To drill long distances, the drill is extended under water using hollow steel pipes of standard diameters 21.3, 26.8 and 33.5 mm with a length of 1500 to 2000 mm, which are connected to each other in the following ways:
Threaded. In this technology, for connection, an external thread is used, which is cut at one pipe end, and an internal thread on transition couplings, which are short cylindrical sections with a diameter corresponding to the lower point of the pipe thread notch. Cutting is carried out manually with dies using die holders according to the old Soviet method or with modern, more convenient devices - cutters. After applying threads to the inner side of the transition couplings and the outer shell of the pipes at one end, a coupling is welded to their other edge, and extension is carried out by screwing subsequent pipes into the couplings of the previous ones.
Bolt and threaded coupling . With this method, a large diameter bolt is welded to one end of the pipe, and a long nut in the form of a coupling with an internal thread corresponding to the external thread of the bolt is welded to the other, and when connecting the pipe elements, they are screwed onto each other until they stop. The technology is reminiscent of joining factory-produced drill rods; factory connecting heads can be welded or screwed to threads instead of bolts and couplings.
Bolting and heads for drill rods
Pin . Joining pipes using a pin is the most optimal method, ensuring high speed of connection and disassembly of extension rods. To implement it, an internal coupling is welded to one side of each pipe, the next pipe is put on it and holes are drilled in them at some distance from the edge. Then a pin is inserted into the through channel of the two joined pipes, preventing them from being separated.
The disadvantage of pin fastening is the possibility of falling out of the holes; the easiest way to eliminate this disadvantage is to use a threaded bolt with a nut for fastening. True, this solution is ineffective for a quick connection; moreover, when used in the ground, the thread is constantly clogged with dirt, which significantly slows down the assembly and disassembly of the extension pipeline. It is more effective to use a pin with a lock, which is a rotating plate embedded in its end, similar to the design used for assembling scaffolding. But this system also has the disadvantage of using individual elements that can be lost; also, when the extension rod pipes rotate in hard soil, there is a high probability of deformation and damage to the weakened pin ends with limiting plates.
Pin designs
The best method for solving problems associated with the disadvantages of pin connections is to use a special design in which a U-shaped plate with an inserted pin is welded to the pipe opposite the through hole, and a restrictive pin is inserted into its body through a through radial channel. The limiter prevents the pin from being lost and falling out of the assembly, and is also an element with the help of which the pin is moved along the through hole, connecting and disconnecting the pipeline. Also, the outer U-shaped steel plate protects the pin and stop from damage when rotating in the ground.
If the above design seems too complicated to be manufactured at home, a good option is to purchase a factory-made pin for attaching soil drills, which is a bolt with smooth walls, in the head of which a hole is drilled and a rigid wire stop is inserted, which goes around the pipe and is put on on the other side to the end of a smooth-walled bolt.
Option for quickly connecting a borehole drill with pins
Distinctive features of the method
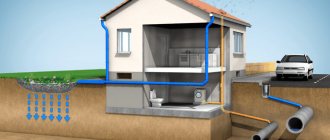
The method involves extracting waste rock with water pumped under pressure into the mine cavity. Drilling tools are not used to remove destroyed layers.
The technology consists of a combination of 2 processes:
- the formation of a vertical well in the ground through the alternate destruction of soil layers;
- extraction of crushed soil fragments from a wellbore under the influence of working fluid.
The process of mixing mud for drilling.
The creation of the necessary force required to immerse the cutting tool into the rock is facilitated by the own weight of the equipment, consisting of a string of drilling rods and equipment for pumping fluid into the well.
To make a washing solution, mix a small amount of clay suspension in water in a separate pit and stir it with a construction mixer until it reaches the consistency of kefir. After this, the drilling fluid is directed into the wellbore by a motor pump under pressure.
During hydraulic drilling, the liquid medium performs the following functions:
- removal of fragments of destroyed rock from the body of the water shaft;
- cutting tool cooling;
- grinding the internal cavity of the pit;
- strengthening the mine walls, which reduces the likelihood of the mine collapsing and the well shaft being buried by the dump.
From pipe sections 1.5 m long, connected by threaded fasteners, a column is formed, which lengthens due to the growth of fragments as the well deepens.
Hydrodrilling technology is optimal for rocks with a high concentration of sand and clay. It is not advisable to use this technique for arranging an autonomous source on rocky and swampy soils: massive and viscous layers of soil are difficult to wash out with water.
Horizontal drilling
From the very beginning, it must be said that horizontal drilling of wells means drilling not only in a strict horizontal plane, but also downhill.
Purely geometrically, if we take as a basis a right angle, where the horizontal part is horizontally directed drilling, and the vertical part is classical, then in reality horizontally directional drilling is piercing the soil with a possible deviation from the absolute horizontal by 45 degrees in any direction.
In practice, horizontal drilling technology is implemented using a specialized installation with a movable mechanism for selecting the angle of entry into the ground.
The driving force of a drill can be different - from mains electricity with a voltage of 220 V and a power of 1.5 - 2 kW to compressors running on diesel or gaseous fuel with an output power of several tens of kW (for mines, oil and gas pipelines, there are installations with a power several hundred kilowatts.
A very important feature of drilling is the regular increase in the length of the drill, which means the rotation mechanism must make translational movements, exerting pressure on the working surface of the drill. Ideally, the maximum length of the drill is not limited, or rather, it is limited, but it is much longer than the length of the required passage.
Important: There is one very unpleasant nuance in horizontal drilling, and the longer the drilled channel, the more noticeable this feature is.
We are talking about the laws of physics and dynamics: - the longer the drill, the more strongly it is attracted by the earth according to the law of universal gravitation (Newton’s First Law); — as a consequence, the position of the drill in the ground is not ideally straight, but bent (hyperbolic), which, when the tool rotates, gives a large radial runout.
In practice, it looks like this: the longer the drill, the larger the hole in diameter you will get at the exit, the more significant the collapse of the exit edge will be. In principle, nothing particularly terrible will happen, but if after drilling it is necessary to insert steel pipes, then problems may arise with calibrating the hole to the diameter.
Application of the horizontal drilling method in practice
Initially, this type of drilling was used only in the mining industry (oil and gas wells, horizontal pits in coal and salt mines), but with the advent of more compact units, it became possible to use this technology in road construction and when laying utilities.
Private land ownership (country houses, cottages, dachas) serves as an excellent field for domestic use of horizontal drilling installations.
With its help, you can perform several types of labor-intensive work in an extremely short time with minimal contamination of the site and changes in its surface: - the horizontal drilling method is used to make drainage ditches under the road with subsequent strengthening of the resulting channel; — horizontal drilling services are in demand for laying a water supply system using polypropylene pipes, HDPE or LDPE pipes; — inclined horizontal drilling is necessary for the correct orientation (downhill) of the sewer line;
— horizontal drilling of soil, as such, can become the main type or method of creating closed-type drainage systems.
Advice: If horizontal drilling is carried out not by professional workers of a service organization, but by the owner of the site, then you should remember that the speed of rotation of the drill, the translational force applied to it, and the choice of the drill head itself depend on the nature of the soil and its fundamental composition (if exactly, then a coronary cutter, often simply called a crown). In order not to burn out the installation for horizontal directional drilling, you need to remember a very simple rule for using drill bits: - loose soils, sandstone and turf are taken with any drill (of naturally suitable diameter); — wattle, clay and salt deposits encountered – with a two-pointed crown;
- if there is a backfill of crushed stone, natural stone and other solid substances, then you cannot do without a four-head cutter with pobedit or carbide plates (grades T5K10 or T15K6).
Important: Drilling horizontal wells is accompanied by quite powerful vibration, which can cause the soil to sag and collapse, making drilling useless.
To prevent this, it is necessary to strengthen the resulting channel in parallel with drilling operations.
That is, the length of the drill, in addition to the direct tip, is in a jacket, which helps maintain the desired result.
Rural workshop: do-it-yourself horizontal drilling
It is, of course, possible to disturb the idyll created by a landscape designer, or to destroy a newly repaired road in order to dig a trench, but there is a cheaper and relatively simpler way.
In order to make a horizontal drilling installation with your own hands, you need to acquire the necessary material (pipes).
Choose one of them of a suitable length (if you are going to make a channel under the road, then the length of the pipe should be at least half the width of the road) and make teeth at one end. They do not need to be sharpened or sharpened in any way - it is enough to cut them with an ordinary grinder.
The resulting tool is called a “bolt”. At its other end, two through holes (from 16 to 25 mm) are drilled strictly along the diameter, into which a corresponding metal rod is inserted.
Do you want to feel like a strongman? Twist the handles sticking out of the pipes yourself! Tired of it? Then horizontal drilling with your own hands receives a bonus in the form of a little mechanization - another one is welded into the middle of the pin threaded into the pipe, so that its axis coincides with the axis of the pipe. Now the free end must be secured to a rotary hammer (preferably industrial) or an electric motor (with a gearbox for reducing speed and increasing power) and start rotating.
Horizontal drilling under the road, in open ground, drilling with a slope - the same thing, only with manual control.
Important: When carrying out independent work, be sure to remember safety, and do not try to change the direction of drilling if at least a third of the drill has already entered the ground. It should be noted that when operating the bolt, all the mined rock gets inside the tool, so do not forget to clean it in a timely manner for ease and accuracy of work.
Tip: To make the bolt work easier and the hole to be more accurate, cut the teeth at the end of the pipe oriented in the direction of the intended rotation. After this, move the teeth slightly apart so that the diameter of the working part with the teeth is slightly larger (5-7 mm) than the main diameter of the pipe. This will facilitate the drilling process and protect the canal walls from crumbling.
Advantages of hydrodrilling wells
Hydrodrilling technology has the following advantages:
- simplicity, allowing even non-professionals to do all the work with their own hands;
- small dimensions of the equipment used;
- minimum number of technological processes;
- no restrictions on the depth of the well, it is possible to drill to an aquifer located 200 m from the surface;
- affordable price;
- high productivity, allowing, under favorable conditions, to travel up to 10 m per day;
- environmental safety and harmlessness to the surrounding landscape.
Many people prefer hydrodrilling to other methods of creating an autonomous well on their own due to the absence of design violations in landscaped areas - there is no need to improve the area upon completion of the procedure.
Scheme of the process of hydrodrilling a water well.
Features of drilling with homemade devices
Drilling with homemade projectiles is possible under the following conditions:
- the aquifer lies at a depth not exceeding 20 m;
- the soil is sandy or clayey, but not rocky.
They make attachments for percussion-rope or rotary drilling - only these methods are suitable for constructing a well yourself. The first method does not require the creation of complex equipment. They build a simple drilling rig from materials that are available on the farm. The method is also attractive because you can work without assistants.
When rotary drilling, a tool is used that, going deep into the soil, lifts it up. 2 people stand on the sides of the bar and rotate it, applying force to the transverse handle. Spiral or spoon type drill bits are used.
Materials and tools
In order to make a hand drill for poles, as a rule, you do not need much effort. But the craftsman needs materials and components to create the product.
List of required parts:
- Nut and bolt M20;
- Disks with a diameter of 100-150 mm - 2 pieces;
- Drill with tip (20 mm in diameter);
- Metal pipe sections: two 500 mm and one 400 mm. The wall thickness should be 3.5 mm, the outer diameter should be 40 mm.
The wall thickness of the metal pipe must be exactly this in order for the finished product to be durable and able to work with any, even fairly hard, soil.
The discs can be taken from a circular saw or you can make them yourself. For homemade disks, you will need sheets of metal at least 3 mm thick. When creating a product you will need the following tools:
- Bulgarian;
- hammer;
- welding machine;
- drill;
- metal drills;
- blade sharpener.
If you do not have a tip with a drill, you can replace it with a drill with a cone-shaped shank. Its diameter must match the screw. In order to avoid injury, it is recommended to use soft bicycle handles.
Useful tips and tricks
When you need a longer drill rod, you can use one of these methods.
What does a drill consist of?
Use threaded coupling connections:
- for this purpose, an external thread is made on each pipe section;
- then threaded couplings are manufactured in the required quantity;
- To protect against spontaneous separation of parts, a cotter pin retainer is made.
Use of welded bolts and nuts welded to the ends of the sections. This method is applicable for split pipes of small diameters. But this method is not the most reliable due to the fragility of the welding joint.
Use pre-fabricated rod sections with bolted fixation. This is a simple and effective way:
- couplings are cut from a pipe with a larger diameter than the split tube;
- then they are welded to the end of one pipe, and the other pipe is inserted loosely into the coupling:
- Each such connection is fixed transversely by an inserted bolt and nut.
Helpful tips to make your work easier
A solid and long drill pipe will significantly complicate the work.
The best solution is a detachable design with an optimal section length of 0.8 to 1.2 m.
Thanks to this device, it will be easier to select the desired length of the drill pipe and increase it as necessary.
Some useful tips to make drilling a well easier using a homemade hand drill:
- you can use a homemade bailer to optimize the process of excavating soil to the surface, since it is better to collect the rock in a container;
- if it is difficult to raise the soil to the surface, then you need to build a lever from available barrels or logs;
- A homemade drill will also come in handy for other household work.
This tool can be used to dig holes for fence posts or pile foundations.
How to make a cable impact drill
The mechanism of the impact drill is quite simple in design. To manufacture and assemble it, you will need the following material resources and equipment: a thick-walled pipe of the required dimensions, angles, sheet steel, a tape measure, an angle grinder, a welding machine and a manual or automatic winch. To make and assemble an impact drill, you should perform some steps in the following sequence:
Device of a cable-impact drill
- A tripod is assembled with a height of no lower than 2 meters.
- The top of the tripod is equipped with a special unit that allows you to install a manual or automatic winch.
- A percussion instrument is being made.
To do this, you need a pipe with an outer diameter that matches the diameter of the future well. A piece of thick sheet steel is welded onto one end. Then a hole is made in it in order to fix the cable. And at the impact end of the pipe, sharpening is made around the entire circumference. To ensure the strength of these elements, they need to be hardened. The instrument should also be equipped with additional weights.
The basis for placing the working tool is being prepared. A shallow hole is cut in the ground. The wireline drill is then mounted on a tripod and positioned so that it can be completely immersed in the prepared area under its own weight.
How to drill wells?
Access to the shallow aquifer can be done with your own hands using one of three types of drilling:
- manual;
- shock-rope;
- percussion.
The method of constructing the well is selected depending on the type of soil and the depth of the passage.
Manual well drilling
If you do not use additional equipment, a drilling tripod (tower) and a block system, you can drill a “well” to a depth of up to 20 m.
Drilling technology:
- A tripod is installed in the selected area for passage. The height of the tower should be 1-2 m higher, the length of the drill rod section.
- A shovel is used to make a recess of one or two bayonets to center and guide the passage of the cutting edge of the drill.
- To bury the drill at a depth of more than one meter, you will need the help of a partner. One person cannot continue to drill for piles.
- If difficulties arise with removing the drill from the hole, it is necessary to turn it in the opposite direction of drilling 2 - 3 turns and remove it.
- Every 500 mm of penetration it is necessary to remove the drill and clear it of soil.
- The drilling process is repeated until the drill arm reaches ground level.
- The drill rod is taken out along with the drill and extended with an additional section.
- All operations are repeated until you reach the aquifer. This is determined by the type of soil being extracted.
- After reaching a layer with water, you need to continue drilling to a solid (water-resistant) layer. This will allow the well to be filled with the maximum volume of water.
- Pumping out water containing soil can be done using a manual or submersible pump.
- After pumping out 3 - 4 buckets of muddy water, clean water should appear. If clear water does not flow, then it is necessary to increase the depth of the excavation by 1.5 - 2 meters.
Tip: Use the design capabilities of the installation to extract the maximum volume of soil, since this operation takes a lot of time.
Tools:
- tripod;
- Boer;
- hoses for pumping water;
- composite drill rod;
- pump or pump.
Percussion-rope drilling
A well made using this drilling method has a long service life of 80 years or more, increased water supply and inflow. The work process consists of destroying and crushing rock in a closed cycle with a special impactor.
Drilling process:
- The drilling rig is placed above the point for deepening the driving glass (ramp, drill bit).
- A guide recess is made for the passage of the ramp.
- Punching the first meter of the well can be done manually.
- Next, a guide is installed in the form of a steel pipe with a larger diameter than the diameter of the glass.
- The discharge of the slope into the pipe is carried out by releasing the winch; upon impact, the soil is destroyed and crushed, thereby filling the glass. The presence of a special valve prevents soil from spilling out of the projectile.
- After which the glass is lifted and the broken soil is removed.
- The cycle repeats again until you reach the aquifer.
This drilling method is labor-intensive and takes up to several weeks. Therefore, it is better to use it for drilling wells on the following types of soil:
- clay;
- on loams;
- on soft (watered) soil;
Percussion drilling
The principle of shock passage as shock-rope. The difference is that the drilling bits are located in the face and are struck using a hammer. In this way, depths of more than 100 m can be passed.
Drilling can be carried out on many types of soil:
- soft earth - a wedge-shaped chisel is used;
- viscous soil - an I-shaped bit;
- hard rocks - cross-shaped chisel;
- boulders - pyramidal shape of the chisel.
How drilling happens:
- a drilling rig is installed;
- a chisel selected for a specific soil is inserted into the face;
- a projectile, weight from 500 to 2500 kg, is launched from a height of 300 to 1000 mm;
- after the impact, the soil splits, the chisel buries into the soil;
- the projectile rises and the cycle repeats;
- cycle frequency – 45 – 60 beats/min.;
- After passing every 200 - 600 mm, the bit is removed from the face and cleared of soil.
Necessary equipment for work
The basic unit of equipment is a small unit (SBU). The small size of the device is optimal for its use in limited spaces of private areas.
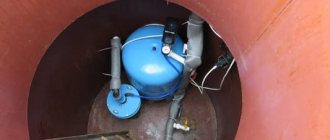
To create the pressure necessary to remove crushed rock from a mine shaft, a borehole pump or motor pump capable of pumping raw media is used. When choosing a suitable model, they are guided by the power of the pump equipment.
In some cases, the penetration power of the drilling fluid is increased by adding sand or coarse shot. To grind large fragments of pebbles found in sandy layers of destructible rock, it is recommended to use roller or cutter bits.
Drilling wells in areas with boulders or large pebbles requires additional reinforcement of the starting rod with a special drill.
The MBU is a prefabricated structure with a diameter of 1 m and a height of 3 m.
Elements of a drilling rig.
The installation consists of the following elements:
- metal frame body, easy to assemble and disassemble;
- well gate or winch;
- an electric motor driving the drill;
- swivel providing sliding fixation of structural parts;
- well pump or motor pump;
- drilling tools, incl. exploration drill;
- pipe rods for extending the column;
- control automation units;
- hoses connecting the water supply pump unit to the swivel.
For stable power supply, it is recommended to include an electric current converter in the list of necessary equipment. The use of a special lifting mechanism makes it easier to raise and lower casing strings and extension rods; a winch is considered the best option.
Since the technology is based on removing waste rocks from the well body with high water pressure, a motor pump should be selected with increased power.
To work, you will also need plumbing equipment: a pipe wrench, a transfer fork and a manual clamp.
How to improve the tool
When making your own garden post auger, you can think about improving it. When drilling holes, you may encounter large rhizomes that lie tightly in the ground. Sharp edges make work easier. For ease of use, teeth should be cut on the sloping area of the blade or the cutting part should be rounded.
The design can be improved by adding removable cutters. They will allow you to drill holes of any diameter. In addition to the manufacture of spare parts, it is necessary to provide for their attachment to the collar. They are connected by two iron plates, fixed by welding. Two holes are drilled into the mounting plates and blades for the bolts. The cutters are fixed with M 6 bolts. The bolts may interfere during operation. To eliminate this problem, they are screwed in with the threads facing up.
If you want to make the best DIY post drill, you can improve it using one more method. To do this, a narrow metal plate is cut out and turned into a cone using a grinder. This will improve the efficiency of the lower end of the knob. The dimensions of the plate are 10 x 2 cm. As a result, you should get a kind of point. There is no need to make cuts in the collar. Metal plates are inserted into the end and secured by welding. They are flattened to form a peak.
If you want to use a pike, you can base it on a different method of making it. To do this, take a 17-centimeter metal plate, from which a screw similar to a corkscrew is cut out. The further algorithm of actions will be the same as in the first option.
If you decide to make a pole drill with your own hands, photos of such structures will allow you to understand which design to give preference to. If a screw is provided, a drill can play its role. It should be able to handle wood and metal. Such a tool will penetrate the soil more easily and will drill holes of the required depth.
If you are working with dense deep layers of soil, you can weld a small flat cutter between the cutter and the pick. This design will allow you to loosen the ground and center it when drilling. For such a part, you need two metal plates 3 x 8 cm. A trick of this kind will speed up the work with the tool.
When making a drill for installing pillars with your own hands, you can supplement it with cutters made from disks that are designed for working with stone. The circles are cut along the radius, and the hole widens in the center. It must match the diameter of the knob. Bending the disk allows you to get something like a screw or a corkscrew. This part will only need to be welded using the algorithm described above.
The cutter can be made from a circular saw blade. The teeth will cope with rhizomes and hard soil. You can upgrade the tool at your discretion. But no matter how high-quality it is, before the drilling process it is better to loosen the soil with a shovel, then the device will penetrate the soil well and the work will go faster.
Making a drill-spoon
This tool is suitable for working on soil that is resistant to crumbling. A hand drill consists of a rod with a handle and a cylindrical spoon with a longitudinal slot in the side.
The length of the small mechanization device is 70 cm. The diameter of the device depends on the size of the expected depression in the ground. The soil extracted from the well enters the cylinder through a slot and is retained there due to adhesion and compaction. If the soil is dense, you can make a fairly wide entrance hole. The looser the soil, the narrower the slot will be.
Detailed production of drill
You can make such a drill with your own hands in three ways:
- based on a metal pipe;
- from an old cylinder;
- by rolling and welding steel sheet.
Spoon drill in a simplified version
The method with sheet steel is more labor-intensive - it will require skillful welding when creating the rod and securing the tip. At one end of the finished cylinder, cuts are made with a grinder, then the metal is bent and the edges are sharpened. Sometimes cutting blades are welded instead. Then a slot is made in the bottom of the cylinder.
The spoon is welded to the rod at a right angle. For easy entry into the soil, a metal drill tip can be attached to the supporting rod.
In addition to the manufacturing technology of any type of drill, you need to know the rules for caring for such a tool. After completing excavation work, be sure to clean the knives of any adhering soil. Store such devices in dry rooms.
Video: How to use a hand drill
Selection of questions
- Mikhail, Lipetsk — What discs should I use for cutting metal?
- Ivan, Moscow - What is the GOST for rolled sheet steel?
- Maxim, Tver - Which racks for storing rolled metal products are better?
- Vladimir, Novosibirsk — What does ultrasonic processing of metals without the use of abrasives mean?
- Valery, Moscow - How to forge a knife from a bearing with your own hands?
- Stanislav, Voronezh — What equipment is used for the production of galvanized steel air ducts?
Blueprints
A self-made drill is good because its design is “tailored” to its owner. During the manufacturing process, everyone makes their own changes, then many more refine the product. But it can be difficult to do without basic drawings. This engraving contains several drawings with the sizes of various drills. As you understand, the dimensions are arbitrary; they can and should be changed, adjusting them to the size of the required wells.
Shovel drill
There is no point in making a serious structure for planting plants. In this case, you can make a garden drill from a shovel. Choose a high-quality shovel made of good steel, apply markings as shown in the drawing. According to the markings, you will need to cut out two small fragments and saw the lower part in the middle to a depth of 30 cm (pictured).
Shovel drill
Next, the edges are bent one forward, the other back, and the petals formed in the lower part are folded towards them. The resulting seams are boiled outside and inside.
Drill for soft soils
If the ground is soft, the conventional design does not work very well. For such cases, there is a special drill with an extended cutting part. It is a kind of glass with slits on the sides. The cuts are equipped with cutting edges. They are best made from well-hardened steel.
Drill for soft soils
This drawing shows an interesting handle design - it can be rearranged as the length of the rod increases.
Basic drawings of auger and garden auger
Both of these units work well, but the garden one has to be taken out often, and the auger one is harder to rotate. Choose according to your own preferences.
Auger and garden auger for soil of different densities
Detailed projection drawing of an auger drill
Garden auger drawing
A simple means of small-scale mechanization for the garden
It is easiest to make such a tool yourself. Its design includes:
- cutting part made of steel sheet;
- drill tip;
- a rod made of round or square pipe;
- handle.
The cutting blades of the drill are made of two steel semicircles with a thickness of 4 mm and pointed edges. Their diameter is calculated according to the size of the required wells. In the center of the semicircles, a recess is cut out in the shape of the rod for a better fit. Blades are usually welded to a rod with a diameter of ¾ inch or 20×20 mm, but it is more convenient to make several replacement pairs and bolt them to the rod. To do this, you need to weld fastening shelves made of strong steel at the desired angle and make holes in them.
A 0.5 meter long handle is attached perpendicular to the rod, the length of which is made up of the depth of the hole and an additional 60 cm. A drilling tip is attached to the other side. It is needed for stability and initial loosening of the earth. If the garden auger turns out to be too long, you can make a collapsible, folding or telescopic rod.
Blade knives can be made from two round halves or from an open circle with offset edges. In any case, the edges of the blades should be separated by 30°. This is necessary for successful work on dense soils. Angles or stops made of thick steel will enhance performance.
Working on an extension pipe
Next, you can begin working with the extension pipe. It must be equipped with a handle. This part is welded in the shape of the letter T. An amplifier in the form of a scarf is attached to it. The workpiece should be inserted into the driver, making a hole between these parts. This will allow you to fasten the parts with a pin. There should be several holes so that the length of the product can be adjusted. You can complete the work process by sharpening the blades. The edge of the cutter is processed so that when rotating the tip is directed downward.
Operation and care of the pole drill
Making garden equipment yourself is one thing, but how to make equipment so that it lasts a long time and performs its functions correctly. It is necessary to operate and care for it correctly, following the rules:
- the blade of the cutting surface and the main rod should be immediately coated with an anti-corrosion compound;
- paint the instrument with metal paint;
- With each use, you should check the sharpness of the blade and, if necessary, sharpen it with sandpaper or a block;
- to be on the safe side before drilling, you should loosen the soil with a shovel;
- the drill should be pulled out carefully, avoiding deflection of the cutting surface;
- After work, you need to clean the tool from the soil.
Drill for making piles
The classic version of a drill for TISE is blades with a container for collecting soil. There is also a wider knife, which is necessary to create an expansion at the bottom of the pile. Using such a homemade drill for personal purposes is not very convenient, since the additional folding knife gets in the way.
In this regard, such structures are often made collapsible, where the folding knife can be dismantled. In general, it is recommended to use a regular garden drill to make a pile for personal purposes, and for expansion, make a separate knife with a container for collecting earth. The work is much easier in this case.
For this design, a scrap from a shovel is used as a knife , and a container for collecting soil can be made from a herring can. The knife is fixed on levers, and when lowered along the pile, it is in the uppermost position, as it is tensioned with a cable. When it reaches the bottom, the cable relaxes and the knife falls onto the walls of the pile, beginning to remove the soil and form an expansion of the desired size.
Alternatively, a dredger can also be made from an old propane tank.
To reduce friction, the well is constantly doused with water. This tool can also be used on hard soils. This is interesting: gas drills for earthworks.
Should you make the design yourself or contact a company?
Of course, the use of homemade inventions has positive aspects. For example, you can save a lot of money by making your own source. There are also many simple drawings and diagrams on how to make a drilling tool. However, all this has an obvious disadvantage - it is impossible to dig the source to great depth.
Therefore, if the water in the area is deep, it is better to contact a specialized company. Perhaps it will use hydraulic installations. In this case, you will need to think through everything down to the smallest detail:
- Find the exact place with water.
- Immediately determine the place for testing.
- Discuss the cost of the work.
- Set work deadlines, etc.
In any of the options, our material should help you in this difficult task.
Areas of application of hand tools
The construction of fences, supports for greenhouses, and foundations of small buildings is carried out using an earth drill. In places where there is no central water supply, a hand drill is used to reach the aquifer. Using homemade tools, they excavate cavities in the soil for the construction of reinforced concrete piles. The dug wells are filled with reinforcement and liquid concrete, obtaining columnar ones for structures on a personal plot.