No building suitable for human habitation or long-term stay can function properly without sewerage. This is the most suitable invention that allows you to live comfortably.
Sewage is designed to drain liquids of various origins: domestic, industrial, excess melt water, etc. These structures are being installed everywhere; if previously sewerage was available only to residents of apartment buildings, now in the private sector not a single house can do without a sewerage system.
Experts classify sewers into internal and external. The first is located in the building, the second is the street waste disposal line.
Sewerage installation is a responsible undertaking; in order for the facility to function correctly, special attention should be paid to every detail, but it is better to hire a professional.
Let's consider these types of drainage systems.
General information
The construction of private houses is experiencing a real boom. For this reason, future owners of such buildings need to install a convenient sewer system, which even a non-specialist in this field can install. At the same time, the drains must be endowed with good performance, because many owners have significantly increased the number of connected plumbing fixtures. First of all, this is due to the availability of a variety of modern washing machines and dishwashers, and showers and Jacuzzis are gaining popularity. These devices increase the usual volume of water consumption by two hundred liters during the day.
The increase in the number of installed plumbing fixtures becomes the reason for the complication of the entire drainage system. Fortunately, to set up a good system, you can use PVC pipes, which come with additional fittings that allow you to assemble an engineering structure in a few days. In addition, plastic parts are sold together with O-rings, which can be easily replaced if a mechanical defect or other damage occurs.
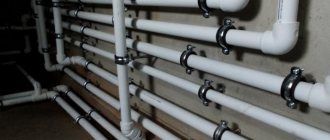
The assembled internal drainage system consists of a large number of plastic pipes. As well as shaped elements intended for connecting main pipes. The entire engineering system is designed to drain wastewater from plumbing installed in a house or apartment. It is worth remembering that installation of sewer pipes in violation of established installation rules leads to disruption of proper operation and other unpleasant consequences.
Which pipes are best to choose?
Structures can consist of copper, cast iron, steel, concrete, reinforced concrete, asbestos, PVC. Plastic products are especially popular for household use.
It is important to know that each material has its own advantages and disadvantages. Therefore, to select the required type of pipes, an individual approach is required. Otherwise, there is a risk that installation costs will be unreasonably high, and the result will disappoint you.
Therefore, we recommend that you carefully select a design that has the properties that you really need. Recently, customers have shown preference for drain parts made of propylene. The most important nuance when choosing a pipe will be assessing its strength. Metal-plastic structures are characterized by increased strength. However, at the same time, they can quickly lose their capacity, as layers form inside the structure.
Ceramic, concrete and metal structures are characterized by sufficient rigidity. However, it is worth remembering that increased rigidity of drain pipes is not always a positive quality. In some cases, high rigidity can cause various problems.
On the modern market there is a wide range of designs for organizing drainage. Each person can choose what suits his requirements.
Arrangement rules
The main element that drains wastewater is considered to be a riser. This detail can be one for all rooms. However, there are a number of important nuances:
- If the area of the residential complex is large, or the toilet rooms are located at a distance, then the owner will have to think about arranging several risers at once. This element consists of pipes installed in a vertical position, starting from the basement and ending on the roof.
- In the basement, the riser must be connected to a pipe of an identical or larger size, located at a certain angle. Such a pipe must discharge accumulated wastewater into a special container or to a treatment station.
- Part of the riser on the roof must be open or equipped with a back pressure valve. It is important to remember that the riser must rise above the roof to a height of at least 50 centimeters.
Sewer riser
Basic Rules:
(return to main content)
These rules are formulated based on the operating principle of gravity (free-flow) sewerage , and if any of the provisions set out below are not clear enough, then you can refer to the specified article for clarification.
The fewer joints and turns you make when laying pipes, the more reliable the system will work.
Each joint or turn is a potential site for sewer leakage due to poor-quality joining and, in addition, additional resistance for liquid and especially solid waste.
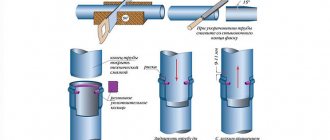
The sockets of vertical pipes (risers) and horizontal pipes must be directed towards the movement of wastewater.
This is done in order to minimize the risk of sewer leakage. And it’s unlikely that you will be able to lay horizontal pipes differently. Sometimes, in the case of repairing a sewer pipe, it is allowed to install connecting (slide-on) couplings, in which one branch pipe (bell) is directed along the movement of wastewater, but in general it is advisable to avoid using couplings; if you cut the pipe , it is better to buy a new one.
Cutting and shortening of shaped parts (sockets) is prohibited. The following are not allowed for installation:
- all pipes, pipes and fittings that have chips, cracks or cuts;
- shaped parts having an internal lining with sharp edges;
- rubber rings and cuffs that have ruptures, cavities and unremoved pressing, as well as rings that do not have plastic spacers provided by the design;
- metal fasteners, the elements of which have sharp edges and burrs at the points of connection with pipes and fittings.
Logical and without comment.
The diameter of the pipes depends on the number of connected sanitary fixtures and the slope.
Of course, there are formulas that allow you to calculate the diameter of the pipe depending on the slope, the number of joints and turns, taking into account the number of sanitary fixtures or, more simply, washbasins, bathtubs, sinks and toilets. But in practice, these formulas for indoor wiring are rarely used, and there is no great need for this. And besides, the exact calculation of the required pipe diameter is the topic of more than one scientific dissertation.
Pipes with a diameter of 100 or 150 mm are placed on the riser and on the area connecting the riser to the well, and if you had a cast iron pipe with a diameter of 200 mm (although this is very rare - pipes of this diameter are installed on risers only if the number of connected sanitary fixtures is more than 1200, I don’t think If this is your case, although anything is possible), then a new plastic pipe must be installed with the same diameter. The exception is their own homes. There, the sewerage system was laid not from the pipes required by technical specifications, but from those that were available.
For internal horizontal wiring, pipes with a diameter of 100 mm are usually installed when connecting the toilet to the riser, all other pipes with a diameter of 50 mm (sometimes 40 mm).
If you have some incredibly complex wiring, and you doubt that a diameter of 50 mm will be enough for normal sewer operation, then you need a hydraulic calculation of the pipelines. And to understand the intricacies of the movement of wastewater and waste through a sewer pipe, sometimes a higher technical education is not enough. If you still want to try it yourself, then take a look at SNiP 2.04.01.85, or familiarize yourself with the basic provisions of the hydraulic calculation of sewer networks. There you can also find out the water flow and the amount of waste from any sanitary fixture and, accordingly, the minimum diameter of the connected sewer, and determine whether the main conditions are met: flow speed of at least 0.7 m/s and pipe filling (ratio of water height to diameter) of at least 0.3; what to do if these conditions are not met, and many other interesting things that I am trying to briefly outline in this article.
Horizontal sewer pipes must be laid with a slope towards the riser.
Since the sewage system is non-pressure, and pressure losses occur due to air resistance and friction of the pipe walls, a certain slope of the pipes is necessary to maintain the flow rate. And to prevent the pipes from silting (self-cleaning of the sewage system), the flow speed must be at least 0.7 m/s - to ensure turbulent flow of liquid, and the filling of the pipes must be h ≥ 0.3d. Like the diameter, the slope of sewer pipes is determined by calculation. When the volume of wastewater is not sufficient to satisfy both conditions, flow turbulence comes first. When performing standard intra-apartment wiring or installing a sewer system for a small private house, the following requirements must be observed:
Minimum sewer pipe slope i=0.025 for pipes with a diameter of 50 mm, recommended slope i = 0.035
Minimum sewer pipe slope i=0.015 for pipes with a diameter of 100 mm, recommended slope i=0.02
i is the ratio of the height difference between the center of the pipe diameter and the length of the pipe. Translated into normal human language, this means that if you have a sewer pipe 1 meter long, then if the bottom of one of its sections touches the floor, then the bottom of the second should be 2 cm above the floor level, of course, provided that your floor is horizontal and the increase in diameter at the socket for joining pipes is taken into account. In this case, the slope of the pipe is assumed to be equal to the hydraulic slope of the fluid flow, thus ensuring a constant flow speed.
Maximum slope for horizontal sewer pipes i=0.15
With large slopes, the speed increases significantly, which in turn increases the force of the hydraulic shock and can lead to clogging of the pipe in areas with high local resistance (changes in the trajectory of the fluid - turns of sewer pipes, the point of connection to the riser). Although this limitation is conditional - it is unlikely that you will be able to lay a 10-meter long pipe with such a slope (external work does not count). If the pipe length is less than 1.5 m, this limitation does not apply, since in such a relatively short section of the pipe the wastewater will not have time to develop a high speed.
Recommended sewer pipe slope i=0.04-0.07
The floors may not be horizontal and determining the slope of the sewer pipe based on the floor level may lead to an error; the foundations of houses may sag, which is why the slope of the pipes may not change for the better. To avoid problems with the operation of the sewer system, it is advisable to make a slope of 4-7 cm per meter (for pipes with a diameter of 50 mm). The more turns and joints there are on the sewer route (see point 1), the greater the slope must be to compensate for local resistance.
If pipes are laid without a slope or even with a counter-slope, then such pipes will clog quite often. The correct solution to the problem would be to eliminate counter-slopes or other causes that lead to clogging of the sewer, but this is not always possible; in such cases, a check valve .
Questions about sewer slope are collected in a separate article.
For normal sewerage operation, pipes must be secured to the floor or wall.
Plastic pipes, unlike cast iron ones, are easily deformed and long loose sections can sag, which will lead to a change in slope. To prevent this from happening, the pipes must be secured to the wall or floor with special fasteners (sold in the same place where the pipes are) every 50-100 cm, depending on the diameter of the pipe. Fastening the riser pipes to the walls is also necessary to reduce the load of its own weight. In addition, it is recommended to fasten pipes in places of turns and connections to partially absorb the load from water hammer.
Availability of fan ventilation.
The ventilation pipe, which is installed on the roof of the building or in the attic, is designed to equalize the air pressure in the drain pipes, which can drop sharply if a large volume of water is discharged through the riser, for example from a toilet. A sharp decrease in air pressure in the riser sucks water out of the siphons of plumbing fixtures, thereby destroying the water seal. And this leads to free access to the apartment of sewer gases with extremely unpleasant odors. In addition, these gases can cause dangerous diseases. As a rule, all houses with more than two floors, and often even two-story Stalin buildings, have fan ventilation. Moreover, if you, living on the top floor, want to remove the pipe leading to the roof during redevelopment (and changing the riser route is redevelopment), then no one will officially allow you to do this, but unofficially, options .
For small volumes of wastewater, the use of an unventilated sewer riser is allowed. Those. The riser does not lead to the attic or roof. In this case, at the point where the horizontal wiring is connected to the riser (according to building codes), it is necessary to “clean out” and close it with a plug (so that wastewater does not leak out). And if, in addition to cleaning, you also make a vertical outlet for a non-return air valve that costs $4-10:
(of course, if you wish, you can buy a branded valve for $100), then in the future you will save time, money and nerves necessary for cleaning the sewer.
If for some reason you do not have the opportunity to place a check valve directly on the riser (this sometimes happens when repairing sewerage in your houses), then a check valve with a diameter of 50 mm can be placed on any section of a horizontal pipe, but it is desirable that the valve be located on height 30-50 cm from the axis of the sewer pipe. Installation options for a non-return air valve can be as follows:
Option A is the most correct. Option B is acceptable in your homes, for example, at the dacha I installed a check valve according to option B four years ago. Option C is also acceptable in your homes when it is not possible to install a check valve on the riser, for example, I installed a check valve with a diameter of 50 mm according to option C for my sister, who lives in her house 5 years ago, according to option C; I placed the outlet for the check valve under the bathtub (the fact is that other people did the drainage for my sister and did not provide for ventilation, and then it was easiest to insert an outlet for the air valve under the bathroom). The diagrams do not show outlets for cleaning.
The essence of the operation of a non-return air valve is that it allows air to pass in only one direction - into the sewer; when water is flushed in the toilet, the air pressure in the sewer pipe in the area up to the toilet and in the riser (if any) decreases and the valve opens. When the air pressure in the sewer pipe is the same as in the room and greater than in the room, the air valve is closed - this prevents gases from escaping from the sewer, so if installed correctly, there should be no odors in the room where the air valve is installed. It makes no sense to install an air valve on the sewer pipes after the toilet; in this case, the valve will not work correctly. When the water in the toilet flushes, and the toilet is a plumbing fixture that creates the maximum flow of wastewater, then the air pressure in the sewer pipe after the toilet will be increased. The higher the non-return air valve is from the axis of the sewer pipe, the lower the risk of clogging the valve with wastewater when the sewer is clogged, so option A is the most correct.
Questions about the check air valve are collected in a separate article.
It is necessary to install “cleaning” in places of turns, changes in angle of inclination and connection of a sanitary fixture to a sewer pipe.
A good rule, but it was observed a long time ago, when installing cast iron sewers. In old houses you can still see somewhere under the sink the appendix of a sewer pipe with a wooden chop sticking out of it for a good 20 cm. Nowadays, plumbers who install plastic sewers do not install “cleaning” (at least I have not seen them) for several reasons. Firstly, sewer pipes are often sewn up for aesthetic reasons. Secondly, modern plastic sewerage, unlike cast iron, is quite easy to disassemble and, if necessary, you can always disconnect some sanitary appliance, for example, a washing machine or sink, and insert a cable through the resulting hole for cleaning.
The inspection (inspection hatch) should be installed no more than 15 m apart.
In five-story buildings, audits were installed on the first and last floors. If on your sewer riser at a height of about 1 m from the floor there is some kind of iron plate, screwed with powerful bolts and causing unpleasant associations with kingstons, then this is an inspection. The revision for plastic sewerage looks much more aesthetically pleasing:
If you are going to sew up the riser, then make an inspection hatch to access the revision.
Plastic sewer pipes can be joined to cast iron ones.
If you have a cast iron riser, it is not at all necessary to replace cast iron pipes with plastic ones if the riser is in good condition. In addition to significant physical effort, you will also need a lot of moral effort to convince your neighbors not to use the sewer for several hours and, as usual, someone will definitely forget. But even if you completely change the cast-iron riser to a plastic one only in your apartment, you will still have to join plastic and cast-iron pipes .
When transitioning the riser into a horizontal pipeline, it is prohibited to use a 90° bend.
(SP 40-107-2003, clause 4.16)
It is recommended to make the transition with 2 bends at 45o, 3 at 30o or 4 at 22.5o.
A good rule, the observance of which allows you to reduce the force of water hammer, the turbulence of the flow of liquid waste and thereby avoid frequent sewer blockages. If the sewer system in your multi-storey building is often clogged, go down to the basement and check whether the builders violated this rule when installing the sewer system.
And if you have your own home and 5-6 sanitary fixtures are connected to the sewer, then you can ignore this rule.
It is allowed to lay plastic pipes in the ground in the absence of additional external loads.
Inspection wells are installed at a distance of no more than 50 m, as well as in places of turns, changes in the angle of inclination and height differences of the pipeline.
The first inspection well is installed at a distance of no more than 8 m from the axis of the riser - with an outlet diameter of 50 mm, 12 m - with an outlet diameter of 100 mm, 15 m - with an outlet diameter of 150 mm or more. In general, the last two rules are relevant for owners of private houses involved in sewer installation. Usually these people are smart and don’t need additional comments. But just in case, I will give a link to an article that briefly describes the design of sewer wells .
UPD: I was wrong, a lot of questions about laying external sewerage have accumulated, so I put them in a separate article.
Rules of hydrodynamics for the arrangement and installation of a sewer system
Failure to use the laws of hydrodynamics can cause the most common mistakes when arranging a drainage system.
The first lies in ignoring the provision of reliable ventilation. The drain pipe leading to the attic from the riser is intended not only to remove the smelly aroma of wastewater, but also acts as a pressure compensator. In the absence of such an important part, the reduced level of pressure generated above the water piston will remove liquid from the siphons. This will lead to a lack of air and the penetration of sewer aroma into the house.
ventilation - vent pipe
Installation of plumbing fixtures
Another mistake lies in the fact that each plumbing fixture is connected to a riser located below the toilet using supply pipes. Such installation is unacceptable, because it will certainly lead to the appearance of uncleanness in the bathroom or sink after each flush. A similar situation will arise when the length of the supply pipe is greater than that established by the rules.
To avoid troubles during daily use of the sewer system, you should familiarize yourself with and follow the important rules for installing sewer pipes.
Rules for installing plastic pipes for water supply
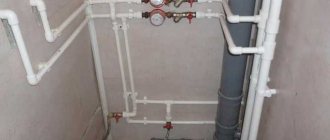
Water supply from plastic pipes
After connecting the sewerage system, water supply is supplied.
A diagram of the connection of all elements is drawn. For hot water supply, a technological gap of 10 mm is left, since the plastic expands when heated. Afterwards, the total length of the line and the necessary fittings are calculated. Number of locking and fastening elements. For subsequent addition of new devices, it is recommended to leave several taps with plugs.
When planning plumbing, it is important to know that plastic pipes are made in gray color. Their markings:
- PN10 – cold water;
- PN16 – hot and cold;
- PN20 – hot water with heating;
- PN25 – heating.
Where the water temperature is below 60°, the first two points are suitable. If the temperature is higher, then use the third and fourth options, since they are reinforced.
To save time and ensure control over the condition of the water supply system, it is better to use an open connection scheme. Pipes are installed at floor level, in the corners of the rooms. The standard option, it is the simplest, is a sequential supply of water to all consumers. To carry out repairs without turning off everyone, a shut-off valve is installed in front of each one.
Step-by-step instructions for soldering plastic pipes
The parts were purchased, the tools were prepared, the question of how to install the water supply system began to be resolved. According to the diagram, sections of pipe are cut with special scissors. They are connected using fittings or welding. The technology is simple:
- the ends are cleaned and degreased;
- nozzles of the required diameter for the soldering iron are selected, it is heated;
- insert the elements to be connected, wait a certain time (determined by the cross-section of the products);
- After welding, fix the parts until they cool completely.
The structural elements are secured to the wall with clips. Risers - using a clamp and a rubber gasket.
Additional elements, such as valves and meters, have a threaded metal connection; it is sealed with tow. Professional plumbers prefer to use fluoroplastic sealant.
With a little experimentation, any home craftsman can connect a water supply system with his own hands, which will function like a clock.
Installation features
The structure of plastic water pipes
This is a relatively new device. Combines the properties of metal and polymer pipes. Reminiscent of a layer cake: polyethylene, glue, aluminum, glue, polyethylene. The performance characteristics are excellent: at a pressure of 9.8 atmospheres they can withstand temperatures of 95°. With short-term overheating up to 130o. They are frost-resistant, easily retain their given shape, and can be bent even by hand.
They are used in systems for transporting liquids and gases, heating and air conditioning systems, and for heated floors. The connection diagram is similar to polypropylene pipes. But since they are more susceptible to mechanical damage and exposure to UV rays, installation is carried out inside special boxes, walls, and floors.
Special fittings are produced for connection:
- detachable;
- compression (clip);
- press fittings (for press pliers).
Installation does not require expensive equipment or special education. When assembling a water supply system with your own hands, know: the last connection is permanent, it can be “packed” inside the floor or wall. The first two are in special boxes for access in case of an emergency.
Recommendations for the arrangement of sewerage systems, which are strictly prohibited from being violated
Before reading these recommendations, it is important to understand that ignoring such simple rules may cause complete failure of the sewage system. The rules in question are easy to follow.
- The toilet should be connected to the riser separately from the rest of the plumbing.
- Each subsequent device must be connected to the waste system above the toilet connection point. It is important to understand that no more than three devices should be located on one liner, the performance of which is allowed by such placement.
Distance and diameter
- The diameter of each supply pipe must not be inferior to the largest circumference of the plumbing connections.
- The circumference of the toilet outlet is 10 centimeters. Accordingly, the riser cannot be thinner.
- The distance from the central riser to the plumbing fixtures (specifically the toilet) cannot exceed one meter. At the same time, any other plumbing fixtures can be installed at a distance of no more than three meters.
- If the installation of internal sewerage is carried out using a supply pipe with a size exceeding three meters, then the internal circumference parameter must be greater than 7 centimeters. The liner, the length of which is 5 meters or more, is mounted from pipes with a diameter of 100 millimeters.
You may also like: Sewer pipe diameters - table and dimensions
When it is not possible to increase the size of the inner circle of the eyeliner, then there is one option that allows you to circumvent this rule. It will be enough to bring one end of the pipe to the roof and install a vacuum valve in it. You can also simply loop the upper end onto the riser above any device in the system.
Preparatory work
Before installing sewerage in a room:
- It is necessary to outline a scheme for laying sewer pipes. You can use a marker on the floor or wall to mark their placement locations;
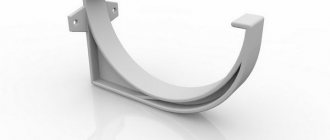
- The brackets that are used to secure them are laid out. For long pipes, fasteners are used that are installed among themselves at a distance of no more than 40 cm;
- at the beginning of work, it is necessary to determine from what material it is planned to install the distribution channels;
- a set of tools is being prepared. You will need a pipe cutter. It will make the work easier;
- the water supply to the bathroom stops;
- old wiring in the room is removed.
Pipes prepared for installation are applied to the place where they are laid. But it is recommended to carry out cutting before joining them, so as not to make a mistake in choosing the length.
After completing these steps, you must begin installing a new sewer line.
Development of an installation diagram for sewer pipe distribution
A schematic layout of the sewer system in the bathroom is being developed on a piece of paper. The location of all water consumers in the room and the piping to and from them are clearly indicated.
- Design is carried out taking into account the creation of an optimal path. The wiring is the installation of single collector channels. Such a system is capable of managing water flows simultaneously for all consumers. Pipes are connected in series using special tees. This option saves on consumables.
- Connecting points are created in smaller quantities. But such a scheme cannot be implemented if there are a large number of remote consumers in the bathroom. It is difficult to quickly switch the water flow due to the large number of tees. Therefore, a liquid flow switch is installed before the point of consumption.
- If the bathtub is not dismantled, then replacing the drain pipe in the bathtub will be difficult. Therefore, the drainage system is made up of several parts. Tightness is maintained at the joints of elements.
- It is recommended to connect the bathtub via a siphon. A nearby bathtub and washbasin are connected via a tee.
- When creating a sewerage installation project in a bathroom, kitchen, or toilet, it is recommended to provide an additional connection for a new plumbing fixture (for example, a dishwasher). For this purpose, additional riser outlets are installed.
By drawing a sewer laying diagram on a piece of paper and moving towards the main drain, the pipes increase in diameter, which will avoid clogging at the joints.
5 mistakes related to the arrangement of in-house sewage systems
Very often, mistakes during sewerage installations are associated with incorrect calculations of the parameters of the pipes used. To ensure uninterrupted operation of the sewage system, the installation of sewerage pipelines must take into account the following nuances:
Tilt angle
The selected angle of inclination of horizontal pipes will depend on the size of their internal section. According to regulatory data, the fifty pipe should fall three centimeters per meter. A pipe with a diameter of 100 to 110 tilts two centimeters. A part from 160 millimeters can have a slope not exceeding 0.8 cm per meter of product.
You may also like: Slope of sewer pipes according to SNiP
Height difference
Do-it-yourself installation of sewerage from plastic pipes implies compliance with such an indicator as height difference. Its value should be equal to one meter. For the rest of the plumbing it is three meters. If it is necessary to exceed the standard value, then you will have to think about arranging ventilation at each end of the line.
Angle selection
Another common mistake lies in choosing the wrong angle. If it is straight (90 degrees), then when it rebounds, a clog will begin to form. The problem can be avoided by creating a smooth transition in a corner location using shaped parts with an angle of 135 degrees.
Fan pipe outlet
An error is considered to be the discharge of the waste pipe into the general ventilation system of the premises. This option will allow the sewer aroma to instantly fill all rooms. It is important to remember that the flow of water creates a lot of noise. To rid yourself of uncomfortable sound, you should consider sound insulation. You can use mineral wool to wrap the pipes. Additionally, you can build special boxes using drywall.
Not equipped with a check valve
The pipe that connects the septic tank to the waste system is not equipped with a check valve. In this situation, if the outdoor tank overflows, the wastewater will return to the house and flood the basement.
Read more in the article: Non-return valve for sewerage - what, where, when?
Recommendations for laying sewer pipes in the bathroom
Sewage in the bathroom is installed with the calculated length and diameter of PVC pipes and sewer outlets. Bends perform the function of connecting pipes and parts of the sewer system to the plumbing unit.
- PVC products with a diameter of 50 mm for the shower cabin, bathtub, and washbasin are used. An option with a diameter from 32 to 40 mm is allowed.
- Suitable for toilets with a diameter of 110 mm.
- On short pipes it is recommended to avoid side branches. When drawing up a preliminary wiring plan, you must not forget this rule.
- Dirt and fatty deposits accumulate on the outlets. It is recommended to install two bends at 45 degrees, which in total will be a right angle.
- To be able to clean the sewer without much difficulty, it is recommended to lay smooth turns.
- The slope of the pipeline depends on the diameter of the product. Smaller diameter means higher pipe slope. The reason is that with a small slope, the liquid will slowly drain through the pipeline. This leads to the formation of a blockage.
- When the slope is large on a long pipe, another problem appears: solid waste fractions will not have time to be completely washed off. Most often this problem occurs on a product with a diameter of 110 mm. The liquid rolls over the lump of waste. You need a powerful stream of water draining at a certain angle. This will wash away contaminants from the walls of bends, connecting points and corners. Therefore, an unspoken rule is voiced: the larger the sewer pipe from the toilet, the larger in volume it is necessary to choose a flush cistern.
- If the sewer pipe is long and has many turns, a coupling with revision is installed. It is needed to clear sewer blockages.
- To connect siphons of different plumbing fixtures, the inlet hole is located at different heights. For example, for a sink, the recommended height is from 50 to 60 cm from the floor level; ideal for a shower stall when the entrance is on the floor (but a few centimeters above the floor is acceptable); for a bathtub, the entrance hole will be at a height of 5-15 cm from the floor level.
- If the central entrance to the sewerage system is installed high, then to create a standard slope of the main line, a podium is laid out for some plumbing units. This is done for shower cabins and boxes. Their distance from the pallet to the floor may be different. Taking this distance into account, a calculation is made for the correct possible connection at the end point of the shower enclosure.
- To reduce the likelihood of a problem associated with the appearance of an unpleasant sewer odor, it is not recommended to use corrugation to connect plumbing fixtures. The corrugation is susceptible to clogging due to its uneven surface. In addition, the length of the sewer should not be long.
Do not dispose of waste into the sewer system.
Errors regarding connecting siphons
Connecting a toilet or any other plumbing fixture to the drain is carried out using a siphon made in the shape of the letter U. This appearance of the product contributes to the constant presence of water in it, which, in turn, leads to the formation of a water barrier and does not allow unpleasant odors to enter the room. If the following shortcomings are not taken into account, the system will not be able to perform its functions:
- lack of ventilation. In such a situation, the vacuum will simply suck out the water, and the smell will freely flow into the rooms.
- Odor may also appear if water evaporates. This situation occurs when the toilet is rarely used for its intended purpose.
Sewer pipeline installation
Assortment of sewer pipes
When installing sewer pipes, we must not forget about the operating features of the sewer pipeline. Firstly, not only liquid, but also various solid inclusions enter this system, and secondly, the system, in most cases, is built by gravity, that is, the liquid is mixed through the pipes due to gravity, and not artificially created pressure.
Pipe diameters and slopes
Thus, when constructing a pipeline, it is very important to correctly select the diameter of the pipes and maintain their slope angle. The choice of pipe diameter in the internal network is carried out depending on which plumbing fixture will be connected to this section of the pipeline:
Fittings for sewerage installation
- When connecting a washbasin, it is allowed to use pipes with a diameter of 32-40 mm.
- When connecting to the washing system in the kitchen and bathroom, it is recommended to use pipes with a cross-sectional size of 50 mm.
- When connecting several devices simultaneously, plumbers use outlet pipes measuring 70-85 mm.
- To organize a drain from the toilet and construct a common riser, pipes with a cross-section of 100-110 mm are used.
If it is necessary to rotate the pipeline, the assembly of sewer pipes is carried out by installing bends with an angle of more than 90 degrees. Since the presence of sharp kinks in the pipeline can lead to blockages in this place.
It is extremely important to maintain the correct level of pipeline slope. It is clear that if the slope is insufficient, the system will not work effectively, since the wastewater through the pipes will move too slowly. But it is also prohibited to make a slope that is too steep, since in this case the water will drain too quickly, not having time to wash away solid waste.
Advice! The slope of the sewer pipes is selected so that the speed of liquid movement in the pipes is 0.7 -1 m/s. The exact slope value depends on the diameter of the pipes and usually ranges from 2 to 15 percent.
About pipe cutting methods
Laying sewer pipes
Before installing sewer pipes, they must be adjusted to length. Cutting can be done in the following ways:
- If you need to cut a large number of pipes, it makes sense to use a special pipe cutting machine. It cuts cleanly and does not require post-end finishing.
- A high-quality cut can also be obtained by using a special saw for plastic pipes with a wide blade.
- If you do not have a special tool for cutting, you can use a hacksaw with a fine tooth.
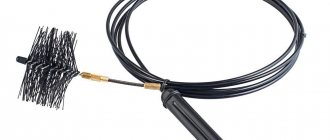
- If it is necessary to cut pipes in a limited space, then a thin cable equipped with handles on both sides is used as a tool.
Advice! Whatever method of cutting pipes is used, it is necessary that the cut is made strictly perpendicular, and there are no burrs at the ends of the sections.
Methods for connecting pipes and fittings
Installed sewerage system
If you install sewer pipes yourself, then the connection of individual pipeline elements is carried out using a socket method. This connection method is quite reliable and, at the same time, simple.
It does not require the use of special equipment or tools. The end of the pipe is simply inserted into the socket, and the tightness of the connection is ensured by the presence of a rubber O-ring.
If PVC sewer pipes are being installed, a joining method called chemical welding is sometimes used. To implement this joining method, special adhesive compositions are used.
Tools for work
As noted earlier, the installation of sewerage systems begins with the preparation of a detailed diagram, which includes marking the installation locations of future plumbing, as well as the parameters of the parts used. Since the drainage equipment involves PVC pipes that have a certain arrangement of ends, the parts should be connected to each other by placing the end of one pipe into the socket of the next one. Installation of sewer pipes, or rather the central riser, is carried out using a part with an internal cross-section of at least 100 millimeters. To connect to an external sewer, it is necessary to use corrugated pipes, since such pipes better resist soil movement.
Installation of sewerage from plastic pipes requires the following tools:
- saw for cutting plastic pipes;
- a well-sharpened knife (needed for aligning cuts and chamfers);
- rubber seal for installation (inserted into sockets).
To collect all parts into a single waste system, shaped parts can be used:
- Bend or elbows, with the help of which corners are formed. Such parts are produced with an angle of 90 or 45 degrees. There are sockets and seals at both ends that create a fairly tight fit of the parts.
- Transition elbow for connecting several pipes with identical internal diameter parameters.
- Several tees acting as fittings for arranging branches in the system.
- Transition couplings designed to create a transition between parts with different thickness parameters.
Often, installers ignore the rule of heating pipes before connecting. Such actions will help the parts fit more tightly. You should use hot water for heating.
Procedure for sewer installation
To maximize productivity and efficiency, it is recommended to adhere to the following order:
- We determine the location of all plumbing fixtures if we plan to add new equipment or change the old layout.
- We draw out the entire sewer wiring diagram using chalk or a pencil. The diagram should indicate pipe routes, lengths, diameters and slopes for each section.
- We dismantle the old wiring system.
- We calculate the number of pipes, consumables and fittings, and sealant.
- We purchase all the elements, including transition couplings from a cast iron riser to a plastic one.
- We install the system in free space, trying on the pipes.
- We dismantle old equipment.
- We install the pipeline and adjust it to the joints.
- We connect the pipes and seal the joints.
- We install and connect plumbing fixtures.
- We connect the system to the riser.
- When the sealant hardens, we check the system for leaks.
Now let’s look at the key stages of the work more carefully, finding out some of the subtleties.
Drawing up a sewerage diagram
If installing a new sewer system simply comes down to replacing pipes in the toilet and bathroom, then there is no need to come up with some new scheme. Everything is done exactly as it was. But if there were problems with the old sewer system and it is planned to add new plumbing, then it is necessary to accurately maintain all diameters and slopes.
Before starting work, think over a detailed diagram of what the finished sewer system will look like and what materials you need to purchase for this (+)
To make sure that the sewerage diagram in the apartment is correct, it is better to have it checked by specialists. This is significantly cheaper than ordering a compilation from scratch.
The diagram should indicate the following elements:
- all rooms where the sewer pipe will pass;
- arrangement of elements for each room, indicating distances from the wall, indicating the length of each section, as well as the total length of the pipeline;
- a full set of fittings, including inspection and cleaning outlets;
- the place where the central riser is located.
The diagram should be as detailed as possible so as not to forget anything and not disrupt the technology.
Image gallery
Photo from
Construction of a sewer system in an apartment
Inspection of the sewer riser
Inspection of the sewer outlet pipe
Cleaning the outlet pipe
Dismantling the old system
It is necessary to analyze the old wiring to select the appropriate dismantling method. If the plastic is changed, then, as a rule, it is simply pulled out of the connections while twisting at the same time.
Sometimes cast iron pipes can be dismantled in the same way, but you need to knock out the sealing joints with a chisel.
In all other cases, which are the majority, you need to cut the cast iron pipe with a diamond wheel from different sides. A wedge is inserted into the resulting hole, which must be struck several times with a one-kilogram hammer until the pipe is divided into two parts.
You should start by disconnecting the pipeline from the riser, and direct dismantling is carried out starting from the farthest section of the sewer. You need to warn your neighbors, turn off the water in the riser and begin dismantling.
Use a power tool to make two cuts in a cast iron pipe for dismantling - stuck pipes are extremely difficult to remove otherwise.
We disconnect the riser pipe that is adjacent to the riser. This is done through two cuts at a distance of 150 mm from each other. First, a fragment of the pipe is broken out from the side of the apartment using a wedge, and then a piece from the side of the riser.
Next, you need to hammer the old seal near the riser outlet to remove the remaining fragment of the pipe. The holes must be plugged tightly with rags. Now you can allow your neighbors to use the water supply while you dismantle the rest of the pipeline in the apartment.
Then we again introduce a ban on the use of sewerage. Lastly, we cut off the old riser to proceed to its replacement.
Replacing a sewer riser
This is an extremely important task that is best entrusted to seasoned specialists, otherwise the cost of an error may be too high.
If you are confident in your abilities, then you will need the following set of tools and consumables:
- two cuff adapters – plastic/cast iron and cast iron/plastic;
- two pipes of appropriate length and diameter;
- two plastic 45-degree turns;
- compensator for plastic pipes;
- metal clamps with studs for fastening;
- plastic cross with a 50 mm bend in the required direction;
- plastic insert with inspection hatch.
First you need to strengthen the old riser at the very top. Make two cuts in the middle of the cast iron pipe at a distance of 150 mm from each other. Insert two wedges into the bottom cut on both sides of the pipe at an angle of 45° to the horizontal.
Dismantling the riser should be carried out by a trained technician with sufficient experience in such work, so think carefully before you start doing it yourself
By tapping you need to get the pipe to break off. This operation requires significant experience, since if done incorrectly, the entire pipe string may collapse.
Insert the wedges into the upper cut and release another section of pipe in the same way. In this case, assistants must be sure to hold the upper part of the pipe. Next, use a chisel to remove all the old caulking at the top.
With slight rocking you need to release the pipe from the joint. Now repeat for the lower joint, removing the seal and removing the pipe by shaking.
We assemble a new riser according to the diagram, starting at the top and ending at the bottom:
- pipe;
- adjusting tap;
- compensator;
- inspection compartment;
- pipe;
- cross.
The lower and upper parts must be connected to the cast iron riser using cuffs.
Make sure that all elements are installed in the correct order, and the cuffs are securely tensioned on the surface of the pipes
We adjust the dimensions of the lower pipe during the rough assembly process. Then we carry out final installation using sealant, connect the lower wiring and install the toilet. We fix the riser using crutches with pins at four points, including each adjusting bend, as well as at 1/3 of the length from the lower and upper edges.
Calculation of materials and fitting
It is necessary to calculate the amount of materials in such a way that during the work you have to cut the pipes as little as possible, because These are all additional costs. Pay attention to the length of the sections. In an ideal situation, trimming will only have to be done for one pipe.
Once you have everything you need on hand, you need to figure out a few things by trying it on.
First , you need to understand how the couplings will be placed, whether pipe tails will hang behind the walls, and whether there is enough space to install the couplings. You also need to mark the locations of the crutches and determine their number.
Secondly , it is necessary to identify difficult places where installation can be complicated and think through its sequence.
Rough installation of pipeline
Preliminary connection of pipes is carried out without sealing. The ends of the pipeline are connected to each other only with complete pipes. Next, cut the pipes from the free end.
It is impossible to cut from the side of the pipe, as this will disrupt the design and tightness of the connection in the future.
To check compliance with the diagram, assemble the entire system from sewer pipes, but do not use sealant yet, adjust all connections
Trimming is done with a hacksaw for metal strictly at right angles. All burrs must be removed with a knife, including chamfers. If this is not done, the remaining fibers will serve as a point of clogging. All rotary splitters must be immediately turned to their operating position.
Finish installation and sealing
Starting with the riser outlet, we connect the entire system in sections. Special attention should be paid to the reliability of sealing - for this, pipe sealant is used.
The composition should be neutral - it is better to use polyurethane or silicone. Sealant must be applied to each plastic gasket. There is no need to apply anything to the rubber seals.
You need to lubricate the outer part of the pipe, which will be in contact when connecting, as well as the inner part of the pipe. We connect each section separately. After the sealant has hardened, you need to check the entire system for leaks by running water into the drain from all plumbing fixtures, including the bathroom. In this case, there should not be a drop of water on the floor.
Sequence of work
Installation of sewer pipes during sewerage installation is carried out in the following order:
- Installation of a riser with terminations in the basement and on the roof. It is important to remember that the riser should be located near the plumbing. The connection in the basement is made with an inclined pipe leading into the septic tank. The end of the pipe in the attic should be equipped with a check valve or left open.
- Carrying out the supply from plumbing equipment to the central riser.
- Connecting the line to the riser from the rest of the plumbing located above the toilet entrance.
- Installation of siphons on each plumbing fixture.
- Connection of liner and siphons.
At this stage the work is considered completed. Next, it remains to check the tightness of the joints and the rigidity of the pipes on the walls, as well as the absence of discrepancies.
DIY sewer video
Do-it-yourself sewerage is a structure that requires calculations and preparatory work. It is much easier to install elements during the construction phase of the building, and if the house is already ready, then placing parts of the structure will be much more difficult. Video - how to make a sewer with your own hands ?
We offer a video “how to make a sewer with your own hands .” It explains in detail the main points during which a non-specialist may have problems installing a sewer system. We remind you that a professional will cope with the assigned tasks much faster, so entrust the installation of the sewer system to the specialists. Such employees work in our company.
AR COMPANY are professionals; the organization specializes in all types of construction work. Our craftsmen will quickly and efficiently carry out internal or external sewerage and install a septic tank.
Don't know how to make a sewer?
The video will help and clarify difficult points. For example, when installing a septic tank, it is important to know the level of groundwater, the thickness of soil freezing, and the topography of the site. Naturally, one cannot do without basic concepts in plumbing, since today the market is replete with building materials and it is important not to make mistakes when purchasing them.