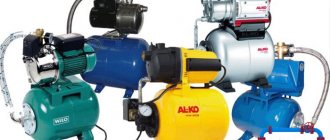
Let's look at how to repair drainage pumps with your own hands, without the involvement of professional specialists. Drainage pumps are a special type of equipment designed for pumping water. Outwardly, they are similar to conventional water pumps, however, they are adapted to work in much more difficult conditions. They can be used for pumping water from wells saturated with mechanical inclusions - a suspension of sand, clay, etc. But, despite all its wear resistance and unpretentiousness, drainage equipment can also fail from time to time.
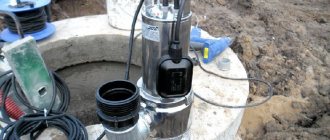
Drainage pump device
The following are installed in the device body:
- Protective mesh on the bottom of the device. Prevents debris and large parts from getting into the impeller.
- Impeller (impeller). Rotating, it creates a rarefied environment around itself, due to which liquid is absorbed.
- Bearing shield. Protects the electric motor, rotor and shaft from moisture.
- The rotor sets the rotational energy for the impeller.
- The shaft is considered an element of the engine, passing through the entire cavity of the unit and attached to the rotor.
- The capacitor serves as a switch.
- Float. Located outside the device, when lowered it prevents the engine from starting, preventing overheating from dry running.
- Cable. Designed to supply electricity.
The design of the unit is sealed. In each compartment, including the engine, there are sealing rubber gaskets between the partitions.
A number of other reasons
There are several other reasons why the pump stops pumping water from the well:
Significant reduction in water level in the well. The main reason for this phenomenon is improper drilling. Often a decrease in water level occurs in the summer, during dry periods. To prevent such situations, it is necessary to contact only trusted well drilling companies, and also use a system of protection against dry work. It would not be superfluous to clean the well using special means. A centrifugal pump can pump out water faster than the well can refill. You need to choose the right pump based on your personal needs. In this case, it is better to buy a device with a power slightly higher than needed, because guests may come, or you will need to water the garden with a large amount of water. Don’t forget to save it as wisely as possible - don’t open all the taps in the house at once and don’t pour water in vain. Weak pressure. Another problem that arises if you choose the wrong pump. For example, the depth of the well is about 50 meters. And the device is designed for a shaft length of about 30 meters. Of course, he will not be able to raise water to the surface with the required pressure. Power outages can negatively affect the operation of all appliances, including the water pump. In this case, it is recommended to buy a voltage stabilizer, or connect the pump to a generator. Disconnecting the pipeline. With this option, you can hear the “gurgling” of water. It is necessary to check the water supply system and fix the problem. Clogged pipes or system filters. Often occurs during the first test run of the pump and water well. During this time, sand or clay particles may get into the hoses or pipes. The main reason is incorrect or insufficiently high-quality system assembly
It is important to maintain precision and accuracy during installation. To eliminate this problem, the pump can be washed in a container of water after disconnecting the pipeline and check valve. If you can clearly hear the sound of a running engine and all possible causes of the problem have been checked, but there is still no water in the house, we recommend removing the pump and taking it to a repair center.
Any malfunction of the water supply system at home is the result of an error by the organization or individual involved in its implementation. In this case, the homeowner has a good chance to learn from his mistakes by repairing the electric pump with his own hands and, with a “successful” set of circumstances, improve his health by carrying water manually for some time from the nearest water source.
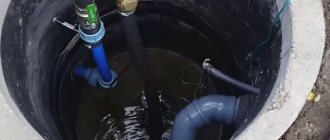
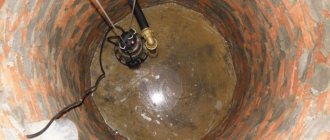
Rice. 1 Well pump assembled
This sequence of actions applies to all types of pumping equipment, regardless of the location and method of installation. It should be noted that the power supply system of the pump, apart from the wires switched by switches, does not have complex circuits, so if the submersible water pump does not pump water, but starts and hums, problems with the supply of the required supply voltage in the vast majority of cases can be eliminated.
First of all, repair of electric pumps should begin by turning off the supply voltage, removing it from the water intake source and disconnecting the outlet hose.
When reconnecting, the reasons why the pump does not work can be divided into several areas according to the location of the manifestation - we will consider them below.
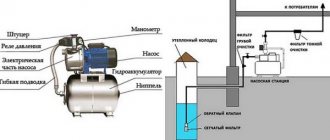
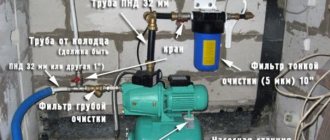
Rice. 2 Water supply scheme for a private house
Causes of drainage pump failure
There are many reasons why drainage pumps fail, here are the most common ones:
- Violation of operational standards (the device is constantly under overload, it is not fully immersed);
- The pump is not regularly maintained;
- The pump was not installed correctly;
- Perhaps this is a manufacturing defect.
Before starting repairs, it is necessary to exclude the last of the listed options. If you bought a pump recently, check to see if the warranty period, if any, has yet expired. Because if you try to repair the pump yourself, it will no longer be accepted under warranty service.
To prevent pump breakdown, it is necessary to carry out its maintenance on time. Preventive measures to avoid repairing the float drainage pump, points that need to be paid special attention to:
- The air entering the pump must flow freely through it and out. If air does not flow freely, then there is an air lock somewhere in the pump.
- There should be no visible damage to the piston.
- It is necessary to monitor the distance between the valves and the inlet opening.
Design and repair features
Pumps of the Vodomet and Vikhr brands are in great demand due to their simplicity of design and easy repair of the downhole unit. The basis of any submersible pumping product is a compact cylindrical body
Pumps of the Vodomet and Vikhr brands are in great demand due to their simplicity of design and easy repair of the downhole unit. The basis of any submersible pumping product is a compact cylindrical body. It is in this housing that the engine with an impeller mounted on its shaft is located. In this case, the impeller is separated from the engine compartment using a special liner. The shaft passes through it.
Before starting to repair deep-well borehole pumps, it is necessary to assess the serviceability of its main components. To do this, do the following:
- First, check the piston for damage and deformation. It should be straight and even.
- Then the patency of the suction opening is assessed. It is considered to be in good condition if air, penetrating from the suction pipe, passes freely from both sides.
- It is also worth measuring the distance between the piston and the magnets of the coils with your own hands. Normally, it should be within 0.4-0.5 cm. If this value is greater, the coils in the device may break. If the clearance decreases, the engine may overheat.
- In addition, in “Water Jet” units and other similar models, it is necessary to measure the distance from the valve closing the inlet to the device body. Normally, it should be from 0.7 to 0.8 cm. This will allow the liquid to flow freely from the unit in the absence of pressure.
- You also need to make sure that malfunctions in the operation of the downhole unit are not caused by critical voltage surges. Therefore, using a special device you need to measure the voltage in the network. It should be within 200-240 V.
Drain pump diagnostics
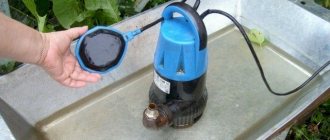
You can repair the drainage pump yourself in situations where the breakdown is not so significant. To do this, you will need to diagnose the operation of the device, identify the malfunction and try to eliminate it. For example, it will not be difficult to replace a worn or broken part, or clean the filters. It is also possible to carry out simple electrical repairs at home - replacing a broken electrical cable or capacitor.
But if a crack appears in the body of the device, the winding of the electric motor burns out, or the valve stops working, it is better to contact a specialized workshop or purchase a new pump.
A break in the power cable can be easily repaired if it breaks near the plug. It will be more difficult to close the gap on submersible models of the drainage pump, in an underwater location. Here, due to the likelihood of a short circuit, you cannot connect the break using simple twisting.
You will need to cut the cord at the fracture site and reattach it to the engine. To do this, you will have to remove the cover and remove the cut off remainder of the cable. Instead, using a tension element, we attach a long cord with a plug, after which we put the cover in place, carefully and thoroughly tighten the fastening bolts.
Pump doesn't work
The reasons may be the following: depressurization of the housing, burnt-out motor windings, broken blades after contact with large solid particles. Check for leaks by immersing the pump in a bucket, and also check the voltage at the outlets. Then unscrew the bolts and remove the housing. Rotate the motor shaft for large particles. If the engine is seized due to large inclusions, they should be removed and, if possible, the destroyed working rings should be replaced. If the impeller and blades are damaged, they should be replaced.
Next, check the electrical. Disconnect the power cord from the engine and, if melted parts are found, replace the entire cord and plug. You should also check if there is a break in the motor winding. If this is found, it is better to entrust the repair to a specialist.
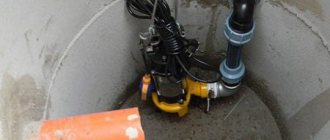
Pump disassembly
After lifting the device from the well, you should blow out the outlet fitting, removing any remaining water from the pump. All mating parts of the device should be marked with a marker in order to set them in the exact position during assembly. Then we proceed to disassemble the case, holding it in a vice by the ledges near the screws. The screws holding the two halves of the housing together (4 pieces) should be loosened evenly. After removing the cover, the vibrator is removed from the housing - the main working unit of the pump.
By unscrewing the fixing washer located on top of the vibrator, you can disassemble the entire assembly. All components are strung on the central rod one after another, like the rings on a children's pyramid.
The main thing is to remember the correct sequence of all these parts when disassembling the vibrator. To do this, it is recommended to capture each stage of dismantling with a phone camera.
The pump in a suburban area does not pump water, we are looking for possible causes of the malfunction
Every year, most summer residents are faced with the problem of a breakdown of their autonomous water supply. As a rule, the pump does not pump water, pumps slowly, noise and other problems appear. Typically, breakdowns occur after winter frosts. It is necessary to identify the cause of the probable malfunction and eliminate it.
Common problems
Nature of the failure and cause of its occurrence:
- Doesn't buzz and doesn't work. The drainer is lowered into the water, the float has surfaced and is on the surface, the cable is connected to the circuit, but the engine does not work, there is no vibration. The cause of the breakdown is a discrepancy between the declared motor power and the electrical network to which the device is connected. Carefully read the characteristics of the pump, its power and efficiency. The pump is not lowered deep enough into the water and the float does not work. Remove the device and, lifting the pillow up, turn it back on.
- It works, but doesn't download. The engine is on, but no water comes to the surface. There are several reasons for this. The protective mesh blocking debris and stones at the bottom of the case is clogged. Raise the device and clean the filter. The thick fraction got into the discharge hose and a blockage occurred. If such a breakdown occurs, it may be knocked out of the base of the pump; if this does not happen, you need to disconnect it yourself and wash it. The impeller is broken. Its augers may break or the bearing may collapse; this can be found out by disassembling the pump.
- Vibrates and overheats. The electric motor braid was broken, water got into the engine compartment, and the shaft bearing was destroyed. The unit vibrates and heats up, while the water flows in jerks or stops altogether. We urgently turn off the power to the equipment and pull it to the surface. The cause of the breakdown is hidden inside. For diagnostics it is necessary to disassemble the case. Several impeller blades are broken. The rotation occurs with an eccentric and hits the body on one side.
- Low pressure with a properly running engine is a consequence of a breakdown of the mechanical part of the pump. Impeller or bearing, clogged discharge hose or suction filter. It can be eliminated by simply washing it in clean water or replacing mechanical parts.
- When the unit is connected to the network, the automatic switch is activated. The fuse cuts off the network if a short circuit occurs. Check all electronic parts of the pump. Go through the cable with a tester and find out where the short circuit occurred - replace it. The motor's copper braiding is also at risk if the unit is run dry. The braid can be replaced or a new engine installed only in a repair shop.
- The device works, but turns itself off. Connected to the network and working, pumping water properly. Suddenly it turns off on its own. The reason is a mismatch between the power of the motor and the electrical network. Voltage surges can also affect the smooth operation of the unit. The solution is simple - study the instructions and characteristics of the pump in detail, install a voltage stabilizer.
Tip: to pump out all the liquid completely, the float is tied to a cable in a vertical position and lowered into the water. Adjust the switching on and off of the device by unplugging the plug from the socket.
Causes of breakdowns
- Incorrect operation of the device. It is necessary to distinguish between drainage and fecal drainage, although at first glance they are similar. Using the former to pump out sewage is unacceptable. The device is used only for pumping conditionally clean water. Incorrect use often leads to damage to the unit. Constantly turning on and off at intervals of less than one minute has a detrimental effect on the motor and bearings.
- Cable damage. The power cable is one of the main elements of the pump. Without it, nothing will work. A break or break in the cord will result in the unit being de-energized. You can replace the cable yourself, the main thing is to choose the correct cross-section and number of cores. You cannot repair the cord only at the short circuit point. It is better to replace it completely, from the plug to the pump.
- Infrequent inspection and improper maintenance. Any device needs technical control. The drainage system is inspected for defects once every six months. If the unit is constantly in water, then it should be taken out once a quarter. During the inspection, procedures are carried out to lubricate the bearings and tighten the fixing bolts and nuts. Ignoring these steps will lead to breakdown of the main components of the device - repair of the drainage pump will be required.
- The unit runs dry. The pump must not operate without water. Only when immersed can it be connected to the network. The owners leave the units unattended, having pumped out all the water, the pump does not stop working, the engine overheats, and the braid of the engine compartment sticks together. A short circuit occurs - the device burns out completely, which leads to significant financial costs for expensive repairs.
- The device operating environment is incorrectly selected. There is an opinion that the drainer is suitable for pumping even liquids with a high content of silt and clay. Of course this is not true. In the first couple of hours, the motor will cope with the strained dense layer of sludge, but subsequently the movement of the thick fraction along the hose will create additional resistance to the motor. Eventually the unit will stop working. Small pebbles are detrimental to the impeller. The power of the device is enough to pull the pebbles into the impeller, but the rotation will stop once the stones get into the mixer augers.
- Incorrect installation of the unit. It must be placed in a container or reservoir, lowering the body with the float to a depth. It must be remembered that immersing the device and placing it on the bottom is unacceptable.
- Manufacturing defects. Nothing can be done about this phenomenon. There is only one piece of advice - do not throw away documents and the receipt for the purchased goods.
- Violation of the seal of the housing. When lowering the device to a depth or into a container for pumping out liquid, it is unacceptable to throw it or suddenly drown it. Hitting a rock or tank wall will cause cracks in the joints or the pump wall. Water will get inside and the engine will burn out or become unusable.
Basic malfunctions of drainage pumps and methods for eliminating them
Repairing drainage pumps with your own hands can be done using a simple tool in the form of a vice, a rubber hammer, screwdrivers, pliers, a soldering iron; it is useful to have consumables on hand: lubricant, silicone. Many domestic and foreign manufacturers, in order to avoid unauthorized access to the internal parts of the electric pump, make the heads of the housing mounting screws of a special shape (three-pointed star). This doesn’t stop anyone, but before disassembling the drainage unit, you will have to spend some time turning a screwdriver of the desired profile.
The pump does not hum and does not work
The main reason for this malfunction is the lack of supply voltage to the electric pump, so first of all you need to check the power cord or switch that monitors the water level in the pumps, working according to the following scheme:
- The drainage pump is turned off, the presence of supply voltage is checked - if it is supplied, the unit is removed from the water intake tank.
- Next, you need to visually check the power cable for internal and external breaks and damage to the insulation.
Floats for pumps and a drainage section in a section.
The most problematic areas of the power cable are the entry point into the pump and the connection point with the plug; they will have to be checked first. It is better to do this with a connected electric pump by bending or pressing on the wires; to avoid electric shock, diagnostics should be carried out with gloves.
- If the pump does not work and the place of possible breakage cannot be felt with fingers, you will have to start disassembling the electric pump. To do this, in some cases you may need a vice and a rubber hammer. Sequentially remove all the parts (it is better to lay them out on the table in the same sequence) and remove the engine from the housing by gently rocking or using additional tools (a vice, a rubber hammer).
- After removing the electric motor and accessing the power wires, they are tested using a multimeter. If a break is detected, if it occurs a short distance from the ends of the wire (this happens most often), it is better to cut off a small piece at the point of damage, slightly shortening the cable, and reconnect the remaining ends.
Drainage disassembled
- Another reason the pump stops is a faulty float switch or its damage, while it does not monitor the water level. During repairs, it may be necessary to replace the float and unsolder it from the drainage circuit.
If the break occurs closer to the middle, the cable should be completely replaced - operating a connected or soldered wire in water is dangerous for the electric pump and the owner himself.
The pump works but does not pump water
In the case when the electrical part of the pump, judging by the sound, is working properly, but water is not supplied to the surface, or its pressure is significantly weaker than before.
There are several reasons for this:
- The water supply line - hose or pipe - is clogged. You will need to disconnect the hose supplying water upward from the pipe and clean them of dirt. If the new pump cannot create the required pressure, it is likely that the length of the water pipes exceeds the technically recommended values, and the device simply cannot create the required pressure. A similar reason lies in the too small diameter of the pipeline. To increase the pressure, you will need to reduce the length of the line, or increase the diameter of the pipes (hose).
- Wear of the working mechanism – the water impeller. Due to constant contact with mechanical debris contained in the water, its blades may wear out, bend, or break off over time. This problem can be corrected only by replacing the part with a new one.
- Difficulties in supplying water may arise due to the pump or its suction tube being too low. At the bottom of the well there is always an increased concentration of silt, suspended sand and clay. Such a suspension has difficulty passing through the filters, and the pressure drops. To solve this problem, you should raise the pump higher from the bottom of the well.
- The filters are clogged. You can wash them with a powerful stream of running water. In particularly “severe” cases, you will have to disassemble the case and clean the mechanism manually.
- When the power of the electric motor decreases, the housing or water hoses may have depressurized, the bearings have failed, or there is insufficient voltage in the power supply network.
- Malfunctions in the electrical part can be determined by “ringing” the wiring of the device using a special device - an ohmmeter. It will show a broken wiring or a burnt out winding of the electric motor.
To accurately determine the malfunction and repair the drainage pump yourself, you will have to disassemble it. This should be done carefully so as not to damage the parts and components of the device.
The power cord is faulty
The flexible element - the cable - is always at risk, since due to regular twists and kinks (which often happens during transportation and reinstallation of equipment), the wires under the layer of plastic or rubberized protection are torn, resulting in the power supply to the pump being cut off.
It is necessary to find the break point and make a connection. This operation is easy to carry out if the break occurs near the plug - you just need to clean and connect the wires, finally carefully insulating the work area.
When removing the cable, try to mark and remember the attachment points of each wire (they are of different colors) so that during reinstallation you do not confuse “phase”, “ground”, “zero”
A cable break in the pump connection area requires more time to repair. First, you need to remove the equipment from the water, wipe and dry it, then disassemble it to get to the internal connection unit. Get ready for the fact that instead of hexagonal holes you will encounter triple ones, which will make it difficult to select a screwdriver.
The cover should be removed carefully, without jerking or effort. By unscrewing the bolts holding the tension element, you can examine the cable and determine the area of \u200b\u200bthe break. We remove the worn piece, mount the cable in its original place, attach the tension element, and fix the bolts.
The pump constantly overheats
To prevent constant overheating of the pump, do not overload it. You need to give him a rest at least every hour and a half. There is no special cooler for the pump; it is cooled by the liquid that it passes through itself. If the pump runs for too long, the water itself begins to heat up, especially in the summer, which is why it will be necessary to take short breaks of ten to twenty minutes in the operation of the pump.
The article listed only the main reasons for the breakdown of drainage pumps. Before you begin repairing drainage pumps, you need to find the exact cause of the breakdown. If you haven’t found exactly your case from the listed problems, then it’s better not to undertake repairs at all, especially on your own.
You can only undertake repairs to the drainage pump if you are confident that you have correctly identified the cause of the breakdown. Also, you should not undertake repairs if you do not understand the fecal pump system at all. If your device is still under warranty, then do not repair it yourself, because you can only damage the device, and the service center will either repair or completely replace the unit completely free of charge (if this is stated in the warranty card).
Never overload the drainage pump - malfunctions will not be long in coming. If you are not confident in your abilities and doubt even a little, it is better to consult with someone who really understands this area.
Turning on the pump knocks out the electrics
When the pump is turned on, plugs fly out or wires burn out. The reason should be sought in the parts directly responsible for conducting electricity - the cable or stator winding. The serviceability of the wires can be checked using a tester; if a worn section is detected, the entire cable should be replaced or (if the break is near the end) shortened.
Winding repair is a labor-intensive task and requires special knowledge. Even with a carefully installed secondary winding, a short circuit cannot be ruled out. If you don’t have time to tinker with a burnt-out part, take the device to a service center - perhaps, after diagnostics, they will advise you to buy a new pump.
If you decide to repair the winding yourself, try to take into account all the parameters - from the number of turns to the thickness and type of wire
Malfunctions and repairs
Most pump products from different brands often face the same problems
Most pump products from different brands often face the same problems. We will list the most common ones and indicate what needs to be done to fix the problem:
- The hum of the motor is heard, but the unit does not pump water. This means that the device operates “dry” (without water). If you are sure that the equipment is installed correctly and the problem is not related to the debit of the hydraulic structure, then the likely cause of the malfunction may be loosening of the nuts securing the shock absorber, wear of the rubber parts (valve) or a broken rod. To troubleshoot the problem, do the following:
- Find the shock absorber of the pumping equipment. There are two nuts on the rod that secure it. They must be tightened all the way, and for greater reliability, it is better to lock the topmost nut.
- If the valve is worn out, it must be replaced with a new product. This malfunction occurs if the unit pumps heavily contaminated water. To prevent this from happening, use a coarse filter on the inlet pipe.
- If the rod breaks, the device cannot be repaired, so you will have to buy a new pump.
- During startup of the device, the plugs are knocked out. This may occur due to winding combustion or a faulty electrical cable. You should start searching for the problem by testing the cable. If it malfunctions, the cable must be replaced. If it is in order, then the problem lies in a burnt-out winding. You can try replacing the old coil with a new product or taking the unit to a service center to rewind the winding.
- During operation, the pump gets very hot and vibrates. Both problems are related to the operation of the device “dry”. The thing is that water cools the body of the device well, but if it operates outside this environment, it quickly overheats, which causes the magnet to peel off and the piston to stop. To repair the device, do the following:
- The unit is disassembled and, by tapping on the body, the installation location of the magnet is found.
- Then all the parts are removed from the body, and a notch of vertical and horizontal strips 2 mm deep is made on the inner surface using a grinder.
- After this, the place with the notch is lubricated with a good moisture-resistant glue or sealant.
- The magnet must be pressed well into this glue.
- When the adhesive has dried, the device can be assembled.
- Low pressure may be due to the gap left in the vibrator being too small. To adjust it do the following:
- First you need to check the tightness of the nuts on the rod, the integrity of the rubber valve, and also make sure that there is no break in the rod.
- If everything is normal, then you need to increase the gap for water penetration. To do this, screw the required number of washers onto the vibrator. Their number may vary and depends on the required pressure and stroke of the pumping equipment.
Video instructions for repairing the “Vikhr” well pump:
Preventive measures and regular pump maintenance
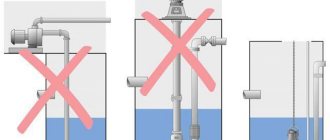
As you can see, the cause of wear of parts can be both inevitable wear and tear and violation of equipment operating rules. To make the device last longer, try to follow the manufacturer's recommendations. For example, position the housing so that the suction device is at a certain distance from the base of the tank and does not capture coarse particles.
At least once a year, check the serviceability of the cable and internal parts by disassembling the case as much as possible. Perform preventive cleaning, which will increase the service life of parts several times. Do not confuse the drainage device with the fecal one - it does not have a special grinder and cannot cope with the movement of large inclusions.
Differences between submersible and surface models
A submersible apparatus is useful for cleaning deep tanks, for example, a newly commissioned well. The first liquid accumulated in it cannot be called drinking, since there are many large inclusions of sand and clay. Throughout the day, it is necessary to pump out the contaminated liquid so that clean, usable water comes in its place.
Unlike a submersible pump, a surface pump is not used for deep tanks; it is more suitable for pumping water from a pool or basement when it is flooded. A hose is placed at the bottom of the container to receive dirty water, the second hose is used to drain wastewater.
If the pump is used in an emergency, it is appropriate to use a float device that will control the critical level of water rise. The advantage is that the design of the mechanism allows you to pump liquid with large pieces of dirt - up to 5 cm (less often - 10 cm).
It is clear that the surface type aggregate differs in its structure. The working shaft and wheel are fixed inside the metal casing, and the motor can be different: for centrifugal products - single-phase with external ventilation, for self-priming - asynchronous two-pole.
Despite the contamination of the pumping environment, you should not allow the pump to operate with liquid in which gasoline, kerosene or other petroleum products and chemicals are dissolved.
Mechanical damage to the pump
Mechanical failures can also cause the failure of the fecal pump. So, if any part of the unit mechanism breaks off, it may well jam the working blades of the pump. To check and confirm/refute this point when repairing the pump, you need to rotate the blades by hand. If they spin easily, then the reason is not a breakdown. If the blade rotates with difficulty, then more complex repairs of the unit and its disassembly will be necessary.
Important: a difficult-to-rotate impeller may be the result of a failure of the bearing system.
The pump has failed
The biggest problem that can happen to an electric pump is the burnout of the winding, and the device usually cannot be repaired (rewinding the winding with your own hands is difficult, and in a workshop the cost of work and materials will not be comparable to the price of the electric pump).
With this malfunction, the electric pump will hum, but will not be able to pump water.
Fig.5 Vibration pumps under repair
Sometimes the impeller of borehole and well pumps may break, the check valve system may fail (they will not allow water to pass through) and the piston ring of vibration models may fail.
Due to constant vibrations during operation, vibration pumps are subject to loosening and unwinding of the mounting mechanism of the composite body, the fixing nuts of the check valve and the piston. These factors can lead to the loss of functionality of a working electric pump, which will hum but not pump water.
Violation of the operating rules for submersible pumps, errors in the installation of the water supply system, a sharp increase in water intake and a decrease in the flow rate of a well or borehole can lead to the hum of a working electric pump, in which water will not flow to the consumer. In most cases, you can repair electric pumps yourself if you remove the device to the surface to accurately determine the problem area.
We recommend reading: What to do if the pump falls into the well
Share with friends:
Maybe
Operating principle of a sewage pump with a grinder
When flushing the toilet, the liquid level in the body of the grinding unit increases. The sensor detects an increase in air pressure and transmits a signal to a pressure switch, which starts the pump motor. The chopper knives are immediately activated, which process the solid fractions found in the wastewater. Next, the liquid from the storage tank under pressure enters the outlet pipe and goes to the sewer riser. After the pump has pumped out all the wastewater from the tank, the sensor registers a decrease in the pressure level, and the relay automatically turns off the installation engine.
Wastewater accumulates in tank A. Membrane chamber B measures the air pressure in the pump storage tank and, using line C, transmits data to sensor D, the pressure switch starts the pump motor E. The engine drives the grinding system F, and the wastewater leaves through outlet G.
Malfunctions of pump components
One of the reasons for the failure of the pump automation may be a malfunction of the pressure sensor or damage to the line leading to the pressure switch. Often the pressure switch itself wears out, causing the pump to operate intermittently. The serviceability of these pump components can only be determined by a specialist, so it is better to diagnose, repair or replace them with the assistance of authorized service providers. Moreover, if the warranty period for servicing the pump has not expired, feel free to contact the company whose phone number is indicated on the warranty card.
It is important to know! It is not recommended to open fasteners sealed or painted by the manufacturer - screws, nuts, clamps, etc. - before the end of the warranty period.