Replacing water pipes in an apartment is a responsible task, but if you have free time, tools and desire, everyone can cope with this task on their own, without involving professionals. We have prepared for you step-by-step instructions for replacing the pipeline, and in addition we will tell you what materials are best to use and why is there a need for this work?
- When do you need to replace pipes yourself?
- Which water pipes to choose
- Replacing pipes in an apartment yourself: important factors
- Dismantling old pipes
- We are planning the wiring
- Installation of water pipes when replacing them yourself
Reasons for replacing water pipes in an apartment
A pipeline can fail even if it was designed and constructed according to all standards and was properly maintained. Moreover, water and sewer networks are sometimes impossible to repair without replacing a significant portion of their components. This problem is especially relevant for risers that were built during the era of mass housing construction and before this period. At that time, the main materials for communications were cast iron and galvanized steel. During operation, cast iron and steel products were inevitably exposed to aggressive components dissolved in water, causing corrosion. This was the main reason for the occurrence of leaks in pipes.
But the main disadvantage of metal water pipes is that, in addition to blockages, they can develop breakthroughs. And this is a more serious problem, entailing flooding of the premises of the problem apartment and the apartments located below. The hot water supply riser is more susceptible to breakthroughs, since it also experiences temperature effects. Therefore, it is necessary to replace the water supply after its service life has expired, as well as in the event of a major renovation of a house or apartment. Current building codes require replacing water supply pipes and risers approximately once every 25 years.
If it is not possible to urgently replace the pipeline, it is allowed to operate it for another 15 years. However, the operation of communications older than 40 years is not permissible in principle, since a breakthrough can occur at any time. Large-scale apartment renovations are also a good reason to replace the water supply. The risers, as a rule, are covered with decorative elements and filled with furniture. If these components are not changed in a timely manner, in the future you will have to destroy the created decor and make repairs again.
It is advisable to replace the riser starting from the entry point, gradually moving towards the ceiling. Partial removal of blockages and traces of corrosion will not solve the problem - a breakthrough is possible in the near future. It is recommended to replace all areas of the water supply system, even the most inaccessible ones, because it is in these places that the pipes wear out the most intensively. Regardless of the location of the pipeline, any replacement requires approval from the operating organization, which will turn off the entire riser for the period of work.
Instead of old metal pipes, it makes sense to install new ones, made from modern materials, which have a much longer service life.
Motivation
Clogged pipes
Over time, steel pipes without anti-corrosion coating inevitably become overgrown. This primarily applies to cold water. Inevitable sand, scale, slag and deposits of mineral salts over several years form a solid substance inside the pipe that interferes with the flow of water.
New water supply in an old apartment
Of course, you can disassemble the water supply and clean the pipes with a special thin cable. However, this will be a half-measure: in a few years the procedure will have to be repeated again.
In addition, since the late eighties, builders have used thin-walled pipes in many typical apartment buildings. For reasons of economy, of course. When dismantled, such water pipes literally crumble in your hands after 20-25 years.
There is little left of the gap inside the pipe
Numerous leaks
Seamless pipes often begin to leak at several points along one seam. With a minimum time interval. After you call a welder for the fifth time, the desire will inevitably arise not to deal with the consequences, but to eliminate the problem once and for all.
Who will like this?
Appearance
Untidy steel water pipes with streaks of rust and years of paint deposits are simply unsightly. To hide them in a box means to look for adventures on your... back. All communications must be accessible - this is the golden rule of an experienced plumber.
At the same time, replacing the water supply pipes with modern ones will make its appearance neat and presentable.
Seeing these pipes, the designer tore his hair out. Not just on the head
Advice: if for some reason you have to hide communications under the decor, make the pipe box in the bathroom, kitchen or toilet collapsible. It’s better to put a little more effort into repairs than to then destroy expensive tiles with a sledgehammer and curse.
Assessing the condition of pipes and fittings before replacement
To check the state of communications, it is not enough just to inspect them and compare the current situation with the design data. In addition, a survey of interested parties (including neighbors) about existing problems with the water supply, as well as consultation with specialists from the service company, will be required. Written opinions drawn up by professionals always contain information about the compliance of the surveyed water supply area with the requirements of SP 30.13330.2012 “Internal water supply and sewerage”. Moreover, not only water supply lines with plumbing fixtures connected to them are subject to inspection, but also water meters.
Urban neighborhoods or individual residential buildings can be supplied not from a central water supply, but from a casing water intake well. This source of water supply also requires periodic inspections by specialists.
During the control process, the following parameters are checked:
- actual location and dimensions of individual network elements;
- nominal diameter;
- perforation intervals;
- the presence of deformations in the cement;
- quality of the filter element.
For such verification, specialized measuring equipment is used. In addition to the water supply, problems with heating pipes and the operation of the bathroom are of particular importance to the consumer. Many residential buildings are still equipped with outdated pipelines installed more than 25 years ago. Over such a period of time, any metal loses some of its qualities. Pipes become covered with deposits, fistulas, and traces of corrosion.
If these problems arise, it is necessary to replace the water pipes in the apartment or house, change the sewer lines and the heating circuit. The cost of repairs will vary depending on the scope of work.
Options for plumbing in an apartment
From the riser (central pipeline) to the consumer, water flows through plumbing, which is of three types: collector, serial (with tees), and rosette.
Only 2 types are installed in multi-apartment residential buildings:
- collector wiring;
- tee wiring.
The method with pass-through sockets is more optimal for external quick-disconnect connections. An example of such cases is irrigation systems. Therefore, most often, socket wiring is used in private houses or when connecting a small number of apartments in a group.
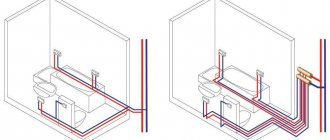
- Collector circuit
This is an ideal wiring option for a large apartment with a single riser and water intake points quite far apart. In such conditions, this diagram shows the most optimal pressure and water flow rates for each plumbing fixture connected to the water supply. Each device is connected to its own separate branch, which is a branch from the common collector.
The same water pressure for all consumers is ensured due to the uniform distribution of the liquid along its route. Another advantage of such a scheme is the grouping of all control elements and automation units in one block and the minimum number of tee connections on the branches.
A serious disadvantage of collector wiring is the increased material consumption. Branches concentrated in one place look very unpresentable, so such a scheme is usually chosen before a planned major overhaul. In this case, the entire collector is covered with decorative boxes, false walls or monolithic screeds inside the floor.
- Tee circuit
In former times this was the only possible option for plumbing, but now it is also used relatively widely. The scheme is as follows: there are two separate pipes for hot water supply and hot water supply, into each of which, as necessary, outlet tees are inserted. In other words, plumbing fixtures are connected in series along the entire length of the branches.
The tee wiring diagram has become popular due to its simple and quick installation, as well as the minimal amount of materials required. This option is optimal not only when replacing water pipes in an apartment as part of a major overhaul, but also in cases of urgent renovation of emergency communication areas. The two laid branches will have a neat appearance, allowing them to be laid open without disturbing the existing finish.
Pipe cleaners
Read more
The main disadvantage of this scheme is related to its sequential nature of operation. This means that the consumer connected closest to the entry point will have the greatest pressure. If water is supplied to all consumers at the same time, the most distant of them will receive a correspondingly smaller volume of water in the same time compared to plumbing fixtures located closer to them. This problem can be solved in two ways: reduce the internal diameter of the pipe as it moves away from the connection point or close the entire line to itself.
The selection of the optimal diameter will be discussed below. Here we only note the need to take into account the length of the branch, data on the maximum water consumption for each consumer and some other factors. This engineering problem is solved either by careful calculation of parameters, or on the basis of the practical skills of the performer developed over a long time. By choosing the diameter of the pipe “by eye”, you risk not smoothing out the pressure in the system, but achieving the opposite effect.
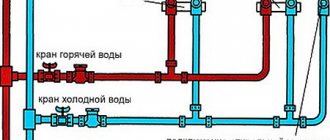
Development of a water collection scheme
You need a water supply diagram in an apartment first of all for yourself, so as not to get confused, not to miscalculate and then to know exactly where everything is - no special permission is required for this work. But when registering the meter, the water utility inspector may ask to look at the diagram, so you need to draw it correctly.
Complete water supply diagram for a private house
A complete scheme according to all the rules is a serious job for a knowledgeable specialist; for example, in the large picture there is a water supply diagram for a private house with a summer kitchen, which is necessary for the project to be approved. But to replace pipes in an apartment, you don’t need to bother so much; it’s enough that the diagram is clearly visible and understandable:
- Hot and cold water pipes, their type and lumen diameter.
- Metering devices.
- Emergency valves and drains.
- Shut-off valves.
- Parsing points indicating consumers.
- Backup branches and devices.
- Direction of water flow.
In order for all this to be clear not only to yourself, or to yourself a year later, certain rules must be followed when drawing. Let's look at examples, see Fig. On the left - more or less ok, but with some comments, on the right - incorrect:
Simplified water collection diagrams with ERRORS
- The diagram on the right is made in isometry - for beauty, or what? The intersections of the pipes confuse her, and she does not give an idea of the actual location of the analysis points: the washing machine and the boiler come out under the floor.
- There are also too many arrows indicating current where it is already clear where it flows, which also confuses the diagram.
- In the same place, shut-off valves with metering devices are depicted unclearly and not according to the rules.
- There, the type and diameter of the pipes are not indicated.
- In the same place - who, where and when saw that water was supplied to the boiler from above, and the toilet was flushed through the low tide?
- But in the diagram on the left, it is clear even to a non-specialist that the boiler (6) is a backup one. The comment will be: “Where is the check valve when it’s hot? Without it, when the supply stops, the boiler will drive itself into a hot riser if valve (10) is not closed.” But this is essentially the case and with full understanding.
Correct simplified diagram of plumbing in an apartment
An example of an arbitrary, not according to the rules for drawing up design documentation, but a completely clear and no-nonsense water collection scheme is shown in the following figure. This is also an example of parallel water withdrawal; where the combs are, it’s clear.
Calculation of pipe parameters for water supply
Before purchasing water pipes, you need to determine their approximate diameter. In the process of selecting the optimal option, you should be guided by the principle “the narrower the pipe, the cheaper it is.” However, a diameter that is too small will cause problems: flow turbulence will increase and the throughput of the pipe will deteriorate. As a result, water will drip from the tap rather than flow in a continuous stream.
Only specialists can perform the most accurate calculation for the optimal diameter selection. However, in a city apartment, you can approximately calculate the parameters of the pipeline to achieve normal pressure yourself.
Certain initial data will be required:
- The minimum permissible pressure is 0.3 atm.
- Pressure loss per linear meter of propylene pipe with a diameter of 16 mm is 0.05 atm.
- The average pressure loss per apartment for one assembly of fittings and fittings is 0.15 atm.
- Pressure loss in the sampling and metering unit is 0.25 atm.
- The periodic presence of turbulent phenomena in a pipe with a diameter of 12 mm at a standard pressure at the inlet point at the riser of 1.5-1.5 atm.
- No turbulence in a pipe with a diameter of 16 mm at the same pressure.
- Availability of at least two times the pressure reserve for a remote connection point.
Based on these parameters, we will calculate the optimal inlet pressure. At the same time, it is necessary to determine the sufficiency of pressure for a remote connection point in the case of sequential insertion with ordinary pipes. If the pressure is insufficient, you will have to use wider diameter and, accordingly, more expensive products. We measure the pressure in the lower part of the riser (in the basement) with a pressure gauge. Then we subtract 0.6 atm from each floor.
Let's show the calculation with a clear example. There is an apartment on the second floor of a nine-story residential building. Water supply communications contain 11 units of fittings, including 5 tee connections, 6 elbows and 1 valve. Considering that the current pressure in the house system is satisfactory for the upper floors, on the second floor it will be at least 4 atm. The total resulting pressure losses in the apartment for all 11 units of fittings are equal to 1.65 atm. Let's also take into account the water pipe itself from the entrance of the riser to the most remote connection point in the kitchen. With a length of this water pipeline of 6.5 m, the losses in it will be 0.325 atm. Let's add to this the losses in the sampling and accounting unit (0.25 atm) and in total we will have: 0.325+1.65+0.25=2.225 atm. This is quite a big deal. So, we arm ourselves with a pressure gauge and check the pressure in the system. Next we need a piece of pipe with a diameter of 20-25 mm. It is advisable to do the wiring parallel to the comb, otherwise in the summer we will experience an acute lack of water.
The example shown shows that straightening the sections is important. It is advisable to avoid lengthening the pipes and cluttering them with fittings.
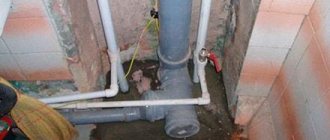
The procedure for replacing water pipes in an apartment
Having chosen the appropriate option, we begin installation work. First of all, you need to dismantle the old water supply system in the apartment, including shut-off valves. It is also recommended to change them. It is advisable to entrust the replacement of taps to a professional plumber, who has the ability to shut off the water supply in the entire riser. Then you should determine the location of the new pipes. You can place them according to the old scheme or design a new wiring option. We directly install communications according to the following scheme.
Video diagnostics of pipes: stages and features of implementation
Read more
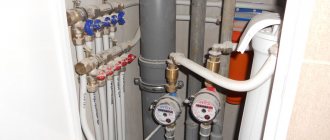
First of all, immediately after the entrance of the riser, we install filter elements for both coarse and fine water purification. When doing the work yourself and without qualified assistance, keep in mind that the removable filter tank must be located at the bottom, otherwise the filter will not work properly. Installation is carried out using threaded connections with flax thread wound around the threads to prevent leaks.
When choosing a filter, you should not take the word of sellers offering imported products for fine filtration. Absolutely any such filter is equipped with a fine-mesh mesh made of stainless alloy and a waste sump. In this case, overpaying for a well-known brand will be unreasonable.
Having installed the filters, we next install meters and check valves. Control measuring instruments should be placed in such a position that the arrow on them coincides with the direction of flow. At the same time, we take into account that the cold water outlet should be to the right of the meter.
We connect a plastic pipe to the output end through a special fitting. All further operations will concern the installation of tees and adapters, as well as the organization of wiring the system to all consumers in the apartment.
Plastic pipes are not subject to corrosion, and they can only leak at the joints. This gives us the opportunity to install the water supply directly into the wall. Although the installation work becomes noticeably more complicated, it makes sense to use such a scheme. First of all, the future position of the pipes is marked on the wall. According to the markings made, a channel is cut to such a width that, in addition to the pipe itself, it contains insulation (merilon), which is necessary in this case. Such insulation is not required to prevent freezing, as it might seem. The fact is that plastic has a linear expansion coefficient. That is, under certain conditions, the length and diameter of the plastic pipe may increase. Simply embedding such a product into the wall will damage the finish, and the insulation will provide protection against this. All connections are made as described above. The water supply installed in the channel is then sealed with cement mortar.
Stages of preparatory work
Like any household work, replacing old sewer pipes will be faster and more efficient if you evaluate the work in advance, draw up a plan and carry out thorough preparation. The entire volume can be divided into several stages.
Planning and purchasing materials
Due to the fact that in this case the sewerage system will not be installed from scratch, but only the pipes will be replaced, design work can be simplified. However, they must be carried out in two cases:
- it is planned to change the design of the engineering system, taking into account the shortcomings of the previous version;
- new consumers need to be added.
The nuances of replacing a water riser in an apartment
A water riser is a vertical pipe passing through all floors, equipped with a shut-off valve at the lowest point. This is an element of the general building infrastructure, therefore it is maintained (including changed) by the housing maintenance organization of the house. Owners and tenants of housing do not pay additionally for replacement. If such a need arises, the apartment owner submits an application addressed to the head of the management company or the chairman of the HOA describing the problem that has arisen. Common property is repaired at the expense of residents only if the residential building is not the property of the housing department. The sections of communications between the riser and the first shut-off valve (in its absence, the first mixer) are also considered such property.
The water pressure in the riser is controlled by taps, which also need to be replaced along with the water supply.
The homeowner also pays for the replacement of the riser in the event of a major renovation in his apartment, during which it is planned to lay hidden pipes or move the entire riser to another location. Everything that is located after the shut-off valve is replaced by the landlord at his own expense.
But any redevelopment work affecting common property must be agreed upon with the management company or the HOA. You can begin repairs with the involvement of specialist plumbers only if you have a document allowing you to carry out the relevant operations.
At the point where the apartment wiring is connected to the riser, a 32/20/32 tee is mounted, treated at the end with liquid soap for easier installation. All connected elements are then soldered to each other. If you plan to install a heated towel rail in the bathroom, you need to provide 2 more tees. In this case, soldering is most preferable rather than a coupling connection.
After installing the shut-off valve, check the system for leaks. If these are not available, the entire assembled structure is attached to the wall using clips, the position of which must be marked on the wall in advance. Fastening elements should be placed every 100-150 cm.
The system can be filled with water at least an hour after the last connection is made. To ensure the required moisture resistance and sound insulation, the openings in the floors through which the pipes pass are concreted throughout the entire thickness of the floors. This and other finishing procedures can be performed only after testing the structures.
Sequence of work
Some may think that dismantling old communications can be done quickly and without problems. However, it is necessary to take into account that the riser passes through several apartments, which means that if it breaks, many people will suffer. Dismantling is a plumbing job of increased complexity. Some experience working with tools and equipment and compliance with safety precautions are required. Therefore, such responsible work must be entrusted to qualified specialists.
To completely eliminate possible emergency situations, it is necessary to perform the following manipulations:
- turning off the water flowing through the riser;
- disconnecting the hose that goes directly to the toilet;
- dismantling the toilet, for which you unscrew the mounting bolts;
- all unnecessary materials, equipment, household appliances and plumbing fixtures are removed from the room so that there are no unnecessary obstacles to dismantling;
- pipes located a little further from the riser are dismantled with a hammer;
- get rid of structures leading to the riser;
- A special cuff is installed on the socket of the tee, for which the old lubricants are removed in advance. If this is not done, then it is impossible to talk about high-quality installation of the new system.
Errors and problems when replacing water supply in an apartment
Most problems arise as a result of improper installation of the plumbing system:
- Erroneous calculations. When calculating the length of a pipe, sections of it hidden by fittings (up to 15-20 mm on each side) are mistakenly not taken into account.
- Poor quality welded joints. Leaks may form in defective seams. To eliminate this problem, a new weld is formed over the old one. Sometimes it becomes necessary to completely digest a compound. If you do not fix the leak, it will only increase in the future.
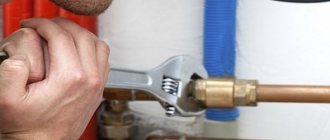
- Leaky threaded connections. In some cases, it is enough to slightly tighten the screwed part. If this does not help, a complete disassembly of the assembly will be required to check the quality of the threads. If there is damage to the threaded threads, the defective part should be replaced. If the thread is not damaged, more skeins of flax or the application of sealant may be necessary. After this, the connection is tightened again.
- Incorrectly soldered polypropylene. Poor quality soldering of plastic and, as a result, reduced strength of the pipe can lead to destruction of the connection when water is supplied. The recommendations and requirements of plastic pipe manufacturers and soldering device manufacturers must be observed. In particular, there are standards for soldering temperature and edge penetration depth.
- Unreliable plumbing was chosen. The desire to save on plumbing equipment can ultimately result in operational problems, failure, broken fittings and subsequent flooding of the apartment or house. It is advisable to purchase products only from trusted manufacturers from Russia, Belarus and European countries.
- Failure to comply with the requirements for the slope of the sewer network. If the required slope is not maintained (for a pipe with a diameter of 50 mm it is 3 centimeters per meter), drainage into the sewer will be difficult. The owner of the apartment will constantly struggle with blockages. This problem can be eliminated only by completely reworking the connecting section with the riser.
- The characteristics of the materials used for water pipes are not taken into account. Pipelines have different linear expansions, can behave differently under temperature changes, and also react to water hammer depending on the material of the pipe.
- The wiring was installed incorrectly. Often, mistakes are made due to the lack of experience of the contractor, who is usually the apartment owner himself. Each riser is necessarily equipped with a ball valve that shuts off the water, as well as inputs for connecting water consumption meters. Before shutting down the system, it is important to check it.
When working near meters, junction boxes, lighting lamps and other stationary electrical appliances, you should be extremely careful. Leaks with water entering exposed areas of wires must be excluded.
Independent replacement of water pipes in an apartment is recommended only for people who have experience in performing such work. Without the appropriate skills, achieving acceptable quality will be difficult. As a result, poor-quality work can threaten to flood not only your own apartment, but also the homes of neighbors below, and therefore entail significant costs for apartment repairs and re-installation of the water supply system.
Pipeline installation
So, now we're doing the plumbing. The assembly of pipes has already been described, but the installation of the entire system also has features of a non-construction nature, such as gating walls, installing channels in the screed. The latter should extend no further than 150 mm from the wall and no closer than 200 mm to the furniture. Plumbing fixtures, of course, are removed before pipe laying begins.
First of all, you need to install arcs - plastic strips with MPB angles under the mixers. They are attached to the main wall with self-tapping screws and dowels. When fastening, you need to take into account the thickness of the finish: plaster and tile or other decorative coating.
Without extensive construction experience, it is very difficult to achieve the location of the outlet pipes flush with the wall. It is better to make them in advance PROTECTING above the finished wall by half the width of the side of the decorative faucet caps: if the caps are non-adjustable, they can be easily adjusted using an emery wheel or manually on an emery block.
The next point is the assembly of pipeline sections. The most convenient way is to assemble them on a table and place them entirely in grooves. But then the question arises: how to install pipes through the walls? There are no problems with metal-plastic, it is all made of detachable fittings, and for soldered pipes two methods can be proposed:
- Using MRN/MRV adapters and metal-plastic inserts. In an apartment this is quite reliable, and in the corners above the grooves you can make removable hatches for inspection and repair of threaded connections.
- Install pipelines locally. For this you need a compact soldering iron. This one is more expensive, and you need to work with cotton gloves so as not to accidentally get burned.
Next, pipe cutting. You can’t saw, especially metal-plastic, you won’t get reliable connections. You need to cut it with a pipe cutter, and the pipe cutters for metal-plastic and just plastic are completely different.
The fourth point is soldering. One soldering requires 15 mm of pipe. That is, if there is exactly 1 m between two fittings, you need to cut 1030 mm; if 0.6 m - 630 mm, etc.
The fifth point is bending metal-plastic pipes. The minimum permissible bending radius is 5 outer diameters of the pipe. You can come across recommendations: they say, put a spring in there, fill it with sand, and you can bend it at an angle, and pull out the spring and pick out the sand with a wire hook. In no case: the coating of the pipe deteriorates, the residual stresses in it far exceed the permissible ones, and the metal-plastic pipe acquires the properties of a very poor, rusted steel pipe.
And finally, installing the boiler. This is a separate production cycle, and it is done after the water supply system is put into operation. The pipes for the boiler are made in advance, but the valves on them (they are definitely needed on both) are closed immediately after installing the pipes, and the pipes are additionally plugged.