Pros and cons of a greenhouse made from a profile pipe
A distinctive feature of a profile steel pipe is its square, rectangular or oval cross-section. Due to this shape, bending strength increases. Square and rectangular profiles are more suitable for greenhouses. It is difficult to bend them into arches without a special machine, but the frame is strong. Due to the stiffening ribs, the thickness of the metal walls is reduced. This is another plus of the material. The strength of the structure made from profile elements remains unchanged, and the total weight is reduced. There is no need to create a reinforced foundation for the metal frame.
If you weld a greenhouse from a profile pipe with your own hands, the design is much cheaper than the factory equivalent. The aesthetic part does not suffer. Caracas looks neat. Due to the rectangular cross-section, the joining of elements is improved. The flat walls of the profile fit tightly against each other, which simplifies the process of welding or bolting.
Advice! The profiled steel pipe allows you to create collapsible greenhouse frames, where individual elements are connected with bolts. If necessary, this structure can be easily disassembled and moved to another place.
The profile is produced in a standard version and with an anti-corrosion galvanized coating. The second option is best suited for greenhouses. In damp microclimates, the protective layer will prevent the development of rust. This frame does not need to be painted. Only the joints will have to be processed. The galvanized layer burns out from welding, and these areas must be painted over. A stainless steel profile is less common. This is an ideal material for a greenhouse, only expensive.
A significant disadvantage is the manufacture of arcs for greenhouses from a profile pipe if an arched design option is chosen for construction. You will need to look for a workshop where there is a pipe bender or try to do it yourself, resorting to traditional methods. The low weight of the profile frame is a positive and at the same time negative feature. If the greenhouse is large, it has a large windage area. To prevent it from being overturned by the wind, it is necessary to build a reliable foundation and secure the frame to it.
Building a greenhouse
Ready frame
Greenhouses made from plasterboard profiles are constructed in several stages:
- pouring the foundation;
- installation of profiles;
- frame covering.
You need to start building a metal frame after the concrete foundation poured earlier has completely dried. One person can easily handle this task with his own hands. The frame is assembled as follows:
- cut metal profiles to the required length;
- then we cut the polycarbonate into the required pieces, guided by the design drawing;
- we assemble the frame in parts, connecting the profiles together using screws and self-tapping screws;
- We install hinges in the frame at the location of the doorway and assemble the door.
Then we cover the structure with polycarbonate sheets. By following these instructions, the greenhouse will be durable and of high quality, and you will get the job done as quickly as possible.
Selection of profile pipe
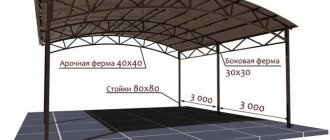
The cost of the profile is determined by the cross-section, wall thickness, steel quality, and the presence of an anti-corrosion layer. To purchase material for the entire frame, you will need to shell out an impressive amount. Here you need to carefully calculate everything. The main elements of the frame (pillars, roof, trim) are created from a reinforced profile with side wall dimensions of 40x20 or 40x40 mm. Pipes are taken with a wall thickness of at least 2 mm. The elements of the horizontal screed bear less load. Pipes are taken with a cross-section of 20x20 mm with a wall thickness of 1 to 1.5 mm.
The profile goes on sale in a standard length of 6 m. In order to have fewer welding joints, the dimensions of the frame are initially correctly calculated. The material is expensive. Greenhouses are assembled from a 40x20, 20x20 mm profile pipe so that less scraps remain.
How many meters of professional pipe are needed for a 6-meter greenhouse?
When calculating the amount of profile for the construction of an arched greenhouse, you need to take into account that the arches are installed in increments of 1 meter. Thus, you will need:
- For the base of the frame: 3+3+6+6 =18 m.
- Vertical parts of the walls (0.75 m) taking into account the depth (0.25 m) into the foundation structure: (0.75+0.25) * 14 pcs. = 14 m.
- Arc-shaped wall elements. The circumference is determined by the formula c = 2πr. The radius of the circle is equal to the difference between the height of the greenhouse (2.1 m) and the straight section of the walls (0.75 m). The length of the arc-shaped elements from the profile pipe will be half the circumference. The total number of profiles for the manufacture of all arcs will be: (2.1-0.75) * 3.14 * 7 pcs. = 29.67 m.
- Horizontal guides: 6*4 pcs. + 2.8*2 pcs. = 29.6 m.
- Spacers: 1.5*4 pcs. = 6 m.
- Doors at two ends: (0.95*2+2*2)*2*2 = 23.6 m.
Total for assembling the frame with your own hands, the total length of the rolled profile is 18 + 14 + 29.67 + 29.6 + 6 + 23.6 = 120.87 m. Considering that the length of the rolled product is 6.05 m, you should buy at least 20 whips.
Types of greenhouse structures made from profile pipes
The profile allows you to create a greenhouse frame of any existing shape. However, due to the complexity of bending, construction of structures with even planes is most often practiced. Greenhouses in the form of a house or an extension to a building are considered popular. If creating arches is not a difficulty for the owner, then you can build an arched greenhouse.
Arched greenhouse made of profiled pipe
The advantage of a greenhouse with an arched roof is good streamlining. Precipitation does not linger on the semicircular slopes, and windage decreases. Greenhouses are often used for the cultivation of low-growing crops. Rounded roof elements steal free space and do not allow tall plants to be planted close to the walls of the greenhouse.
Gable greenhouse made of profiled pipe
A greenhouse in the shape of a house with a gable roof is considered the best option. Firstly, the profile blanks do not have to be bent. Secondly, a maximum of free space is created inside the greenhouse. You can grow plants of any height, install shelving, create tiers, and arrange vertical beds.
Lean-to greenhouse made of profiled pipe
In general terms, the structure is half a house with a gable roof. The greenhouse is attached to the wall of the building on the south side. The roof is made with one slope. An additional advantage is the receipt of heat from the wall of a heated building. Plants often do not need heating. However, dampness causes the façade to disappear faster. Fungus appears on the wall.
Back and front walls of the greenhouse
Let’s look at the option with a gable roof, since traditional dome structures are much more difficult to assemble, especially if a galvanized “omega” profile is used in the construction of the greenhouse, which is difficult to bend and will constantly break.
In order for the greenhouse structure to be level, you will need an area with a flat surface. If the back or front wall is assembled with a “screw,” it will be very difficult to straighten it later, and the polycarbonate will lie crooked.
So, we lay out a square or rectangle of profiles on the ground, where the lower and upper parts are the width of the future greenhouse, and the right and left parts are the height.
Important! Before attaching the profiles to each other, be sure to measure the size diagonally from one corner to the opposite.
The two dimensions between the corners must be completely identical or differ by no more than 5 mm. Thus, the result is a square, not a rhombus.
The profiles are inserted into each other and secured with self-tapping screws with pressure caps. Since galvanization is very soft, it does not need to be drilled; the self-tapping screw will make a hole for itself and reliably fasten the two segments together. At least two fasteners are placed at each corner, otherwise the structure will wobble and break.
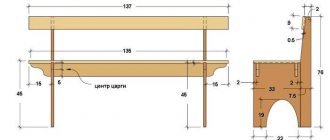
As soon as the square is assembled, we find the middle of the upper segment and draw a perpendicular line upward from it. This will mark the ridge of the greenhouse roof. Using a tape measure, measure the size from the corner to the ridge and multiply it by two - this is the size of the profile that needs to be cut and cut the walls exactly in the middle. Thus, the profile is bent at the required angle and forms a gable roof.
We attach the roof to the square and get a finished rear wall, which remains to be further reinforced with stiffening ribs. They can stand either crosswise or diagonally. This significantly strengthens the structure and will not allow it to bend under the weight of snow and even a person.
The front wall is assembled in exactly the same way, with the only difference being that it is necessary to assemble the doorway and, accordingly, the door itself.
Advice! It is better to assemble the door frame along the opening. This will help avoid possible distortions and errors in dimensions.
Construction site
Plants growing in a greenhouse must receive heat and light. The correct location of the greenhouse on the site increases energy efficiency. The owner incurs fewer costs for heating and artificial lighting. A prefabricated greenhouse made from a profile pipe is installed with your own hands on an area that best meets the basic requirements:
- The greenhouse is located in a place slightly blown by winds. During winter use, heat loss will be reduced.
- The greenhouse body should be illuminated by the sun as much as possible during daylight hours. The air will warm up naturally, and heating costs will decrease. Sunlight benefits many plants. For shade-loving crops, shade with polycarbonate is used.
- To ensure the stability of the greenhouse, choose a flat area. The best place is considered to be flat or elevated. It is undesirable to install profile structures in lowlands due to flooding with rain and melt water.
- You will need to install plumbing and electricity inside the greenhouse. The profile structure is installed closer to the location of communications.
There is a free access of at least 1 m to the greenhouse walls on all sides for maintenance.
Polycarbonate sheathing
Covering the frame with polycarbonate begins with attaching the lock to the profile at the joints of the sheets. The lock is simply screwed on with self-tapping screws and rubber gaskets.
It is optimal to start laying polycarbonate from the roof. The sheets are inserted into the grooves of the lock and screwed to the profile with self-tapping screws and plastic washers.
All polycarbonate sheets must be evenly pressed against the frame with self-tapping screws. It is important not to overdo it so that the sheet does not crack.
After fixing all the sheets, all that remains is to snap the top cover of the lock and remove the protective film from the polycarbonate.
The video shows the production of a greenhouse frame from a profile:
The greenhouse is completely ready, all that remains is to do the interior arrangement and you can grow your favorite crops.
It is now becoming popular to make greenhouses from plasterboard profiles with a removable roof. This approach can increase the life of the greenhouse by many years. Depending on the size of the future greenhouse, other profiles can be used. When choosing, the main thing is to pay attention to the quality of the material - when bent, a good profile will not bend, but will return to its original form. Assembling a greenhouse frame from pipes
- A rectangle of the required size is made. The slats are attached to the corners using iron inserts;
It should be understood that in winter, plants need light. You should take care not only of heating and water, but also of lighting. Fluorescent lamps are best suited for this.
They are energy efficient while still providing enough light for plants to photosynthesize.
How to build a greenhouse step by step from a profile pipe
The construction of a profile greenhouse structure involves observing the order of execution of a certain algorithm of actions. Before starting work, it wouldn’t hurt to watch a brief overview of the construction process on video:
Foundation for a greenhouse from a profile pipe
The type of base is chosen at the stage when the greenhouse project is being developed in drawings from a profile pipe, and the cladding is determined. Polycarbonate is lightweight. The design does not require a reinforced foundation. If glass is chosen for cladding, the weight of the greenhouse will increase. A solid foundation will be required.
The type of foundation is selected taking into account the characteristics of the soil and the level of groundwater. Typically, a pile, column or strip base is used for greenhouses. For most regions, concrete strip is considered the best choice.
To fill the foundation, markings are applied to the area. Dig a trench 80 cm deep. The bottom is covered with a layer of sand and crushed stone approximately 20 cm thick. The walls of the trench are covered with roofing felt. Formwork boards are installed on the surface. Inside the trench, a reinforcing frame is installed from reinforcement, shaped like a box. Anchor pins are welded to the rods. Their threaded part should protrude from the concrete strip in height. The lower trim of the profile frame will be attached to the anchors.
Concrete pouring is carried out in one day. The tape is made so that it protrudes 20 cm from the ground. The foundation is left to gain strength for a month. The surface is periodically wetted with a watering can and covered with film.
Assembling a greenhouse frame from a profile pipe
When the base gains strength, begin assembling the profile frame. The surface of the concrete tape for waterproofing is covered with roofing felt. A 40x20 mm bottom pipe is laid around the perimeter of the foundation. A frame is welded from the profile and fixed to the anchors protruding from the base.
Further construction of a greenhouse with your own hands from a profile pipe involves the installation of vertical frame frames. The end elements are installed first. On the frames, a doorway 70 cm wide and a large opening for a window 80 cm wide are formed directly from the pipe. Intermediate profile frames are spaced at 1 m intervals. The elements are welded with racks to the bottom trim made from a profile steel pipe. The frames are welded together with horizontal jumpers made of 20x20 mm pipe. The elements will provide stability to the profile frame. The jumpers are welded flush to the frame elements to avoid protrusions.
Advice! When constructing a profile arched frame, the first lintel is attached below 10 cm from the bend of the arc. Polycarbonate will be fixed to the pipe.
Wall and roof cladding
The cladding method depends on the chosen material. Glass is expensive, fragile and heavy. The film is short-lived. A greenhouse made of polycarbonate and a profile pipe is considered popular today in terms of price and quality. Transparent sheets bend well. The sheathing material is fixed with self-tapping screws and sealing washers. Holes in polycarbonate and pipe are pre-drilled. At the joints, the sheets are connected with a special connecting profile. The ends of the polycarbonate are covered with plugs to prevent dust from entering.
Installation of doors and windows
The door leaves are welded from a 40x20 mm pipe. For vents, a profile of 20x20 mm is sufficient. The sashes are hung on the elements of the profile frame with hinges. The cladding is carried out with the same material that was used for the greenhouse.
Getting ready for construction
At this stage, it is necessary to carry out the following preparatory actions:
- choose a location for future construction;
- the surface for construction work must be leveled and cleaned of dirt and any type of debris (plant or construction).
Cleared area
Also at this stage, it is necessary to treat the profile with a special anti-corrosion agent, since the frame will be used outdoors, where the climate is not constant and sudden changes in temperature and humidity are possible. After finishing cleaning the area, the foundation should be laid and poured. With it, your structure will withstand any gusts of wind and will last for a very long time.
Note! If the greenhouse will be used for a long period, then a shallow strip foundation should be made.
You need to fill the foundation with your own hands as follows:
- We mark the perimeter of the structure on the ground using threads and pegs;
- we dig a trench 50-60 cm deep and 25 cm wide;
Trench for the foundation
- We make a drainage pad at the bottom of the trench. It consists of sand and crushed stone (proportion 1:1);
- we make a concrete solution from sand, cement and crushed stone (proportion 5:1:3);
- We create wooden formwork from boards and pegs. We fasten all the elements together with wire;
- Next, pour concrete into the formwork.
Note! After pouring, the strip foundation must stand for one month so that the concrete can completely harden and become durable.
The formwork is removed a week after the foundation is poured. As a result, we will get a concrete strip on the ground around the entire perimeter of the greenhouse. After this, we begin the construction itself.
How to bend profile pipes for an arched greenhouse
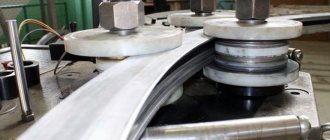
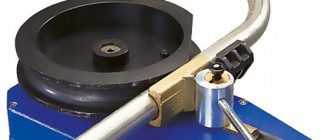
The profile has one drawback. It is difficult to bend the pipe into an arc for an arched greenhouse. Stiffening ribs prevent uniform bending. It would be nice to bend a profile pipe for a greenhouse yourself using a pipe bender, but there is no point in buying an expensive machine for one day of work. It is better to order ready-made profile arches in the workshop. If this is not possible, they try to bend the pipe, resorting to folk tricks.
Using sand
The profile bending method is considered simple and effective. First, prepare the sand. It is sifted from large stones and spread out in the sun to dry. If the weather is cloudy, sand is spread in a thin layer on the tin. A fire is lit under the sheet metal. After calcination, the sand is allowed to cool.
Wooden plugs are cut into the ends of the profile. They should fit tightly with a hammer. One plug is installed at once. Dry sand is poured inside the pipe. The second end of the profile element is similarly closed with a plug. Place the pipe between strong supports and try to bend it with gentle pressure. The sand inside the profile will create pressure that prevents the square walls from deforming. When the profile arch is ready, the plugs are removed. Sand is poured out of the workpiece.
Using water (winter method)
The traditional method has many disadvantages. Firstly, you can only use it in winter, when there is severe frost outside. Secondly, if the technology is violated, frozen water can tear the walls of the profile during expansion.
To bend the profile blank, you will need plugs in the same way. The plugs are made so tight that they prevent water from flowing out. The plug is driven in with a hammer from one end of the profile. Water is poured inside the pipe and closed with a second plug. The profile blank is left in the cold. When the water turns into ice, the metal element begins to bend. The result is similar to sand.
When the profile arch is ready, the plugs are removed. The profile is heated over a fire until the ice is completely melted.
Grinder cuts
The bending method with notches is considered the most difficult, but guarantees a 100% positive result. The profile is clamped in a vice. Markings are applied in the form of wedges at equal distances. According to the markings, cuts are made with a grinder, but not through. Only wedges are cut. The opposite flange of the profile remains untouched. After cutting, the pipe is bent into an arc. If the radius is large, cut out several more wedges. The procedure is continued until the arch bends to the desired radius. The cut areas are welded.
Greenhouse Made of Plasterboard Profile: Construction Stages
- Reduce the distance between the arches. Introduce additional braces and columns that will support the roof of the greenhouse. Despite the increased costs, they will pay for themselves over time.
- Install a removable roof. But this can be done for greenhouses that are used only during the summer season. The roof is removed for the winter.
Advice: When choosing a structure of complex shape, you should take into account that its assembly requires quite a lot of experience, a lot of time and effort, which is not always worth spending. Advice: If the greenhouse is located in southern latitudes, where little snow falls in winter, it should be removed from the roof of the greenhouse every time after precipitation. Tip: When choosing any profile for a greenhouse, you should pay attention to the quality of its anti-corrosion coating, including corners and bends. The material should be free of stains, abrasions, foreign inclusions and other defects. This can significantly reduce the life of the frame due to the gradual destruction of parts that have traces of corrosion.
Instead of ceiling profiles, you can use wall profiles: PN and PS, which are also selected to size and mounted in pairs. To give the elements the desired shape, the profile ribs are cut with metal scissors. Step 1. Measure and cut the base profile, drill holes for fastening to the foundation. Leave “petals” from the edges to connect the side walls of the greenhouse with the gables. The last stage of building a greenhouse from a metal profile is the cladding.
The most commonly used sheets of cellular polycarbonate are 4 mm thick. Here are step-by-step instructions for working with them.
Photos of greenhouses made from profile pipes
Greenhouse made from a plasterboard profile: 5 stages of construction
A drawing of a greenhouse made from a plasterboard profile with empty brackets in which you should indicate the dimensions suitable for your project. In order for a greenhouse made from a profile to serve you for a long time, it should be installed on a foundation. Otherwise, the metal, due to direct contact with the ground, will be susceptible to corrosion processes, from which even a galvanized coating cannot completely protect it. At this stage, it is better to get an assistant, since it is very inconvenient for one person to attach both the polycarbonate and the film. You might even ruin the material.
Try to screw the self-tapping screws not in the center of the profile, but closer to the corner where there is a stiffener. In this case, the connections will be much more reliable. The price of the film is, of course, lower, but if you want to grow vegetables all year round, then it is better to go with polycarbonate. It is more resistant to mechanical and atmospheric influences.
Types of profiles
Galvanized profile has the following qualities:
- strength;
- rigidity;
- ease.
The metal profile is divided into: racks (CD, CW) and guides (UD, UW). The thickness of the profile ranges from 0.4 to 0.6 mm; in construction it is used when installing drywall.
Differences:
- Profile posts can withstand significant loads, so they have stiffening ribs, longitudinal corrugations and C-shaped edges.
- Profile guides are used in the form of horizontal fasteners of the structure. The horizontal guides are connected to the posts with self-tapping screws.
- Profile galvanization has differences in cross-section. The guides used for the ceiling have dimensions of 28x27 mm, the size of the racks is 60x27 mm.
- Arched (shaped) profile CD, UD, UW - used for making arched doorways, any complex curved structures, as well as arched stairs and greenhouses.
Did you know? A greenhouse cannot be a transparent, sealed bubble in which plants grow. The design must provide at least two (or more) ventilation openings located on walls opposite from each other. The most optimal location of the vents for ventilation is under the ceiling: this is where the hottest air masses collect.
Do-it-yourself greenhouse made of galvanized profile - step-by-step instructions
We discussed the process of building a gable greenhouse from a galvanized profile in previous sections. However, this option can also be used for the construction of arched buildings, but for this you need to use a special V-shaped profile (Figure 5).
Step-by-step instructions for construction look like this:
- Cut the profile into several separate pieces that will make up the arch. The optimal number of such blanks is 5 pieces per arch. To give them a rounded shape, use a pipe bender. As a result, you should end up with several blanks with different bend angles: one with the maximum (will be located at the top of the arch), two with a smaller angle (located on both sides of the central part of the top) and two more - almost even, since they will be attached to the foundation.
- In each part you need to drill several holes on both sides, and use them to fasten the arch parts with screws or bolts. To strengthen the structure, it is necessary to additionally attach jibs and crossbars to its internal part.
- Vertical posts, oblique cross members and a door frame are mounted on the pediment using corners and triangle plates. You also need to attach corners to fix the horizontal ties of the structure.
- The side and top horizontal ties should be secured to the pediment, and intermediate arches should be attached to the ties. These steps should be repeated until the full length of the greenhouse frame is complete.
- On the rear side, another pediment is installed (without a door frame) and the finished frame is secured to the foundation.
At the final stage, you need to check the strength of all fasteners and the symmetry of the structure. After this, you can begin covering the greenhouse with film or polycarbonate.
The process of assembling a greenhouse from a galvanized profile is shown in more detail in the video.
Profile selection
The consumer chooses a metal profile based on the purpose of application. The thicker the metal profile, the greater the load it can carry. If it is intended to be used in the construction of a greenhouse, the thickness of the metal profile plays a very important role, because being in a warm and humid environment, a thick metal sheet will be able to resist rust for longer.
For ceilings and walls
The wall profile posts have the following dimensions: 100×50 mm, 75×50 mm, 65×50 mm, 50×50 mm. Dimensions of wall profile guides: 100×40 mm, 75×40 mm, 65×40 mm, 50×40 mm. To attach plasterboard sheets to the wall, CD and UD galvanized profiles are used. CD is used as a stand profile and goes from below to the ceiling, UD is used as a guide profile and goes along the floor and ceiling.
Septal
For partitions, a U-shaped profile is used; it is commercially available in the following sizes: PN-50 (50×40 mm), PN-65 (65×40 mm), PN-75 (75×45 mm) and PN-100 (100x40 mm). The guide profiles have special holes with a diameter of 8 mm for dowels. It must be remembered that the guides can also be marked with the letters UW, for example, UW-50 is identical to the markings PN-50. In addition to longitudinal guides, rack profiles in the shape of the letter C are also used to create partitions. Rack profiles for partitions are available in the following sizes: PS-50 (50×50 mm), PS-65 (65×50 mm), PS-75 ( 75×50 mm), PS-100 (100×50 mm). The transverse dimension of the backrest of the guides and rack profiles is the same, since they are connected to each other.
Did you know? To grow cucumbers in a greenhouse, the presence of carbon dioxide in the air is important. In small home greenhouses, carbon dioxide can be provided to cucumbers by installing a 20-liter container with fermenting mullein solution in the greenhouse.
We build a greenhouse from a plasterboard profile
Based on the drawing, the necessary building materials are already purchased. It is better to take them with a small margin, since no one is immune from mistakes. It is also necessary to take into account that the material will expand under the influence of temperature.
This means that when fastening it is necessary to leave a small gap at the top.
- You should start by assembling the end on the ground.
- The profile is fastened with self-tapping screws. For greater strength, it is recommended to bend the connections inward.
- When the end is assembled, the door is attached to the hinges. The second end is mounted in the same way.
- You can proceed to the base of the greenhouse. Already on it, if the structure is arched, arcs are attached. Once the greenhouse frame is assembled, it's time to install polycarbonate on it.
The carbonate must be attached to the greenhouse with an overlap. Install with the front side facing outward, since it is on this side that a layer protecting against ultraviolet radiation is applied. Attention! It is better to seal all joints with double-sided tape, because drafts are contraindicated for any plants. If you have planned two windows on opposite walls, then it makes sense to make them at different levels. This way the greenhouse will be ventilated by replacing air masses.
They say that a greenhouse made of metal profiles can be installed in 1 day. Foundation work, of course, lengthens the process, but the reliability of the greenhouse increases. A shallow strip foundation is suitable for the greenhouse. To do this you need: