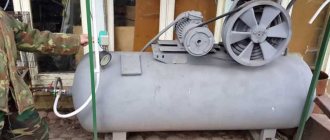
A plow for a walk-behind tractor is an attachment designed for cultivating any type of soil, including dense and viscous soil. The use of such equipment allows farmers to reduce the cost of physical energy and reduce the time required to complete agricultural work. You can make such a device yourself. It is cheaper than buying a ready-made factory product. Equipment of our own design can be installed on any units, including motor cultivators with reversible drive.
Kinds
Before choosing a plow for a walk-behind tractor of the desired design, you should study the existing types of such devices. Depending on the nature of agricultural work, the following are used:
- single-hull,
- double-hulled;
- rotary;
- rotary;
- dump;
- dump-free units.
You can independently make a universal plow for a motor cultivator, which is suitable for most types of soil. The optimal option for plowing a personal plot and for use by people who do not have the appropriate skills is a lightweight single-hull design.
Single-body and double-body models
A single-furrow plow is used for plowing soft soil. It is equipped with one plowshare. Such agricultural implements are easy to assemble and use, have a relatively low weight and a small number of structural elements. It can significantly facilitate the process of harrowing on a small plot of land.
The double-furrow plow model is intended for cultivating any type of soil that does not contain stone inclusions. This arable device is suitable for cutting even furrows, hilling crops, and destroying weeds. It is recommended to install on walk-behind tractors with power up to 3.5 hp. You can make a double-furrow plow with a fixed or adjustable working width.
Negotiable
This type of unit is intended for plowing difficult-to-cultivate soils. The required engine power of the cultivator depends on the dimensions and weight of the ploughshare. Making a reversible plow with your own hands is somewhat more difficult than a single-body model. It is distinguished by the presence of a working element (feather) curved at a precisely adjusted angle in the upper segment of the structure. This allows you to turn over the soil layer immediately when lifting. The reversible model is the optimal choice for plowing hard soil.
Rotary
The rotary design is intended for performing complex agricultural work on large, difficult-to-cultivate soils. For self-production, this is the most labor-intensive option. In its design it is similar to a motor cultivator. This model is equipped with several shares mounted on one axis. The advantage of a rotary plow is the ability to cultivate hard soil up to a cutting depth of 0.3 m without applying much physical effort. It allows you to plow the soil simultaneously along different trajectories due to the movable design of the plowshares.
Dumpboard and non-dumpboard
The plow for a motor cultivator can be moldboard or non-mouldboard. Models of the first type are in demand by summer residents and owners of small plots of land. According to the method of plowing, such devices are divided into:
- furrow;
- smoothly ploughing;
- leaving no furrows.
The latter type of equipment is used when it is necessary to process the soil into a dump. To plow the soil into a collapsed plow, a plow is used, leaving furrows. The moldboard design, which has a special angle of inclination of the plowshare, allows you to simultaneously loosen and turn over the removed layer of earth. Moldless models are most often used in arid areas with strong winds and soil erosion.
First furrow and blade angle
Once the previous steps have been completed, it is time for the final adjustment to ensure that subsequent furrow cutting runs smoothly. To do this, the walk-behind tractor is placed at the edge of the plot, the plow is driven into the ground and the first furrow is driven. It is important to maintain a straight line at this stage so that subsequent passes will also be level. A thread stretched on pegs or another guide can help here.
At this stage, it is best to check how deep the plow goes into the ground - place a ruler or tape measure in the furrow. If necessary, adjust the plowing depth.
Then, with one wheel, the walk-behind tractor is placed in the furrow and the plow is oriented so that it is perpendicular to the ground; to do this accurately, use a square. If you are not comfortable doing this in the ground, place the walk-behind tractor on a flat surface, placing a stand under one wheel that matches the depth of the furrow. After this, setting up the plow is considered complete and you can proceed to the second and third furrow.
Advantages of homemade plows
A plow with a skimmer for a walk-behind tractor can be combined with a device of the required power, ensuring full structural and technical compatibility.
Advantages of homemade equipment:
- accuracy of calculations with determination of the optimal angle of inclination;
- obvious economic benefits, since making a unit with your own hands is cheaper than buying a factory model;
- confidence in the quality of materials and workmanship.
The productivity of field work will be ensured by a disc plow. It copes well with processing heavy soils with a high concentration of weeds.
Drawing of plow parts for walk-behind tractor
You can draw up a layout diagram of functional and structural elements and a detailed drawing of the plow yourself. Maximum accuracy will allow you to avoid difficulties during assembly and the negative impact of errors on the performance characteristics of the finished unit. It is necessary to strictly adhere to the dimensional parameters of the parts. Even minor inaccuracies can have a significant impact on equipment performance. The drawings with the dimensions of the attachment for the walk-behind tractor include three structural surfaces:
- The plane of the slide is lateral.
- Bottom horizontal.
- Front dump.
A typical diagram of a simple homemade plow consists of:
- Two handles made of steel pipe.
- Frames.
- Stand clamp with screw size M10 or M8.
- Mounting fork for frame hinge.
- Drawbar.
- Bearing.
- Jumpers between handles.
- Joint shaft.
- Locknuts.
- Adjusting washer.
- Drawbar handles.
- Tee.
Depending on the type and purpose of the inventory, this list may include other elements.
Homemade single-furrow plow
The single-hull model should be equipped with an adjustable stand, which will allow this simple homemade plow to be successfully adapted to a motor cultivator and the existing field work conditions. High-quality cleaning of welds, careful grinding and painting of the structure will not only give an aesthetic appearance to the product, but will also ensure its durability. The plow stand is made of a steel plate about 10 mm thick. After manufacturing, it is advisable to harden it.
ploughshare
To make a ploughshare, you will need sheet steel 2-3 mm thick. You can use a circular disk. It is made of high-strength alloy steel 9ХС, designed to work under large radial loads. The cutting edges of the ploughshare are sharpened at an angle of 45°. You can also make self-sharpening double-layer blades from a special steel alloy. This is a more expensive option. In addition, they still require periodic manual sharpening.
The well-optimized working surface of the ploughshare plows the soil easily, without unpleasant jerks and does not cause operator fatigue.
Sharpening is best done on an anvil with preliminary heat treatment of the metal, which will provide an HRC hardness of about 55 units. It is advisable to make the ploughshare removable. This will facilitate the process of periodic sharpening and will allow you to adapt arable equipment to different types of soil.
Blade
This structural element can be made in different ways. You should choose the one that is least expensive in terms of effort and materials. A durable steel pipe is used to make the plow blade. Its diameter should be at least 30 cm, and the wall thickness should be 40-50 mm. The pipe is placed on a flat surface and a piece of the required size is cut out of it. It is recommended to first make a cardboard template, which will help to avoid errors in dimensions and maintain the desired shape of the dump. Cutting is best done using a welding machine.
The working element obtained as a result of these manipulations is carefully processed with emery or a grinder. It is important to ensure optimal bending. For this you will need sheet bending rollers. The workpiece is fed into them at an angle of 20-23°. After completing the bending procedure, you can correct the shape using a hammer. The most labor-intensive and technologically complex way to obtain the desired part is to use a forge for heating and a matrix, which can be the moldboard of another plow.
Drawings of a plow for a walk-behind tractor
Using the experience of craftsmen who made a plow for a walk-behind tractor with their own hands and left drawings, the ploughshare should be made in such a way that it can be removed, this will make it easier to sharpen it before plowing.
Alloy steel 9ХС, from which I make blades for hand saws, is considered an ideal material for the cutting part of a plow.
Suitable steel grade 45, when hardened, brought to a hardness of HRC 50-55. If you only have ordinary steel on hand, say carbon St5ps, which is not subject to heat treatment, then by beating the cutting edge on an anvil and sharpening it, it is quite suitable for cultivating the soil.
Plow blade for walk-behind tractor
The moldboard of the plow is the part that takes the earth to the side.
The first method of making a blade:
The working surface of the blade must be given a curved shape. If you have a metal bending machine or sheet bending rollers, then giving the workpiece the desired shape will not be difficult.
A metal blank with a thickness of 3-5 mm is required, the rollers are directed at an angle of 20-22 degrees, as shown in the drawing, and the desired bend is given.
Second way:
Here, prepared. A pipe with a diameter of 600-650 mm can serve (this is the diameter that will require less labor, since the bend of the pipe will maximally repeat the desired bend of the future dump) and a thickness of 3-5 mm. We make a template from cardboard and apply it to the pipe, not forgetting the angle of 20-22 degrees, as shown in the drawing below.
We outline the template with a pencil or chalk and cut it out using gas. welding, if necessary, grind the workpiece and bring it to the desired condition.
Third way:
Probably the most difficult method of making a moldboard is when the workpiece is heated and, using a matrix, given the desired shape, which can be a moldboard from another plow.
The material of the plow body is steel sheet grade St3 - St10 with a thickness of 3 mm.
Drawing of plow parts for walk-behind tractor
a — ploughshare made of alloy steel;
b — side shield of the rack, St3;
c — spacer plate, St3;
g — plow base plate, St3;
d - field board, corner 30x30 mm;
e - stand, pipe with a diameter of 42 mm
We advise you to first make the plow parts from cardboard and attach them to each other at the required angles. Thus, the values of the angle α on different parts of the plow body will be from 25° to 130°, the values of the angle γ - from 42° to 50°. If the homemade model of a cardboard plow suits you in all respects, you can move on to working with metal.
When the metal parts of the plow are ready, you need to find an additional sheet of steel 3 mm thick, 600x600 mm in size, it will be needed to assemble the plow, and a welding machine (preferably an inverter). On this sheet we retreat 40 mm from the edges and measure the angle γ0.
Plow assembly
1 - ploughshare;
2 — side shield of the rack;
3 - additional sheet 2-3 mm
Using wedges with an angle α0=25 degrees and an angle γ0=42 degrees, a ploughshare is installed on the additional sheet and tacked to the sheet by welding, pointwise on both sides.
The side shield of the rack is connected to the ploughshare vertically so that its edge extends beyond the ploughshare by 4-7 mm, while the raised shield should be higher than the blade of the ploughshare (that is, higher than the additional sheet) by 6-8 mm, so as not to interfere with the ploughshare, cut the ground. The shield is also attached to the ploughshare and to the additional sheet.
Next, the blade is attached to the ploughshare very tightly, without leaving a gap, so that their surfaces are one whole. The angle between the upper edge of the blade and the ploughshare blade is equal to (γmax − γ0) = 6-8°.
Mounting the plow share
- ploughshare;
— countersunk head screw M8;
- dump;
— base plate;
— corner 30x30x90 mm;
- M8 nut
If it is found that the corners and/or surfaces do not correspond, the blade is adjusted using a hammer. After fitting the blade to the ploughshare, it is welded from the back to the ploughshare and to the side shield. Then the side shield is welded to the spacer bar and the base plate; the thrust corners for the ploughshare are attached to the latter by welding.
Followed by. Inspect the finished plow again, and if everything is clearly welded completely. Add. the sheet is separated from the body with a chisel or LNA. All welds are ground.
Assembly
If everything was done correctly in the previous steps, assembly should not cause significant difficulties. To do this, you will need a sheet of steel with an area of at least 25 cm². All parts are welded to it, including the side shield.
Such work requires special care, since parts of the future agricultural implements must fit well and the angles must match. The side shield, which ensures stability and reliability of the assembly, is connected to other elements by spot welding. If a discrepancy in the geometric configuration is noticed, the shape of the blade can be easily corrected with a hammer.
Share attachment
This structural element is attached with its rear surface to the blade and the side plane of the frame. The latter, using a welding machine, is attached to the spacer element and the plate base, to which the thrust steel angles for the ploughshare are attached.
All parts of the structure should protrude a few millimeters beyond the side shield. The steel sheet used for precision assembly of the structure is separated from it with a chisel or a hand-held circular saw with a cutting disc installed. Weld seams should be sanded, and the plowshare and blade should be sanded with fine sandpaper.
Assembly of the structure
When all the metal parts of the plow for the Neva walk-behind tractor have been created, for final assembly you will need a sheet of metal measuring 50x50 cm and an electric welding machine. To the metal sheet, strictly observing the angles, you need to lightly weld the elements of the future plow - the side shield and the ploughshare, to which to fit the blade. If any inconsistencies are found, the blade should be brought to the required condition with a hammer and welded to the back of the ploughshare.
Inspect the entire structure and, if no problems are noticed, then major welding can be performed. The sheet of metal on which the plow was assembled is disconnected from the structure using a grinder or a hammer and chisel. Next, you need to thoroughly clean the welds and sand the plowshare and blade with sandpaper. After the structure is assembled and almost ready for use, it should be painted, especially the welded joints. This will not only give the plow an aesthetic appearance, but will also protect the metal from corrosion, and, consequently, significantly extend its service life.
Although independently making a high-quality plow for the Neva walk-behind tractor is not an easy task, it is quite doable and can be done by anyone with minimal experience working with plumbing tools. For everything to be successful, you should follow the instructions and drawings, and also carry out proper configuration of the entire structure. Making a plow with your own hands is not only quite interesting, but also economical, since most of the material can be found on the farm by any craftsman.
Do-it-yourself Zykov plow for a walk-behind tractor
One of the most popular single-body plowing tools is the Zykov plow. It makes it possible to effectively plow the ground, cut trenches for planting and get rid of weeds. The plow consists of the following parts: ploughshare, support part, field board, feather and stand. The tool can be with a constant working width, or with a variable one, which is achieved by installing moving wings.
To make it yourself, you first need to study the drawings with dimensions. In the diagram, Zykov’s plow is indicated in yellow.
How to make a single-body plow yourself was discussed above. The stages of manufacturing the Zykov plow are similar to this algorithm.
Do-it-yourself reversible plow for walk-behind tractor
A reversible plow turns the top layer of soil 180 degrees. This is necessary when processing hard types of soil, where conventional loosening is ineffective. A reversible or mirror plow for a walk-behind tractor consists of two single-body knives mounted on opposite ends of one stand, which has the ability to make a half-turn to turn the soil.
To make such a plow with your own hands, consider the device diagram and detailed drawings with the dimensions of all components.
- Make 2 mirror single-body plows from a piece of sheet steel 0.3-0.5 cm thick. The blade of one plow bends to the left, the second - to the right. The knives can be given a curved shape using a gas torch to heat the metal and a large hammer. It is better to make the plowshares removable using high-alloy steel.
- To allow the plow stand to rotate, a hinge joint is used. A pin or pin connection can serve as a limiting mechanism or lock for securing the device in two opposite operating positions.
Purpose of the plow
So, what is a plow used for in agriculture? This implement is designed for plowing lands of different densities in order to prepare the soil for further sowing.
The layer of soil is cut with a ploughshare and turned over from bottom to top, with the bottom layer of soil on the outside, and the top layer with weeds moving down. The soil becomes loose and soft.
We suggest you look at a schematic drawing depicting a plow for a walk-behind tractor:
As you can see, the plow is connected to the walk-behind tractor using a special coupling device (hitch), which can either come complete with the walk-behind tractor or be sold separately.
There are two types of couplings:
- universal adjustable (angle of attack, horizontal, etc.);
- unregulated.
The KaDvi plant, which produces Oka walk-behind tractors, also produces adjustable coupling devices, with the help of which various mounted and trailed equipment can be attached to a motorized unit.
The manufacturer produces screw coupling devices that allow smooth adjustment of the depth of the plow into the soil.
Do-it-yourself double-furrow plow for a walk-behind tractor
A double-body plow differs from a single-body plow in that it consists of several frames, which are equipped with appropriate tools (knives for cutting the soil), rigidly connected to each other. It is used in large areas for plowing and harrowing various types of soils and primary plowing of virgin soil.
To manufacture this design, it is necessary to make two blades from thick sheet steel and bend it. Reinforce the lower part with a metal strip, secure it with rivets or weld it, sharpen it. On the unsharpened side, weld posts about 40 cm long to the plows. In order for the elements to be adjusted in height, you must first drill holes in the posts for fastenings.
To make the body of a double-furrow plow, you need to take a rectangular pipe with a diameter of 3-5 mm. The length of the body should be about 0.5 m. To attach the frame to the walk-behind tractor, weld a flange to the workpiece. Secure two prepared single-body plows to the frame with bolts.
Features of a plow on a walk-behind tractor
When choosing a walk-behind tractor, you should take into account the area to be processed and the condition of the soil.
The following types of walk-behind construction are distinguished:
- lungs;
- average;
- heavy.
The first option is used in areas with a small area. These are small-sized devices with an engine whose power does not exceed 5 hp. An essential feature of such motor cultivators is that they cannot be used for a long time. Due to their light weight and low-power motor, they are not able to dig deeply into the ground and quickly overheat.
The second type, in most cases, has rear-wheel drive and does an excellent job in large areas. The weight of the car has been increased and they can corner easily. Engine power can reach up to 12 hp.
Heavy representatives of walk-behind tractors are equipped with a power unit with a capacity of 15-30 horsepower. You can attach any additional equipment to them (potato digger, plow, trailer). Quite powerful equipment and at the same time very inconvenient when making a turn.
In this video we will look at a plow on a walk-behind tractor:
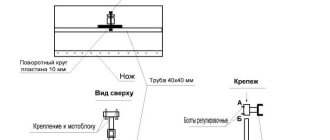
How to make a rotary plow for a walk-behind tractor
The rotary design is a manual unit on a special coupling. When making such a tool, it is important to place the blade of the ploughshare 1.5-2 cm below the horizontal surface of the skid, and its front base should fit snugly against the blade. The plow with a support wheel for the walk-behind tractor is also assembled on a sheet of steel.
After completing the welding work, the polished surfaces are thoroughly cleaned, filled with technical lubricant and rubbed with a rag. This will protect homemade agricultural implements from corrosion. The back surface of the welded share should be made as smooth as possible. The angle formed by it and the plate base of the equipment should be in the range of 18-20°, and the rear surfaces of the working edges should be 12-15°.
Plow dimensions for walk-behind tractor
A hand-made rotary-type mounted unit must be compact, relatively easy to operate, weigh little and at the same time have high productivity, the ability to cultivate large areas of land and function properly in difficult field conditions. The recommended dimensions of such equipment are:
- 570x380x250 mm (LxWxH);
- ploughshare coverage width - 205 mm;
- calculated plowing depth - up to 13 cm;
- the angle between the cutting edge of the ploughshare and the field surface is 40-45°;
- the angle between the vertical plane of the blade and the cultivated soil surface is approximately 48°.
The angle of attack of the share should be 16°. This will ensure smooth insertion of the working blade into the soil and durability of the product.
Manufacturing and fastening of working elements of the plow
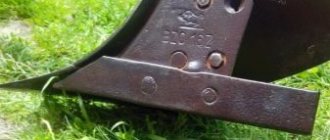
The main elements of the single-hull design are the blade and the ploughshare, the creation of which requires durable sheet steel 3-5 mm thick. First of all, a ploughshare is made, for which it is worth using an old disk from a circular saw, since it is made from high-strength steel. To sharpen the cutting edge of the ploughshare, it should be beaten on an anvil.
Next, you need to make a blade from a metal pipe with a diameter of 50-60 cm and a wall thickness of about 5 mm. A template is created from cardboard or thick paper, which is applied to the metal and traced along the entire contour with chalk. Afterwards, along the resulting lines, a workpiece is cut out using gas welding, which is brought to the required dimensions using a grinder or a hammer and emery.
Double-sided plow for walk-behind tractor
A double-sided model, called a hiller, is used to destroy weeds, cut neat furrows, plant and backfill crops, in particular potatoes. This device differs from the single-hull modification only in the grip width, which is adjusted by movable steel wings. This design includes 12 mm rack supports that protect the cultivator from overload.
Such attachments are designed to work with engines with a power rating of at least 4 hp. They are equipped with a special small skimmer, which follows the leading working part and slightly cuts the soil. This makes the further plowing process easier. Before making a plow of this type, it is necessary to draw up an appropriate drawing taking into account the features of its design.
How to make a rotary plow for a walk-behind tractor with your own hands
A rotary plow (plow) is the most complex modification of such equipment for making using the artisanal method. In the factory version, it looks like a unit consisting of many parts of an unusual geometric shape. When making such a device yourself, you first need to make a pair of plowshares from alloy steel. They will connect to square posts. Therefore, everything should be accurately measured and the angles of contact, the degree of rotation, and the synchronization of their movement in relation to each other and the frame should be calculated.
Assembling a homemade device
The plow drawing consists of the following parts:
- alloy steel ploughshare;
- side pillar shield, made of St3;
- spacer plate, made of St3;
- the base plate is also made of St3;
- field board, corner 30 by 30 millimeters;
- the stand is made of pipe with a diameter of 40 millimeters.
Experts recommend first making all parts of the device out of thick cardboard, then connecting them together while maintaining the required angles. If the cardboard model suits you according to all the criteria, you can safely start working with metal blanks.
When you have completed all the steel blanks, to assemble the body you will need an auxiliary steel sheet 500 by 500 millimeters and approximately 3 millimeters thick, as well as a machine for welding the blanks.
Using wedges having an angle α equal to 25 degrees, a ploughshare is mounted on the auxiliary sheet and spot welded to the sheet on both sides.
The side shield of the stand is connected to the plow share in a vertical position so that its edge extends beyond the edge of the share by 7 millimeters, while the side shield must be raised higher than the blade of the share itself by 10 millimeters, so as not to interfere with the cutting of the soil by the share. The shield also needs to be lightly welded to the ploughshare and, accordingly, to the auxiliary sheet.
How to install and adjust a plow on a walk-behind tractor
You need to set up the plow after preparing the walk-behind tractor itself for working with attachments of your own production. The unit is located on a stand. Wheels with rubber tires are removed. The productivity of the equipment, the speed of plowing the soil and the service life depend on correct adjustment. The wheels of the device on rubber tires must be replaced with lugs, which will provide increased maneuverability on loose soil. The plow is installed by attaching it to the fasteners for attachments.
Do not immediately completely tighten the bolts that secure the equipment to the cultivator bracket. They also perform a regulatory function. When carrying out this important operation, which directly affects the quality of plowing, the coincidence of the longitudinal axes of the hand-made agricultural device and the clamp is taken into account. Adjustment of the plow is carried out only after checking that it is correctly installed on the walk-behind tractor bracket.
Plow hitch
Motoblock hitch disassembled
The hitch is an important design element that ensures reliable fastening of attachments to the Neva walk-behind tractor. The most popular option is a U-shaped mount made from a channel, which is installed under the steering wheel of a walk-behind tractor.
When creating the hitch, you will need to drill holes for attaching the bracket and mounting pin. The bracket for attaching to the walk-behind tractor is either at the top or bottom, so as not to interfere with hanging.
Plowing depth and how to adjust it
The plowing depth should be at least 20 cm. It is easy to set up. To do this, the unit is rolled out to the site of the upcoming work, where a control pass is made. A cord is stretched along the approximate first furrow. It is advisable to immediately turn the handle of the device to the left in order to move on a surface that has not yet been plowed. The passage to the opposite end of the section is carried out at minimum speed. This will allow you to check the correct installation of the plow bar and make the necessary adjustments.
The right lug should be placed in a fresh furrow and moved forward slowly. After the first pass, the device turns 180° and moves in the opposite direction. At the same time, the depth of the furrow made is assessed. If it is unsatisfactory, the equipment is adjusted using the bolts of the fixing bracket. It is necessary to ensure that the right lug does not leave the furrow, and the equipment stand is placed perpendicular to the soil surface.
Field board tilt
For those who already have experience plowing the land with a walk-behind tractor, there is no need to explain what and how to do at this stage. Below is information for those who are encountering this activity for the first time.
The inclination of the field board, or as it is also called the angle of attack, is the inclination of the level of the plowing plane relative to the surface. Adjustment occurs via a screw handle.
The procedure is as follows:
- Install the walk-behind tractor with the plow on the stands that were mentioned at the beginning of the article.
- Turn the adjustment knob to the maximum until the field board rests completely on the ground, without gaps.
- Start turning the handle in the opposite direction until the back is 2-3 centimeters above the ground.
If you make a mistake here, there will be consequences:
- At a large angle of attack, the plow will turn into an anchor - the walk-behind tractor will constantly slip and move forward with difficulty;
- If the angle is small, the required layer of soil will not be removed.
You can check whether everything is correct at the plowing stage - the walk-behind tractor should not rest against or go too easily.
How to set up a plow on heavy walk-behind tractors
To use homemade attachments on a heavy unit, it is necessary to carry out the standard preparation of the walk-behind tractor described above. The difficulty is that incorrect adjustment will not only take a lot of effort, but will also not allow you to achieve satisfactory plowing quality. Using the adjusting bolts, the plow body is tilted so that the angle between its heel and the ground surface is 16°. The control handles rise to the level of the operator's belt. If the distance between the crests of two adjacent furrows does not exceed 10 cm, the plow is adjusted correctly.
A self-made plow for heavy-duty walk-behind tractors (for example, Neva MB-23S or Aurora Space-Yard 1350D) will require modification. To prevent the powerful walk-behind tractor from rearing up when working, a wheel is installed on the plow. In detail about such modernization, you can find many step-by-step guides with photos and videos on the Internet.
Plow design
There are several types of plows installed on the Neva walk-behind tractor, and each of them has its own design features. Currently, single-body, rotary and reversible structures are used for cultivating land on personal plots.
The single-body type of plow is the most popular design and you can find a large number of drawings of this particular type on the Internet. In addition, it is considered the most optimal option for those who do not have the appropriate skills.
Plow drawing for Motoblock KV-04
Homemade plow with the dimensions of the Motoblock KV-04
Plow side view
Plow front view
View from the inside
The reversible design has a curved feather at the top, which allows you to immediately turn the layer over during the process of plowing the land.
This design feature makes it an excellent option for working on hard soils, you can see the drawings in the article. Since such a plow has a rather complex design, only a person with sufficient experience can make it. The rotor plow design is considered the most difficult to manufacture. It is more reminiscent of a cultivator, since there is not one, but several shares attached to one axis. In the process of cultivating the soil, the axis rotates, due to which the soil layer turns over. The advantage of the design is that the soil can be cultivated at a depth of up to 30 cm using little effort. In addition, the rotary plow allows you to plow the area along different trajectories.
Video of this plow in action
Tips and tricks
Depending on the size of the plot and the type of soil on it, it is necessary to select a walk-behind tractor. Its design and technical characteristics determine the appropriate type of attachment. A small garden plot with soft soil is best cultivated using a simple cutter mounted on a plow. Adjusting attachments becomes especially important when plowing hard soil with clay and rocky inclusions, as well as large fields.
In such conditions, it is recommended to equip the plow with special “crow’s feet” attachments made of high-strength carbon steel. The main design feature of such devices is the triangular shape of the cutting surface, which ensures crumbling and grinding of solid deposits. They easily wrap around weeds on their blades. The quality of soil cultivation with a hand-made plow is not inferior to branded models.
Dear craftsmen and designers, please share your tips for making your agricultural inventions.