Peculiarities
Structural elements, such as calibrated holes and T-slots in combination with a variety of accessories, allow you to securely and quickly secure the parts to be welded .
Welding and assembly table Evidence SS8-2d-as (800x1200). Photo Welder Altai
The presence of several base surfaces makes it possible to produce high-quality assembly and welding of parts of the most complex configuration.
Video
Necessary tools and equipment
First you need to prepare all the tools. You will need:
- Pliers and, preferably, adjustable pliers. To make work more convenient, you can buy grab grips.
- Tape measure and square. When welding the legs, right angles will be needed, so the angle ruler must be calibrated.
- Marker or chalk.
- Hammer.
- Good nippers.
- "C" type clamps.
- Angle grinder. Although it can be replaced with a hacksaw, you will need to cut a lot of steel.
- Welding machine.
- Taps and wrench.
- Fraser (highly desirable).
Usually, even a non-professional welder has this set of tools, since without it he will not be able to work with metal.
Varieties: collapsible, modular and others
Depending on the design features of the parts being welded, production conditions and other technological factors, the tables have certain differences, which makes it possible to distinguish their main types.
Modular. The principles of the modular design of welding tables allow you to change their working surface for each specific part being processed. Moreover, the workspace is brought into the desired position quite quickly.
Video
Universal. Such welding tables allow you to solve various production problems at a single workplace. The design of the base base allows you to install a wide variety of equipment for fastening parts of various shapes, including three-dimensional products. Then you can carry out welding work, stripping products, machining and other technological operations.
The rotary round table Slot-Table of the PST series is used for assembly, welding, stripping and other positioning of workpieces. Photos Tehnoveld
Collapsible. The design allows you to disassemble the equipment into small components and then assemble it again without any problems. This makes it much easier to transport the table over long distances.
With a coordinate grid . The presence of scratches in the form of a coordinate grid on the working surface facilitates the installation of assembly equipment and parts to be welded . Any of the marks can serve as a base for installation, which reduces the time for using additional stops.
Five-sided 3D table TEMPUS SSTW 75-105/35M nitrided, with a coordinate grid. Photo MOSSklad
Mobile. Production conditions often require welding to be carried out in a strictly defined location. Mobile tables provide this opportunity. of special wheels on the supports makes it easy to move the table to the desired location.
Mobile table SibarWelding. Photo by BelSvaMo
On the rail track. When producing long steel structures, welding equipment can be used on rail tracks. The rails are leveled and installed as basic equipment elements for the production of cars, bridges, railings and other similar objects . The welding tables mounted on them move one after another and are fixed in the right place using special stops.
Welding table on a rail track. Photos Tehnoveld
Rotary. The use of a rotary table allows the welder to process even large workpieces without changing his position at the workplace. This makes it possible to best position the auxiliary equipment for constant and comfortable use. Rotary tables allow you to mechanize welding work using automatic and semi-automatic machines.
Rotary welding and assembly table with an inclined plate. Photos Tehnoveld
With rotating work plate. It is convenient to weld large fences and rectangular frames on equipment with a rotating working base. If you do not create rotation for such workpieces, then it will be very difficult for the welder to reach some places. In such cases, it is necessary to reinstall the workpiece, which significantly complicates the welding process.
With hydraulic drive. The hydraulic drive is used to raise/lower welding plates with massive workpieces. This allows the welder to work at different height levels, leaving the fasteners in the same position.
With hood . Local suction is the most effective option for cleaning the welding work area from harmful substances. With minimal air flow, maximum toxic welding gases are removed. Structurally, on welding tables, local exhaust is made in the form of umbrellas or a suction pipe with filter elements made of material that stretches and bends for better installation in the welding zone.
It is important that the exhaust device does not interfere with the welder while working.
Materials for welding table
Metal is almost always used as the load-bearing frame of a table for welding work.
The photo shows a mobile model on a rigid frame made of a profile pipe with a cross-section of 60x60 mm and a wall thickness of 2 mm. The frame is made by welding, the sidewalls are additionally reinforced with reinforcing bars. A profile pipe with a cross section of 60x140 mm was used as a surface for the desktop. This design weighs about 150...200 kg, which is quite enough to provide the required load capacity.
Below are the profiles of square and rectangular hot-rolled steel pipes that are suitable for making the load frame of welding tables. You should immediately pay attention to pipes with a wall thickness of 2 mm or more, since a pipe with a wall of 1.5 mm may not have sufficient strength when working with large parts.
It is not necessary to use a closed profile - it is permissible to use a channel or other similar type of rolled product.
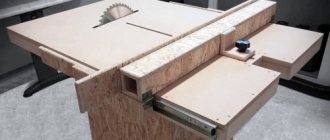
Interestingly, the surface of the desktop is almost always made with gaps. This is necessary so that parts can be secured to its surface with clamps and other devices to hold the products in the desired position.
In addition to tabletops made of strips, a perforated option is often used.
In this case, a steel strip is used (as shown in the photo) or a solid sheet. Hole diameter – 10…25 mm.
The thickness of the sheet (strip) for normal operation should be at least 8...10 mm, preferably more. This also increases the weight of the product and contributes to its stability and better distribution of the load across the tabletop. Unfortunately, the cross-section and wall thickness of the profile of the support posts also have to be increased.
For small parts that do not need to be fixed to the work surface, a table top made of sheet metal with a thickness of 8...20 mm is suitable. Shelves and drawer bottoms for items that aren't too heavy are often made from wire mesh or thinner solid or perforated sheet metal.
In some cases, it is permissible to use OSB or thick plywood for non-critical (hot objects will not be placed on them, sparks will not fall on them) shelves.
Important: if any materials or equipment that cannot tolerate high temperatures will be stored under the tabletop of the welding table, it is advisable to insulate the tabletop. To do this, it is necessary to use NON-FLUSTIBLE heat insulators - basalt or mineral wool, basalt cardboard, asbestos and the like.
To protect wooden shelves and drawers made from wood substitutes from sparks and scale, metal sheets 1...5 mm thick are laid on top of them.
The last point regarding materials and components: legs for mobile welding tables must have a stopper and be designed for the weight of the product. The use of non-locking wheels is permissible only for small products intended for rare work.
Models and systems of assembly and welding tables: SSM-01-03, 1200 x 750 x 800, system 16 and others
Assembly and welding table made of cast iron plates with 28 mm holes. Photo TECHNOVELD
Let’s look at the names of the models using the example of the “VTO” (High-Tech Equipment Plant) equipment line. Assembly and welding tables have the abbreviation SSM . Further variety of digital designations is caused by different dimensions, shapes and conditions of the workpieces being welded:
- 01, 10 – designation of basic options;
- 02-xx, 09-xx - designation of modular tables, where “xx” highlights differences in dimensions and materials for the tabletop (here and in the following text);
- 03-хх – with a rotating work plate;
- 04-хх – with a rotary-extraction device;
- 05-хх – rotary tables;
- 06-хх – mobile;
- 07-хх – universal;
- 08-хх – with hydraulic drive;
- 01-07….01-10 – tables with a coordinate grid;
- 11-хх….15-хх – collapsible;
- 16 – placed on a rail track.
For mounting parts on countertops, there are three fixation systems : D16, D22 and D28(26). They differ in the diameter of the calibrated mounting holes, which are respectively 16 mm, 22 mm and 28(26) mm. The lowest load capacity and thickness of the tabletop sheet is for the D16 system, the highest for the D28(26). The D22 system occupies an intermediate position in these indicators.
Foreign companies, Demmeler and others engaged in the production of assembly and welding tables, have their own unique models with a set of equipment for any of the specified fixation systems.
Basic requirements for the table
To ensure safe operation, welding workbenches must meet certain requirements and have special qualities.
- Ventilation should be both exhaust and supply. Most often, the table is equipped with a fan located at a height of up to 1.5 meters to the left of the main work area. There is an exhaust hood to remove smoke.
- To ensure convenient cleaning of the electrodes, a copper strip edging is installed.
- It is important to have local lighting of the workplace.
- Rotating holders for tools and consumables: hammers, chisels, brushes and electrodes.
- Additionally, there must be cabinets for long-term storage of equipment.
- A bracket must be equipped to secure the grounding.
The working surface of the table is made of metal that can withstand high temperatures and the weight of the parts.
Structurally, it is a steel plate. The height of the welder's table has dimensions from 700 to 850 millimeters, and the size of the work surface is 1000 × 800 mm.
When placing a work table for welding in a home workshop, you can consider a folding surface, but be sure to have a reliable fastening and a margin of safety.
Accessories: fasteners and more
Extender for welding table. Photo Welder Altai
The equipment guarantees optimal conditions for assembling parts on welding tables. It must provide :
- the widest possible size range;
- a design that has absorbed the best engineering thoughts;
- minimal labor costs during use;
- made from quality materials;
- durability in operation;
- maximum accuracy in positioning of parts;
- simple reconfiguration, depending on the task.
For more information about equipment for welding tables, follow the link “Equipment for welding tables.”
Table dimensions
Now you need to find convenient dimensions. You can take industrial welding tables with ready-made drawings, but they are not very convenient in a garage. But here are some standard ones that are definitely worth picking up.
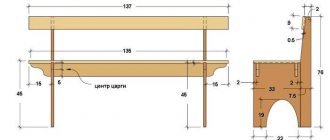
You can rely on these dimensions:
- The working area should not exceed 100x80. The table should be compact and capacious.
- The height should be between 70-85 centimeters. Higher - you will have to raise your hands and the electrode will be located too close to the body. Below, you will have to bend over, which causes back pain if you work for a long time. Although in your own workshop you can focus on your growth.
Here is an approximate drawing that can be taken as a basis.
Do-it-yourself: assembly kit, drawing, etc.
Making a table for a home craftsman who, among other things, also does welding work, will not be particularly difficult . It is better to make a table that will take into account all the wishes of the master according to the drawing . This engineering approach will make it possible to prepare the required set of materials and quickly process the structure in the absence of any standard size material.
It is better to cut workpieces on a saw, instead of using a traditional grinder. They will be exactly the size of the drawing. In addition to the welding machine, you must have a set of plumbing tools, especially marking tools. Thus, to make a welding table with your own hands you will not need a wide range of equipment.
Assembly order
To carry out the work you will need a welding machine, electrodes, a grinder with metal discs, a measuring tool, and bolts for fastening. A design drawing is first drawn up and the dimensions of the workpieces are calculated. In the latter case, the thickness of the weld seam must be taken into account.
Assembly instructions:
- Forming blanks, checking their dimensions according to the drawing.
- Assembling the frame, welding the support posts, attaching the stiffeners.
- A worktop is made according to the dimensions of the finished frame. After measurements it is not attached.
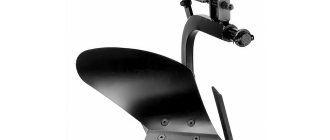
- Installation of a protective screen. The tilt angle is up to 45°; an additional chute is made for dumping welding waste.
- Installation of the main work surface.
- Manufacturing of sidewalls, they are attached to the structure on hinges. Movable stops made of small diameter pipes.
- Primer and painting.
- Installing a sheet of fiberboard or chipboard.
Additionally, hooks, drawers or boxes can be installed on the welder’s table for storing and securing tools. The choice depends on the requirements for functionality and ease of use.
Making a hood for a welding station with your own hands
Homemade ventilation equipment is used for welding stations organized in garages. Due to the reduced gas emissions, the design of the hood differs from an industrial system. A perforated panel of the ventilation hood is provided above the workbench. An electric pump releases combustion products into the atmosphere through an opening in the roof or side wall. The gas exhaust channel is made of a corrugated pipe connected with screw clamps.
We recommend that you read
How to make your own welding table
Since closing the gate disrupts the flow of fresh air, it is necessary to provide an additional channel. To drive the fan, an electric motor from an old machine is used, designed to be connected to an AC mains voltage of 220 V. A filter is not provided, but some craftsmen install a metal filler in the umbrella to extinguish sparks. After assembling the structure, tests are carried out and any deficiencies found are corrected (for example, the fan drive power is increased or the diameter of the pipes is increased).