Profile advantages
The gate can be made from a corner, but the profile has a number of advantages. The design made from it has a large margin of safety. For such a wicket this quality is especially important. It is subjected to not only static loads, but also dynamic loads during repeated daily openings.
The profile pipe is inexpensive in comparison with other types of rolled metal with the same technical characteristics. With good processing after welding, the structure will serve for a long time.
Using squares you can make a gate of any configuration. It can be solid, sewn with multi-colored durable corrugated sheets, flat slate, or “cards” made of sheet metal. The gate is decorated with forging elements or simply sheathed with metal mesh and profile sections.
The design itself is quite simple to manufacture using electric welding.
Two pillar parts must be welded with 3 cross members and covered with corrugated sheeting. The only difficulty is welding and installing the hinges.
If you can weld a gate, then you will be able to weld gates and other frame structures for your home.
It is possible to manufacture a gate without welding. The parts are secured to brackets and bolts. But welding is a more reliable and durable option.
Photos of beautiful gates
Making a gate that is not ordinary, but beautiful is not so difficult. And this does not always require expensive materials. What is always needed is imagination. Then even a bicycle, a shovel, a knot or a pickaxe is a material for exclusive design.
For pets
For houses in a modern style, gates need appropriate
From a variety of materials... even from knots
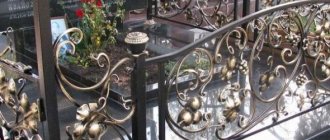
Wood and forged elements - a win-win combination
The main component is fantasy
A stencil changes even the simplest fence
Make a couple of cutouts in the boards... the original wooden gate is ready!
Visiting fairy tales
Bicycle, wheels, shovel - all materials for making gates
To the fence made of Euro picket fence
A small fragment - a cat made of plywood...
Original design... from the courtyard side
Even a gate made of corrugated sheets can be original
Dimensions and shape
You can weld the gate in the form of an arch, an ellipse or any other shape. The most popular shape is rectangular with several jumpers to fasten the pillar parts and add rigidity. Installation together with poles is possible, but most often the gate is hung on the hinges of already standing poles.
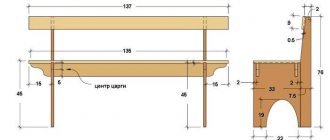
Common dimensions of parts for the simplest design: height 2100 mm, width varied, depending on the installed pillars.
Older households had rather narrow and inconvenient gates, so you may have to make changes to the fence by moving the posts and widening the opening. As a rule, the entrance is made 1000 mm wide.
How to properly weld gates and wickets: a fence at the dacha
Owners of private houses or summer cottages are often faced with the question of how to weld gates so that this design is practical and also looks attractive. The easiest way to solve this problem is to hire specialists. But you can spend a little time and, having studied the technology, weld the gate yourself.
Materials
The pillars are made from profile pipes with shelf sizes of 80 or 100 mm. Taking into account its lowering into the ground by 800 mm, the length of the pillars should be 3 m. Plugs are welded to the upper ends to prevent water from entering.
For greater rigidity and securing the rack, you can weld small pieces of reinforcement or other rolled steel, 1 m long, on the section extending into the ground.
For standing ones, take a 40/40 or 40/60 profile, cut off two parts with a length of 2100 mm using a grinder. The edges of the pipes are cut at an angle of 450 for a larger welding area and reliable fastening.
The upper and lower lintels are prepared from the main profile, with a gate width of 1000 mm. parts are cut to size 980 mm. This will provide a gap of 10 mm between the loot and the gate on each side. Cut the edges at an angle of 450.
For the middle lintel you can take a 25/40 profile, its length should be 900 mm, it will be inserted inside the frame, so the width of 2 profile shelves is subtracted from the total length of the workpiece, in this case it is 80 mm.
You will need 2 hinges with an outer diameter of 30 mm and 4 steel plates with a thickness of 5 mm and a width of 40 mm. It should be disassembled and the internal surfaces well lubricated with grease or other thick lubricant, then reassembled . It is better to purchase loops with balls.
The plates are laid out on a flat surface and loops are attached to each part from different sides. That is, if a plate is attached to the part of the loop with a hole from the outside, then on the mating part the plate is placed towards the inside.
Welding is mandatory on both sides to ensure welding of the root of the seam. After the first pass, you need to beat off the slag and weld the second pass. At the root, welding is performed in one pass.
Swing gates
When the project has been drawn up and the required material has been purchased, all that remains is to study the technology of how to properly weld gates at the dacha.
Drawing of a swing structure with a gate. Installation takes place in several stages:
- Preparation of materials and metal pipes for further processing. If old pipes are used, they must be thoroughly cleaned of rust using sandpaper. If the pipes are new, then it is necessary to degrease them with a solvent.
- Then marking and subsequent cutting of pipes is carried out. To install the gate correctly, it is best to cut the pipes in pairs. So the future design will be symmetrical.
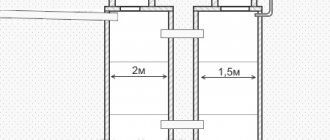
- To install the support pillars, you need to dig 2 holes about 1 m deep and 40 cm in diameter. The pipes are placed clearly vertically in level, after which they are filled with concrete. The hardening time of the solution is 12–14 days.
- Using a welding machine, all cut metal pipes are connected into a frame. Welding is performed with electrodes with a diameter of 3 mm at a current of 55–65 Amperes. Do-it-yourself retractable gates on rollers from above? The most convenient way to connect metal pipes is on a welding table. When welding pipes with a square, you need to constantly check the connection of the corners. Otherwise, the product will be skewed. In the middle part of the sash, cross members with a cross section of 5x5 cm are welded; they strengthen the frame of the structure. Upon completion of the work, the seams must be carefully sanded.
- Then, when the sashes are welded, you can attach the hinges. It is advisable to do this with an assistant. To begin with, they are welded to the support posts, and then directly to the frame. Welding must be done using protective equipment.
- Wood, polycarbonate or profiled sheets are used to cover the frames. The height of the supporting corrugated sheet varies depending on the height of the gate. The corrugated sheet is mounted on crossbars outside or inside the frame. The sheets are screwed using self-tapping screws or fastened with rivets.
- Wooden cladding is less durable than corrugated sheets. To secure the boards, you need to make holes in the frame. The casing is fixed with screws or self-tapping screws.
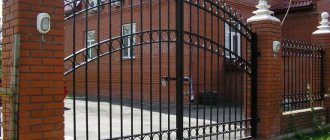
Sliding gate ideas can be seen in the photo below.
Doors with a bolt
Tools for work
When all the main parts of the gate are ready, you should decide on the lock and handles. If necessary, you will need to weld brackets to attach the handle from the inside.
Next, tools and additional materials are prepared for welding. You will definitely need:
- welding machine;
- electrodes for welding steel grades MP-3 or ANO-21;
- hammer, sledgehammer;
- protective clothing and welding mask;
- building level or simple plumb line;
- trowel or spatula;
- several sections of pipe, 1000 mm long, for lintels when concreting pillars;
- concrete solution;
- For installation and welding of hinges, embedded parts are prepared to provide gaps between the gate, hatch and floor.
Having prepared all the materials and tools, we begin to manufacture and install the gate.
Installation and concreting of pillars
Based on the size of the opening, mark the installation locations of the pillars and use a hand drill to make a hole in the ground 80 mm deep. Then the profile is lowered into the holes and set in a strictly vertical position using a level or plumb line.
Special attention should be paid to this operation. The correctness of the entire installation of the gate depends on it. The pillars are fastened together with spacers and additionally each with jibs, filled with concrete, not forgetting to compact it when pouring. Now the concrete needs to be allowed to harden for 24 hours.
Frame welding
Welding can be done first, and then installing the pillars, but it can also be done the other way around. It will not take much time to weld the structure. The pillar parts and lintels are laid out on a flat surface.
They are set according to level. Connect the pillars and the top jumper. Place 2 potholders on each rack on the outside and sides. The lower part is grabbed in the same way.
Use a tape measure to measure the diagonal. A 2 mm skew on the side is allowed, but it is better to do it without skew. Having set the diagonal, they grab it from the outer end surface of the joints. Mark and grab the additional strut of the structure. It should be flush with the surface of the racks.
The entire structure is scalded on all sides. The front side of the gate, on which the lining will be attached, is cleaned with a grinder. All other joints are hammered and the quality of the weld seam is checked.
If the pores are large, scald these areas again. Now you can clean up the uneven joints a little without disturbing the seam. The wicket structure is ready.
It is necessary to weld the hinges onto the gate frame. This can be done when hanging it on poles, but welding in the lower position will provide a better quality seam.
For welding, mark the same distance from the edge of the structure, align the hinges coaxially to each other and the gate, and grab them in several places. Once again check that the hinges are installed correctly and weld them on both sides.
Building design
Gates, as a rule, are made swinging.
The gate consists of supports in the form of pillars and a door leaf on a frame, which is fixed to the posts using canopies. To close, locks are installed. The pillars are made of brick, steel, reinforced concrete or wood. Inside monolithic and stone supports, embedded parts made of thick metal, angles or rods are inserted in order to weld a gate frame made of corrugated pipe to them.
The door is made as a separate passage in the fence or combined with a gate. In this case, the frame of the gate is placed in one of the leaves. If there is a sidewalk in front of the yard, the opening is made inward so as not to disturb pedestrians. In this case, the size of the leaf is taken into account so that there is a distance for the sash to fully swing open.
Hinged or sliding
The first option is considered an inexpensive design that is easier to cook and install. Such a gate does not require a base to install guide beams; it does not need a counterweight or roller elements. The swing system is combined with the gate and saves space at the entrance. At the bottom, the canvas is cut to height in areas with heavy snowfall. This way, the resulting snowdrift does not affect the opening.
Sliding schemes are more complicated, since guide girders are often placed at the bottom and require a level foundation. There are options with a device for cantilever movement of the leaf, in which the beam is hung so that it does not limit the height of the span, and the rollers are placed inside the sash frame. Automation is installed on swing and sliding systems.
Hanging on poles
After allowing the concrete to cure, they begin to install and secure the street door. Remove the spacers from the tray. Using mortgages, set the position of the gate between the pillars, maintaining the gaps.
At the bottom, to prevent rubbing when the structure sag, a gap of 100 mm is made. This will provide ventilation to the yard and prevent scuffing. Check the correct installation in all planes and begin welding the hinges.
The plates on the mating part of the loop are placed on the pole. Now you should weld the hinges on all sides of the plate. We remove the embedded parts and check the operation of the gate. It should work easily without scuffing.
Sheathing
If you are sewing up the gate with mesh or rods, they should be secured before installing them on the posts. When laying a sheet of corrugated sheets, it should be fastened after welding. The corrugated sheeting is secured with self-tapping screws, the heads of which are covered with decorative overlays.
Without high-quality welding, the gate will not last long. For reliability, be sure to check the filling of the seam with molten metal.
Before welding, double-check that the part or the structure as a whole is installed correctly. Take your time.
Before sheathing with corrugated sheets, be sure to degrease all surfaces and first apply a primer and then paint that matches the color of the decorative coating of the gate and fence.
Having completed all the work on welding and installing the gate correctly and efficiently, you gain invaluable experience in the manufacture of frame structures.