If you decide to install a gate on your property, then you may be faced with the question of which type of structure is easier and more economical to install.
Availability of materials, ease of manufacture and installation, transportation and operation, this is just a short list of the advantages that gates made of profile pipes have. To manufacture a structure of this type, a large list of materials and tools is not required; the main thing is the ability to work with a welding machine and knowledge of the characteristics of the steel material.
Advantages and disadvantages
Gates made from profile pipes have a number of advantages and disadvantages that you should pay attention to.
Main advantages:
- Availability and cost of profile pipes on the market;
- Long-term operation;
- Simple installation that you can do yourself, without the involvement of specialists;
- Reliable design;
- Possibility of implementing various design solutions, including those regarding fences and gates;
But there are also disadvantages of gates made of this material, these include the following disadvantages of profile pipes:
- Susceptibility to corrosion - with constant contact and interaction with a humid environment, as well as with the penetration of liquids into the pipes, there is a risk of rust development;
- When using threaded fasteners, deformation of the structure may occur;
- A large amount of necessary paint and primer, as well as long-term application of protective materials.
Types of gates
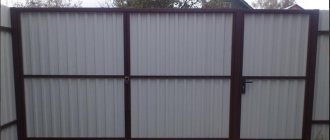
Gates made from corrugated steel pipes are divided into varieties according to the opening method: sliding, sliding or swing. Each of these three options can be made in a unique and beautiful design; the main thing is to prepare the correct drawings in advance for successful installation and convenient operation in the future.
Swing
The easiest design to install, its installation requires only welding and a grinder. Such gates can be installed both on the fence and on the garage, very easily, using regular hinges.
Sliding
This type is often used if it is decided to construct a garage door from a profile.
They can also be installed on a regular fence. They are also installed on rollers; they are difficult to implement, but at the same time they are very popular.
Recoil
If you don’t want to bother with hinges or want to make a structure that is easy to use, then you can install a sliding solution on rollers - this is more difficult to implement, but it looks impressive and is more convenient than conventional swing gates.
Design Features
The gate frame, welded from metal, usually has considerable weight, so swing gate leaves must also be secured by welding to strong, rigid, stable supports.
Swing
This requirement can be easily met by manufacturing garage doors. They are attached to existing walls made of stone, concrete or other material that is highly durable and resistant.
After all, it makes no sense to make metal gates for a wooden garage or barn. The only complication is that the opening in this case needs to be welded with a steel angle in order to weld hinges or canopies to it.
If the gate is installed in a fence opening, care must be taken to ensure that the pillars that serve as supports can withstand its weight.
If the gate is swinging with a leaf width of up to 1.5 meters, filled with light material, for example, corrugated sheeting, then a round or square steel pillar made of a pipe with a diameter of 100 millimeters or more can be used as a support for each leaf.
It is enough to concrete the pillar into the ground in such a way that the lower end is necessarily deeper than the freezing level, otherwise in winter the swelling soil can push out and tilt the pillars. In this case, the gate leaves will shift from the design position.
Recoil
Sliding gates welded from metal will require the construction of a fairly serious foundation. Being a cantilever in the closed position, they will exert a large load on the support, and this load can be directed both downward and upward, that is, to be pulled out of the ground.
It is desirable that the foundation of the sash be connected together with the foundation of the supports. This will prevent them from moving relative to each other during any ground movements, which is possible from heavy vehicles passing along a nearby road.
Sliding gates are typically suspended on rollers from a beam connecting the top of the supports. The connection is made by welding and there are no special requirements for the stability of the supports.
How to calculate the dimensions of a structure
If you are the owner of a car, then it is important to choose a width that will allow you to operate the car comfortably. The standard design is 4 meters wide and 2 meters high. If you are installing the gate on pre-installed supports, then in the calculations take into account the size of the hinges and the gap between the leaves, and also calculate in advance the distance between the supports of the gate and the wicket, if one is assumed.
Once you have decided on the dimensions, you can begin creating the drawing.
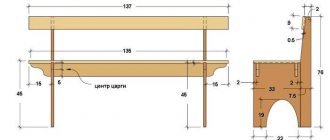
Drawing
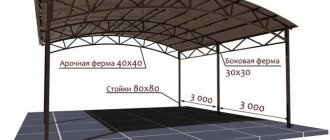
On the drawing you need not only to indicate the dimensions of the structure, but also to determine the base of the gate. Typically, profile pipes are buried in the ground, concreted for stability. You can use a ready-made drawing:
This drawing of a gate with a wicket, if you build it from a different material, then you don’t have to use it when creating the drawing.
How to choose a profile
The profile is used in various construction fields, so its range is quite wide. Pipes vary in cross-sectional size, coating, shape and material from which they are made: galvanized steel, stainless steel, carbon steel. The first type of metal is not suitable for making gates - it is too light, but carbon and stainless steel are excellent.
Different grades of steel have different densities and can be used in different climatic regions.
The profile also differs in production technologies. Seamless ones can withstand significant loads, vibration, and constant impacts, but they are expensive. A welded profile is quite cheap, but it is less resistant to damage. The choice of profile pipe for the gate determines the service life of the structure.
Material calculation
It is the drawing that allows you to understand the required number of profile pipes, but in addition to them, you will also need other necessary materials:
- Hinges or rollers - depending on the type of solution chosen;
- Sheathing material and decorative elements, if any;
- Lock or other fastening elements, such as a latch or latch;
- Primer and paint - to protect the structure from possible corrosion.
The amount of materials can be calculated using a drawing that has been drawn up. If you decide to use the example drawing proposed above, then you will need the following amount of materials:
- Square profile 80*80 mm long 3 meters in the amount of 3 pieces, for the construction of the base.
- Profile pipe size 40*20 for the construction of gates 3 meters long in the amount of 10 pieces.
- Gate lock.
- Metal bolt.
- Garage hinges 6 pieces.
- 1 bag of cement for the base foundation.
- Primer and paint 1 liter each.
The amount of materials may be different if you envision a structure different from the drawing above.
Step-by-step instructions for DIY assembly and installation
When the drawing and materials have been prepared, you can begin work on installing the gate. You can understand in more detail how to install a gate with your own hands step by step by watching the video at the end of the article.
First, decide how you will build the structure: using welding or connecting the profile using a threaded method.
Welding or threading
If you do not know how to properly weld a gate, because you do not know how to handle welding, then you can assemble a structure from profile pipes using ordinary bolts and a drill. This is a more labor-intensive process, but any householder can do it. In any case, it is better to use welding - if you do not know how to operate the machine, you can hire a qualified welder for this purpose.
Pipe cutting
The workpieces are cut according to the drawing, using a grinder and a metal cutting disc. At the cut points, the metal profile must be cleaned with a grinding machine. Rust is removed in the same way.
Installation of supports
The location of the future gate is determined in advance; holes are dug at the places where the supports are installed, at least one meter deep and 10 centimeters wide. The height of the support pillars must correspond to the drawn up drawing and the height of the gate. Sand and crushed stone are poured inside the holes. Then the pillars are installed inside the holes, after which they are filled with concrete.
Use a diagram or drawing prepared in advance for the correct installation of support structures.
Using the drawing above, you can understand that the support must be buried and concreted into the ground to a depth of 1 meter.
Loops
Hinges for installation are installed in advance, in the location specified in the drawings. The hinges are easiest to weld with a conventional welding machine, but if desired, they can be mounted using bolts. It is best to weld gate hinges using third electrodes so as not to damage the parts or profile.
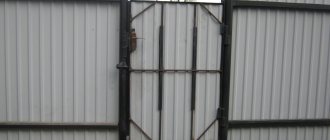
Frame installation
When the hinges are welded to the supports, you can begin assembling the gate. Using the drawing above, it is necessary to correctly fold the structure before welding work on the ground. Each sash should have the shape of a rectangle, while in the middle of each, horizontally to the ground, strips are installed to ensure the integrity of the structure. To ensure that the sashes have the correct angles, a diagonal strip is installed.
All pipes used in the design proposed by us for installation are 2 meters in size. Thus, according to the drawing above, you will get two mirror doors, on each of which hinges are welded at a distance of 15 centimeters from the lower and upper corners. They will allow you to attach the frame to the support posts.
Attaching to supports
The process of attaching to the supports is carried out manually. The work will require several people: lifting the frame and controlling the process of attaching the frame using hinges to the support posts.
Gate
If you decide to install a gate also from profile pipes, then its manufacture, installation and fastening are carried out in exactly the same way. According to the drawing we proposed, the gate has the same height, but the three horizontal slats should have a shorter length - 1.2 meters. The assembly of the structure is also carried out on the ground, according to the figure.
After completing the assembly, 2 hinges are welded at a distance of 15 centimeters from the upper and lower corners of the gate.
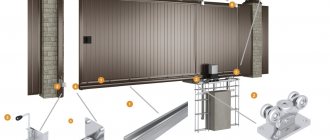
Sliding gates
Varieties
Sliding or sliding gates are an excellent choice for those who always don’t have enough space on their property, and at the same time have extra money and time to complete the work. Sliding gates consist of one or two leaves that move in a given direction along special rails. Such gates are divided according to the type of sliding system.
Let's take a closer look at them:
- Rail sliding gate system. This is the simplest option of all. Before the doors are manufactured, a metal rail is installed in the ground, along which the gate is then moved using a roller. This design is not very practical, since snow, dirt, leaves get clogged into the rails and all this is difficult to clean.
- Suspended sliding gate system. In this case, the sash moves along a special metal beam installed not in the ground, but on top. Such a beam is attached to the support pillars. This is a reliable and durable option, but you need to take into account that in this case the height of the gate will limit the height of the car that can drive onto the site.
- Cantilever sliding gate system. The most expensive and time-consuming option, but the one used most often. In this case, a beam installed at some distance above the ground on special cantilever blocks is used as a guide. The sash is welded to this beam in advance.
Next, we will tell you how to properly weld sliding gates.
Frame welding
We're cooking sliding gates! To do this correctly, you need to decide on the design in advance and make drawings. Here the difference between the varieties is much more noticeable than when welding swing gates.
We will not go into detail about how to weld each type of sliding sashes. Because this is a topic for a separate article. Let's just say that the frame can be assembled from corrugated pipes 50x50 or 40x20 mm, depending on the reliability requirements. Welding should be done like this: first the tacks, then the seam. Move the electrode neither quickly nor slowly. So that the seams are uniform, without pores or defects. After welding, the seams must be cleaned.
Installation of sashes
In the case of sliding gates, we do not use hinges, so there is nothing to weld here or to anything. The main task is to weld the frame. And further installation is carried out using special roller systems that have nothing to do with welding.
The installation process differs and depends on the type of system. In the case of a rail or console system, the installation principles are completely different and must be considered separately. If you decide to install sliding gates, we recommend that you further study the topic of their installation, since this is not our competence.
Finishing
After completing the installation of the frame, it must be degreased, coated with a primer to prevent corrosion and paint for durability. Then the structure is dried and finishing begins. There are several ways to finish gates made of profile pipes, the most popular are: forging, profile sheet, wood, polycarbonate, metal mesh or sheets.
Forged decor
The frame covered with forged parts made from reinforcement looks very impressive. To create beautiful forged gates you will need the professional help of a 3rd grade welder. The forged decor looks like this:
Net
Covering the profile frame with metal mesh does not look impressive, but this method allows you to significantly save on finishing. The mesh is a very cheap material, and it is easier to attach than others - you can use bolts, or perhaps use wire. This option is suitable for implementation in summer cottages.
Polycarbonate
Carbonate finishing is very popular today, but it has one drawback - the structure is essentially transparent, just like when covering the frame with mesh. Installing polycarbonate on the housings is very easy - all you need to do is make holes with a drill and secure the polycarbonate sheets to the profile pipes with bolts.
Profiled sheet
Installing corrugated sheets on a frame is considered more economical and easier to install. All you need to do when installing corrugated sheets is to drill holes in the right places and screw bolts into them. Such gates look like this:
Metal cladding
In the mid-nineties, finishing the profile frame with metal sheets was very popular. Their fastening is done by welding - heavy sheets of metal cannot be held on bolts. The use of cold rolled steel types is generally recommended for this purpose.
Primer and painting
After completing the installation work, you should begin processing metal surfaces. Carefully prime the joints between the profile elements and structural parts to avoid rust.
Wood
Wood used as cladding for fences and gates looks very beautiful, and after some time, wood-clad models look even more beautiful than the original version. The disadvantage of this type of cladding is its low resistance to rotting and mechanical stress - after installing the wood, it must be carefully treated with impregnation, primer and varnish.
After the finishing is completed, you can begin installing locks, priming and painting work, and decorative elements can also be installed.
Installation of locks
Typically, the lock system is installed in supports, but if the gate is attached directly to the fence, then you can install a security lock on it.
It is better to purchase reliable models of locks, with a complex key, mortise type. Many people use a classic latch, which is installed on the inside of the yard or garage. If the finishing was done with metal sheets, then the entire surface of each sheet should be carefully treated with a primer and painted in two layers.
We sheathe the gate
If a material is selected for the cladding (corrugated sheet, polycarbonate, etc.), which is secured with screws or rivets, the frames must first be cleaned of dirt and rust. After treatment with an anti-corrosion compound, priming and painting are carried out. The finishing of the sheathing, if it is made of sheet or roofing iron, is carried out after welding.
For popular swing gates made of corrugated sheets and polycarbonate, they try to select sheets so that there is no seam on the gate. If it is not possible to obtain material of this size, the first strip is leveled and secured with a pair of screws. After checking the position, they are screwed into all waves adjacent to the elements of the welded frame. The next sheet is attached overlapping the wave of the previous one.
Sheathing is also made from other materials:
- Tree. An affordable, beautiful option with easy replacement. However, regular maintenance is required. Please note that wood may crack when drying.
- Metal sheet. The lining is strong but heavy.
- Forged. It is possible to create original designs, but only specialists can weld such gates.
- Metal mesh. Low price, ease of work, light weight. However, the aesthetics are poor, and few people will like the accessibility of the area adjacent to the house to be viewed by strangers.
- Combined options are welded from forged elements, so swing gates can have any shape. To protect against curious people, the doors on the courtyard side are sheathed with metal, profile or polycarbonate sheets. Installation is usually carried out by specialists, since welding gates of this type is beyond the capabilities of a beginner.
Before covering the gate, it is necessary to protect it from corrosion, prime it and paint it.