DIY drawings of benches for a summer residence: photos and diagrams
When making a bench, individual needs are taken into account, as well as certain parameters. To create a high-quality design, you will need a drawing with all dimensions. An important point is the calculation of the amount of materials, which will depend on the final design parameters. Profiled timber is particularly convenient. To round the edges, you can use a special cutter.
DIY garden bench with backrest drawings: double designs
Benches can have different capacities. Most often they are designed for 2-4 people. For a double structure you will need bars and boards. It will take no more than one day to build such a product. Before cutting, you need to select the correct drawings.
Drawing of a small product
Do-it-yourself bench for a summer cottage made of wood: how to make it step by step
First of all, boards for sitting are prepared. In this case, the material is cut and processed. A grinding machine or router will help in this matter. You can also use sandpaper, but it will take much more time. Using bars you can build strong legs. The areas where fasteners will be placed must be marked.
Metal pins are used as fastening elements. For greater strength, you can use special glue. Pins are also used to securely fasten the backrest. After marking, you need to measure the distances from the edge.
A simple option for a summer residence
The assembly goes like this:
- the bars are placed on top of each other;
- all parts are secured with clamps;
- holes are made in the center and along the edges;
- Through the holes made, the parts are fixed with pins.
How to make a simple design, look at the video:
The seat boards are then secured to the legs using nails. After this, the nail heads can be masked with a mixture of mastic and sawdust. Be sure to cover the surface with paint or varnish.
Do-it-yourself garden bench from scrap materials: from pallets
You can make a bench from pallets with your own hands. You can see photos of interesting options on our website. Such furniture can be placed not only in the garden, but also in a country house or on the veranda. For installation work you will need three pallets.
Beautiful composition of pallets
This is how the assembly works:
- the pallet is divided into two halves. These halves will be used for the back;
- two pallets are joined together using nails;
- then the back is attached to them;
- A mattress of suitable dimensions is placed on top.
Video: how to make a simple bench from pallets
DIY drawings of a garden bench with a wooden back: transformable option
The transforming structure is independently constructed. For this you will need boards and bars.
You can see a version of a similar design in this diagram.
Technology for making a transforming bench with your own hands
You can build the structure by performing the following steps:
- 3 boards are attached to the supporting part, from which the seat will be made. You need to insert 4 screws into each board;
- when assembling units, it is necessary to apply wood glue to these areas;
- the legs to support the backrest must be sawed off from the end side. Then the legs need to be connected in pairs;
- then you need to make a backrest, which, when transformed, will turn into a tabletop.
- the boards are fastened so that there is a gap;
- 3 holes with a diameter of 0.8 cm must be made in the support board.
Here is a convenient transformer design:
To create the axis of rotation, you need to make two holes on the rear leg. The backrest is secured to the base using bolts.
Related article:
Drawings and dimensions of a garden bench made of metal for a summer residence
Of course, the amount of work and complexity of operations for different types of furniture differ significantly. If you have experience in making decorative metal fences, window bars or any other similar products, then you can make outdoor metal benches with your own hands, even without drawings, having only a sketch of the frame.
A simple shop for all occasions
The simplest option is shown in the diagram below. Such an iron bench can be assembled with your own hands in a couple of hours, and taking into account finishing operations, for example, selecting a pattern and method of upholstering the seat, everything can take a whole working day.
Important! The number of U-shaped supports is selected depending on the length of the bench.
For a bench with a longitudinal dimension of up to two meters, you can use two racks. For furniture 2-3.5 m long, it is recommended to make drawings for a homemade metal bench and accurately calculate the locations and welding points of the additional third support.
Dimensions and drawings of a bench with a metal back
All existing bench models with a backrest are largely similar to each other, only the details of the assembly pattern and design of the backrest and uprights differ. If you rely only on your own strength, then the easiest way is to make metal benches yourself in two versions:
- Bend the side posts of the bench in the form of several arches from a water pipe or square pipe, steel tape or fittings;
- Weld the sidewalls from square profile sections.
You can come up with the rest of the metal parts yourself or borrow from the most interesting projects. Drawings for a bench with a metal base are given below.
Arches can be easily bent on a homemade machine
Benches with arched sides are somewhat more difficult to manufacture, since metal blanks have to be bent on a machine or even decorative inserts made from forged fittings must be used. As a result, more force and metal are required, but it is possible to give the bench a more elegant look and style of classic garden furniture.
If you don’t want to tinker with decorative trim, then it’s quite possible to make a bench with your own hands from a metal profile with stands in the shape of an inverted number “4”.
Calculation part
Guided by a pre-developed drawing, you can easily calculate the amount of materials and select the tools necessary for the job.
Necessary materials
Regardless of the chosen bench design, the following materials must be prepared to manufacture the product:
- profile pipe, the cross-section of which corresponds to the developed documentation. The material is used to make the power frame of the bench;
- planks 20–30 mm thick, made of softwood. Boards or bars are necessary to form the base and back;
- galvanized screws with M6-M8 threads and a length of 80–100 mm, as well as nuts and washers. Hardware with a semicircular head is used to attach planks to a tubular frame.
Let's calculate the amount of materials for making a simple bench.
Manufacturing requires a minimum of materials
To make a bench measuring 2.3x0.6x0.45, prepare:
- square pipe 30x30 mm with a total length of 10 meters;
- pine boards 30 mm thick and 100 mm wide - 5 pieces, 230 cm long;
- bolts with a semicircular head M8x80 with nuts and washers - 10 sets.
The range of materials used for the manufacture of a bench with a back differs slightly.
The need for materials is determined by the design of the bench
To build a bench 1.5x0.44x0.9 yourself you will need:
- rectangular pipe 40x20 mm - a total of 12 meters;
- bars 30x30 mm - 9 pieces of 150 cm each;
- M8x100 countersunk head screws with nuts and washers - 18 sets;
- steel thrust bearings 2 mm thick, size 50x50 mm, under the legs of the bench - 4 pieces.
The profiled pipe should be pre-cut into blanks corresponding to the drawing dimensions.
To increase the service life of manufactured products you will need:
- paint to protect the metal frame of the bench from corrosion;
- material for antiseptic treatment of wood;
- stain or varnish for finishing wooden planks.
These materials will increase the resistance of the bench frame to corrosion and ensure the safety of the wood when used in conditions of high humidity.
Tools and equipment used
To carry out work on making a bench of any level of complexity, you will need the following equipment and tools:
- welding machine complete with electrodes with a diameter of 3 millimeters;
- grinder with cutting wheel for metal;
- electric drill with drills;
- grinding machine (you can use a file and sandpaper);
- roulette;
- building level.
If radius blanks are used in the design of the future bench, then it is necessary to prepare a device for bending profile pipes.
The device allows you to smoothly bend the profile pipe
Description and dimensions
The simplest metal bench for a summer house consists of two supports and a seat. For greater comfort of vacationers, a backrest is provided.
Benches made of iron without the use of other materials (wood, plastic, etc.) are classified as anti-vandal.
However, it is irrational to install such furniture in the courtyard of a house. After all, metal has tens of times greater thermal conductivity; sitting on it is uncomfortable and even harmful to health. Therefore, it is better to build a country bench according to the formula: metal frame + wooden seat with backrest.
Diagram of a bench made of a profile pipe with a cross-section of 25x30 mm and a wooden beam 60x30 mm.
The dimensions of the bench are selected individually. But there are several rules that it is advisable to take into account:
If the bench is above 45 cm, then the legs hang down; when below 30 cm, the knees are bent at an acute angle, which impedes blood circulation and manifests itself in the form of an uncomfortable feeling of numb legs. Another nuance that requires attention when designing is the relative position of the backrest and seat. If the angle between them approaches a right angle, then you will have to sit as if you had swallowed a crowbar. From a physiological point of view, this is useful for the spine... But it is inconvenient.
Decor for country benches made of metal
Since just a metal frame and boards are boring, craftsmen strive to diversify their products with interesting additions. Most often, forged elements act as such additions. They simultaneously serve as decoration for outdoor furniture and at the same time increase the rigidity of the structure by creating additional support points.
For example, in this model, curls of square rod act as side rails and support wooden armrests.
Here, a curved profile pipe completely replaces the standard sidewall and back support elements.
This model doesn’t have any decor as such, but polished stainless steel with a rod crosshair on the side looks elegant on its own.
The creators of such products prefer minimalism, so they do not decorate the benches. The shape of the models, the use of only brushed metal or the original design are interesting.
Asymmetry, curved contours and original shapes also help make ordinary benches made of profiled pipe the best addition to a garden or park.
Manufacturing stages
One of the main reasons that makes metal a popular material for the manufacture of such structures is its availability, because it can be purchased at any hardware store. In addition to this, you can significantly save on the manufacture of such a product if you have old metal parts on your site, for example, from water pipes or cots. They can also serve as the basis for making a metal bench.
Materials and tools
A metal pipe is not the only material you will need to make your own garden bench. You should also have pine boards available, one of which, 35 mm thick, will go on the seat, and the other, 25 mm thick, will be used to create the backrest. All your costs for purchasing materials will be a maximum of 1000 rubles. You will also have to take care of having a number of tools:
- Bulgarian;
- welding machine;
- anti-corrosion paint;
- woodworking tool.
Bolts, nuts, gloves and glasses, as well as a hammer and a hacksaw must be present.
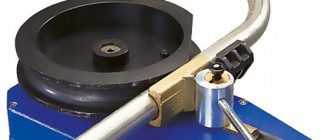
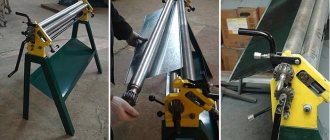
A bending tool, for the manufacture of which you can use a car brake disc, would be useful. Using it, you can avoid damage to the pipe when bending.
Pipe bending
The bending procedure itself is performed as follows: first you need to take a cork and plug the end of the tube with it. After this, fine sand is collected into the pipe and closed on the other side.
Next, the pipe is fixed in the bending device so that it is securely fastened between the protrusion on the disk and the pin. Then you can begin bending the pipe at the required angle.
Recent posts Chainsaw or electric saw - what to choose for the garden? 4 mistakes when growing tomatoes in pots that almost all housewives make Secrets of growing seedlings from the Japanese, who are very sensitive to the soil
It is not always possible to give the pipe the required angle on the first try. To simplify the procedure, you can heat the bend using a blowtorch. By following this recommendation, you can bend the pipe without much effort.
Next, they begin to fasten the constituent elements of the structure. To do this, you can use threaded connections or resort to welding.
If you have to work with duralumin pipes, then there is only one option for connecting them to each other - a connection based on screws and bolts. Welding for such pipes will be useless, since they cannot be welded.
The process of manufacturing a garden bench from a profile pipe is completed by processing the seams. To perform this operation, you will need a grinder, but if you don't have one, you can use a file.
Grinding must be carried out until the joint area acquires a smooth surface. Even before finishing the frame, it is necessary to remove any scale that may appear after welding.
Having completed all the above steps exactly, you will create a frame for your future garden bench. If everything turned out correctly, then you will have another reason to be proud, since you completed the most difficult part of the work without the help of specialists.
The last step will be to install the frame for the seat, for which they use corners attached with self-tapping screws. After this, your bench is ready for use.
To make the armrests, you will have to use a pipe: you need to divide it into two fragments, each of which should be 75 cm long. Next, they need to be bent using a pipe bending device.
These parts then need to be welded to the metal frame, after which they need to be processed using a grinder or file. Finally, the armrests are painted.
Having completed all the work described above, your bench will acquire a more presentable appearance. Thus, few people will think that you made it yourself.
Bench with backrest
A garden bench with a back requires more time to make with your own hands, but it is convenient because you can always lean on it. Using a detailed drawing, you can create a comfortable, beautiful bench without much difficulty and material costs.
To do this you will need the following materials:
- 8 meters of pipes with a cross section of 25x25mm;
- boards 30-35 mm thick for the seat and 25 mm for the back.
You need to prepare frame parts from profile pipes. To do this you will need a metal grinder and a tape measure.
- 1 piece of pipe 1550 mm long for the crossbar between the supports;
- 2 bent sections with a span of 100 mm, 780 mm high, for the back and rear of the supports;
- 2 pieces of 350 mm each will be the base of the seat;
- 2 pieces of 390 mm each to create the front part of the supports;
- 2 pieces of 200 mm each to strengthen them;
- 4 metal plates 40x40 mm will serve as a stand on supports;
- 2 bent metal strips 450 mm for connecting supports on each side.
Next we prepare:
- 3 boards 1600 mm long, 60 mm wide, 30 mm thick - for the seat;
- 3 boards of the same length and width, 25 mm thick - for the back;
- 24 bolts and nuts for screwing boards to the frame.
After preparing the frame, all that remains is to assemble the bench. To do this, you need to connect the crossbar and 2 pieces 350 mm long together.
It is important to consider that the crossbar must be installed in the center of each segment, perpendicular to them. Then weld 2 bent sections 780 mm long to the structure
Weld where the pipes are bent. Then the front parts of the supports are welded to the frame. Please note that the junction of the supports should be located 9 cm from the base of the seat. In order to increase the strength of the bench, the front supports need to be connected to the crossbar.
At the last stage, 2 arcs are welded between the supports and secured to the ends of the legs. The finished product is polished at the welding points and painted. After the paint has dried, wooden elements are installed to serve as a seat and backrest. The boards are first processed with a plane, sanded, and coated with varnish or paint.
Making a bench with your own hands is a feasible task that does not require large expenses. All you need are tools, materials, drawings and a little patience. A product into which effort and soul have been invested will be a real decoration for a country plot or the yard of a private house.
How to make and weld a bench with a back from a metal profile with your own hands
The process of making a classic bench with a back is no more complicated than the previous options. First of all, you will need to cut the metal profile into several main parts. One piece is cut 85 cm long; this will be the back support and backrest. Two more parts, 60 and 45 cm long, will be the horizontal support for the seat and the front leg of the bench.
We weld them in the form of an improvised letter H, cut off part of the horizontal blank, and you can assemble the frame of the bench. To do this, you will need to weld a horizontal cross member and thereby connect the two sidewalls into one structure.
After cleaning the metal surface from rust with emery cloth and painting the frame, we drill holes for fastening wooden slats for the seat and back of the bench.
The wood will need to be treated with a protective varnish, otherwise after the first rain the structure may be deformed and twisted by the propeller.
Metal benches for the garden: how to make?
The bench can be built either entirely from metal or in combination with other building materials. For example: wood + metal. This type of benches has advantages that cannot be ignored:
- The construction of a combination bench requires minimal costs.
- The design is practical and reliable.
- A seat made of wood does not heat up as much as a metal one, making it comfortable to spend time on such a bench even on a sunny day.
- A bench with a metal frame will last a very long time.
Most often, builders choose steel to create a frame. The material is practically not subject to corrosion, is easy to process, due to which you can add beautiful forged elements to the structure. In addition to forged elements for decoration, profile pipes are used for benches.
Compared to concrete structures, a metal bench is lightweight and easy to install. Benches made of stone are inferior to metal products in the variety of design solutions, and stone is much more expensive than metal. A universal material for construction is wood. The main disadvantage of wood is its vulnerability to weather conditions, which cannot be said about metal.
Creating benches from profile pipes yourself
The pipe cross-section may be different. On the construction market you can find a suitable option for the job. To create a bench, in addition to pipes, you will need wooden beams, an apparatus for welding, drilling and grinding wood. Additionally, you need to purchase metal paint, stain or any other paint for wood processing. You will also need nuts, bolts, pliers, a hammer, a tape measure and a construction meter; if you don’t have them on the farm, you will have to purchase them along with the material. To create symmetrically curved pipes, professionals advise using a groove. Before bending the heated part of the pipe, it is necessary to pour sand into it. The pipe is bent by hand.
Instead of a bench, you can build a bench. The difference between a bench and a bench is the absence of a backrest. The absence of this element helps to reduce cash costs, save effort and time for construction. You can replace the back of the bench by placing the bench in the gazebo, where the wall plays the role of the back. You can use profile pipes to construct other buildings, for example, gates, or you can include a decorative element from this material in the construction of a gazebo. This way, all the buildings on the site will look harmonious, create a unified style and complete the composition.
Creation of the design. For this design, you need to purchase 24 bolts and the same number of nuts. The seat of the future bench is formed by three metal rectangles. The rectangles are connected to each other by a pair of profile pipes. The bench is easy to install and design, so it does not require detailed drawings. To create it, you can use a photo from the network that you liked most.
Creating a bench. First of all, a frame is created for the seat of the future bench. To create it you will need pipe sections. With the help of guides, these segments take the shape of a rectangle. In order to achieve a right angle between the profile pipes, use a square. By adding additional supports to the original structure, you can increase the size of the bench. After welding the elements, the wooden beams are adjusted.
e7b328a7a4e4d5cc31834b6c6a9dfe70.jpe 25c8f2d41390fb37a0bf616fbecbeae6.jpe
6a614a38a0ad093523110239f4e88c27.jpe
Assembly of all forged elements, processing of welding seams and coating them with a primer. After installing and painting the frame, it is necessary to drill 8 holes in each of the elements for mounting the wood part (seat). The holes must be positioned symmetrically. It is imperative to treat the wood with stain to prevent the process of darkening, rotting, and also to protect the material from various insects. After the wood has dried, the seat is mounted to the frame part of the bench. Additionally, you can build a canopy over the bench or create a single structure. This solution allows you to sit on the bench in rainy weather.
Advantages of benches and benches made of profiled pipes:
- Strength and reliability of the structure.
- Withstands any weight load.
- Low cost of materials to create the structure.
- Light weight of the finished product: benches or benches.
- Ease of installation.
- Durability.
Bench made of profiled pipe
This is the most convenient material to work with. To make the frame of the bench, a profile pipe of square or rectangular cross-section is used.
Its advantage is its high resistance to physical impact, ease of assembly and low price.
A pipe with a wall thickness of 2-3 mm is enough to support a weight of up to 300 kg. You just need to correctly draw up a drawing and select elements from wood of the appropriate thickness.
You can bend parts made from professional pipes yourself. Before bending, the pipe is tightly filled with fine sand. And the finished structural elements are fixed either by welding or bolts.
Photo: process of assembling and welding a frame from a profiled pipe
Special requirements are placed on fasteners that connect wooden elements. They should have rounded hats to prevent damage to clothes.
Preparing for construction
It is quite difficult to make a complex bench with a lot of decorations. Actually, we did not set ourselves such a task.
Model selection
We chose a simple bench for work with a seat and back made of narrow boards, the only highlight of which was the curved armrests. However, if you do not have the skills to work with a “pipe bender” or do not have the device itself, or you do not know how to bend metal using a welding machine, you can easily refuse them, this will not affect the functionality of your bench.
Drawing of our future bench
Material selection
Selecting a pipe profile. An oval profile is best suited for our purposes.
Pipe profile with conventional dimensions
Select the desired pipe section. Since excessive load is not provided, you can choose a pipe with a rectangular cross-section and a small wall thickness of 1.5 mm. The suitable cross-section is 40x20 mm - this is just enough to ensure strength and not burden the structure.
GOST standards for profile pipes, making it easier for us to choose
Pine can be used perfectly for the back and seat. It is cheap, planes well without scuffing, is elastic and does not splinter or splinter, and due to some resin content, it is less susceptible to fungus and rotting, and therefore is durable. A wide board takes a long time to dry out after rain; a narrow board is uncomfortable to sit on; it requires a lot of work with a drill and self-tapping screws, or bolts and nuts, to secure each plank. As a compromise, we choose a 25x100 mm board.
Untreated pine board
Drawings and dimensions
Let's draw a drawing. You can scour the Internet and find a ready-made one. We did just that, taking a drawing from the Industrial Metal Structures website.
Drawing of a bench with specifications and dimensions
Required Tools
- Welding machine
- “Pipe bender” or “snail” made from a car disk for bending pipes
- Grinder with sharpening and cutting wheels for metal (or hacksaw for metal)
- Power saw (or wood saw)
- Drill with metal drill bits and attachments for sanding metal and wood (or a file and a set of sandpaper)
- Hydraulic level
- Roulette
- Square
- Planer, jointer
- Set of screwdrivers and keys
- Hammer
- Pliers
Tools (photo gallery)
| Name | Specification | Quantity |
| Regular profile pipe made of low alloy steel | 40x20x1.5x6000 mm | About 14 kilograms plus 2 kilograms of reserve |
| Metal sheet for “nickels” under the legs | Thickness 4 mm | A small flap, sufficient to cut 4 “nickels” 70x70 mm |
| Boards for back and seat | 25x100x3000 mm | 4 boards (provided that the boards are without defects; if the board is defective, then a margin is needed for rejection)) |
| Electrodes for welding machine | 3 mm | 1 pack |
| Anti-corrosion primer for metal | According to the consumption per 1 m2 indicated on the packaging | |
| Anti-corrosion paint for metal | According to the consumption per 1 m2 indicated on the packaging | |
| Anti-rot impregnation for wood | According to the consumption per 1 m2 indicated on the packaging | |
| Primer for wood | According to the consumption per 1 m2 indicated on the packaging | |
| Weatherproof colored or clear varnish, or weatherproof paint, or wood stain | According to the consumption per 1 m2 indicated on the packaging | |
| Waterproof glue | 1 tube | |
| Bolts with washers and nuts (preferably a semicircular head). Or self-tapping screws | M6x35 | At least 30 pieces |
| Plastic plugs for profile ends | If you plan to use the bench at home - 6 pieces, if outdoor use - 4 pieces | |
| Plastic furniture plugs | At least 30 pieces | |
| Sand | Fine | 10 kilograms |
Product stability
This is a safety issue: the bench should not tip over when people sit on it. Stability is ensured in various ways, taken into account at the drawing development stage. They depend on the types of products, which can be portable and stationary.
Stationary garden benches are firmly fixed at the installation site. Additional mounting elements need to be made in the design of their legs:
If the bench is installed on a hard and flat surface (asphalt or concrete), then it can be fixed with anchor bolts. For this purpose, brackets with holes are welded to the legs.
When installed on the ground, the legs are fixed using local concreting. Their length must be calculated taking into account the part that goes underground. Rods are attached to the legs of finished products that are not permanently installed, increasing their length.
A portable bench is convenient because it can be used anywhere and on any surface without resorting to installation. But this is also its disadvantage: ensuring sustainability becomes much more difficult.
63f9996f986e3d7673b5324438806a2e.jpe
It is necessary to ensure that the bases of the legs are located in the same plane, parallel to the seat. For precise installation, you will need to do it yourself or purchase ready-made devices. You can also use regular clamps, a bench square, and a large workbench with a flat surface.
You should strictly adhere to all specified parameters: lengths, distances, angles, alignment, etc. Therefore, it is better to use drawings prepared by professionals. Finding them on the Internet is not so difficult. And if you want to make something exclusive with your own hands, it is much easier to do this by making changes to the finished assembly diagram. No one is discouraging you from realizing your creative potential, but by working according to the model, you will make fewer mistakes. Having a variety of options before your eyes is useful for developing your own ideas.
Tips for making decorative elements
Profile pipes bend well with the simplest homemade bending devices. There are two bending methods, each of them has its own characteristics.
- Cold. The most common, used in all bending machines, including industrial ones. It has several disadvantages: it requires a lot of effort, bending must be done in several steps, and there is a high risk of wrinkles. Advantages: safety and accessibility.
- Hot. A little more complicated, it is rarely used at home and only for the manufacture of small parts. The pipe or other rolled product is heated with a blowtorch or gas torch to a bright red color; during bending, safety regulations must be observed. The hot method eliminates the appearance of cracks and folds on surfaces and makes it possible to bend metal at a large angle in one pass.
Curvilinear parts are made in various sizes and simultaneously perform load-bearing and decorative functions. Come up with patterns yourself, any of them will be completely original
It is their exclusivity that attracts attention to homemade benches
By bending profile pipes you can create a variety of shaped elements for a bench
Options for arrangement of wooden parts
There are two ways to place bars - along and across. There is much less work with the longitudinal one, but the transverse one allows you to make a more convenient, homey bench.
Arrangement of boards across – 1, along – 2
Considering that the frame is the same in both cases, additional work is required only for drilling holes and manufacturing wooden elements.
In case of damage, it is much easier to change the transversely located lamellas, and such repairs are cheaper.
Metal profile as a material for a bench
Benches made from metal pipes have several advantages:
- relatively light weight, in contrast to cast iron and concrete products, suitable only for parks;
- low cost and wide design possibilities, which cannot be said about structures made of stone;
- extraordinary strength, which distinguishes it from wooden benches that deteriorate under the influence of weather conditions, bugs and mold.
A significant disadvantage of the metal pipes used to create the bench is their unaesthetic appearance. However, you can ignore this drawback, because there are many ways to decorate a metal product. It is not for nothing that the most popular benches are those made from rust-resistant steel pipes and complemented with wooden elements. The seat is usually made from wood, so the bench does not heat up under the sun.
DIY metal garden benches: drawings and photos, characteristics
Despite the fact that this type of structure belongs to the category of metal, in most cases, photos of do-it-yourself metal benches that can be found on the Internet show products of a combined type. In them, the frame part is made of metal, and wood is used as the material for the seat and backrest.
Successful use of metal elements in garden benches
Thus, not only does the construction of the bench become cheaper, but the design itself becomes more practical and comfortable, since a wooden seat, unlike a metal one, does not heat up under the sun.
Advantages of a DIY metal bench over products made from other materials
Metal supports do not have the disadvantages that are inherent in the frame parts of benches made of other materials:
cast iron is the heaviest type of structure, which is suitable for installation exclusively in park areas (products are characterized by high cost, decorativeness and complex manufacturing technology);
Bright and creative bench design
- concrete - benches are heavy and are accompanied by a number of difficulties during installation on the site;
- stone - products are high cost and significantly limited in design matters;
- wood - despite its beauty, availability and light weight, the supports in these structures quickly become unusable, since the material is extremely vulnerable to the influence of weather and climatic conditions, as well as negative environmental factors (fungi, insects, mold).
Original metal bench made from the back of an old bed
Steel is often used as a raw material to create a metal frame. It is this material that is considered most suitable for benches and benches intended for installation in dacha-type plots and local areas of country cottages. Steel is practically unaffected by corrosion processes and destruction. It offers many design options through the use of decorative forging.
A combination of metal and wood in an original design
Sequencing
Have you decided to independently produce forged products for your summer cottage? In this case, study the sequence of actions.
First you need to study the range of forged products that are offered by professionals. Having selected the appropriate size bench option, you can proceed to drawing up a sketch.
It is according to the drawing that the required number of parts, fastening and decorative elements are calculated. After all the individual elements of the future product have been prepared, you can proceed to direct welding, strictly following the drawing.
Next, using a grinding machine, unevenness and welding marks are removed from the product.
Do you want a forged product to have a wooden seat and back? In this case, you need to prepare the wooden parts, coat them with a special protective compound (impregnation or varnish), then attach them to the metal frame.