In this article we will tell you in detail how to make two devices for processing (cold forging) a square corrugated pipe. The first option is a mini machine, the second is a manual jig.
The machine is of greatest interest to home craftsmen.
There are a variety of designs - we will look at one of the simplest. We will describe in detail below how to roll a corrugated pipe with your own hands for cold forging.
The drive of the rolling machine can be used in different ways - you can roll the profile manually, or you can install an electric motor. At home, a machine with a manual mechanical drive is quite sufficient.
1
Manufacturing of the block body
Materials that will be required to make the body of a homemade reinforcement block for a profile pipe:
- metal plate;
- round steel pipe;
- bearings (size - 6304);
- threaded rod;
- rollers for rental;
- gears from a car crankshaft.
To assemble the body of the machine block to reinforce the profile pipe, using a grinder or plasma cutter you will need to cut a metal plate 10-12 mm thick.
1
What are rollers for?
Bending a profile pipe is a process that is almost impossible to perform accurately and accurately using a hammer, heat or muscle force. The application of pressure of varying strength, deviations in the degree of heating and the fatigue of the master lead to deviations in the geometry of the finished products. If it is needed in a single copy, then you can live with it. As a rule, to create engineering structures, several blanks that are identical in all respects are required.
Only rolling on a special machine is a way to achieve a similar result. Rollers are a mechanism consisting of several metal shafts and an energy source that drives them.
Manufacturing of rolling rollers
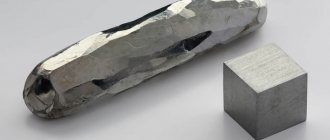
In this case, we will do without using a milling machine and lathe - the method is available to every craftsman. We will use hex nuts M30 and M27 as a basis.
Please note: nuts must be used from KAMAZ, but not ordinary construction ones - they will not cope with their task. The M30 nut was taken from the jet rod, and the M27 nut from the stepladder.
All dimensions of parts and drawings of shafts and other structural elements will be presented by the author in the video.
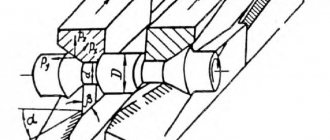
First of all, we make a homemade roller for rolling 15x15 mm square corrugated pipe.
We take an M30 nut, grind off a semicircular chamfer from the end, and then mark a line from the edge of the nut with a marking tool at a distance of 8.2 mm. We cut this nut according to the marked markings.
We cut out a template from paper, apply it to each face of the nut, and trace it with a pencil or marker.
Next, we grind the nut along the markings using an angle grinder and a flap wheel.
Now we need an M20 nut. We grind the edges with a flap wheel and press it inside the rolling roller so that the edges of the nut protrude the same distance on each side.
In a similar way, we make other rollers for rolling profile pipes with our own hands, but you will need to take into account the standard dimensions indicated in the drawing.
For example, to make a roller for rolling a 20x20 mm profile, we use an M27 nut and cut the roller not 8 mm wide, as in the previous case, but already 11 mm wide.
There is one caveat - the M20 nuts that are pressed inside the roller are 15 mm wide, so they will have to be increased. Or you can use an extended M20 nut and cut a piece of the desired size from it.
You can watch the detailed process of making homemade rollers for rolling (rolling) a square corrugated pipe with your own hands in the video. The author of the YouTube channel Welder DIY shared his experience.
DIY assembly
Pipe bending rollers are a simple device. You can even make it from scrap materials left over after renovation and construction. In most cases, when deciding how to make rollers, novice craftsmen tend to choose a mechanical type design. It is easy to design and assemble using welding, which is found in every home.
The small-sized machine is easy to move around the site; there is no need to build a separate room for it.
Drawing
Before making a high-quality and functional machine for bending profiles, it is necessary to make detailed drawings, the dimensions of all parts should be applied with high accuracy.
Roll patterns can be made on graph paper or on a computer. The choice depends on design skills. Based on the drawn up drawings, the need for building materials and tools is calculated. An estimate is made, equipment is selected and missing property is purchased.
Materials and tools
To assemble homemade rollers, you will need the following tools and consumables:
- welding machine;
- grinder or milling cutter with discs for metal;
- roulette;
- electric drill;
- set of screwdrivers and wrenches;
- square;
- core;
- oil level;
- hardware (angles, bolts, nuts, rivets);
- channel or I-beam;
- blanks for shafts;
- profile pipes.
When selecting material for construction, you should remember that metals and alloys for rollers must be much stronger than the steel of profile pipes.
What is included in the design
The bed is made of thick and heavy rolled steel.
The strength and weight of the base must correspond to the force applied when rolling the profiles. The assembled frame must be stable and strong so as not to swing during operation.
The clamping system is assembled in the shape of the letter “P”. A threaded hole is made on the top crossbar to create clamping force. Another option is to weld the nut over the round hole. Subsequently, a bolt is inserted into it to adjust the clearance between the rollers.
The rollers themselves are equipped with rolling bearings, which are mounted on durable axles. The rollers are turned on a lathe and undergo a hardening cycle in oil.
The drive is made from bicycle sprockets and a chain. The sprockets are welded to the driven and drive shafts, and then connected by a chain. A gate with sufficient leverage is welded onto the drive sprocket.
Filling with sand or water?
When the workpieces are given a strong bend, they are flattened and the cross-section geometry is disrupted. In order to prevent this, hollow profiles are filled with dense material that does not change volume under pressure.
The simplest solution is to fill the blanks with sand. It is spilled with water, compacted, and then plugs are welded to the ends.
With water it is more difficult, since the plugs must be sealed. If the assembly takes place in winter, then the best solution would be to fill the pipes with water, cover them with plastic plugs and freeze them. This method is used in the manufacture of wind musical instruments.
Spring selection
Springs are used to reduce the impact of vibration from the electric motor on the rolling system. With strong vibration, workpieces may shift along the horizontal axis. The springs must be stiff to prevent the engine from rocking and at the same time reduce shaking. It is recommended to use at least 4 springs to fix the motor frame.
Cut and cook
The roller manufacturing process is carried out in the following sequence:
- Taking measurements and applying markings in accordance with the diagrams.
- Cutting rolled products into blanks, cleaning the field for welding.
- Turning and hardening of shafts, installing bearings in them, attaching sprockets, securing them to an axle.
- Welding the frame with a rolling and pressing mechanism.
- Drive installation. It can be permanent or removable.
- Checking the functionality of the machine.
Finally, the metal is cleaned from rust, primed and painted. Moving parts are lubricated.
Assembling a machine for strengthening a profile pipe
After the rollers and other parts have been made, you can begin assembling the homemade device. Let's look at the main stages of work to be done.
Metal plates with bearing cages act as the side walls of the housing.
We insert shafts into them (M20 threaded rods) with gears and rollers mounted on them for rolling out (reinforcing) the profile. Fix with nuts.
Before inserting the studs with rollers into the second side wall, we put eccentrics on them, and weld nuts to them.
Shafts with installed eccentrics
We weld two metal strips on the bottom and top of the side walls.
To fix the rolling machine block in a vice, it is necessary to weld a piece of metal angle or profile pipe to the bottom of the side walls.
At the last stage, all that remains is to clean the welds and paint the homemade product. You will also need to make and install a handle to rotate the drive shaft.
You can see the step-by-step process of assembling a cold forging machine in the video below.
Pipe rolling machine
When rolling long pipes on a machine, the center of movement is shifted. Due to this displacement, a curve is formed between the rollers. One roller presses from the inside of the radial contour, and the other two form the external contour of the future product.
Drawing of a pipe bender for pulling profile pipes. All dimensions of parts required for manufacturing are indicated:
Structurally, such a device is made on a strong support made of channel. The lower rollers are located in bearings. Usually the distance between them does not change (there are versions of the machine where, by changing the location of the lower rollers, a different rolling radius is created).
The top roller is located on top. It can be moved in height. By moving the supporting part downward along the thread, significant forces can be developed. They will act on the pipe during the rolling process.
For self-production, you can go a different route. The walls of the device are cut out of a sheet 2...4 mm thick, where the rollers are installed.
Simplified pipe bender design:
The most difficult thing is to make the sidewalls, inside of which are located:
- Support shafts – 2 pcs.
- A pressure roller located on a suitable device.
- A handle that allows you to roll a profile pipe.
Industrial machines are made with manual or electric drive. When manufacturing an electrified machine, the possibility of reverse must be provided. Then you can roll, forcing the length to move in both directions.
Functionality
Having small dimensions and weight, a homemade machine allows you to perform many operations on processing profile pipes.
As a result, we get not just a reinforced profile, but also a decorative element.
Using a rolling machine, the manufacture of which we discussed in detail above, you can create different patterns on the surface of the corrugated pipe - “pigtail” and “wave”.
A reinforced profile pipe after one- or two-sided rolling is capable of withstanding increased bending loads, due to which it can be used in the manufacture of various bent decorative metal structures.
In a home workshop, the use of a homemade mini rolling machine to strengthen a profile pipe is completely justified, and a do-it-yourself design is much more profitable than a factory-made machine.
You can use a variety of rollers (rollers), depending on what kind of pattern you require. Eccentrics are used to roll out (flatten) the ends of the profile pipe.
Homemade devices for rolling pipes
It is practically impossible to do without such a device as a device for rolling corrugated pipes in those situations when you decide to do your own repairs, during which you will have to deal with bent pipes. To do this, you can purchase a serial device for this purpose or use a homemade profile bender, the design of which is not very complex. It also makes sense to ask the question of how to make a profile bender for the reason that serial models are quite expensive, so purchasing them (especially if they are required only for home repairs) is not always advisable.
Approximate dimensions of homemade rollers
In order to make high-quality homemade rollers, you can study theoretical information, watch a video on this topic, but the main thing is to follow the recommendations of those who have already achieved good results in solving this issue. Of course, to make your own roller, you need to have not only the appropriate knowledge, but also certain skills in the manufacture and use of various technical devices.
Kinematic diagram of the machine
Homemade rollers can even be made from scrap materials, which are almost always available in any garage or home workshop. Moreover, the efficiency of such rollers, if they are made taking into account all the recommendations, will not be much lower than that of commercially produced models.
Machine shaft drawings:
What is rolling
For the construction of buildings and structures made of metal profiles, a curved pipe is often required. Metal arches are used for the manufacture of canopies, canopies, gazebos, greenhouses and other outbuildings and small architectural forms. Bent corrugated pipes of small cross-section are used to create interior and exterior design elements: fences, gates, stair railing posts, shelves, candlesticks and much more.
At the same time, it is quite difficult to give a corrugated pipe the desired shape without special equipment, and making several arcs of the same shape is almost impossible. Thin-walled products bend relatively easily, but it is impossible to control the angle and bending radius. In addition, during such bending, centers of stress are created in the walls, and folds appear on the inside of the bend, which is why the finished product has low strength and a short service life.
You can also create an arch using welding and a grinder - cut the walls, move the cuts apart and fill the gaps with solder and weld. If you have experience in such work, it is possible to make a small number of arches, but for large-scale manipulations and creating bends of more complex shapes, this method is not suitable - it is too labor-intensive.
Rolling, a technological procedure in which the longitudinal shape of the pipe gradually changes through mechanical action, allows you to create beautiful and durable arcs, waves and even spirals.
Note! The essence of rolling is that the profile is changed in such a way that the force is applied to the entire surface of the bent section. The load is distributed evenly over the walls, which is why there is no large internal stress, and the curved product turns out neat and durable.
Arches for greenhouses and greenhouses
Different types of greenhouses are used in the practice of gardeners
Greenhouse metal frame 3·4 m:
Most often, three-meter arcs are chosen. An entrance is created at the ends. Additionally, a window is installed that can be opened while leaving the door closed. Profile pipes of 20·20 and 25·25 mm are used.
Reinforced arc of an arched greenhouse:
In winter, the load can reach over 200 kg/m². Therefore, a curved arc inside is welded to the outer contour. Additionally, radial connections are welded. Now a more rigid circuit is working that will withstand high loads.
Stationary greenhouse “Butterfly”:
Small greenhouse structures can be made stationary or portable. They are convenient because you don’t need to go inside to work with the plants being grown. It is enough to open the doors slightly to gain access. The greenhouses are called “Butterfly” because they open in both directions. From the end, the raised doors look like butterfly wings.
Portable “Breadbox” greenhouses are installed on the beds for the spring and autumn periods. In this design, the door opens in a similar way to how this issue is resolved in bread bins. It rises up and moves along the back wall. Such devices are in enviable demand among vegetable growers.
The desire to reduce the snow load and create a durable metal frame is pushing designers to create teardrop-like greenhouses. The generatrices of the walls are built along complex curves. The top is pointed, the snow rolls down without stopping on the surface.
Joining semi-arches in the “Droplet” greenhouse:
Inside, the semi-arches are connected in the center of the frame. This solution facilitates the production and delivery of products to the gardener’s plot. All that remains is to make the halves and assemble them on site.
Drawing of a radial arch for a greenhouse made of 20·20 mm profile pipe. Doorway:
The most common design is made along a radius of 1500 mm (outer profile). In it, a height of 2115 mm is reached in the center of the structure. Vertical sections are created on the sides of the generative arc; their length is 615 mm. Users will enter through a 780mm wide doorway. The opening height of 1830 mm is sufficient for the passage of people of average height.
Practice shows that such a greenhouse is in demand in most areas. There is enough space inside to accommodate beds and walkways.
Arch for a heifer 2800 mm wide:
Some people like to use a greenhouse that has a slightly smaller width (2800 mm). In it, the height in the central part is slightly higher, amounting to 2195 mm. Here the vertical sections along the edges have a height of 795 mm. The radius of the generatrix of the curve is 1400 mm (outer dimension).
The large height (2085 mm) and width (800 mm) of the doorway attracts attention. Even tall users will be able to walk inside freely without bending over when entering.
For a greenhouse 6 m long you need:
- 7 arcs, they are placed at a distance of 1 m from each other;
- for the manufacture of end elements, 33.3 m is required;
- the longitudinal elements between the arcs will total 42 m;
- To manufacture a metal frame, 20 profile pipes (6 m) will be required. The calculation was performed for a 20·20 mm profile pipe with a wall thickness of 1.5 mm. The total weight is 99 kg.
ROLLING MILL... ON THE TABLE
Regular readers of our magazine and viewers of the television program “You Can Do This” are familiar with the name of a craftsman from the town of Troitsk near Moscow, Yuri Mikhailovich Orlov.
The machines and devices developed and made by him are distinguished by their well-thought-out design, reliability in operation and the wide capabilities inherent in a universal tool. All these requirements are met by the tabletop rolling rollers offered to your attention. Tabletop rolls resemble a two-high roll stand in a rolling mill. They differ from their factory counterpart not only in size, but also in capabilities - due to the installation of replaceable tools. Using cylindrical rollers with shaped grooves, you can produce wire of a wide variety of sections: round, triangular, square, diamond-shaped. Rollers with symmetrically located ridges and grooves are convenient for straightening (rolling stiffeners) metal plate parts. And by installing instead two steel disks with sharpened conical edges, it is easy to cut sheet materials - from paper to stainless steel 0.5 mm thick. Even the gears of the roller drive mechanism are used to form wavy parts: wire zigzags or corrugated plates. Rolling a wire ring or a cylindrical sleeve on this machine is also not difficult: it is enough to have a pair of cylindrical rollers of the appropriate diameters and, when rolling, press the workpiece with a wedge against one of them.
The rollers are driven into rotation by a handle placed on the square shank of the lower roller. The rotation is transmitted to the top using a gear transmission. This not only makes the rollers more efficient, but also allows the design to be used for cutting sheet metal using circular knives mounted on their axis.
Rice. 1. Design of universal rolling rollers:
1 — regulator gear (m = 1, Z = 50), 2 — thread stop gear (m = 1, Z = 50), 3 — M10 bolt (4 pcs.), 4 — upper plate, 5 — replaceable tool: shaped rollers, circular knives, 6 - plain bearing (bronze), 7 - stand (steel 20), 8 - M10 screw (4 pcs.), 9 - upper roller (steel 40X), 10 - base (steel 20), 11 - lower roller (steel 40Х), 12 — roller gear (steel 40Х, m = 2, Z = 25), 13 — sleeve, 14 — spring, 15 — slider of the upper roller (steel 20), 16 — threaded stop (steel 40Х) , 17 — regulator gear axis, 18 — regulator handle, 19 — handle, 20 — M8 screw, 21 — handles, 22 — roller handle.
Rice. 2. Additional replaceable roller tools:
1 - shaped rollers, 2 - circular knives, 3 - toothed rollers, 4 - set for rolling the workpiece into a ring (cylinder), 5 - rollers for straightening.
Source
Rolling mills - main types and design
It is difficult to name an industry that does not use metal and products made from it, for the production of which a rolling mill is actively used. Metallurgical enterprises today place quite high demands on equipment. That is why modern industrial machines, in particular rolling mills, differ significantly from the models that were produced earlier.
Rolling mill for the production of corrugated sheets
Pros of a homemade device
Ultimately, everything you need to make such a universal device can be purchased at a low cost at any hardware store, or you can select the necessary components from old, long-forgotten things, as well as select drawings. In any case, the price of such a machine will very quickly pay for itself, since it can produce parts of any complexity with minimal costs for consumables.
Important: renting a rolling machine will cost a tidy sum, which is why you can place ads and make good money from your device.
The work done pays off quite quickly, since you can produce any parts. Here is just a small list of them:
All these homemade products will be useful to you when building a new house or renovating it. As practice shows, homemade sheet bending machines are extremely in demand, since their design does not require complex manufacturing, but at the same time allows the production of a lot of useful and necessary parts.
Video: DIY rolling machine.
Components of a rolling mill
The design of any rolling mill includes three main elements: the so-called working stands, transmission devices and drive motors. The rollers along which sheet or profile metal moves are part of the working stands. They also include installation mechanisms, frames, plates and wiring. The movement of all working parts of the rolling mill is provided by powerful electric motors, which are connected to them through elements of the transmission device: couplings, spindles and gears.
You should know that the main characteristic of billet and crimping rolling mills is the diameter of the work roll. If, in the process of processing a workpiece, several working stands are used at once, then the diameter of the roll on which the finishing operation is performed is used as such a characteristic.
A section rolling mill, where products of complex shapes and with fairly accurate geometric parameters are produced, includes several stands at once through which the rolled stock passes sequentially during its processing.
Modern enterprises today use universal rolling mills equipped with 3 or 5 working stands. Some of the rolls of such mills (2–3) have a diameter of 1350 mm, the rest - 800 mm. Equipment for producing sheet metal of considerable thickness is, as a rule, equipped with one or two working stands. The working width of such mills, determined by the length of the rolls, is in the range of 3.5–5.5 meters. A sheet metal mill is most often equipped with additional working stands with vertical rolls, which ensure compression of the side edges of the formed sheet of metal. Sheet metal in the form of strips is produced in a device equipped with 10–15 working stands equipped with horizontal rolls with a length of 1.5–2.5 meters and vertical rolls for crimping the ends.
A rolling mill, as can be seen from its design, can be of considerable length. The most notable thing in this regard is pipe rolling equipment, which includes three mills simultaneously. At the first of them, a hole is pierced in a metal workpiece, at the second, the workpiece is drawn into a pipe, and at the third, calibration is performed, which is carried out to give the finished product the required diameter. On part rolling mills, the workpiece is subjected to both helical and transverse processing.
Rolling mill design