How to cut smoothly with a jigsaw: recommendations
If this is the case, then it is better to make the cut with a circular saw.
- When it becomes necessary to make a cut on the inside of the workpiece, you should first drill a hole at the starting point.
- When working with the tool, do not use much force. An electric tool cuts wood quite well and without excessive pressure. If you apply serious force to advance the jigsaw, the saw and motor will become very hot and the risk of damage increases. In addition, excess pressure is the main cause of chipping.
- When cutting hardwood, it is advisable to add a little machine oil to the blade.
- Sometimes you have to work at low speeds. In this case, it is necessary to take frequent breaks from work, as the saw becomes very hot.
Shape cutting technologies
Jigsaw
As we noted above, a jigsaw will come in handy if we are looking for how to cut a word out of plywood or make other parts of complex shapes:
- We transfer pre-printed drawings or templates onto the workpiece using carbon paper.
Figured carving with a jigsaw: photo of the finished product
- If the structure has through sections, we make starting holes with a thin drill.
- Insert a file or jigsaw blade into the hole. Secure the free end of the file with a fastening screw or clamp.
- We make a cut along the intended line, pressing the workpiece to the workbench. The saw moves either automatically (for electric jigsaws) or manually.
After all the arc elements have been sawn, we remove unnecessary areas and process the finished part with a file or sandpaper.
Finished hole
Fraser
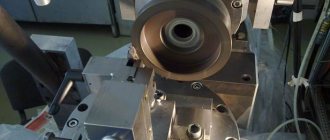
A furniture router is great for cutting out thick plywood. Of course, you can’t make a complex shape with it, but cutting an arc or circle is easy:
- We fix the standard ruler included in the router in the center of the circle using a self-tapping screw.
- If the length of the ruler is not enough, you can assemble a simple bracket from a metal profile or wooden planks.
- By rotating the cutter along a fixed radius, we select a groove along the circumference, resulting in an almost perfect hole.
Bracket for router: with it you can cut a disc of almost any diameter
Note! When calculating the diameter of the circle, you should take into account the dimensions of the working cutter. The instructions for the device will tell you the exact numbers.
In this way, you can cut not only circles, but also individual arcs - for example, in order to make grooves for furniture brackets.
Using improvised means
For shaped elements, it is advisable to have special devices, but any craftsman may need to make a round hole in a slab of laminated veneer. Below we will tell you how to cut a circle from plywood when you have nothing at hand. Well, almost nothing:
- To cut plywood, use a wooden strip with two nails.
- One nail is driven through the strip into the workpiece, exactly in the center of the hole being made.
- We drive the second nail into the bar so that the point protrudes on the wrong side by at least 5-10 mm. The distance from the first nail should be equal to the radius of the hole being made.
- Rotating the bar, use the tip to draw a groove on the plywood, deepening it with each turn.
- Instead of a stick, you can use a strong cord. The operating principle remains unchanged.
Diagram of "threading" using nails. The sharper the nail used, the faster the hole will be made. It should be noted that although the price of such a device is low, it is worth using it only when other methods are not available: the edges still turn out to be far from ideal.
Accuracy problems
Let's look at how to cut smoothly with a jigsaw:
- The object to be processed must be securely fastened. Moreover, in such a way that it would be convenient to make the cut.
- In cases of particular uncertainty or for greater guarantee of accuracy, it makes sense to use guides. When making a straight cut, you can use a wooden block fixed along the marking as a guide. If the cut shape is complex, then the situation becomes more complicated. In this case, you can use patterns, if any, or you will have to reduce the speed of work by more carefully guiding the jigsaw.
- One of the options why a jigsaw cuts crookedly is problems with the saw. It may be dull or have chipped teeth. If you notice that the jigsaw literally turns itself wherever it likes, inspect the saw.
- Jigsaw failure. For example, if the motor runs jerkily, the likelihood of a crooked cut increases sharply. Likewise, other mechanism failures can lead to a decrease in accuracy. Such problems are difficult to eliminate on site, as they require diagnostics and, possibly, repairs.
- Finally, the accuracy of the work is greatly influenced by the skill of the performer. If you are a novice carpenter, do not be discouraged by periodic failures: accuracy comes with experience.
Read also: No spark on chainsaw calm
Chips
Another serious question is how to cut with a jigsaw without chipping? These are usually formed:
Avoid these actions and you will reduce the likelihood of chipping to a minimum. Also, some models allow the use of special anti-splinter inserts for jigsaws.
Anyone who has ever had to cut laminated chipboard or wood with a jigsaw knows that the material is almost never without chips.
You can, of course, use special files for finishing cuts.
Rules for working with a jigsaw
To understand how to properly saw a circle in wood, it is important to study the features of a jigsaw. This carpentry tool helps to cut out ovals, wavy patterns, figures with uneven outlines, non-standard carved boxes, shelves with end-to-end patterns. To ensure that interaction with a jigsaw is organized and safe, it is important to adhere to the following rules:
In order for work with a jigsaw to proceed quickly and safely, do not forget to fix the product before work.
- To avoid inconvenience, special stands should be prepared during work. A slot is made up to the middle of the support, somewhat reminiscent of a lock hole.
- The stand is fixed with clamps or screws to the workbench.
- At the time of work, you need to sit down, position the file strictly vertically relative to the floor and perpendicular to the surface.
- The workpiece is placed in the middle of the stand, holding it with your left hand; you can saw the plywood with your right hand. The location of the cuts should be in the middle part of the support hole.
- The tool does not tolerate strong pressure: just a small touch and gradual movement up and down, and it will begin to work effectively.
Attributes:
- pencil;
- drill;
- drill;
- knife;
- jigsaw
Smooth cutting of material with a jigsaw
For example this one. But even they do not always provide a chip-free cut. So what should we do?
Let's look at why chips occur. Watch how the chip appears. When the finishing saw goes down, the teeth come out of the material, practically without sawing it or forming any chips. On the contrary, they saw upwards and the teeth at the exit catch the material and break it out. In wood, neighboring fibers cling; in laminated chipboard, chips stick together with the coating.
Now try sawing two layers of chipboard at once. You will find that the bottom layer has been sawn clean on both sides. If you think a little, it is not difficult to understand why this happened.
This happened because the top layer of laminated chipboard did not allow chips to form.
By carrying out these small observations and experiments, you can quite easily solve the problem of cutting with a jigsaw without chipping. So what should you do?
I would like to draw your attention to the fact that when drilling holes, the same picture is observed: at the exit of the drill, chips also easily form, so you need to press some unnecessary part from the exit side of the drill when drilling through holes.
Carpentry tricks Jan 21, 2014
Get access to the premium section
Subscribe to our newsletter
How to Use a Hand Router with a Circle Cutting Attachment
Those who have already had to work with a router can probably assume further developments. The required radius is measured from the cutter along the fiberboard strip. In the location determined as a result of the measurement, the strip is attached to the workpiece. This can be done, for example, using a nail.
After this, the manual router should only be moved. And in a few passes you can get the perfect circle of the required size.
So, I told you how a hand router can do work that seems beyond its capabilities.
This is not our last publication about how to use tools and equipment. We will continue these publications in the future. In order not to miss any of them, we recommend that you subscribe to our newsletter. And all our new articles will be directly in your inbox from the very morning.
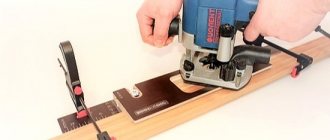
How does a handheld circular saw attachment work?
The device in question is extremely simple and consists of only a few parts: a base for the saw, a guide rail, a thrust block and an eccentric clamp that ensures reliable fixation even on lumber that has been loosened with slight deviations in width.
Diagram of a device for a hand-held circular saw.
The homemade product is very easy to use. First, markings are made on the board.
Then a homemade device is installed on top, the lower stop of which is pressed against the edge of the workpiece, and the right edge is aligned with the mark.
Photo of a device for a circular saw.
Next, the plywood base is securely secured by turning the lever of the eccentric clamping mechanism.
Photo of the device - view from the bottom.
Now all that remains is to place the circular saw on the base and make the cut, pressing the edge of the sole against the guide side stop.
Cross cutting of boards using a manufactured device.
The result will be a perfectly even cut that exactly follows the markings.
With this device it is convenient to make many cross cuts when you need to frequently move the tool to a new cutting line, for example, when making grooves in beams. It is also useful if it is necessary to reduce the length of the workpiece by several millimeters, and it will cope with this task no worse than a miter saw.
How to make a device with your own hands
The cutting device is made for a specific model of power tool. On your circular saw, measure the distance from the engine to the bottom plane of the sole and subtract 5 mm. The result obtained is the height of the guide stop.
Removing the required dimensions of the circular saw.
Prepare a plywood base with right angles and wooden slats with parallel edges according to the dimensions.
Blanks for assembling a device for cross-cutting with a circular saw.
Measure the distance from the cutting blade to the edge of the sole.
Read also: PPU PE pipe what is it
Add an allowance of 6–10 mm and install a guide rail at this distance from the right end of the plywood. Secure the plank with countersunk screws, ensuring its strictly perpendicular position.
Screw the stop block on the back side and fix the device on the workbench.
Cut the plywood to the final width with a circular saw, creating a reference edge for precise positioning of the jig along the markings.
Draw a template for the cam clamp cam on paper.
Drawing of an eccentric clamp.
Mark the piece on 10mm plywood and use an awl to mark the center of the drill hole for the bolt.
Cut the workpiece with a jigsaw.
Make a washer with a diameter of 50 mm from the same plywood using a ballerina extendable wood drill.
Sand the workpieces and select an M6 or M8 furniture bolt with a mustache (or with a square headrest), a handwheel nut, a washer and a bushing. The latter can be made from a tube of suitable diameter. The length of the sleeve is the total thickness of the base, lever and plywood washer.
Ready-made plywood eccentric.
Make holes in the base with a drill according to the diameter of the bushing, which serve to rearrange the eccentric clamp according to the width of the board being cut.
Hole drilling diagram.
Assemble the eccentric mechanism: insert a bolt with a sleeve on top, and install a wooden washer, the cam itself and a steel washer from below. Tighten the parts with a nut.
Stick a strip of sandpaper on the inside of the stop to prevent slipping when the eccentric is locked, which can happen when the device is fastened to a smoothly planed workpiece.
The clamping system of this device has a stroke that ensures fastening on boards with a spread of approximately 10 mm in width. If you need to cut or trim pieces of a different size, simply place a wooden block in front of the stop beam.
An example of using a device for cross-cutting a board of smaller width with a hand-held circular saw.
If desired, the potential of the considered device can be expanded by adding a cutting angle of 45°. To do this, you will need to slightly increase the dimensions of the support platform and install a second thrust block at a given angle.
Techniques. What can you do when working with a router?
Using a hand router, you can cut out parts and products of various configurations - shelves, racks, railings and other parts. This tool is indispensable when used at home. For example, when restoring old furniture. Once you gain experience, it is quite possible to do the following things:
- Treat flat and shaped surfaces, facades.
- Cut out various recesses: imitation of panels, grooves, ridges. Perform end processing of wood.
- Punch holes.
- Apply various inscriptions - engrave.
- Insert door hardware – locks and hinges.
- You can make a complex connection - a spike. Ensure reliable joining of wooden parts.
List of necessary tools and devices for working with a router:
- Milling cutter
- Jigsaw
- Electric drill with drills
- Templates for cutting parts
- File
- Protective clothing
The depth to which it is planned to go deep is adjusted by setting the distance between the pin and the washer near the electric motor.
A straight guide is used to maintain the distance from the edge of the workpiece. Note! Some models additionally include a circular guide, which is used for milling circles with large radii. For circles with a radius of less than 25 cm, technological holes are made in the base of the tool for the centering pin, into which it will be inserted at a certain distance. Cutting grooves can be done using an angle stop.
How to make a circle with a router
Milling of various round holes is done with templates. They are performed using an adjustable rod compass, which is a metal rod. There is a height-adjustable center at one end, the other end is fixed in the holes in the base for the rip fence.
To work you need:
- Unscrew the stop screw.
- Ensure that the length of the compass rod is adjusted to the desired radius.
When milling external arcs, you should monitor the distance from the center to the inner cutting edge of the cutter, and for internal arcs - from the center to the outer edge. It is possible to secure the leg of the compass to the material by directly sticking the leg of the compass into the material if this part is to be thrown away as scrap. Otherwise, you can place a piece of plywood by gluing it with double-sided tape.
Processing metals with a manual milling machine
Processing metal (stainless steel or aluminum) with a milling cutter is not the best idea, since, unlike a metal processing machine, it does not have a gearbox or gearbox. However, in the absence of a professional tool, the device is suitable for one-time work. A manual milling cutter, due to its design and functions, allows processing in two planes: vertical and horizontal. When working, you should correctly determine the direction of movement of the tool.
Note! To work on metal, the milling cutter must be set to minimum speed, as there is a danger of the metal softening during work. It is necessary to make a minimum passage depth.
Joinery joints using a hand router
Various connections that serve to strengthen structures, from furniture to building elements, are made using wood cutting tools. Some of the joints that can be made with a router are dovetails, tongue-and-groove joints, tongue and groove joints, and others. This can be achieved using various special cutters.
Processing edges with a manual router
There are two ways to remove the edge: with or without a template. It is better for an inexperienced carpenter to use a template. To process the edges of the board, you will need 2 cutters - with bearings at the beginning and end of the cutting part.
How to make a hole with a milling cutter
On the working site, it is necessary to mark the axis around which the cutter will move. Mark the radius from the cutter located further, make a hole and install the axis.
Note! When working, eyes must be protected with goggles!
How to make a tongue and groove board with a hand router
To perform this work, you need high-quality material - dry, without visible damage. The board is secured to the table with clamps and marked with a pencil. A quarter groove is selected in the edge, quarters are selected on both sides in the opposite edge, forming a tenon. This completes the work.
How to mill a radius
To start working, you need to insert the cutter into the boring head. The boring head allows you to adjust the radius of the recess by moving it to the sides. The depth of the recess is adjusted by moving the milling table. The chamfers are removed with a cutter.
How to cut a circle with a jigsaw safely and quickly?
- Date: 09/23/2015
- Comments:
- Rating: 13
Often the question of how to cut even circles from plywood with a jigsaw confuses novice craftsmen. After all, doing this is much more difficult than a simple straight cut; no saw will help here.
Drawing of a hand jigsaw.
Most often, a jigsaw helps to cope with the task of figure cutting. Jigsaws are manual and electric. A manual jigsaw consists of a frame with blade clamps and a handle. The main disadvantages of a manual jigsaw: low mechanical strength of the blade and small frame size. As a result of this, the blade often breaks and it is impossible to cut at a large distance from the edges of the part. These jigsaws are usually used for processing wooden products. There are regular jigsaws, in which the saw is positioned vertically, and for artistic cutting, where the cutting element is a steel blade. Electric jigsaws are usually used when working with thick material.
How to cut a circle with a jigsaw: basic methods
Questions often arise about how to cut a circle with a jigsaw, since many craftsmen only deal with straight cuts of the material. But cutting out varying degrees of curvilinearity seems difficult only at first glance.
Features of the electric jigsaw.
For cutting you will need:
- jigsaw;
- plywood or other material;
- special purpose files depending on the material;
- marker;
- sample;
- working surface;
- clamp.
There are different ways to cut with a jigsaw. You can cut a circle with either a manual or mechanical jigsaw. A hand tool is a simpler device than an electric one. It is not suitable for thick layers of material or for long cuts. Jigsaws are divided into ordinary and artistic. The difference between them is in the location of the file: in a regular file, the file is located vertically, but in an artistic one, the role of the file is played by a steel blade. A regular jigsaw can be used to cut through thick plywood to make a headboard or other furniture. Artistic ones can cut out complex elements, letters, puzzle pieces.
Cutting blades are varied for each type of jigsaw, and they need to be selected according to the material with which you are working.
How to cut out of plywood with a jigsaw?
Scheme for cutting a circle from plywood.
Before you cut a circle out of plywood, you should remember a few general tips for working with this material. Sawing can only be done on dry material. Wet plywood has increased resistance, and when cut, the veneer will begin to peel, which will lead to damage to the file or even the entire tool in the case of electric models. At the first sign that the teeth are not sharp enough or that some part of the blade is bent, the file should be replaced.
When sawing plywood with a jigsaw, you should, if possible, place the main cutting lines along the veneer fibers.
This will promote clean cut edges. When working with a hand jigsaw, it is easier to cut across the grain. This will not protect you from chips, but there will be less chance that the file will get pinched or it will move along the chip away from the intended line.
Before cutting out the circle, you need to transfer its contours to the plywood. In this case, you need to try to ensure that areas with defects, chips, stains and knots fall outside the cut contour. You can transfer the outline to plywood by tracing it through carbon paper, cutting out a paper outline for tracing, or simply drawing a circle of the required radius with a compass. If necessary, a starting hole in the plywood is made using a thin drill.
Sawing modes for a jigsaw.
To cut a circle with a jigsaw, a blade is inserted into the hole. The free end of the manual model is again fixed in place using a clamp or mounting screw. The workpiece is pressed to the workbench with clamps, the cut is made according to the transferred line. When the circle is closed, the central element is separated from the sheet and the edges are processed with sandpaper or a file.
Before cutting with a jigsaw with an electric motor, you need to install a narrow file on it. There is a special improvement for this tool called a circle cutter, it is installed in the center and work begins. When working, do not put pressure on the tool; this does not contribute to faster movement. As a result of the pressure, the jigsaw blade and even its fasteners can bend and break. If the circle that needs to be cut has a small radius, it is better to do the work in several approaches, since sharp turns can break and bend the blade.
Return to contents
How to cut a hole in a tile with a jigsaw?
Tile drill bits are small in diameter and will not fit most required holes. When using an angle grinder, mastery of the tool is required to make a straight hole. Therefore, practically the only way is to use a jigsaw. For work you will need a special cloth of increased strength. Before starting work, you need to drill a hole using a drill or crown.
Having brought the blade inside and secured it, they begin to saw. Coated tiles are even more difficult to saw than homogeneous tiles. After completion of the work, the hole is processed with sandpaper.
moiinstrumenty.ru
Key rules
To make the sawing process simple and fast, you must follow the basic key operating rules:
To ensure that the edges of the plywood are even, it is better to cut along the blade.
- You can only work with dry material, since humidity increases the resistance of the material, as a result of which the veneer may begin to delaminate;
- it is necessary to change the cutting blade immediately after the first signs of dullness of the teeth appear;
- It is better to work with a jigsaw along the fibers of the material, so the edges will be smoother;
- Use a hand jigsaw to cut across the grain of the veneer.
To ensure safe work, you must adhere to the following recommendations:
- securely fasten the sawing table and the file in the frame;
- the jigsaw must have serviceable and well-fitted handles;
- You should not press the jigsaw too hard, trying to “help” it, this will only lead to an acceleration of dulling of the working blade;
- It is best to make straight and long cuts with a wide blade, so the cutting process will go faster;
- You must always see the markings, so sawdust must be removed from the material being cut by hand, and under no circumstances should you blow it away, as it can get into your eyes.
Following these simple rules will help a beginner learn how to cut circles with a jigsaw and make his work easier.
Cutting Tips
Selecting a tool
When starting to work with sheet materials, many craftsmen only have an idea of how to cut in a straight line. Therefore, the question of how to cut an even circle from plywood can confuse many. And indeed, a regular or circular saw cannot cope with the task. Figure cutting is most often done using the following tools:
Hand jigsaw
- Hand jigsaw. The simplest device used for sawing. With the help of a jigsaw, even the most delicate work can be done with your own hands, but for thick material or long cuts it is practically not suitable.
- Jigsaws. Here you can use two types of devices: a regular one, with a vertically positioned file;
- artistic, in which the role of the cutting element is performed by a steel blade.
Ordinary jigsaws will come in handy when working with thick plywood, for example, when making a bed with your own hands. But if you are looking for a way to cut letters out of plywood or make other complex elements (for example, parts of a children's construction set), then it is best to use a model with a band saw.
Model for artistic cutting
Advice! Naturally, for each type of jigsaw there are several types of files and blades. The correct choice of cutting element is a necessary condition for high quality of the product.
- In addition to jigsaws, you can use a furniture router for curved cutting. Despite how difficult it is to operate, it is many times superior to most models of plywood saws in terms of the quality of the holes it makes. Using a router, you can make a wonderful rocking chair from sheets of plywood with your own hands.
Also, do not forget about available devices, but we will talk about their use in the appropriate section.
Tips for cutting plywood
Cutting from plywood has several nuances that the master needs to take into account:
- Firstly, you can only cut on dry material. High humidity leads to an increase in the resistance of plywood, therefore, with excessive force, either the veneer will begin to delaminate or the file will break.
- You need to change the saw or cutting blade immediately after the first signs that the teeth have become dull appear.
- If we are cutting from plywood using a jigsaw, then to obtain cleaner edges, the main cutting lines should be placed along the grain of the veneer. But with hand files it is easier to work across the grain: there will be slightly more chips, but there is less risk of the file getting pinched or moving away from the intended line.
File for rough work: the edges of the product will need to be filed.
Tip! When transferring designs for cutting from plywood onto the workpiece, try to place the template in such a way that the elements to be removed fall on areas with defects: knots, chips, stains, etc.
Cutting instructions
Before starting work, you need to drill a hole in the plywood for the jigsaw blade.
To cut even circles with a jigsaw quickly and beautifully, you don’t have to be an expert in this field, but for a beginner it can be a very difficult task. In this matter, the main thing is patience and, of course, the presence of the necessary accompanying tools, such as the jigsaw itself, a file, a compass, a simple pencil and devices for polishing the surface.
Read also: How to remove super glue from skin
The first thing to do is draw a circle on the surface of the material you will be working with. It would be best to use a compass or select a suitable circle and trace it. You need to trace with a pencil so that traces of it can be erased in the future.
If you need to cut a circle inside the surface, you should make a through starting hole. Next, you need to insert a jigsaw blade or file into this hole and secure the free end of the file with a clamp. It is recommended to cut while sitting. First of all, you need to secure the file in the jigsaw using a key, keeping in mind that the teeth of the file should be directed downward.
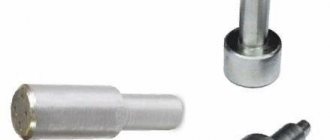
Drill saw
Neither a hand saw nor an electric hacksaw will help if you need to cut a small hole in the workpiece - less than 10 cm in diameter. A jigsaw may also be useless if the workpiece is large. In this case, the most suitable tool is a drill saw. With its tip it bites into the wood like a drill and thus makes a “starting” hole for further cutting. Externally, the saw is similar to a round file with the difference that its shaft is surrounded by a spiral around the cutting edge.
Drill saws are available with interchangeable attachments of various diameters, designed for processing both soft and hard wood, as well as a variety of materials made from it.
The working body of a drill saw is a metal rod with a cutting tip, like a gimlet, and a cutting edge that goes around the rod in a spiral.
This is what the narrowest of hand saws looks like. Thanks to the fastening unit, the blades in the hacksaw can be changed depending on the nature of the material being processed.
Drill attachment
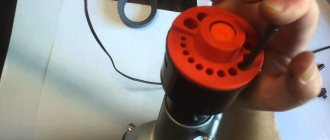
One of the most popular and convenient options for cutting a hole is a special attachment for a drill. It is made in the form of a crown comb and has a rounded shape. With this attachment, cutting holes occurs quickly, and they turn out quite smooth.
drill bit for holes
Nozzles come in different diameters, which allows you to cut a hole of the required diameter. If you have already prepared a hole, we can advise you to try your hand at options trading.
Drill
You can also cut a large hole using a drill. To do this, it is necessary to pre-mark the outline of the hole to be drilled. Next, use a small drill to drill through holes along the contour prepared in advance. Next, using a jigsaw or a very sharp knife, we cut off the holes, thereby connecting the holes. After which you can smooth the circle using sandpaper of various grain sizes.
Chisel
You can also cut the required hole using a chisel. It is enough to remove the wood layer by layer along the contour. This option is the least suitable for interior decoration. The hole must be smooth, which cannot be achieved by using improvised and unsuitable materials for the job. The best option would be to use a drill bit. The hole is even and has smooth edges.
Thus, to summarize, it becomes clear that you need to choose a tool for cutting a hole based on your goals. If you need a high-quality cut, then you cannot do without a special tool.
Any design, whether in your home or in production, involves working with metal.
Often, during the operation of this material, the question may arise: how to cut a circle in?
It deserves attention, since the labor intensity of the work process and the quality of its result directly depend on the choice of the right tool and technology.
Metal can be thin or thick and durable, so a variety of tools are used to cut it.
The choice of materials and cutting technology also depends on what diameter the circle is needed and how even it should be.
Using a jigsaw
If you need a perfectly even circle, you can use an electric one to cut it out.
The work is carried out in several stages:
- First, the thickness of the metal is determined and the appropriate saw blade for the electric jigsaw is selected.
- Before cutting a circle in metal with a jigsaw, the outline of the circle that will be cut is drawn on the working plane.
- Using a drill and a drill (with a diameter of eight to ten millimeters), a hole is cut out from which work will begin.
- A jigsaw saw blade is placed in the resulting gap and cutting continues as planned.
Cutting using this tool does not take much time and effort. Moreover, using a jigsaw you can get a circle with perfect edges. But this tool is used only for working with metal of minimal or medium thickness (for example, 2 - 3 mm).
Using an angle grinder
The grinder is used when working with thin metal. You can create a round hole with this tool by following these step-by-step tips:
- Before cutting a circle in metal with a grinder, markings are made so that its contours are clearly visible.
- Along the entire length of the intended drawing, short sections are cut with a grinder disc, which will eventually be connected.
- The figure will look more like a polyhedron than a circle. Therefore, after cutting is completed, the product is processed and cleaned until the edges become sufficiently even and smooth. You can also use a grinder for processing. If the circle is wide, you can sharpen the contours with a large disk.
When processing a cut circle using a grinder, you should be careful that the disk is inside the hole and, at the same time, is located in the same plane with the work sheet.
How to saw chipboard without chipping
You need to cut from top to bottom. The tool should be held straight to avoid nicks and bevels.
The main thing in this process is not to rush and cut smoothly without sudden movements.
It is necessary to take short breaks during the sawing process, as the file may overheat and break. Now the circle is ready. Now it is recommended to use a file to straighten the edges, erase the markings left by the pencil and polish the part. If necessary, it can be varnished.
Of course, sawing with a jigsaw requires certain dexterity and skills, but everything comes with experience. Therefore, following the recommendations described above should help the novice master in mastering this interesting and exciting activity.
Do you need to make a perfectly round hole in plywood or board, but don’t have any special tools at hand? This article is for you.
Hello everyone, dear friends. This is rather my last article here, I think it will be interesting to many. I encountered the following problem: I needed to make an even circle in the plywood under the speakers, but there were no tools for this, this device was invented. The device is very simple, anyone can make it, and it is very easy to use.
For this “device” we need:
– a board 20-30 cm thick, 2-3 cm thick – two self-tapping screws – a screwdriver – and something in which the hole will be made
You screw one screw into the middle of the board or a little closer to the edge, as convenient
Next, measure the required diameter, measure it on the board and mark it, screw in the second screw
This is roughly what it should look like
Now we screw the central screw through into the plywood, and slightly unscrew the second one so that its “sting” sticks out slightly from the board.
And we begin to rotate the board, thereby cutting through the board or whatever you call it
Each time, as soon as the board becomes easy to move, we screw the screw in a little inside, and thereby cut further and further into the circle
Here is the final result, the hole has already been cut, everything is perfectly smooth, if desired, you can sand it to give a smoother surface
That's all, we cut an even circle without any costs or special tools.
As it turns out, not many people know that you can easily cut a perfectly round hole of any diameter in plywood.
And I decided to share this method with you.
To do this we need a piece of rail and two self-tapping screws.
Divide the diameter of the future hole in half and put two marks on a piece of wood.
Then we drill according to the marks.
And screw both self-tapping screws into the drilled holes so that their ends protrude by 5-8 mm.
Now we align the first tip of the self-tapping screw to the center, and with the second, applying a little force, rotate it around the axis
Having reached the middle of the thickness of the plywood, we turn it over and perform the same operation. Don't worry about the center getting lost. Scrolling in place, the central self-tapping screw drilled a hole.
Using the example of a piece of krages, you were convinced that it is not so difficult to cut out a perfect circle without special tools.
In this way I cut holes in 10 mm thick plywood.
And of course, in the video you can watch the whole process in detail.
BEING THE AUTHOR OF THIS ARTICLE, I PROHIBIT COPYING TEXT, PHOTO AND VIDEO MATERIAL FROM THIS SITE TO OTHERS.
How to cut a circle in plywood with your own hands?
- Date: 09/13/2015
- Rating: 31
When working with different types of wood, you always need to know the detailed variations in its processing. Before you cut a circle in plywood, you need to know all the options, because you often have to adapt to the situation. There are many options for carrying out such an undertaking, and they differ radically.
In order to cut a circle from plywood, you can use both professional tools and improvised means.
Power tools or hand tools?
Tools and materials:
- drill;
- jigsaw;
- hand jigsaw;
- milling machine;
- nails;
- rope;
- chisel;
- hammer;
- stationery knife;
- sandpaper;
- compass.
When determining the diameter of the future circle, it is necessary to take into account the dimensions of the working cutter.
The most popular option among all is a jigsaw. This tool allows you to cut not only circles, but also any other geometric shapes. Its only disadvantage is the need to form additional grooves at turning points (corners), but this is not noticeable when creating a circle. It is very important to choose the right nail file, because... they come in 3 types: vomiting on the left, vomiting on the right, vomiting on both sides. After the canvas is selected, cut out a circle of any size.
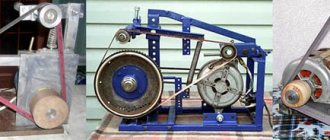
An ordinary hand jigsaw. Before cutting a circle from plywood using this tool, you need to make sure that the workflow is accessible. The main difficulty is the limitation (usually up to 30 cm) due to the physical structure, i.e. It will not work in deep places. When starting work, not from the edge, but directly from the center, the nail file is threaded last.
Milling machine. A very convenient option, but it requires rigid adhesion to the surface, for which a self-tapping screw is screwed into the center of the circle. A circle can be made of any diameter, and very quickly. Sometimes there is not enough working handle, which is why you have to make all sorts of improvised brackets, which can be a channel, a profile, a block, a board or even a rope, but with a rigid hitch it is much more convenient. This tool makes a fairly wide hole, so before starting work you need to carefully measure the future structure.
It is necessary to select only sharp nails, and sand the edges of the resulting workpiece with coarse sandpaper.
Nails. A very popular method in cases where the work must be done “yesterday”, but the tools will not be available soon. It is worth noting right away that the work ends up being quite rough, so it is used as a last resort. All you need is a hammer, 2 nails and a rope. One nail is driven into the center of the hole, and the other is pulled on a rope to the required length (radius), after which a circle is drawn with a firm movement. Such circles with pressure continue until the circle is finally cut out. At the very end, the nail is removed from the hole, turned over and carefully beaten with a hammer to achieve a more accurate seam.
Chisel and stationery knife. Here everything is much simpler, because first you need to draw a circle with a compass (pencil), after which this circle is circled several times with a stationery knife under pressure. The peculiarity of the stroke is the movement not of a knife, but of a sheet of plywood, so as not to break the metal, and this action is repeated on 2 sides. Then a chisel is applied to the prepared seam and with gentle blows it is brought to the opposite seam (2-3 blows are usually enough). At the very end, a circle is knocked out with a hammer, as in the version with nails.
Return to contents
Preparation and completion of work
Before cutting a circle in plywood with your own hands, you need to drill holes for the tool. It is important to choose the drilling location, because... in one case you need the cut out circle itself, and in the other - the outer side. A careful hole is made 5-8 mm away from the edge in the part that will go to waste, then the tool is adjusted, and work can begin. In the case of a milling machine, the hole is made along the path of the tool in a circle, because It will be difficult to expose it later.
After the cutout is ready, you need to sand it with coarse sandpaper.
At this stage, the quality of the working tool is checked, because With good sharpening and successful work there will be no chips.
But you shouldn’t be upset if you have them, because... everything can be compensated for with subsequent finishing.
moyafanera.ru