Safety precautions when working
- The main danger when working with a homemade installation is the risk of burns from the heated elements of the installation and molten metal.
- The lamp circuit includes high-voltage elements, so it must be placed in a closed housing to prevent accidental contact with the elements.
- The electromagnetic field can affect objects located outside the device body. Therefore, before work, it is better to wear clothes without metal elements and remove complex devices from the operating area: phones, digital cameras.
It is not recommended to use the device for people with implanted pacemakers!
A furnace for melting metals at home can also be used to quickly heat metal elements, for example, when tinning or forming them. The operating characteristics of the presented installations can be adjusted to a specific task by changing the parameters of the inductor and the output signal of the generating sets - this way you can achieve their maximum efficiency.
Equipment
- main tank;
- auxiliary tank;
- copper heat exchanger;
- pump set;
- fans;
- pressure and temperature sensors;
- electrical cabinet
DIY making
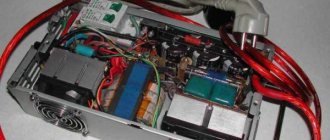
If desired, the device in question can be assembled at home. A simple circuit consists of the following elements:
- field effect transistors;
- 470 Ohm resistors;
- two diodes;
- film type capacitors;
- copper winding wire;
- two throttle rings that are removed from the computer power supply.
The above list of elements determines that it is possible to create an induction furnace at minimal cost. The device assembly process can be characterized as follows:
- To begin with, field-effect transistors are installed on radiators. It is worth considering that such a stove gets very hot during operation. Therefore, large radiators should be used. It is possible to install transistors on one radiator, but they will have to be insulated.
- Next, you will need two chokes, which you can also make yourself. To do this, copper wire is wound around the rings of the power supply of a personal computer. Why these particular rings? The reason is quite simple - ferromagnetic iron is used in their manufacture. You should wind about 10 turns, and also maintain the same distance between them.
- An important design element can be called a capacitor bank. By connecting individual capacitors, you can get a battery with a capacity of 4.7 μF. The connection of individual elements is carried out in parallel.
- To generate a magnetic field, you need to create a winding, which is made of copper wire 2 millimeters thick. It is enough to create about 7-8 turns. The resulting space inside must be large enough to accommodate the workpiece that will melt. The winding must have two long ends that will connect to the current source.
- In this case, the power source can be a regular 12 V battery. The current supplied to the coil is about 10A. The capacity of such a current source lasts for about 40 minutes, after which the device has to be charged.
Homemade induction furnace
When creating a furnace with your own hands, you can adjust the power by changing the number of turns. It is worth considering that as the power of the device increases, a larger battery is required, as the energy consumption increases. In order to reduce the temperature of the main structural elements, a fan is installed. During long-term operation of the stove, its main elements can heat up significantly, which is worth taking into account.
Lamp-based induction furnaces have become even more widespread. You can make a similar design yourself. The assembly process has the following features:
- A copper tube is used to create an inductor, for which it is bent in a spiral. The ends must also be large, which is required to connect the device to a current source.
- The inductor should be placed in the housing. It is made of heat-resistant material that can reflect heat.
- The lamp cascades are connected according to a circuit with capacitors and chokes.
- The neon indicator lamp is connected. It is included in the circuit to indicate that the device is ready for operation.
- A variable capacitor is connected to the system.
An important point is how the system can be cooled. When operating almost all induction furnaces, the main structural elements can heat up to high temperatures. Industrial equipment has a forced cooling system that runs on water or antifreeze. In order to create a water cooling design with your own hands, quite a lot of money is required.
At home, an air cooling system is installed. For this purpose, fans are installed. They should be positioned so as to ensure a continuous flow of cold air to the main structural elements of the furnace.
Differences between homemade and factory units
To understand the difference, you need to take the purpose of using the equipment as a starting point. Home-assembled units are usually needed for periodic use (breaks can be significant), so the minimum cost, the ability to perform simple manipulations, and low maintenance requirements come to the fore.
If the results of smelting are used to earn money, it is more advisable to purchase a factory induction model - such equipment promotes accurate work, helps to accurately observe measurements, and reduces to zero the likelihood of unwanted impurities. The same equipment is difficult to do with your own hands - assembling an inductor, choosing a crucible , screen arrangement requires specialized skills. Not everyone can create a capacitor bank and generator.
DIY crucible furnace
The ergonomic characteristics of stoves should not be overlooked. In artisanal preparations, they are given a minimum of resources; as a rule, such variations are inconvenient to use and are often dangerous due to the use of improvised materials. In the factory lines, proven technologies are used to ensure comfortable work, in particular, this concerns the configuration and rotating mechanism of the crucible. It is important that they create conditions to prevent injuries.
Construction of a melting furnace for jewelers
The unit has the following components in its design:
- melting device;
- capacitor bank;
- high-frequency transistor generator (hereinafter VTG).
The melting device in an induction furnace for jewelers is a crucible located inside the inductor. The raw material for smelting is loaded into a special hole on top of the device.
The melting furnace for jewelers stands on a support for ease of use. The electric furnace is supported by two racks, each of which is a welded structure. At the top of each rack there are hinged fastenings for the electric furnace frame. The frame consists of a frame, a concrete bottom slab, an inductor and a top concrete slab.
The jeweler's melting furnace inductor is used to create an electromagnetic field. With the help of which the charge is heated and melted. It is effective in that it heats the metal from the inside, which makes melting the latter quick and economical. The inductor is removable and prefabricated, which allows you to easily replace it if it breaks.
The jewelry induction furnace tilts to drain the metal as the lower cavities of the two plungers are filled with oil through a hydraulic distributor. The oven returns to its original position under the influence of its own weight. The hydraulic distributor is controlled remotely using a remote control.
Components of a jewelry melting furnace such as capacitors, a high-frequency transistor generator, inductor elements, and pipes require cooling. The water cooling system of the electric furnace copes with this task.
Types of equipment
Only two types of furnaces are widely used: crucible and channel. They have similar advantages and disadvantages, the differences lie only in the method of operation used:
- In a crucible type furnace it is necessary to load each portion of the charge separately. The principle of operation of the device is as follows: the metal is loaded inside the inductor, after melting it is drained and a new portion is loaded. As a rule, such a model is purchased for small workshops when work is carried out with a small amount of raw materials.
- Channel ones differ in that they allow metal melting to be carried out continuously. The design allows loading of a new portion of metal and draining of already molten metal during operation. The only disadvantage is that difficulties arise at the time of draining, since the drain channel must be filled.
The most popular type of induction furnace is the crucible type. This is due to their high performance and ease of operation. In addition, if necessary, such a design can be made independently.
Homemade versions are quite common. To create them you need:
- Generator.
- Crucible.
- Inductor.
An experienced electrician, if necessary, can make an inductor with his own hands. This structural element is represented by a winding of copper wire. The crucible can be purchased at the store, but a lamp circuit, a self-assembled battery of transistors, or a welding inverter are used as a generator.
Using a welding inverter
An induction furnace for melting metal with your own hands can be created by using a welding inverter as a generator. This option has become the most widespread, since the efforts made relate only to the manufacture of the inductor:
- Thin-walled copper tube is used as the main material. The recommended diameter is 8-10 cm.
- The tube is bent according to the desired pattern, which depends on the characteristics of the housing used.
- There should be a distance of no more than 8 mm between the turns.
- The inductor is placed in a textolite or graphite housing.
After creating the inductor and placing it in the housing, all that remains is to install the purchased crucible in its place.
Application of transistors
Such a circuit is quite complex to implement and involves the use of resistors, several diodes, transistors of various capacities, a film capacitor, copper wire with two different diameters and inductor rings. Assembly recommendations are as follows:
- When using the scheme in question, the structure will become very hot. This is why efficient cooling should be used.
- The purchased capacitors are assembled into one circuit to form a battery.
- Throttle rings are used as the basis for the inductor. A previously purchased copper tube with a diameter of about 1 mm is wound onto them. The number of turns determines how powerful the homemade stove will be. The recommended range is from 7 to 15 turns.
- A second copper tube is wound around a cylindrical object, the diameter of which should be about 2 mm. It is worth considering that the ends of this tube should be left large, since they will be used to connect to the power source.
- A 12 V battery can be used as a power source.
The created circuit is placed in a textolite or graphite case, which are dielectrics. The circuit involving the use of transistors is quite complex to implement. Therefore, you should undertake the manufacture of such a stove only if you have certain work skills.
Lamp stove
Lately, lamp-based stoves have been created less and less frequently, as they require careful handling. The circuit used is simpler compared to the case of using transistors
Assembly can be carried out in several stages:
- 4 beam lamps are used as a current generator, which are connected in parallel.
- The copper wire used must be connected in a spiral. The coils created must have a diameter of 8 to 16 cm, with a distance of at least 5 millimeters between them. It is worth considering that you will need a fairly large amount of wire, since the crucible must fit inside the turns.
- The created spiral is placed in a housing made of a material that does not conduct electric current.
- The efficiency of the circuit can be increased by additionally connecting a trimmer capacitor.
The llamas used must be protected from mechanical impact.
Self-assembly of the stove
There are many technologies and schematic descriptions of this process presented on the Internet and magazines, but when choosing, it is worth choosing one model that is most effective in operation, as well as affordable and easy to implement.
Homemade melting furnaces have a fairly simple design and usually consist of only three main parts housed in a sturdy casing. These include:
- element generating high frequency alternating current;
- a spiral-shaped part created from a copper tube or thick wire, called an inductor;
- crucible - a container in which calcination or melting will be carried out, made of refractory material.
Of course, such equipment is not often used in everyday life, because not all craftsmen need such units. But the technologies found in these devices are found in household appliances that many people deal with almost every day. This includes microwaves, electric ovens and induction cookers. You can make various equipment using diagrams with your own hands if you have the necessary knowledge and skills.
In this video you will learn what this oven consists of
Heating in this technique is carried out thanks to induction eddy currents. The temperature rise occurs instantly, unlike other devices of a similar purpose.
For example, induction cookers have an efficiency of 90%, but gas and electric cookers cannot boast of this value, it is only 30-40% and 55-65%, respectively. However, HDTV cookers have a drawback: to use them you will have to prepare special dishes.
Transistor design
There are many different schemes for assembling induction melters at home. A simple and proven furnace made from field-effect transistors is quite easy to assemble; many craftsmen familiar with the basics of radio engineering can handle its manufacture according to the diagram shown in the figure. To create the installation, you need to prepare the following materials and parts:
- two IRFZ44V transistors;
- copper wires (for winding) in enamel insulation, 1.2 and 2 mm thick (one piece each);
- two rings from chokes, they can be removed from the power supply of an old computer;
- one 470 Ohm resistor per 1 W (you can connect two 0.5 W each in series);
- two UF4007 diodes (can easily be replaced with the UF4001 model);
- 250 W film capacitors - one piece with a capacity of 330 nF, four - 220 nF, three - 1 µF, 1 piece - 470 nF.
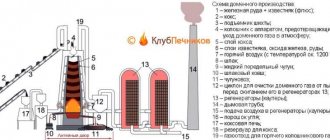
Induction furnace for metal melting
An induction furnace is a heating device where the induction method is used to melt steel, copper and other metals (the metal is heated by currents excited by a non-alternating field of the inductor). Some consider induction stoves to be a type of resistance heating device, but the difference lies in the method of transferring energy to the heated metal. First, electrical energy becomes electromagnetic, then electrical again, and only at the very end it turns into thermal energy. Induction stoves are considered the most advanced of all gas and electric stoves (muffle, steel-smelting, mini stoves), thanks to their heating method. With induction, heat is generated within the metal itself, and the use of thermal energy is most efficient.
Induction furnaces are divided into two types:
- with core (duct);
- without core (crucible).
The latter are considered more modern and useful (heating devices with a core, due to their design, are limited in power). The transition from channel to crucible furnaces began in the early 1900s. At the moment they are widely used in industry.
However, at the moment, steel smelting is often carried out using a heating structure such as an arc steel-smelting furnace; it uses the thermal effect for melting, and it is more convenient and practical. You can make many simple heating structures with your own hands. For example, a homemade melting furnace is very popular. If you decide to build a mini heating structure with your own hands, you need to know its structure. There are many types of induction furnaces, but we will describe only a few of them. If necessary, you can use the necessary diagrams, drawings and video recordings.
Induction Furnace Components
For the simplest designs, there are only two main parts: an inductor and a generator. However, you can add something of your own, improve the unit, using the necessary circuits. Inductor The heating coil is the most important component. Absolutely the entire operation of the heating structure depends on it. For homemade stoves with low power, it is permissible to use an inductor made of a bare copper tube with a diameter of 10 mm. The internal diameter of the inductor must be at least 80 mm. and no more than 150 mm., number of turns – 8-10. It is necessary to take into account that the turns should not touch, so the distance between them should be 5-7 mm. Also, no part of the inductor should touch its shield.
Generator The second most important component of the furnace is the alternating current generator. When choosing a generator circuit, you should in every possible way avoid drawings that give a hard current spectrum
As something that does NOT need to be chosen, we present a popular circuit based on a thyristor switch.
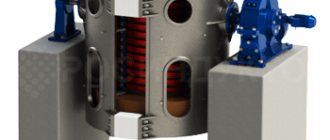
Crucible furnace structure
Inside there is a melting crucible with a drain sock (“collar”). On the outer sides of the structure, an inductor is located in a vertical position. Next comes a layer of thermal insulation, and at the top is a lid. On one of the external sides there may be a supply of current and cooling water. At the bottom there is a device for signaling crucible wear.
How to make an induction oven
First you need to assemble a generator for the inductor. Here you will need the K174XA11 circuit. The transformer should be wound on a mini-ring with a diameter of 2 centimeters. The entire winding is made with a wire with a diameter of 0.4 centimeters and should be 30 turns. The primary winding is characterized by the presence of exactly 22 turns of wire with a diameter of 1 millimeter, and the secondary winding should contain only 2-3 turns of the same wire, but already folded four times. The inductor must be made of 3 mm. wires with a diameter of 11 mm. There should be exactly 6 turns. To adjust the resonance, it is best to install a regular or mini LED.
Operating principle
The operating principle of an induction furnace is illustrated in Fig. on right. In essence, it is an electrical transformer with a short-circuited secondary winding:
Operating principle of an induction furnace
- The alternating voltage generator G creates an alternating current I1 in the inductor L (heating coil).
- Capacitor C together with L form an oscillatory circuit tuned to the operating frequency, this in most cases increases the technical parameters of the installation.
- If the generator G is self-oscillating, then C is often excluded from the circuit, using the inductor’s own capacitance instead. For the high-frequency inductors described below, it is several tens of picofarads, which exactly corresponds to the operating frequency range.
- In accordance with Maxwell's equations, the inductor creates an alternating magnetic field with intensity H in the surrounding space. The magnetic field of the inductor can either be closed through a separate ferromagnetic core or exist in free space.
- The magnetic field, penetrating the workpiece (or melting charge) W placed in the inductor, creates a magnetic flux F in it.
- F, if W is electrically conductive, induces a secondary current I2 in it, then the same Maxwell equations.
- If Ф is sufficiently massive and solid, then I2 closes inside W, forming an eddy current, or Foucault current.
- Eddy currents, according to the Joule-Lenz law, release the energy received through the inductor and the magnetic field from the generator, heating the workpiece (charge).
Electromagnetic interaction from the point of view of physics is quite strong and has a fairly high long-range effect. Therefore, despite the multi-stage energy conversion, an induction furnace is capable of showing an efficiency of up to 100% in air or vacuum.
Note: in a medium made of a non-ideal dielectric with a dielectric constant >1, the potentially achievable efficiency of induction furnaces drops, and in a medium with a magnetic permeability >1, it is easier to achieve high efficiency.
Types of induction furnaces
Considering the classification of devices, we note that the workpieces can be heated both inside and outside the coil. That is why there are two types of induction furnaces:
- Channel. This kind of device has small channels that are located around the inductor. To generate an alternating magnetic field, a core is located inside.
- Crucible. This design is characterized by the presence of a special container called a crucible. It is made from refractory metal with a high melting point.
Crucible induction furnaces are characterized by relatively small sizes. In most cases, this type of device is used in jewelry making, as well as when melting metal at home.
Installations using transistors have become quite widespread, since they can be made with your own hands with minimal time and money.
Advantages and disadvantages
The advantages of stoves include:
- Heat is supplied solely due to the electromagnetic field, and the utensils used are not contaminated;
- Objects made of steel and other materials that do not contain carbon can be melted;
- When used, virtually no carbon monoxide is formed - melting materials absorb little nitrogen and hydrogen from the atmospheric air;
- When melting, the liquid metal is mixed naturally, and as a result, all metallurgical processes proceed much faster;
- During melting, the temperature can be adjusted if necessary;
- The high productivity of furnaces of this type allows them to operate in the mode of dispensing smelted metal in small portions over short periods of time;
- The device has small overall dimensions, making it easy to melt metal both in industrial premises and in small work areas;
- Minimum smoke emissions during operation and maximum environmental friendliness when melting metal;
- During operation, the induction furnace produces minimal noise;
- The most favorable conditions are created for operating personnel when melting metal at such installations.
The induction furnace has small dimensions, so smelting is carried out both on the territory of a large workshop and in small working areas. In addition to the listed advantages, the device also has a number of disadvantages:
- When melting metal, the slag is heated precisely by the metal mixture, as a result of which it has a lower temperature;
- When using the device, difficulties often arise in removing impurities such as sulfur and phosphorus from metal.
The furnace is classified as a high-frequency generator located in an inductor isolated from the external environment, passing a high-frequency current. To create a vacuum, air masses are pumped out of it. All operations for introducing additives, loading the charge, and dispensing metal are carried out by automatic mechanisms with electrical or hydraulic control. Alloys with small admixtures of oxygen, hydrogen, nitrogen, and organics are obtained from vacuum furnaces. The result is far superior to open induction ovens.
Types of induction furnaces
Crucible induction furnace
Two types of induction furnaces are widely used: channel and crucible. They differ only in the method of working with them. In all other respects, including advantages, such melting furnaces are very similar. Let's consider each option separately:
- Channel furnace. The main advantage of this type is a continuous cycle. You can load a new portion of raw materials and unload already molten metal directly during heating. The only difficulty may arise during startup. The channel through which the liquid metal will be discharged from the furnace must be filled.
- Crucible furnace. Unlike the first option, each portion of metal will have to be loaded separately. That's the point. The raw material is placed in a heat-resistant crucible and placed inside the inductor. After the metal has melted, it is drained from the crucible and only then the next portion is loaded. This furnace is ideal for small workshops where large masses of molten raw materials are not required.
The main advantage of both options is the speed of production. However, the crucible furnace wins here too. In addition, it is quite possible to make it with your own hands in almost home conditions.
A homemade induction furnace is not fraught with any difficulties so that an ordinary person with at least a little knowledge of electrical engineering could not assemble it. It has only three main blocks:
- Generator.
- Inductor.
- Crucible.
The inductor is a copper winding that you can make yourself. You will have to look for the crucible either in the appropriate stores or get it in other ways. And the following can be used as a generator: a welding inverter, a self-assembled transistor or lamp circuit.
Induction furnace on a welding inverter
The simplest and most widespread option. Efforts will have to be expended only on the construction of the inductor. Take a thin-walled copper tube 8-10 cm in diameter and bend it according to the desired pattern. The turns should be spaced at a distance of 5-8 mm, and their number depends on the characteristics and diameter of the inverter. The inductor is fixed in a textolite or graphite case, and a crucible is placed inside the installation.
Transistor induction furnace
In this case, you will have to work not only with your hands, but also with your head. And run around the shops looking for the necessary spare parts. After all, you will need transistors of different capacities, a couple of diodes, resistors, film capacitors, two copper wires of different thicknesses and a couple of inductor rings.
- Before assembly, it is necessary to take into account that the resulting circuit will become very hot during operation. Therefore it is necessary to use fairly large radiators.
- Capacitors are assembled in parallel into a battery.
- Copper wire with a diameter of 1.2 mm is wound onto the throttle rings. Depending on the power, the turns should be from 7 to 15.
- A cylindrical object, suitable in diameter to the size of the crucible, is wound with 7-8 turns of copper wire with a diameter of 2 mm. The ends of the wire are left long enough for connection.
- According to a special scheme, everything is mounted on the board.
- The power source can be a 12-volt battery.
- If necessary, you can make a textolite or graphite case.
- The power of the device is adjusted by increasing or decreasing the turns of the inductor winding.
Assembling such a device yourself is not easy. And you can take on this work only if you are confident in the correctness of your actions.
Induction furnace with lamps
Unlike a transistor oven, a lamp oven will be much more powerful, which means you will have to handle both it and the circuit more carefully.
- 4 beam lamps connected in parallel will generate high frequency currents.
- Copper wire is bent into a spiral. The distance between the turns is 5 or more millimeters. The coils themselves are 8-16 cm in diameter. The inductor should be of such a size that the crucible can easily fit inside.
- The inductor is placed in a housing made of a non-conducting material (textolite, graphite).
- You can put a neon indicator lamp on the body.
- You can also include a tuning capacitor in the circuit.
Making both circuits requires having some knowledge, which can be obtained, but it is better if a real specialist does it.
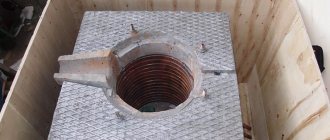
For a regular crucible
Construction of a crucible induction furnace
The residual capacity irritated metallurgists - the alloys they melted were expensive. Therefore, as soon as sufficiently powerful radio tubes appeared in the 20s of the last century, an idea was immediately born: throw a magnetic circuit onto (we will not repeat the professional idioms of tough men), and put an ordinary crucible directly into the inductor, see fig.
You can’t do this at an industrial frequency; a low-frequency magnetic field without a magnetic circuit concentrating it will spread out (this is the so-called stray field) and give off its energy anywhere, but not into the melt. The stray field can be compensated by increasing the frequency to a high one: if the diameter of the inductor is commensurate with the wavelength of the operating frequency, and the entire system is in electromagnetic resonance, then up to 75% or more of the energy of its electromagnetic field will be concentrated inside the “heartless” coil. The efficiency will be corresponding.
However, already in the laboratories it became clear that the authors of the idea overlooked an obvious circumstance: the melt in the inductor, although diamagnetic, is electrically conductive, due to its own magnetic field from eddy currents, it changes the inductance of the heating coil. The initial frequency had to be set under the cold charge and changed as it melted. Moreover, the range is greater, the larger the workpiece: if for 200 g of steel you can get by with a range of 2-30 MHz, then for a blank the size of a railway tank, the initial frequency will be about 30-40 Hz, and the operating frequency will be up to several kHz.
It is difficult to make suitable automation on lamps; to “pull” the frequency behind the blank requires a highly qualified operator. In addition, the stray field manifests itself most strongly at low frequencies. The melt, which in such a furnace is also the core of the coil, to some extent collects a magnetic field near it, but still, to obtain acceptable efficiency it was necessary to surround the entire furnace with a powerful ferromagnetic screen.
Nevertheless, due to their outstanding advantages and unique qualities (see below), crucible induction furnaces are widely used both in industry and by home-made people. Therefore, let’s take a closer look at how to properly make one with your own hands.
Design of induction crucible furnace with aluminum body
Melting unit
The design of the melting units of furnaces of this type does not contain magnetic circuits, so the aluminum body is not protected from the magnetic field of the inductor. To prevent induced Foucault currents from short-circuiting and melting, the non-magnetic aluminum housing consists of 2 halves, which are electrically separated from each other at the rear and front using insulating spacers. The durable aluminum body holds the load well when melting and tilting the furnace when casting metal. However, it does not withstand spillage of smelting metal onto the body. Inside the housing there is an inductor made of a rectangular copper tube with inlets for cooling water and terminals for connecting electricity. On the side, the aluminum body has bosses for attaching a slewing bearing, which is installed on a concrete base or steel frame. The furnace is rotated using an electric motor and gearbox. The melter controls the rotation of the furnace from a remote control installed in a convenient location. In the event of a failure of the electric drive, the metal can be drained by rotating the furnace emergency tilt handle. In the upper part of the body there is a platform with a cavity for lining the drain sock. In the lower part of the body there is a packed hearth on which the crucible is installed or packed. The crucible thickness is monitored visually or using a crucible consumption indicator. Crucibles can be used either printed or ready-made. But for large weights, melts and crucibles are usually filled. For ferrous metals, quartz crucibles are used, and for non-ferrous metals, graphite-containing crucibles are used. Stuffing crucibles is a special art, and the crucible company greatly depends on this operation. This is its service life, measured in the number of melts. You can read about packing made from modern materials here and in Mosinductor - Articles
Thyristor frequency converter TFC
The thyristor frequency converter (TFC) cabinet is made of sheet steel; controls are located on the front panel. The cabinet is not protected from workshop dust, so it needs periodic cleaning. To protect it from dust, the main control board is placed in a box that can be locked with a key.
When commissioning, the thyristor frequency converter needs to be configured by specialists from the supplier company. We put induction melting furnaces into operation only after commissioning has been carried out by our service department.
The TFC is made according to the circuit of an adjustable rectifier with subsequent inversion. The control board is designed using modern digital technologies, and is responsible not only for control, but also for protecting power electronics from such factors as overvoltage, inductor short circuit, inverting failure, decrease in coolant pressure, loss of one phase, etc. According to our reviews customers, a thyristor frequency converter of this class is very versatile and well suited for powering Russian-made furnaces.
Capacitor battery
The capacitor bank is a set of water-cooled, medium-frequency, high-capacity electrothermal capacitors with a metal shell. The capacitor banks are mounted on a metal frame and connected to each other by copper busbars. The capacitors are placed in a metal case and equipped with water inputs and outputs and busbars for connecting electrical mid-frequency current. Furnaces of this type use a parallel oscillating circuit. Current resonance leads to the fact that the currents flowing from the capacitors to the furnace are four times more powerful than the currents flowing from the generator to the capacitor bank. Make sure that the cooled current conductors do not pass close to metal structures or metal floors. Failure to comply with this rule leads to burnout of the cooled current conductors.
Cooling system
We recommend using only dual-circuit cooling towers for cooling induction furnaces of this type. They are characterized by a high specific cooling power per unit of workshop area. They have separate furnace cooling circuits. They save distilled water and have a large number of real advantages over any other cooling systems. More details>>> Double-circuit cooling towers can be installed in a workshop or outdoors. In winter, cooling towers installed outside are filled with antifreeze and only the primary circuit is used for cooling.
Terms of use
For experienced radio technicians, assembling an induction furnace according to the diagrams with your own hands may seem like an easy task, so the device will be ready quite quickly, and the master will want to try his creation in action. It is worth remembering that when working with a homemade installation, it is important to follow safety precautions and not forget about the main threats that may arise during operation of an inertial furnace:
- Liquid metal and heating elements of the device can cause severe burns.
- Lamp circuits consist of high-voltage parts, so during assembly of the unit they must be placed in a closed box, thus eliminating the possibility of accidental touching of these elements.
- The electromagnetic field can influence even those things that are outside the installation box. Therefore, before turning on the device, you need to put away all complex technical devices, such as mobile phones, digital cameras, MP3 players, and also remove all metal jewelry. People with pacemakers are also at risk: they should never use such equipment.
These furnaces can be used not only for smelting, but also for quickly heating metal objects during forming and tinning. By changing the output signal of the installation and the parameters of the inductor, you can configure the device for a specific task.
For melting small volumes of iron, homemade stoves are used; these effective devices can operate from ordinary sockets. The device does not take up much space ; it can be placed on a desktop in a workshop or garage. If a person knows how to read simple electrical diagrams, then he does not need to purchase such equipment in a store, because he can assemble a small stove with his own hands in just a few hours.
Radio amateurs have long discovered that they can make induction furnaces for melting metal with their own hands. These simple diagrams will help you make a HDTV installation for home use. However, it would be more correct to call all the described designs “Kukhtetsky’s laboratory inverters,” since it is simply impossible to independently assemble a full-fledged stove of this type.
In this video I will talk about rf energy generators in Thermal Expansion. Reagent generator.
if the sound is quiet please add my qiwi- +79005280267 my vk- my nickname in .
Hello everyone, Oleg and Pasha are here again: 3 We continue to develop and teach you some fashions with humor.
Sorry, I made a mistake with the files) ===== Hello everyone, Oleg and Pasha are here again :3 We continue to develop and teach.
Hello friends! We continue to play on the StarTech assembly! Group in contact: Link to assembly: .
Thank you for watching! Like and subscribe to the channel. Issues are published 3 times.
In this video I will tell you how to build a smelter and how to use it in Tinkers Construct Version: Tinkers.
Good steel production is guaranteed! I'm on VK, put my group.
Thank you for Like and for Subscribing to my channel because I appreciate it