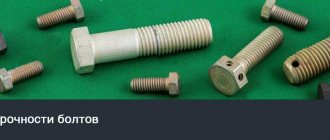
How to remove a crankshaft pulley bolt: why is everything so complicated?
A knowledgeable motorist usually spends no more than a quarter of an hour on the process of dismantling the crankshaft pulley. But inexperienced drivers, when trying to remove this part on their own, are faced with many problems that they often simply cannot solve. The instructions for carrying out repair work and maintenance of any modern vehicle contain comprehensive information about the dismantling process, but, unfortunately, it does not help car enthusiasts.
First of all, difficulties arise with fixing the crankshaft. It is very difficult to dismantle it if the part is constantly rotating, “slipping” out of your hands. It is also not clear to many from which side to approach the bolt that holds the pulley. And its strong tightening usually makes the process of removing the unit very, very difficult, since dismantling under such conditions is fraught with damage to the body covering or elements of the car’s engine compartment.
All car manufacturers and car service specialists use great force to tighten the nut or bolt of the crankshaft pulley (on some vehicle models the mechanism is supported by a bolt, in others by a nut).
This is done specifically to avoid self-unwinding of this part during vehicle operation. If a bolt (nut) falls out while driving, it will not be easy to bring the car back to life in order to continue driving it, and the repair itself will cost, believe me, a pretty penny. In addition, the described fasteners increase their tightening level independently when the engine is running. And the final “indestructibility” of the bolt is given by the phenomena of coking, sticking, and corrosion.
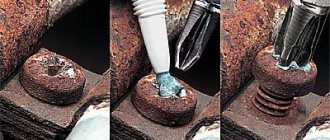
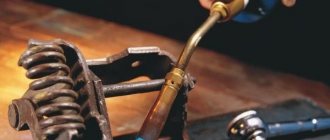
Heat up the bolt
Sometimes situations arise when a bolt urgently needs to be cut, but there are no power tools or special devices at hand at all. In this case, it can be heated to soften the iron and cut with any sharp object. An ordinary meat hatchet, which is found in every kitchen, is perfect for these purposes.
To heat up the fastener, you can use a special forge, a blowtorch, a gas burner, or an electric stove. As a last resort, you can simply light a fire and use it to heat the bolt rod. After it heats up to the desired temperature and softens, you need to hit it (at the cut site) sharply and firmly with a sharp hatchet.
You should be vigilant and follow safety precautions when using this pruning method.
After all, when striking a hot metal surface, a large number of sparks appear, which can leave a burn on the skin or damage the eyes. Therefore, before heating and cutting a bolt in this way, it is strongly recommended to wear thick clothing, safety glasses and gloves.
Expert answers
I would like to note right away that a bolt that is located in an inconvenient place is difficult or even impossible to remove. Let's say the asterisk is freely available, then there are several ways to remove it.
Using a gas (pipe) wrench. You just need to hold the bolt with a wrench and unscrew it. The clamping force of this tool allows you to unscrew even completely smooth products.
Using a hammer and chisel. This method can safely be called folk. First, a small depression is made so that it is convenient to insert a chisel into it, then several blows are applied with a hammer in the direction of unscrewing, and that’s all.
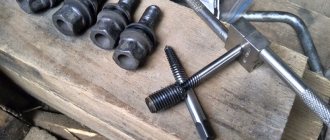
Restore edges. To do this, use a file or grinder, which is used to apply a new relief pattern. You can also drill a hole in the product and drive a metal rod with edges into it. You can also weld a new nut to the damaged head. If we are talking about small fasteners, then the nut can simply be glued.
You can also do it like this:
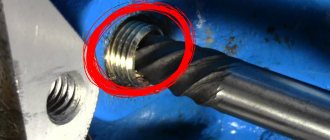
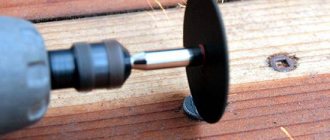
Use a grinder to cut the thread for a flat-head screwdriver:
Surprises are inevitable during renovations. Equipment may fail, a seemingly strong part may break in the most unnecessary place, and bolts and nuts may resist unscrewing. And then the repair drags on, taking extra time, nerves and money.
Nowadays you can find many videos on the Internet with guidance on carrying out any repair work. They say that based on videos from the Internet, you can build a house from scratch and reassemble a car, piece by piece.
But with such a huge number of tips and recommendations, it is difficult to choose the right course of action for you. In this article we will try to collect all available experience and systematize it for ease of use.
Cutting a bolt with a chisel
Working with a chisel requires special attention and certain skills:
- Accurately mark the desired contour with a special metal scriber.
- If the thickness of the metal is such that one blow of a chisel will not break it, then the bolt is clamped with a bench vice. Otherwise, you can chop on a thin rod directly on a strong backing or a blacksmith's anvil.
- You need to make sure that the jaws are at the level of the mark. If the rod is thick, the scribe line should be approximately 4 mm above the clamping device.
- Place the chopping tool on the nearest jaw so that the angle is 30–350, and the sharp edge is adjacent to the surface being processed at approximately 450.
- Hammer blows should be short and precise, towards the back of the head.
When it is not possible to cut the metal in one go, the passage is repeated again. Sometimes it is more expedient to do this using the same markings, but from the other side.
How to remove a sprocket from a single-speed bicycle (singlespeed)
To remove the transmission sprocket on a single-speed bike, simply release the locking ring. Many singlespeed fans claim that the “original” locking ring is no good and sometimes breaks, even if there is no talk of replacing the sprocket. In any situation, if the stopper fails, you need to replace it. Otherwise, backlash is inevitable. The chain will simply dangle in different directions.
If the sprockets are faulty, the bike will not ride. Timely replacement of transmission parts is important for all models of bikes: from the simplest “hard workers” to the most sophisticated high-speed highway bikes and mountain bikes.
Bolt with torn edges
Now we will figure out how to unscrew a bolt with torn edges . As a rule, the reasons for this problem lie in the following:
- The parts held by the bolt were misaligned in an unnatural way. This leads to pinching and damage.
- The bolt itself was very tight when tightening.
- The tool used to tighten it was the wrong size and improvised means were used (screwdrivers or chisels are often placed in larger keys when there are no suitable small ones).
Before unscrewing a broken bolt or nut, you need to do some preparation. This will allow you to spend less time and effort, and sometimes save expensive equipment.
Sequencing
- Coat the joint with liquid to aid unscrewing. Such a liquid can be the famous WD-40, brake fluid or kerosene. Take your time and let the liquid do its job. As practice shows, you can safely leave the part alone for thirty minutes, or even an hour.
- Take any available tool and lightly, not forcefully, tap the hardware from all accessible sides. Your goal, in this case, is not to launch the bolt like a golf ball, but just to slightly loosen it at the place where it is attached. While performing this activity, there is a danger of damaging the thread, so balance the strength and swing.
- If you have the opportunity and space, try heating the bolt. A gas burner is suitable for this. Make sure there are no flammable liquids or objects near the workplace. Also, before you start warming up, make sure that in case of an emergency you have somewhere to retreat. Do not heat the part with an open flame in enclosed spaces. It is better to open the gate or move the bolt to the air. Rust and grease scorched in this way will turn into ash and will no longer prevent the bolt from being unscrewed.
Star bolt
You can unscrew such a bolt in the same way as unscrewing a nut with torn edges. We discussed the main methods of unscrewing stubborn bolts and nuts in great detail earlier, and now we can summarize all the methods that are suitable for such a screw. So, if your star bolt has stripped edges:
- The easiest way is to use an extractor. This proven product will not let you down this time either. Make a hole in the fastener leg, fix a suitable extractor there and carefully unscrew the stuck bolt with careful movements. As we can see from this article, a set of extractors of various diameters is a really necessary thing on the farm if you regularly do such assemblies and disassemblies.
- Use the gas wrench. This adjustable wrench will tighten the bolt tightly, and you can remove it with a few turns. This method is good because you don’t need to buy a separate tool. There is a similar wrench in almost every home.
- Focus on the bolt head. If there is enough space around the bolt, make a notch on its head with a grinder or a hacksaw. You can rest a screwdriver or chisel against this notch and turn the bolt by hitting its free end with a hammer or other tool convenient for you.
We have looked at options for releasing bolts and nuts that are available for use by any home craftsman. Of course, methods used in professional workshops or car repair shops were left out of the discussion. However, they constantly use equipment that you might only need once or twice at home. And it costs a lot of money. Professionals use to release bolts with torn edges:
- Impact wrench.
- Hairpin driver.
- Specialized extractors.
However, if such situations occur to you no more than once a year, then there is little point in purchasing special tools.
Among detachable connections, threaded ones take first place both in terms of prevalence and reliability. However, in practice there are many cases when it is not easy to unscrew a threaded pair.
Installation of connecting rod
After dismantling the part and performing all the planned manipulations, it is necessary to return the structural element to its original place. Before carrying out work, it is advisable to clean all surfaces and connections, and then treat them with a thick lubricant. This approach will allow you to install the connecting rod evenly and will significantly facilitate the work if it needs to be dismantled again.
During installation, it is necessary to deeply seat the part on the shaft. This will avoid the appearance of backlash during movement. If the connecting rod is not secured tightly enough, the socket will gradually become unusable. To securely fasten the part, applying a force of about 50-70 Nm is sufficient.
Using a screwdriver
You can cut and shorten the length of the bolt even without using an angle grinder. To perform this procedure, the user should prepare a screwdriver, a hacksaw, a marker, and nuts (2 pieces). It is worth noting that cutting bolts using a screwdriver is one of the fastest and easiest methods for shortening the length of such fasteners.
After all the tools and materials are prepared, you need to take the bolt and use a marker to draw a neat line for the future cut on its surface. The line is drawn directly onto the surface of the thread. Then you need to take two nuts and screw them onto the bolt on either side of the drawn cutting line.
In this case, the first nut acts as a special limiter. The second nut allows you to lock the first one and prevent it from moving. In addition, it should be noted that after trimming, the nuts will be screwed together, as a result of which the first turn on the thread, which was jammed during the cut, is restored.
In case of urgent need, you can screw another nut onto the lower part of the thread, but with a small gap. This will increase the adhesion force of the hacksaw blade and prevent it from “dancing” while cutting.
After all the preparatory work has been completed, the bolt must be inserted into the screwdriver chuck and securely fixed. You must attach a hacksaw to the cut location marked with a marker. Then the user should simply turn on the screwdriver, as a result of which the fixed bolt will begin to move.
As a result of the movement, the hacksaw blade will quickly cut off the part marked on the workpiece with a marker, practically without disturbing its thread. Thanks to the use of this method, the cut on the surface of the fastener is smooth.
Wrench sizes
Typically, all of the above types are sold in sets with different sizes and diameters. Let's say the small ring key from the set has a ring of 2−4−6−8−10−13−15, and the hexagon and dodecahedron are only even: 4−6−8−10−12−16 and so on. Wrench, socket and tube tools have the same dimensions as ring wrenches. Depending on the type of set, there may be devices for both larger and smaller nut sizes. The same goes for sliding and gas keys. They have their own numbering, and each of them covers only a certain diameter. The main thing is to be able to choose the right ones for you.
Why do the edges of a screw, screw or bolt lick off?
Licking is the grinding down of the edges of a bolt or a screwdriver slot on the head of a screw, screw or self-tapping screw. Both masters and beginners can encounter this problem. When the edges of the bolt are licked, the key begins to slip on it and it is not possible to unscrew such an element. The slots on the head of screws and screws can become damaged, which also leads to the screwdriver turning and making it impossible to unscrew the damaged fastener.
Reasons why the splines of a screw, a screw or the edge of a bolt or nut can lick off:
- use of worn tools;
- incorrect use of a wrench or screwdriver;
- poor quality fastener.
If a key or screwdriver slips through while unscrewing the fastener, do not panic and need to figure out the reason. Sometimes it is enough to change the screwdriver or wrench to solve the problem immediately.
Types of connecting rods
- Single-component - presented in the form of a monolithic structure, where the left and right elements are fixedly mounted on the axis. The advantage of this solution is high reliability, ease of maintenance and low weight due to the lack of fasteners.
- Two-component - the axle, the right connecting rod and the drive sprocket are connected into a single structure. The left connecting rod is attached to the system thanks to a nut fit.
- Three-piece - the most common option. Presented as a separate axle, as well as a right and left connecting rod connected to a sprocket.
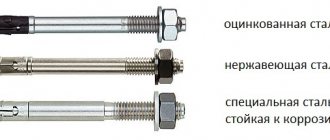
Why are fasteners needed?
Fasteners are the most important elements of mechanical engineering, which are used almost everywhere. The most common fasteners that have threads are:
A bolt, like a screw, is a rod with a head that has one threaded end. Screws are usually classified into two types:
- Installation ones that fix the parts mutually.
- Fasteners that are used for detachable connections.
Screw heads can be cross-slotted or single-slotted.
As a rule, this element is necessary if you need to attach an additional element. Often, a machine screw with a countersunk head is used instead of bolts, since the protruding head interferes with some mechanisms.
Most often, screws are used when there is a need to fix parts that have been mounted on shafts or axles.
Installing new stars
If you are not messing around with oval sprockets, where you need to precisely select the angle of rotation of the sprocket relative to the connecting rods, then you will not have any difficulties installing new sprockets. The outer star usually has a small pin. The sprocket should be installed so that this pin is directly opposite the connecting rod. This simple design will not allow the chain to get stuck between the sprocket and the connecting rod if it falls off.
The inner star, as a rule, also has such a pin for the same purposes. But if it is not there, pay attention to the inscriptions on the star itself; they should be visible when installing it, that is, they should be turned away from the connecting rod.
After you have aligned the stars, you need to insert the bonks into them and tighten them. You can focus on one bonk. Please note that the inner part of the hexagon or torx mount usually faces outward, that is, it is inserted from the outside of the connecting rods. Insert the inner bonnet and screw the outer one into it. Once you've done this with one bonnet, you'll no longer need to hold the stars in place and try to screw in the rest at the same time. Tighten each bonk sequentially. The sprockets should not be loose, so tighten them well, or use a torque wrench.
Here's a short video to keep you from getting confused:
Cutting a bolt using a hacksaw blade
It is much easier to quickly achieve the desired result using a metal file and a screwdriver or drill. In addition to these tools, you will also need a couple of nuts, a marker pencil and skillful hands.
On a note! If you get down to business without preparation and just start sawing the bolt with a hacksaw, then damage to the thread is virtually inevitable. Then the fastener will become unsuitable for further use.
You can be guaranteed to protect yourself by using a proven method. The algorithm of actions is simple:
- Select the correct diameter bolt and make a trim mark directly along the threads.
- Screw two nuts onto it to the intended line - one will act as a limiter, the second will act as a lock nut, which will prevent the first from moving along the turns.
- To fix the saw blade, if necessary, you can screw an additional nut below the cut mark.
- Insert the assembled structure into the screwdriver/drill chuck and firmly tighten it with the clamp.
- Place the hacksaw blade on the cutting line.
- Plug in the tool. The sharp teeth of the saw will quickly separate the excess end of the rod.
This technology will help you trim quickly and efficiently, and the cut area will remain level.
More ways
Other methods include:
- If the bolt is not too small, you can use a chisel or a regular hammer: they strike at an angle in the direction of unscrewing the fastener.
- Using a gas or spanner wrench.
- You can use a wrench with an attachment.
- Welding: it is necessary to weld a little metal with a nut or a piece of reinforcement to the fastener, with the help of which it is then unscrewed.
The last resort is complete dismantling of the fastening, when cuts are made with a hammer and the fasteners are disassembled.
The most important thing when working is not to forget about safety. Care should be taken to protect the face, eyes and hands when carrying out the above manipulations.
We use a regular file
With a small cross-section of a metal rod, this simplest tool, which is found in almost any home, is quite suitable. They can easily grind off a few extra millimeters. True, this will require a lot of time and physical effort.
Algorithm of actions:
- Clamp the bolt in a vice with the head facing down.
- Mark the cut location with a marker.
- Carefully make a cut (if the rod is not too thick, then it can be easily broken using pliers).
Cutting metal strip
The first thing to do is measure the length of the edge of the hexagon for which you need to make a key.
We multiply this size by six (the number of edges), and we get the length of the metal strip that needs to be cut.
I recommend adding 6 mm to the resulting length (which I didn’t do), then it will be easier for you at the next stage of manufacturing.
The plate should be wider than the height of the bolt for which you are making the key (a couple of millimeters is enough).
How to make a bicycle puller with your own hands
A lock nut puller cannot be made at home; a lathe is required. But to make a whip, you just need to take four long screws, an ordinary thick board and an old bicycle chain. The sequence of actions will be as follows:
- The master places the board strictly vertically.
- A chain twisted in three must be attached to the top of the board.
- Two self-tapping screws are screwed on top between the pins of the chain so that they hit the top of the board.
- You also need to screw a self-tapping screw on the left and right sides of the board, preventing the chain from “walking.”
Having placed the chain on the cassette sprockets, you can begin to unscrew the lock nut. For ease of storage, if desired, a small hook is screwed to the bottom of the board, from which you can hang the structure. Such a homemade tool will save a decent amount and will last for quite a long time.
How to unscrew a licked bolt
When turning the bolt, pry it up with a nail puller and pull it out to the maximum possible height, leave it in tension and gradually unscrew it with a wrench. When you don't have a nail puller, you can use a screwdriver. A small bolt is removed using pliers by the head. If it does not give in immediately, then rotate it, clamping it with pliers counterclockwise with upward force.
Use a tap and insert it all the way. If you don’t have it at hand, then a screwdriver with a cone-shaped edge will do, which you carefully hammer in until it stops and try to unscrew it.
To prevent such situations from reoccurring, they must be treated with graphite lubricant before tightening the bolts. But solid oil or lithol are not used for this purpose, because they are used for rubbing parts, and after lubrication, bolted joints become jammed with them.
Grind the bolt using a block
The use of this device involves the targeted removal of layers of metal due to the abrasive effect of the emery stone. The procedure requires a lot of patience, because durable metal is difficult to process manually. For this:
- Clamp the bolt firmly in a vice with the head facing down.
- Take the block with both hands by the opposite ends.
- Grind off the required amount of metal surface using uniform movements with great force.
Attention! This tool is suitable in cases where you just need to slightly sharpen the excess length of the rod.