It is no secret that many users of a drill or hammer drill have had their drill bits break during various plumbing and installation work, both in domestic and industrial settings. As a rule, such unpleasant incidents occur for the following reasons:
- Working incompatibility between the materials of the drill and the workpiece;
- Chipping of cutting edges due to excessively high rotation speed;
- Long work without sharpening, which leads to dulling of the cutting edge of the drill;
- Incorrect diameter selection;
- Overheat;
- Illiterate drilling mode leading to overload.
Unfortunately, not everything always goes according to plan, so various unpleasant incidents are possible during repair work.
The methods used in various circumstances to remove the fragment depend on:
- Drill diameter values;
- Dimensions of the part (workpiece) during drilling of which the breakdown occurred;
- The type of material during drilling of which the drill broke;
It is also important to take into account this circumstance: whether the fragment protrudes outward or remains deep in the workpiece.
The simplest situations
First, let's look at methods that do not require special tools or the use of etching solutions:
- In cases where the broken drill is of small diameter and protrudes from the body of the workpiece, it is often simply pulled out with pliers or pliers, having previously lubricated the grooves of the fragment remaining inside.
- Make a hole on the back side of the part (if it is possible to access it), to the point where the broken tool has already drilled , and carefully knock it out from the back side with a suitable bench tool. To avoid damaging the part, it is advisable to use a gasket;
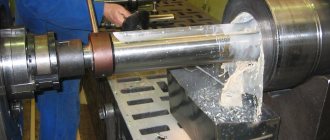
Breaking the wreckage
If the drill is firmly stuck in the hole and cannot be moved, use a metal rod and a heavy hammer to force it out of place. Remember that the drill is made of alloy steel and can crumble from strong impacts.
The fragments are easily pulled out using pliers with long jaws. Do not hold the rod with your hands, but use pliers or round nose pliers for this. This is necessary in order to avoid hitting your fingers in case of a miss.
Safety precautions and a couple of tips
To make it easier to remove a stuck drill, drop a few drops of oil into the hole. Wear gloves and eye protection while working. When a hammer hits a metal object, shards of metal may fly off. It is necessary to hit the metal rod with a hammer at an angle of 90 degrees or with a slight slope from the axis of the hole to avoid hitting your hands.
[custom_ads_shortcode3]
Using Spring Wire
Considering the fact that the diameter of the drill is slightly smaller than the hole itself, you can try the following option. On the surface of the side of the pre-heated rod, mill grooves in two opposite places, into each of which then solder a piece of spring wire with a diameter selected so that it can be completely recessed in the spiral groove of the drill. As far as possible, clean the product from chips. Then, deepening the rod into the hole, after the wire enters the spiral of the drill bit, ensure that the rod begins to rotate. Then jerk the drill bit out.
However, more complex options are not excluded, which are worth considering in more detail. If the drill is broken so that there is no way to get to it and get it out, you can try the following methods.
Using pliers
This is the simplest option when the drill did not penetrate deeply and broke close to the surface. Use pliers with long straight or curved jaws. This tool is used by electricians in their work.
To remove the drill, insert the pliers into the hole and grab it by the screw groove. First, with light movements to the left, move the drill bit out of place. As soon as you feel that it is not tightly seated in the hole, pull it out.
Remember: all drills have a right-hand helical sharpening. To pull them out, you need to turn the working tools to the left in order to disengage it from the metal.
[custom_ads_shortcode2]
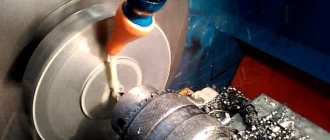
Use of citric acid
This is only suitable if you are dealing with a small diameter drill and a relatively small part. With this extraction , it is necessary to prepare an aqueous solution in a stainless steel container in a ratio of 20 grams of acid per 100 grams of water. For these purposes, ordinary kitchen citric acid is suitable.
The container with the solution is placed on the heating device, and the broken part, in turn, is lowered into the container. The temperature of the solution during the process must be maintained at about 90 degrees Celsius. Depending on the length of the drill remaining inside, this task can take from one to four hours.
Reasons: why the drill stuck
Experienced experts cite three main reasons why the drill cannot be removed from the drill (regardless of the type of chuck):
- Tool diameter too large. During the process, a drill that is too large grinds in and gets stuck, like a dowel.
- Weak steel and, as a result, deformation (most often, the tail wedges like an anchor) of the drill or drill. For the same reason, equipment breaks, especially in rotary hammers and impact drills.
- Mismatch between the shank and the chuck clamping mechanism. This often leads to the equipment falling apart and a part remaining in the chuck, but it also happens that the drill/drill simply gets stuck.
Another, less common reason is rust. People who often do repairs usually don’t encounter this, but if a drill/hammer with accessories collects dust for a long time on a balcony, in a barn, unheated country house, garage, etc., the tool is eaten up by corrosion. In this case, masters say that the sting has “soured.”
Extraction using a strong electrolyte
If the part is made of aluminum, it is possible to etch the drill bit out of the hole using an aqueous solution of nitric acid.
This method is carried out by applying a caustic liquid to the fragment. It is necessary to wait long enough for the acid to corrode the cutting edges of the drill and then knock the part out of the hole with a tool bit.
When using this option, it is recommended to lubricate the area next to the broken drill with paraffin or wax. The ambient air temperature during the process should not be lower than 20 degrees Celsius.
An easy way to remove a broken drill bit
No one, even the most skilled craftsman, is immune from drill breakage during work. If a fragment sticks out from the workpiece, then removing it is not difficult - you can, for example, use pliers, clamp the fragment and, turning it in the opposite direction, pull it out. But if a piece of the drill remains in the metal, then this is a more serious problem.
Drill destruction can occur for many reasons. The most common are related to:
- With high speeds of the cutting tool, its overheating, poor sharpening or due to dull [cutting edges on it;
- With the deviation of the drill from the axis when drilling, the beating of its chuck.
When the piece of a broken drill is small (the hole is drilled shallow) and it is located near the surface of the part, pliers with curved or elongated jaws can help - electricians have such a tool in their arsenal.
Place the ends of the jaws of the pliers into the hole and try to grab the screw groove with them. If this succeeds, they begin, applying light efforts to the left, to try to move the fragment from its place. When they feel that this has happened, they pull out the element.
You can remove the fragment from the hole using tweezers. A household one with a corrugated work surface is suitable. The task can be completed if the jaws of the tool can enter inside the hole and grab the drill. Next, the tweezers are turned to the left and at the same time swayed in different directions.
There is a method in which two screwdrivers are used to remove the drill bit. They must be thin, able to fit into the hole and screw grooves. Push the screwdrivers in all the way and squeeze tightly with both hands. They begin to turn to the left and, if they succeed in turning, they pull out the fragment. If the drill “fits” tightly and you don’t have enough hand strength, you can clamp and turn the screwdrivers with pliers.
Sometimes it is possible to knock a piece out of the hole. This is possible with a part that can be tilted. Then they hit it with a heavy hammer on all sides - this can knock the drill out of the hole.
There is a method of welding sticking. Use a welding machine and a thin electrode. They make sure that the fragment is welded to the end of the electrode after the first pulse. They wait until everything cools down and try to pull out the fragment. To avoid welding the electrode to the walls of the hole, its end is wrapped with electrical tape.
If the fragment does not respond to any of the described methods, all that remains is to break it. A strong metal rod is inserted into the hole and its upper end is hit with a heavy hammer. Drills are made of alloy steel, so they can crumble from impacts. Afterwards, the fragments are pulled out with pliers or tweezers.
To make the drill bit easier to remove, before starting the operation you should drop a little oil into the hole. Hands and eyes should be protected with gloves and goggles.
Drilling
You can try to drill out the fragment with a harder product - carbide, diamond or a drill with a special coating. This method will require extreme care, caution and patience from you, as it can lead to deformation and bending, which, in turn, will cause the fragment to move into the soft body of the part. In addition, if there is a high probability of metal shavings getting inside important components, parts and assemblies, it is better to abandon this method. However, on the contrary, if the part is not of great value and you don’t mind it, then you can drill out the space around it and then remove the fragment from this hole by picking it up with a suitable tool.
How to drill out a broken drill bit
- Causes of cutting tool failure
- Methods and procedure for removing a broken drill
- Conclusion
- Video
Drilling metal is one of the most common metalworking processes. In order to drill metal, you must have a drill, a suitable cutting tool with the appropriate diameter, as well as a special punch with a hammer, with which you mark a hole. In order for the drilling process to be as efficient as possible, it is necessary to take into account the sharpness of the tool, since the drill has the property of becoming dull very quickly. The speed of dulling depends on several parameters: speed, feed force, cooling force. In order to create the best conditions for this process, it is important to dip the tip of the device in oil or drip machine oil into the punching area; this will help the device cool better and also make cutting metal easier. Each material that is drilled has characteristics of this process. It is imperative to select a suitable separate device - a cutting tool - for drilling each material. For example, a device made of carbide material will be able to drill through ductile iron. The devices require careful care and timely sharpening, otherwise they will break. If a breakdown occurs, you need to know how to drill out a broken drill.
Causes of cutting tool failure
Devices wear out during the cutting process and often break. There are several main reasons for breakdowns of cutting devices:
- Dull cutting edge. Occurs due to a very long operation of the device without sharpening, high speed of the cutting process, turning the installation in the chuck, improper sharpening, increased load on the device, as well as due to overheating of the device and lack of cooling.
- Chipping of cutting edges. This occurs due to too high a cutting speed, the presence of hard inclusions in the part being drilled, work with a blunt structure and a large sharpening angle.
- Incorrect cooling mode. Incorrect amount or composition of coolant.
- Incorrect device size. The conductor bushing is larger than the cutting tool.
- Incorrect drilling mode. Too high speed or low speed with high feed, overload, excessive cutting feed.
- Mismatch between the drill material and the material of the workpiece. If the device is made of a material that cannot be drilled into a certain part, then it will certainly break.
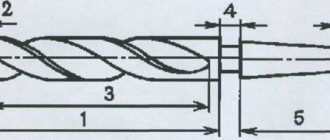
photo: broken drill and bent metal
The main recommendation for preventing these causes of breakdowns is the timely sharpening of dull devices using a special device. We recommend that you take into account the sharpening angle and take into account the symmetry of the installation tip. The optimal sharpening angle is 118 degrees, but it may differ for different materials.
Methods and procedure for removing a broken drill
If a drill is stuck, you need to know how to remove it. How to remove the drill? There are several techniques:
- Do not drill a piece with a cutting device that is designed for hard materials, otherwise it will deviate and a bend will form, which will cause the structure to sink into the soft body of the part. What metal is the part made of? If it is made of aluminum, then it is possible to etch out the broken part using a nitric acid solution. This method will help remove structural debris from a blind hole. Tip: dilute the acid with water. Apply acid to the chip, wait until it “boils” and corrodes the cutting edges. Using a punch, knock the part out of the through hole.
- Remove debris that has a diameter of 8 millimeters or more using a special bolt that has hard spokes welded onto it. Step one: drop the oil and kerosene mixture into the hole. Step two: insert the three protrusions of the mandrel into the groove of the broken device. Step three: rotate the mandrel, turn out the fragment. Expert advice: rotate in the opposite direction.
- Use an EDM machine. A special machine pierces rolled metal from https://cheliab-profit.ru/listovoy-metalloprokat.html of any hardness.
Also, if you don’t mind the part, drill around the broken device. Then you can get it out by drilling with a harder tool. A diamond drill, carbide or specially coated, is suitable.
Tip: if you decide to use etching to solve the problem of how to remove a broken drill, we recommend that you lubricate the surface near the broken device with wax or paraffin.
Conclusion
You need to have information on how to use the drill in order to avoid possible structural failures that could lead to the installation getting stuck in the metal. Study how the drill works, as well as all possible causes of breakdowns, sharpen the structure in a timely manner, cool it and do not exceed the cutting speed.
How to remove a broken drill with your own hands: Video
Method using a special set of extracts
You will need a special set of extracts, which can be used to remove stuck studs, stripped bolts, broken drills, etc.
Your next steps:
- In the center of the stuck drill, it is necessary to drill a hole with a diameter slightly smaller than the diameter of the extractor;
- Next, insert the extractor and carefully screw it in;
- Then begin to remove the stuck drill bit.
Keep in mind that the extractor has a left-hand thread, so when screwing it in, it will screw in the opposite direction.
How to remove the broken end of a drill from the chuck
When a drill, drill or other equipment with an irregular tip (for example, SDS instead of a hexagon) is driven into the chuck, under heavy load and especially if the steel is of poor quality, the tip breaks. This happens especially often with hammer drills - the equipment falls apart where the balls grab it.
It is extremely difficult to remove such a fragment. An awl, a screwdriver, and a magnet with superglue show low efficiency. A more risky way is to supplement the awl with a generous portion of butter.
The author of Miss Clean magazine read various opinions on forums and came to the conclusion that the safest option is to go to a workshop, where the cartridge will either be disassembled or replaced.
Without disassembling the hammer drill and the cartridge, the fragment can be removed in two effective (but unsafe) ways.
Welding machine:
- Clamp the hammer drill in a powerful vice with the chuck facing up.
- Remove the seal, stopper and other washers-nuts, if necessary, or simply pull the cartridge down.
- After this, lower the insulating sheath from a powerful wire (at least 7 mm in cross-section) into the maximally opened cartridge.
- Fix one terminal of the welding machine to the body of the hammer drill.
- Use the second terminal to grab a long rod or tip for welding (the cross-section is smaller than that of the insulating tube).
- Place the tip on the fragment in the cartridge and give a short discharge.
- Pull out the rod along with the fragment.
We recommend: Can silver be washed in the dishwasher?
This is a very quick method if a friend or your own tools have a welding machine. If not, it’s unlikely that you’ll be able to find an analogue for it. Another drawback that was noted on the forums is welding adhesions, which can form chaotically in both the chuck and the hammer drill. Such bows subsequently damage the instrument.
With pressure:
- Remove the boot.
- Pull the cartridge down.
- Turn on impact mode and simultaneously press anything on the fragment.
At the same time, a fragment of the drill shoots out (and where it will hit is unknown). The method is fast, but you should put something in front of the “barrel” of the hammer drill that will absorb the impact of the “projectile,” otherwise the ricochet will easily cause injury or break something around.