Effective ways to unscrew a broken bolt
There are several ways to unscrew a broken bolt, but before you begin, you should do some preparatory work.
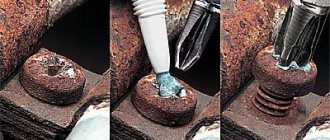
Such work means: Cleaning the work site from dirt, oil, etc.
Treat the threaded connection with WD-40 or at least machine oil. Alternatively, you can hit the fragment a couple of times with a hammer or heat the bolt with a soldering iron or lamp, provided that this is possible and other important parts (rubber, plastic, fabric, etc.) will not be damaged by the heating.
How to unscrew a bolt if it breaks above the threaded surface
1. If you have already managed to “break” the threads of the bolt even a little, that is, if it has already begun to unscrew, you can try to unscrew the broken bolt using pliers or a good adjustable wrench.
2. The second option will require you to use a hacksaw or a grinder (depending on the size of the bolt); sometimes a chisel also helps, the main thing is not to overdo it. The principle is as follows: make a transverse hole for a screwdriver and try to unscrew the bolt with a screwdriver.
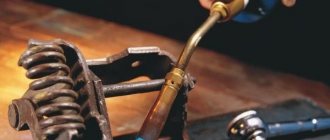
3. Option three - welding. As you understand, this method requires a welding machine, everything is done as follows - take a bolt with a head of approximately the same diameter and weld it to the fragment, then using a wrench, carefully without using excessive force, try to unscrew the broken bolt. Rumor has it that there are so-called “aggressive adhesives” that can supposedly perform the role of welding. However, this method has not been personally tested, so we will not claim its effectiveness.
How to unscrew a broken bolt if it breaks off flush with or below the surface
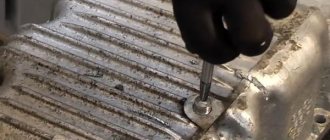
- In this situation, you will have to act more radically; you will need a drill with a thin drill and good skills in using this tool. You need to drill 2-3 or more thin holes in the body of the bolt in order to then combine them into one. You will need to install a screwdriver in this hole and unscrew the broken bolts.
- The second method is more complicated. If you cannot unscrew the broken bolt using any of the above methods, you will have to use more drastic measures. You will need a drill, a tap, a lot of skill and patience. Your task is to drill a hole in the center of the bolt, then carefully cut a left-hand thread in it (either yourself or ask someone who knows how to use a tap). When you screw a new bolt with a left-hand thread into a freshly made thread, then having reached the end, that is, having screwed it in completely, the old broken bolt should begin to unscrew.
- The third way to remove a piece of a bolt that has broken flush with the surface is by drilling. This method is the most difficult and most dangerous, since when doing this work you risk damaging the thread.
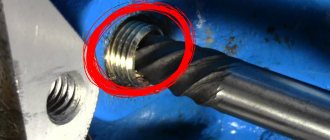
The principle is as follows - you need to drill a hole exactly in the center using a thin drill, after which a thicker drill is installed, and the procedure is repeated. The most important thing is to drill the first hole exactly along the broken bolt there will be practically no left, and the walls will become thin enough to break them, try to very carefully break the remnants of the thread using thin sharpened wire or tweezers. If you do everything correctly, you won't have to cut new threads or "drive" old ones. If you have an “extractor” with a left-hand thread, you can use it to unscrew the remaining fragments, see details in the view at the end of the article
And lastly, if after several attempts you notice that something is not working out for you, there is no need to act rashly, as you will only complicate everything, it is better to entrust this work to someone who has already encountered this problem many times. We wish you good luck in your hard work, we hope the article was useful to you and helped resolve your issue. See you again on the website of automotive advice - Question Auto.
The most typical failure situations
A bolt can break in different ways. The easiest case is when it breaks flush with the part. In this case, there will be no special problems in how to drill the bolt. But, nevertheless, it will be necessary to carry out some preparatory measures that will allow you to extract the remaining part without much difficulty. And they are as follows:
- The most important thing is to prepare yourself for the fact that you can only drill out a broken bolt without damaging the thread if you apply maximum patience and calm. Haste in this case is the main enemy
- First of all, you need to use a tool to quickly unscrew rusty bolted joints. There are a great many of them in the markets. But the overwhelming majority of such funds are absolutely useless. A self-respecting car enthusiast and mechanic should always have in stock a penetrating agent for loosening nuts and bolts, which contains substances that have the ability to penetrate any joint. Recommendations for choosing can be obtained from any well-known car service center. The most effective lubricants are those based on molybdenum disulfide and graphite.
- Next, you can try one of the simplest options on how to drill out a broken bolt without any problems. To do this, you need to use a thin drill and a low-speed drill to drill a slot for a screwdriver.
- You can purchase a gas torch for loosening bolts at any hardware store. If there is such a burner, then with its help it is necessary to slightly warm up the part itself in such a way that the remaining piece does not heat up. In this case, there should be a fire extinguisher nearby.
- Then try using a screwdriver with a wrench to slowly loosen the rest of the bolt. If the bolted connection is not old, then the piece should come off.
Read more: How to drive slowly with the clutch
But not many people know how to drill a bolt correctly if it breaks inside the socket. Typically, such breakdowns occur when tightening the cylinder head studs of a car engine. In this case, some skills are needed when using a drill and tap.
Preparatory activities are the same as in the previous version. Then, before drilling out the broken bolt, you need to pour liquid into the hole for quick unscrewing and leave until completely penetrated into the joint for 2-3 hours.
Then, using a low-speed drill and a drill with a diameter half as big as the bolt, carefully drill a hole in the center, without tilting and at low speeds, to a depth of one-third of the total length of the fragment. Using a left-hand thread tap, cut a thread to the full depth of the hole. Then a high-strength bolt with the same thread is screwed in. Using a spanner wrench, lightly tapping and rotating the bolt, remove the remaining part of the bolt.
Replace the old fasteners with new ones: https://avselectro.ru/catalog/4976-bolty - excellent quality bolts from global manufacturers in a large assortment.
Reasons for failure of metal drills
Photo #1: broken drill
The following reasons lead to drill breakage.
- Drilling with tools made from less hard materials. For this reason, drills break most often.
- Failure to comply with cutting conditions. When drilling at powers exceeding the recommended ones, overheating and overloads occur.
- Wear of cutting edges. It is caused by prolonged use of the tool without sharpening, excessive load and other factors.
- Failure to comply with the cooling mode. Breakdowns are caused by using a small amount of coolant or its incorrect composition. Overheating occurs.
In addition, problems can arise due to incorrect selection of drill diameter.
How to unscrew the remaining fragment
If the pin does break off, don’t despair. To unscrew the broken part, several techniques are used. Some require the use of industrial equipment, while for others, simple equipment available to a home craftsman is sufficient.
How to unscrew a broken hairpin
If a fragment remains sticking out, then use one of the following techniques:
- Put on a nut with a slightly larger diameter and weld it. Next, you can use a key to unscrew the broken pin.
- Weld a transverse rod (reinforcement) 30-40 cm long. Using it as a wrench, you can unscrew the fragment.
- Use a file to sharpen the top to a square. Now the fragment can be unscrewed with a tap wrench.
Unscrewing a broken pin
If the breakdown occurs flush with the surface of the cylinder head (or other unit), the fragment will have to be drilled out.
Drilling out the threads of a broken stud
Before drilling, cover the cylinder head with a thick cloth to prevent sparks and waste from entering the cylinders.
Next, you need to use an angle grinder with an abrasive disc to level the surface of the fragment. It should become strictly horizontal. A point is marked in the middle.
Next, take a drill with a diameter slightly smaller than the internal diameter of the thread. It is best to place the cylinder head on the workbench of a stationary drilling machine - this way there is less risk of the drill deviating from the vertical.
Drilling out the threads of a broken stud
After passing the hole to its full depth, you should unscrew the remains of the drilled fragment from it using pliers or needle-nose pliers. Next, you must go through the hole with a set of standard taps.
Drilling the bolt according to the rules
Not all home craftsmen know how to drill out a broken bolt correctly. Meanwhile, you need to follow certain recommendations so as not to worsen the situation. The hole is drilled extremely carefully and precisely in the center, otherwise you will break the thread when unscrewing (note that broken screws, nails and studs are removed using the same principle. If all actions were performed correctly, any stuck fastener can be easily removed to the surface. In complex In cases, the hole must be gradually expanded using drills of different diameters, moving from smaller to larger.When the walls of the rod become thinner, they can be broken and pulled out with tweezers.
How to unscrew a hex or sprocket head bolt
In the automotive industry and other equipment, hex tool bolts are often used. How to turn out a torn cap that has broken edges:
- Make a horizontal notch on the head with a grinder or file. In this case, a strong screwdriver is used to unscrew the broken screw.
- Using a special TORX sprocket, which is driven into the head. The nozzle is selected in size, slightly larger than the torn cap, for a strong connection between the walls.
- A set of extractors that can be purchased at a hardware store. Before using the extractor, a hole is drilled with a drill in the base of the bolt, then the extractor is inserted, and the screw is removed with pliers or a special clamp.
- Using a left-handed drill with a slightly smaller hole diameter. Work with the tool is carried out in reverse mode, with this method it is possible to damage the thread.
How to unscrew a bolt with torn edges manually
Broken nuts are more difficult to unscrew, since during work there is a possibility of damage to the threads. The simplest way is to use chemicals; the surfaces are cleaned and treated with the product for 15 minutes. If the edges are torn off, it is impossible to use a wrench or socket. In such cases, a chisel is used to destroy the main part of the nut, then removed and replaced with a new nut.
How to remove a bolt if the head has broken off
A broken head of the structure can cause a lot of trouble during work. How to act in such a difficult situation without resorting to using a serious tool. If the element is small, it is possible to make a notch with a grinder, the recess of which will allow the use of a screwdriver with sharp edges. To perform more complex work, you will need an extractor, drill and reamer. The base of the threaded connection is drilled exactly in the middle, after making the hole, the tool is screwed in counterclockwise.
When performing sequential actions, unscrewing a damaged structural element will not be difficult even for those who are encountering this problem for the first time. It is necessary to correctly assess the situation and use a good quality tool for a productive result.
How to drill out a broken bolt
A drill made of high-quality material is used for the work. The size must be selected in accordance with the torn edges; the diameter of the drill should not be larger than the hole. A high-quality drill has a higher price, but its use eliminates rapid wear and the possibility of breakage during operation.
Diagram for correct drilling of a broken bolt
Drilling out a broken bolt
You should use the tool slowly, and before completing the task, correctly assess the situation. It is necessary to monitor the position of the tool during operation; drilling is carried out strictly in the center, without deviations in different directions.
Complex option
If you can't unscrew it using these methods, we'll drill it. The main thing is that the broken bolt is not hardened. There are several methods to try before attempting to drill out a broken bolt. The most basic thing is to take a drill with reverse and a drill bit. Sometimes this trick can be done with a regular metal screw with a drill at the end. We press on the broken part, try to unscrew it with small turns, accuracy is needed here - you need to twist it “tightly”. If these methods fail, we move on to serious action. When the diameter of the pin is small, you need to determine how to remove the fragment - there is not enough space for two options.
Method one. Using a small diameter drill, we make two holes in the fragment. Against each other. We drill shallowly - about 5 - 10 mm, preferably away from the center. Then we take a lock ring remover, narrow-nose pliers, or simply insert two nails, clamp them with pliers and try to unscrew them.
Read more: Original Kalina Cross wheels
Bolt Removal Technology
Method two. You need a special tool - an extractor. It is sold in tool stores. It is something like a cone drill, has a reverse thread, very hard hardened metal. First, we select a drill according to its diameter. Carefully mark the center of the stud with a core; we need it to drill the hole. It is not necessary to go deep - just drill a little deeper than the length of the extractor. Then we wrap the extractor and try to unscrew the broken piece.
When none of the methods help, the most difficult option remains - drilling. To do this you need several sharp drills of different diameters and a strong hand. The most important thing is to catch the center of the fragment. We mark the center as accurately as possible with a core; the accuracy of drilling depends on this. Then, using the smallest drill, we drill through the broken one.
It is important to drill exactly along the rest, parallel to the wall, so that the alignment of the holes on both sides is maintained. Then we take the next diameter of the drill and so on until we reach the wall of the hole. If you slightly miss the center of the hole, it happens. The main thing is to stop in time, leaving the thread intact. We take a chisel, screwdriver or nail, and crush the rest of the wall of the fragment inward. Then we simply pull the resulting lump out.
If you find an error, please select a piece of text and press Ctrl+Enter.
A situation where a bolt breaks during tightening and the broken piece remains in the part is not uncommon. But not many people know that there are quite a few effective ways to drill out a broken bolt.
A situation where a bolt breaks during tightening and the broken piece remains in the part is not uncommon. But not many people know that there are quite a few effective ways to drill out a broken bolt. The main thing is not to panic, but to carefully read this information material to the end.
Fastener classification
This fastening category includes a list of elements that are used to connect various structural parts, but they cannot be dismantled without special equipment. Fasteners are classified into the following types:
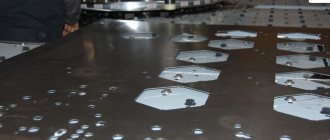
- Self-tapping screws with a hidden or cylindrical head, as well as for a bit with two characteristic holes.
- Anti-vandal hex bolts with a semicircular head and breakaway nuts.
- Rivets.
- Washers.
- Star plugs.
The group of anti-vandal products also includes a unique cabinet, inside of which you can place communication equipment. It provides excellent protection against adverse environmental conditions, as well as against attacks by intruders. Its design requires the presence of special bolts and other fasteners with original slots.
Permanent anti-vandal fastener
There are two main methods by which you can ensure that the fasteners are non-removable. The first involves the failure of the installation part. It is necessary to tear off the required element after ensuring the necessary tightening, so that there is simply nothing to unscrew. For these purposes, shear bolts and nuts are used.
The second includes a slot acting in one direction. It can be easily installed, but it is extremely difficult to dismantle. The head or screwdriver will rotate or simply slip out of the grooves. To install such an element, no special tools are needed, because the process takes place using a standard screwdriver or bit.
Demountable anti-vandal fasteners
The principle of operation of such a mechanism is based on complicating the design of the slot or access to it, so that traditional tools cannot cope with this task. There are a huge number of varieties of such splines, and new ones appear every year. This significantly increases security, but at the same time there are problems with installation, because you constantly have to purchase new “keys”.
How to remove a broken bolt: step-by-step instructions
The most difficult thing to remove is a bolt fragment that has a non-flat surface - during the drilling process, the drill can simply slip, and the part will be damaged, and removing the bolt will become more difficult.
This is what a broken bolt looks like in detail
To make it easier, it is worth injecting the lubricant again, and then using a guide bushing that matches the thread. It must be screwed into the hole until it stops, and then tightened with a lock nut.
Matched bushing
Using a drill, you need to make a small hole in the fragment for the extractor. It is recommended to lubricate the end of the drill with lubricant.
Making a hole with a lubricated drill
If everything is in order, you can continue drilling - you will not damage the thread, since the recess has already been created. You just can’t drill through the fragment - you can damage the part, especially if it is made of soft metal.
The next step is to drive a suitable size screw extractor into the hole. Make sure it is firmly secured and does not slip out. If this is the case, you can begin to carefully and slowly unscrew the extractor along with the fragment.
Screw extractor Turn out the fragment
The broken bolt has been removed, all that remains is to check whether the thread is intact - to do this, you need to screw a new bolt into the hole. To make this easier, you can lubricate the threads with lubricant.
The extracted bolt fragment. As you can see, his thread remained intact thanks to careful actions. The item is not damaged
In the process of removing the bolt, you will use chemicals, possibly heat the part in the hole, use impact tools and drill, so it is important to take care of personal protection: it is better to wear gloves, long sleeves, glasses, and, if possible, a respirator to protect the respiratory tract. This method will help you remove a broken bolt even from a deep hole, if you do everything correctly and follow safety precautions
There are other methods, but we cannot vouch for their effectiveness, while the method described above always works flawlessly
This method will help you remove a broken bolt even from a deep hole, if you do everything correctly and follow safety precautions. There are other methods, but we cannot vouch for their effectiveness, while the method described above always works flawlessly.
How to unscrew a broken bolt if the fragment does not protrude above the surface of the product.
Method 4.
If you have a left-hand drill, you can try using it to unscrew it.
Drill diameter = pin outer diameter – tooth height x 2
Make a hole in the center of the stud with a core. Install a regular “right-handed” thin drill into the resulting recess. Drill 1-2 cm.
Then install the “left” drill of a larger diameter into the chuck and drill at low speeds.
The peculiarity of the method is that the “Left” drill drills counterclockwise, which coincides with the direction of unscrewing the stud. And if it is not strongly stuck, the pin may begin to rotate during the drilling process.
Method 5.
Extractor.
Drill a hole in the center of the stud with a diameter corresponding to the type of extractor.
Insert the extractor into the resulting hole and unscrew your pin.
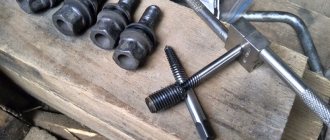
Method 6.
Drill a hole in the stud and cut a thread in it with a tap.
Screw in the corresponding bolt, tighten it with a lock nut, and unscrew the stud with a wrench placed over the head of the fixed bolt.
Method 7.
Select a drill with a right-hand stroke and a diameter as in “Method 4”.
Drill the pin along the entire depth of the hole. The idea of the method is this: only the thread teeth of the stud will remain in the thread body of the product, which can be removed with a tap.
Use a tap of the same diameter as the diameter of the stud to drive the threads through the solid body of the product.
The main condition for the successful implementation of this method is the precise placement of the drill in the center of the stud. Otherwise, you will ruin the thread in the solid product.
If the thread was damaged during the process of dismantling the stud, it makes sense to drill out the damaged hole for the next standard thread size and use a tap to cut a new thread of a larger diameter.
Method 8.
If a pin breaks off in an aluminum solid, you can use nitric acid (it’s hard to find, but in case you have it).
Fill the chip with acid. It corrodes steel, leaving aluminum (or duralumin) untouched. When the remaining stud is removed, be sure to neutralize the acid in the hole with an alkali (such as soda).
The process is of course long, so it is suitable if you are not in a hurry.
Method 9.
Drill a hole in the stud and drive into it either a triangular file or a tap sharpened to a cone with three edges.
Unscrew the pin by rotating the wedged file or tap.
Extractor for unscrewing broken bolts
No matter how durable metal is, we all know that even it sometimes fails and fails at the most unnecessary moment. One of these situations may be the breakdown of a fastening element, in particular bolts and studs. There is nothing worse for a person with a wrench to see a broken bolt, part of which remains in the screwed-in element. And then the extractor comes to the rescue, do not be alarmed, its name is much more complicated than its design. Let's talk in more detail about working with it and its features.
Device and types of extractor
There is nothing complicated in the design of this tool. In appearance, it is a steel rod at the end of which a left-hand thread (or wedge) is cut; the shape of this miracle tool resembles a beard or a puncher. There are quite a lot of sizes, the larger the bolt being removed, the larger the extractor. I advise you to always buy this tool as a set, because you never know in advance which bolt or stud will fail. The most commonly used sizes are from M1 to M16.
According to their design features, extractors are divided into:
- Wedge-shaped. They are a cone with edges and work on the wedge principle. The extractor is driven into the pre-drilled part of the stuck bolt and then turned out with a key. Working with it, of course, is simple, but before drilling a hole, be sure to keep in mind that you need to drill strictly in the center, without moving the hole to the side. Otherwise, all of the extractor's rotating force will be displaced and you will not be able to remove the broken bolt. You can also break the extractor itself.
- Rod type. Made in the form of a rod with edges, very similar to a wedge-shaped extractor. It gets hammered into the broken part and is turned out with a wrench. Like the first type, the extractor can be quite difficult to remove from an already unscrewed part.
- Spiral type. The most common and effective extractor for unscrewing broken bolts. The same cone only with a left-hand thread (right if we unscrew the left bolt). The extractor is not clogged, but is screwed into the bolt hole, wedged together with the part and removed.
The operating principle of the extractor for unscrewing broken bolts
If you have read the description of the types of this tool, then you can already imagine the whole simple procedure for removing bolts. But without systematization, this material will be incomplete, and let’s look at everything in more detail.
The first step is to mark the center of the broken bolt. For this we need a center punch and a hammer.
The bolt broke off flush with the surface of the part or deeper
According to experts, such a breakdown is the most difficult. The problem is that it is not always possible to determine the circumference of a broken piece of hardware. Therefore, before you start unscrewing the bolt, you need to clean the place where it is located. This is the only way to determine where the edge of the hardware is and not damage the thread of the part when unscrewing it.
Core is a tool that should be in any workshop or garage PHOTO: fine-tools.com
When the boundaries are determined, you need to mark the center of the broken bolt and, using a special tool (punch), knock out the recess. This is necessary in order to start drilling. Otherwise, the drill will “float” and it will not be possible to drill exactly in the center. The same actions are performed if the bolt breaks off deeper than the upper level of the part.
In theory, the drill should go along the bolt exactly in the center of the PHOTO. yandex.ua
Next, you need to drill a hole exactly in the center, with a diameter smaller than that of the hardware. It should go as smoothly as possible along the axis of the bolt. When this work is completed, you can proceed directly to twisting. To do this, use a tap with a reverse thread, which is screwed into the drilled hole counterclockwise until it stops, after which rotation continues in the same direction. The remaining bolt should come out.
Taps can have right-handed or left-handed threads PHOTO: vseinstrumenti.ru
Using an extractor to deal with broken bolts
If you cannot remove the hardware using a tap, you will need a more powerful tool. This can be a special device called an extractor. It looks like a wrench attachment with a right or left taper thread. The extractor is screwed into the hole until it stops, after which the bolt fragment is unscrewed using a socket with an amplifier. It is almost impossible to break such a device, which means that efforts can be made without fear.
Extractors do an excellent job of turning out broken bolts or studs PHOTO: afmforum.ru
Step-by-step instruction
Step one . We put on the thinnest drill and begin to drill strictly in the center of the bolt. Make sure that the drill does not go to the side. If the hole turns out to be crooked, then later, during extraction, additional (and very serious) complications in the work will appear.
Step two. We gradually change the drill bits to increasingly thick ones until approximately one third of the bolt is drilled out.
Step three. Take and hammer a triangular file into the hole. The point is to keep it as tight as possible. Otherwise there will be no way to remove the bolt.
Step four. As soon as the file is in the bolt and sits there tightly, we begin attempting to remove it. To do this we will also need to use pliers or a wrench. We clamp our file and begin to twist the resulting lever.
Step five. If the bolt does not give in, then you can resort to one “exotic” extraction method. We drill out the hardware further so that another bolt of a smaller size (diameter) with the opposite thread can be placed in it, having first made a thread for it in the first (broken) bolt using a suitable tap. After this, we try to unscrew the hardware using a smaller bolt as a head.
Read also: How to find out the type of light bulb base
Step six. If this method does not work, then as a last resort you can try to continue drilling the bolt further until it is sufficiently weakened. When this happens, you can unscrew it using only a tap of the appropriate size.
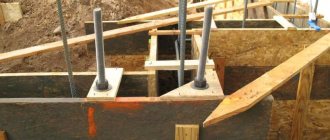
How to unscrew a broken aluminum bolt
The time has come to change the levers, but bad luck I couldn’t unscrew the bolts. The bolts securing the silent block holder to the subframe were welded to death with the subframe itself. This phenomenon is known and predictable. Iron alloys and aluminum alloys become welded over time, especially in a humid environment. Normal manufacturers understand this and use thread sealant, which, in addition to its ability to fix fasteners, also insulates, thereby preventing welding of parts. But the previous owner had already changed the levers and tightened the bolts dry. As a result, two of the four bolts were unscrewed, the remaining two broke off.
I started with simple but unsuccessful attempts. VD-ashka, heating, welding of iron. Everything is in vain, boiled to death.
The VD-ashka did not help simply because there was no gap left in the thread where it could leak. Welding the piece of iron to unscrew it also did not lead to success. A piece broke off, not due to welding, but the bolt itself, just like the first time.
All that remains is to remove the debris. You can drill it, but you need to understand that we have a hardened bolt in soft aluminum, and the length of the fragment is more than four diameters. There is a risk that the drill will go to the side, and drilling a hardened bolt is not much fun. Then it’s not a fact that all the carvings will be saved. Although, if you make a jig and have straight hands, you can drill it, I’ve done this more than once, but now I decided to use a different method, corresponding to my nickname, chemical.
First of all, we clean the surface from dirt and degrease.
Let's take nitric acid. I came across a chemically pure one with a concentration of 64%. This concentration is not particularly poisonous, and even passivates the surface of the iron. But for etching, the optimal concentration is about 30%. So we use water for dilution.
They stuck a plasticine bucket over the object to be etched. We poured the solution and observed the process.
We have two bolts in total, one bucket is red, the other is black.
The next day I changed the solution and looked at how the process was going. Everything is in order, half of the bolt is gone, the thread is intact.
And he twisted it!
As a result, the thread is intact, nerves are saved.
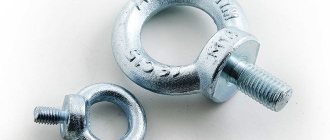
Characteristics of studs and nuts
They are used as fasteners for the manifold. A stud is very similar to a bolt, but the latter has a head. The design itself is a threaded rod. The thread is necessary to tighten the nut, which secures the stud, ensuring its secure fixation.
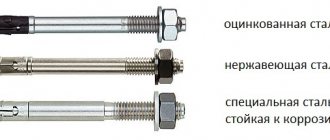
The differences between the studs that are used for fastening manifolds and fastening bolts are as follows:
- Shape of the rod.
- Head shape and size (if any).
- Thread type and pitch (this also applies to the inside of the nut).
- Material of manufacture.
- Strength.
These characteristics are important; the choice of product depends on them. There are various options for manifold fasteners on the market.
Material of manufacture
When compared with previous years, the quality of modern products leaves much to be desired. To understand the difference, you need to compare how modern mounts differ from those that were produced before:
Nowadays the most common material is uncoated steel. In 1990, fasteners were made of copper-plated steel. The quality was noticeably better. In 1970, very durable brass products were made.
Flat head screwdriver and hammer
An accessible method, effective if the fracture occurs above the thread and the surface has an uneven edge. Then for extraction you will need a simple set of tools, which can be found in any garage.
We carefully examine the cleaned surface and find the largest protrusion on the fracture area. We place a flat-head screwdriver at an angle, pressing into the selected location. For more reliable support, you can use a core, with which the unevenness deepens. After this, using gentle blows, we carefully try to turn the thread. If you can’t do this right away, you need to gradually increase the strength.
However, you should be extremely careful with this method, since, firstly, the surface must be accessible enough for the hammer to work. And secondly, you need to carefully calculate the force of the impact to prevent damage to adjacent parts.
When the fault was above the surface
In this case, it is easier to deal with the bolt. Here are some of your options:
- Grab the rod visible above the surface with pliers or pliers and try to unscrew it.
- Take a punch and set it at an angle to the edge of the bolt. Try to give the bolt a rotational movement by lightly hitting the center punch with a hammer. Sometimes such small efforts are enough for the rod to begin to unscrew.
- Using a hacksaw for metal, cut a transverse hole for a flat screwdriver on the visible surface and try to unscrew it. You can also use a grinder or even a chisel for this.
- Another option is to use welding or aggressive glue. Try welding/gluing another bolt to the rod and unscrewing it. You can also weld, for example, an L-shaped hexagon or any other suitable handle that can be used as a stop.
If you are using welding, do not try to unscrew a heated bolt right away - let it cool. Remember: metal expands when heated, so it will be impossible to remove a heated bolt. Run cold water over the welding area to speed up the cooling process.