Which drill is better to use
- Any tool that contains cobalt in its alloy. The higher the percentage of this component, the better. Cobalt products differ from ordinary ones in a yellowish tint. Do not confuse the cobalt alloy with the application of this metal only to the outer part of the drill by electroplating. In the latter case, it will not be possible to drill through stainless steel.
- Expensive specialized tool. Such pobedit drills can drill through stainless steel, not just concrete. They have a certain sharpening angle.
- For thin stainless steel, you can use a feather-shaped drill bit for ceramic tiles. This is not the best option, but it will help to drill the workpiece once.
Application of cobalt drill
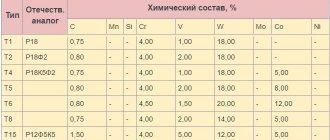
Of the old Soviet drills for stainless steel, the most suitable tool would be the one with the brand R6M5K5. This type of equipment contains up to 5% cobalt in the alloy. Due to this element, the tool acquires high strength, and the heating temperature can reach 135 degrees Celsius, which does not entail destruction of the material. Products of this quality can only be found in markets where old Soviet equipment is sold, and even then not always. An alternative to a domestically produced cobalt drill is a foreign analogue under the HSS-Co brand.
Tricks for drilling stainless steel
As can be seen from the article, the process of drilling stainless steel is quite labor-intensive and requires certain skills and training.
We have prepared some useful tips on how to drill through stainless steel:
- When drilling, metal shavings should be long and come out in uniform sections; small, dark-colored shavings indicate that the rotation speed is incorrectly selected, and that the cutting edges of the drill are excessively heated.
- If you don’t have a prepared lubricant on hand, you can use regular vegetable or olive oil; pork fat or lard are also excellent.
- To work with thin sheet stainless steel, you can use a special drill bit for porcelain tiles.
- It is advisable to carry out the drilling process at a low speed of rotation of the cutting tool, and if the drill does not have a speed control function, drill by briefly turning it on and off for 2-3 seconds.
- If a cobalt drill is not available, you can use a pobedit tool with sharpening the cutting edges at 135 degrees.
- Before starting the drilling process, the workpiece should be punched, which will facilitate centering the drill.
- When drilling a workpiece of increased thickness, you can preheat the treatment area using a gas burner; when cooling, the heating can be repeated periodically.
- When processing thin stainless steel parts (up to 1 millimeter), you can use a high-quality wood drill bit; experience shows that the holes are smooth and of precise dimensions.
Simple rules
To avoid unpleasant moments associated, for example, with overheating of the drill, strong heating of the drilling site, and others, you need to follow a few simple rules, which will allow you to make perfectly even holes without additional time and material costs. It must be taken into account that stainless steel has a viscous structure, therefore, in order to avoid overheating of the drill, stainless steel must be drilled only at low speeds. The drills should be as sharp as possible. In addition, to avoid severe overheating of the drilling site, which will significantly complicate further drilling of the material, it is necessary to reduce the temperature of the drill every 10 seconds.
If during the drilling process the chips become increasingly fine and dark, this indicates that the drill is dull and the hole in the stainless steel is overheating. Before continuing work, the drill must be sharpened or replaced with a new, sharper one. Drilling into stainless steel usually starts with small diameter drill bits, such as size five or four. Next, you can use drills of the required diameter to achieve the required hole size. As a result of such actions, you can significantly reduce drilling time and make the hole as smooth as possible.
Very few basics at the beginning.
Before work, you must select the cutting mode. What it is? Elements of the cutting mode when drilling
There are 3 main parameters:
The cutting speed
when drilling is conditionally the peripheral speed (the speed of a point located on the surface) of the drill relative to the workpiece.
(In simple terms: "how fast the drill rotates", or the number of revolutions per minute depending on the diameter of the drill.) For example, the same cutting speed of 20 m/min is achieved if a drill with a diameter of 1.0 is rotated 6366 times per minute (rpm), and a drill with a diameter of 10.0 - 637 times per minute. Feed
– the amount of movement of the drill in the direction of the drilling axis per revolution in mm/rev (how quickly the drill immerses into the material).
Torque
perceived by the drill when cutting (what torsional load the drill experiences during operation).
Read also: How to properly cut pipes with a grinder
These three parameters are mutually determining and their choice depends on: - the material being processed; - the material of the drill itself; -equipment on which work is performed and type of cooling; - other factors (surface roughness, contamination, etc.).
About
the features of drilling stainless steels
The main feature (difficulty) when working with stainless steel is related to its ductility. As a result, a kind of sticking occurs on the working surface of the drill, which leads to overheating of the tool and its failure. Therefore, it is important: – to ensure heat removal using cooling; – use drills that are more resistant to heat and allow better chip removal.
Cobalt drills
Made from high speed steel HSSCo (M35) or similar designations (HSSCo5, HSSE, P6MK5), these drills are specially designed and recommended for drilling difficult-to-cut and
stainless steels.
1. The composition of R6M5K5 includes 5% cobalt, which significantly increases the red-hardness of the drill - the ability to maintain high hardness and wear resistance obtained as a result of heat treatment when heated to red-hot temperatures. 2. The drill is made using more expensive grinding technology - i.e. The drill bit is not twisted into a spiral (like rolled drills), but the flutes are formed on a grinding machine. As a result, there is no internal tension in the drill, and the surfaces are smooth, which significantly improves chip yield (important when drilling stainless steel). 3. The apex angle is 135 degrees with a cross-shaped point. This is the angle between the working edges of the drill (i.e., unlike conventional metal drills, cobalt drills look more “blunt”). This angle reduces the area of the drill’s working area, which reduces the load on it, and the cross-shaped point at the top reduces the dead zone (in this place the drill bears the greatest load) between the working edges.
How to drill ordinary stainless steel with a cobalt drill
If you can provide the correct cutting conditions,
i.e.
If you have a machine on which you can accurately set the speed, feed and provide cooling
, then we simply choose for stainless steel:
Cutting speed
V = 10 m/min is recommended by most manufacturers for working with stainless steels and is necessary for selecting speed.
Then the revolutions can be calculated using the formula: n=3180/D for a drill with a diameter of 1.0 - 3180 rpm, for a drill 5.0 already 636 rpm Feed:
0.005-0.01d mm/n, where d is the diameter of the drill .
This means that in one minute a drill with a diameter of 5 mm should drill a hole with a depth of about 3 mm, and a hole with a diameter of 10 mm is already 1.6 mm. Cooling: It is recommended to use oleic acid as a coolant .
If you work with an ordinary drill in “field conditions”
For cooling, you can take olive oil (it contains 81% oleic acid) or sunflower oil - up to 40%, and if it is absolutely impossible to use liquid, then you can use lard or fat - they contain up to 44% oleic acid. Drill at minimum speed (100-200 rpm). If the drill does not allow you to set the speed, use the on/off method and drill by inertia. Only the minimum feed (pressure on the drill), while trying to ensure a uniform feed.
Very useful to know
1. It is a grave mistake to cool the drill by dipping it in water or something else (i.e., drill “dry” and then dip it, etc.). By these actions you instantly damage the drill. Rapid heating and cooling leads to unpredictable consequences, a kind of uncontrolled tempering or hardening. 2. Cobalt drills do not have to be yellow (bronze), cobalt is not a coating, it is part of the high-speed steel from which the drill is made. The coating is either: additional protection against corrosion, or it improves gliding, or it is just an image move by the manufacturer. 3. The given recommendations are valid when working with ordinary stainless steel; they have additional features when drilling thin-sheet stainless steel.
To prevent oil paint from drying out during storage and to prevent a film from forming on it, place a circle of thick paper on the surface of the paint and fill it with a thin layer of drying oil.
"The polyethylene film covering the balcony or greenhouse is protected from being torn off by the wind by a string stretched on both sides at intervals of 10-15 cm. "
» To make it easier to work with a concrete mixture, clay is usually added to it, but clay reduces the strength of the mixture. Add a spoonful of washing powder to it per bucket of water. "
“To prevent the screw, the head of which is hidden behind the obstacle, from rotating together with the tightened nut, you need to throw several turns of thread or thin wire over it and lightly tighten the ends. Due to friction, the screw is held well in place. The ends of the thread can be trimmed after tightening. "
» You can cut out the birdhouse entrance without a brace. It is enough to split the front side of the board in the center and cut out half-holes of the required size with a chisel or hatchet, and then connect the halves again. "
Wooden screw plugs crumble and fall out of the wall. Take your time to cut out the new plug. Fill the hole in the wall tightly with nylon from an old stocking. Using a nail of a suitable diameter heated red hot, melt a hole for the screw. The fused nylon will turn into a strong cork.
» It’s easy to turn a carpenter’s level into a theodolite by equipping it with an aiming device consisting of a slot and a front sight. "
» In order for two strips of linoleum to lie end to end, it is convenient to use a self-adhesive decorative film, placing it under the base of the noleum. "
» To ensure that the nail goes in the right direction and does not bend when driven into a deep hole or groove, it should be placed inside the tube, secured with crumpled paper or plasticine. "
Before drilling a hole in a concrete wall, secure a piece of paper just below it. Dust and concrete fragments will not fly around the room.
» To cut the pipe exactly at a right angle, we recommend doing this. Take a straight strip of paper and roll it onto the pipe along the sawing line. The plane passing through the edge of the paper will be strictly perpendicular to the axis of the pipe. "
Read also: Compressor for wall putty
» A simple device will help you move logs or wooden beams - a piece of motorcycle or bicycle chain, equipped with a hook on one side and attached to a crowbar on the other side. "
“In order for one person to work with a two-handed saw, we recommend using a simple technique: move the saw handle from the top to the bottom position. "
You can cut a piece of slate of the required size with a saw, but it is better and easier to punch holes along the line of the intended cut with a nail at a frequency of 2-3 cm, and then break off the slate on the support.
» The best way to stick tiles to the wall: take bitumen, melt it and drop just four drops on the corners of the tile. Stuck on dead. "
When making shaped window casings, it is most convenient to cut shaped holes with a hacksaw with a sharpened blade.
» Making stained glass is a long and difficult task. You can make a quick imitation of stained glass. To do this, they take thin slats or twigs of vines, glue them to a sheet of glass, and then paint the glass and cover it with varnish. "
“If you don’t have a dowel at hand, you can make one from a piece of plastic tube. The body of a ballpoint pen may also be suitable for this purpose. Having sawed off a piece of the required length, make a longitudinal cut, about halfway, and the dowel is ready. "
» It is notoriously difficult to hang a door when working alone. But it’s enough to shorten the bottom pin by 2-3 mm and the work will become much easier. "
"A very durable, non-shrinking and fairly waterproof putty is made from bustylate mixed with any powder - chalk, gypsum, cement!, sawdust, etc. "
» If you need to screw a screw into the end of a particle board, drill a hole slightly smaller than the diameter of the screw, fill the hole with Moment glue (not epoxy!), and screw the screw in a day later. The plate does not delaminate. However, the resulting connection can be placed under load only after a day. "
» It is more convenient to secure portraits, photographs, paintings in wooden frames with glass not with nails, but with the help of push pins bent at right angles. The buttons are gently pressed with a screwdriver. Compared to nails, the risk of splitting thin frames is reduced to a minimum. "
» Driving a screw into hard wood is not easy. If you poke a hole for the screw with an awl, and rub the screw itself generously with soap, then after such an operation the work will go like clockwork. "
To save time, the edge of the wallpaper can be trimmed with a sharp knife without unrolling the roll. To do this, you must first align the end of the roll and draw the edge border on the outside with a simple pencil. Working with a knife, the roll must be gradually turned in the direction of rolling.
To carry large sheets of plywood, glass or thin iron at home, it is convenient to use a wire holder with three hooks at the bottom and a handle at the top.
How to drill stainless steel
. Anyone who has tried to drill stainless steel knows that it is impossible to drill through it without some tricks. Usually a special lubricant is used for this. It consists of machine oil and a small amount of sulfur. Usually the sulfur used is the one sold in Priroda stores. It has names there: “colloidal sulfur”, “sulfur color” or “sulfur for fumigation”.
The first two are used without preparation; The sulfur for fumigation is finely ground.
A more effective lubricant can be made by mixing sulfur with fatty acids. To obtain acids, they take the lowest grade laundry soap, which is crushed and dissolved in hot water. Excess commercial hydrochloric acid is poured into the soap solution. Fatty acids float. Pour in excess cold water - the fatty acids harden and are easy to separate from the solution. They are washed 4-5 times as follows: placed in a pan, filled with hot water, stirred for 5-7 minutes, cold water added, removed, placed back in the pan, etc.
Fatty acids are mixed with sulfur in a ratio of 6:1 (by weight). One more remarkable property of fatty acids should be noted. If you mix them with rosin (heating over low heat) in a ratio of approximately 1:1 (by weight), you get an excellent paste-like flux for soldering metals with lead-tin solders.
Most often, drilling holes in stainless steel materials entails a number of unpleasant moments. This includes overheating of the drill, overheating of the actual drilling site, and loss of precious time. To avoid all this, you should follow several rules. These rules will help you in making your own stainless steel products, for example, canopies and awnings. So here are these simple tips:
1. Stainless steel has a very tough structure and in order to avoid overheating of the drill, it is necessary to drill only at low speeds and use sharp drills.
2. During the drilling process, it is necessary to cool the drill every 10-15 seconds. This should be done to prevent calcination of the drilling site. Hardened stainless steel is extremely difficult to drill.
3. If you notice that the chips are becoming darker and smaller, then immediately replace or sharpen the drill. This means that the hole is overheating and the drill has become dull.
4. For initial drilling, use drills with the smallest diameter. It is recommended to drill stainless steel first with a four or five, and then drill out to the desired diameter. This will significantly reduce drilling time.
5. And finally, if the hole area is still hardened, try removing this layer with a well-sharpened drill of a larger diameter, and then drill again with the original one.
By following these simple rules, you will not only reduce the time spent drilling, but also keep your nerves in order.
What are they?
Based on the materials from which drills are made, several classes of products are distinguished.
- Drills made of tool steel with an edge that is reinforced with a high-hardness plate. The main difference is low cost.
- Metal drills with cobalt additives or pure cobalt. They are best suited for drilling hard metal alloys, as they can withstand elevated temperatures and heavy workloads.
- Titanium tools are similar in strength to cobalt tools. Excellent for working with various steels and alloys. They can retain their original sharpness for a long time.
- High-speed steel drills perform their functions well and are reasonably priced. However, it is worth considering that they quickly lose sharpening. Especially if operating temperatures have been exceeded.
When choosing drills, it is also important to consider that there are different models that differ in their shape. The classic type is considered to be step drills that have a cylindrical shape.
They are most often used for drilling holes in metal sheets. As a rule, they are made from steel marked HSS, which has increased strength and durability.
The classic type is considered to be step drills, which have a cylindrical shape. They are most often used for drilling holes in metal sheets. As a rule, they are made from steel marked HSS, which has increased strength and durability.
Drills are also divided by color, as it allows you to determine what quality they are and what they are made of.
- Gray means that the metal drills have not been subjected to any processing. Often such tools are disposable.
- The black color is obtained if the metal is treated with steam at high temperatures. This gives the products increased strength, allows them to cope well with cyclic heating and cooling, and also retains their original sharpness for a long time.
- Drills of a dark golden color are tempered (normalized), which increases their strength by reducing internal stresses. Such tools are suitable for drilling very strong metals and hard alloys.
- The bright golden color indicates the addition of titanium to the metal. Such drills fully correspond to their high price and do an excellent job even with very complex tasks.
According to the length of the drill, it is customary to divide it into 3 types.
- Long drills are called drills with a length from 56 to 254 mm. Their diameter, as a rule, ranges from 1 to 20 mm.
- Elongated ones can have a diameter from 0.3 to 20 mm. Moreover, their minimum length is 19 mm, and the maximum is 205 mm.
- The length of short instruments varies between 20-131 mm, and the diameter is completely similar to the diameter of the elongated ones.
Selection rules
If you purchase a cobalt tool in order to drill only a few holes with it, then you can opt for more economical options. For frequent and intensive use, it is advisable to choose more expensive products from trusted manufacturers that can last a long time without losing their original characteristics.
The highest quality and most reliable cobalt drills include tools that were produced by enterprises of the former Soviet Union. It is becoming more and more difficult to purchase such drills, which can be identified by the marking Р6М5К5, every year. Specialists who are often faced with the need to drill stainless steel are well aware of the quality characteristics of such a tool and will never miss the opportunity to buy it.
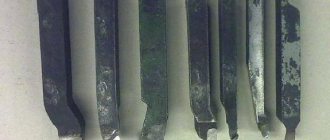
Drill made of R6M5K5 alloy – time-tested quality
If we talk about cobalt drills from modern manufacturers, the highest quality and most reliable of them are considered to be the tools produced under the Bosch and Ruco trademarks
When choosing such tools, you must first of all pay attention to their markings, by which you can determine how much cobalt is contained in the chemical composition of the manufacturing material. Thus, the marking Р6М5К5 or HSSCo5 (according to the foreign classification DIN 338R) applied to the shank indicates that the drill material contains 5% cobalt
It should be borne in mind that the material used to make instruments belonging to the cobalt category must contain at least 4% of this element.
Cobalt drill markings
To create a high-quality hole, it is important not only to choose the right cobalt tool, but also to know how to drill stainless steel with it. To increase the accuracy of such a technological operation, as well as to reduce the wear rate of the cobalt drill used, drilling stainless steel with it should be done at low speeds
In addition, it must be borne in mind that such a drill does not require frequent cooling during use. Moreover, if a cobalt drill is subjected to frequent cooling, it will become unusable much faster.
Use of lubricants
To prevent the procedure from ending in failure, you need to use cooling materials. The thing is that stainless steel has high viscosity. During operation, the load falls simultaneously on the drill and the material, as a result of which overheating of either one or the other may occur. Therefore, it is so important to consider how to cool the instrument.
When you have to drill a lot, it makes more sense to attach an automatic supply of lubricants to the machine. If drilling is a single and rare case, then the drills are processed immediately before drilling. A mixture of machine oil and sulfur is used as a lubricant. In this case, sulfur can be taken both colloidal and for fumigation, well known as “sulfur color”.
If it was purchased in powder form, then the substance is simply mixed with machine oil. When the sulfur is lumpy, it still needs to be ground. An effective cooling lubricant is a mixture of sulfur and fatty acids, which can be obtained at home from ordinary laundry soap.
To do this, perform the following steps:
- a bar of soap is rubbed, and the resulting mass is poured with hot water;
- technical hydrochloric acid is carefully poured into the soap solution;
- when fatty acids float to the surface, pour in cold water;
- wait until they harden and remove the top layer.
When creating a cooling material, fatty acids and sulfur are taken in a 6:1 ratio. The effort and time spent are justified, because this composition will help drill through even the thickest stainless steel.