A mini-drill is a universal assistant for a master when carrying out minor home repairs. It is also used to repair various types of digital and computer equipment or radio electronics. You can find the device at the market or in an electrical equipment store, but this can be expensive.
Therefore, if you don’t have a mini-drill at hand, and you don’t have the time or desire to spend your own money on buying one, you can take the advice of experienced craftsmen and construct a tool at home, using available tools and materials.
Necessary materials
Before moving on to describing the various methods for making a homemade mini-drill, you should determine what structural elements this tool consists of.
There are four in total:
- The drive is the heart of any instrument. It can be either mechanical or electrical, in the form of an electric motor. At the same time, based on safety rules, craftsmen recommend using a low-power unit with an operating voltage of up to 12 Volts for a mini-drill.
Electric motor RS385 12V
- Chuck clamp. If desired, you can find a universal chuck suitable for both a drill and a screwdriver. Such are, for example, collet mechanisms - they are cheap, and consist of a chuck and replaceable drills, which are fixed in the chuck with protruding bolts.
Mini small cartridge 0.7 mm – 3.2 mm
- A miniature battery or power pack to power our mini drill. If possible, it is better to use a unit with an adjustable supply voltage, this will allow you to change the shaft speed.
- Casing or housing.
Reference! There are options for mini-drills with manual or electric drive, in the manufacture of which individual elements are excluded from the design (for example, the power unit or housing).
Instructions for making a drill
When making small things, decorative and other products, a compact drill, engraver and similar hand tools are very convenient, and therefore remain indispensable in the home workshop. Using such equipment, you can drill and process products made of wood, plastic, textolite and other durable materials. You will also need a micro drill when drilling printed circuit boards.
To manufacture drilling equipment, select a suitable chuck and a body of suitable dimensions (plastic container). To rotate the work surfaces, you need to select an electric motor and a power supply, for which you can disassemble an old hair dryer or other electrical equipment.
To learn how to make a mini-drill, just read the following list of recommendations:
- You first need to secure the cartridge to the electric motor shaft, for which you will need adhesive materials (“cold welding”), which ensure a reliable connection between the metals.
- You will have to work very carefully, since the adhesive materials set quickly, which eliminates the possibility of eliminating errors and correcting the connection.
- After fixing the cartridge, it is better to cover its surface with a special heat-resistant glue, which will ensure the density and strength of the connection.
- On the case you need to make a hole in advance for the switch (preferably a push-button one).
- The drill will be more functional with a reverse mechanism, which is implemented using a six-pin switch.
- When connecting to the power supply, you will need a 12 V power supply or a battery (2-3 pieces) with a similar voltage.
Having assembled a mini-drill into a single structure from individual parts with your own hands, you can turn on the power and do test drilling.
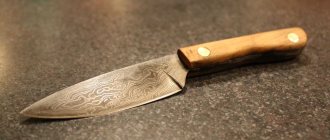
Complete analogue of the factory “Dremel”
The first thing you need to construct a mini-drill is a miniature 5-12 Volt electric motor. They can be found in children's and decorative toys, old cassette players, printers or portable fans. In many stores they are sold in the electronics and modeling section, including in online stores.
Drill example
The original housing is also made independently in such a way that the engine is tightly fixed inside, while leaving a gap or an open part in the heating area.
The body of the mini-drill can be any plastic tube.
There are models that used a tube of sealant, a syringe, a plastic tube of toothpaste or children's candy.
A piece of plumbing plastic pipe cut to the required length will also work, but in this case the open ends will need to be sealed with some kind of movable “plug”, for example, acrylic or cut out of plastic.
You can make a mini-drill chuck or clamp yourself, for example, from a regular connecting terminal, or buy it on the market or in a store. For collets, you can contact engraving workshops, as well as modeling departments or sections of components for household power tools.
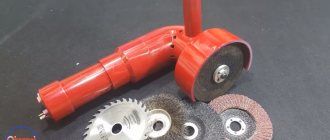
The resulting tool is a universal option; Depending on the type of repair, various attachments are fixed with such a clamping chuck: drills, cutters, discs with a cutting edge or screwdriver heads.
How to make a homemade holder for working with a Dremel
To make this device you will need very little:
- piece of board;
- a pair of clamps, the size of which allows them to completely surround the body of the instrument;
- two M8 screws with nuts on them.
Before starting work, you should make sure that the selected clamps are capable of completely enveloping the Dremel body. Having done this, you can start working with the wooden base. The following operations are performed:
- the longitudinal center line of the board used as the base is determined;
- the distance between the nuts of the clamps, previously put on the Dremel body, is measured;
- the measured distance is laid out in the center of the center line of the board, which allows you to determine the drilling locations and make the corresponding marks;
- holes for M8 screws are drilled according to the marks;
- so that the screw heads are flush with the surface of the board, countersinking is performed;
We talked about other ways to beautifully hide the head of a screw or screw in this article.
When determining the dimensions of the Dremel for which we are making a stand, we noticed that its front part is 5 mm thinner than the back. In order for our tool to stand level on the holder, it is necessary to shorten the screw for supporting the rear part by 5 mm.
After this, the screws can be inserted into the drilled holes and secured with nuts. You can now attach clamps to the screws secured in this way.
Now the Dremel itself can be secured in the installed clamps.
As you can see, making this device is not difficult at all. The manufactured holder is not only simple, but also very cheap. The author of this “masterpiece” claims that the total cost of the parts he used is about 70 rubles.
To carry out drilling work on miniature workpieces, engraving machines, the so-called “dremels,” are usually used. The name comes from the name of the most popular manufacturer. This is a convenient hand tool, but its cost is usually high (especially for high-quality branded products).
Read also: How to choose a differential machine
The most common area of application is amateur modeling and production of printed circuit boards. As a rule, an industrial design is redundant for such work: some of its capabilities are not in demand. Therefore, home craftsmen often create instruments with their own hands.
From an electric toothbrush
Toothbrush Example
An interesting option is a mini drill that can be repurposed from an outdated electric toothbrush.
The motor and gearbox installed in it are capable of transmitting sufficient torque to drill a hole in thin metal, plastics or computer boards.
The main thing that is required from the master is to replace the cleaning head on the shaft with the same engraving or collet chuck. Before purchasing a cartridge, it is important to determine the diameter of the shaft so that the cartridge is securely fixed on it - sometimes this will require filing down the mounting screws.
Reference! Many brushes, including older models, are already equipped with a rotation speed controller and are sold complete with a battery pack.
From an old tape recorder
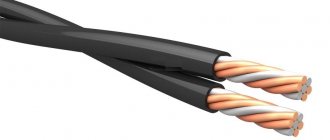
Another basis for a mini-drill can be the electric motor of a well-worn player or tape recorder that rotates a CD disc. The standard motor of such devices runs on 6V voltage, so you may need to additionally purchase a portable power supply or build a mount for a battery or battery.
Using two soldered wires, the power unit (via a switch button or without it) is attached to the motor and fixed with tape or glue in a homemade tube-shaped housing. After this, the same collet chuck is attached to the shaft, which holds the drill.
Important! To avoid “figure eights” and vibration of the drill, the diameter of the collet hole must correspond as closely as possible to the size of the engine shaft, usually 1.5 - 2.3 mm, and sit tightly on it.
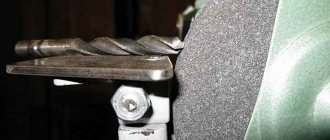
From a fishing reel
A simple and effective version of a mini-drill can be constructed using the reel mechanism of an ordinary fishing rod as a drive. Such a tool will work like a drill, in which the torque of the handle is transmitted through a gear.
The craftsman will only need to dismantle the line spool of the reel and trim the axle, and then in their place weld or glue a collet or chuck from a non-working drill in which the drill will be fixed.
The model is mechanically driven, does not require power, and is driven manually.
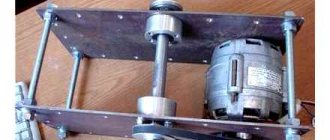
The process of making a homemade milling machine
A square-shaped frame is assembled from sawn wooden blanks, along the edges of which the author drills holes for bolts using a feather drill. Then nuts are screwed onto the bolts and tightened with a wrench.
Next, in the resulting structure, you need to make a seat for the Dremel, and secure the tool using homemade wooden clamps.
At the last stage of work, it is necessary to make a base with a rotating element, and connect it to a wooden platform with a Dremel using a furniture hinge. After this, you can test the device in operation.
For details on how to make a milling machine from a Dremel with your own hands, watch the video on our website.
Economical option without housing
The most budget model of a mini-drill is a regular electric motor, to which a power unit is connected through wiring without a housing.
A 12-volt motor will require a power supply consisting of a 30-watt transformer and a rectifier bridge, for example, on a 1N1007 diode.
The inclusion of a simple capacitor in the circuit, up to 25 V with a capacitive characteristic of 1000 microfarads, will protect the motor from pulsating oscillations of the winding during voltage rectification.
The chain works reliably, but as the load increases, for example, when drilling dense material, the voltage will drop, which will lead to a stop in rotation. The voltage can be stabilized by adding stabilizers to the KR142EN8B or L7812CV circuit
After the drive unit is ready, a chuck is made or purchased - even a pen rod in which the drill is fixed with glue can be suitable for home drilling of miniature holes. The cartridge can also be replaced with the previously proposed collet or screw terminal.
Power Supply Options
Any screwdriver requires much less voltage than a regular socket produces. Therefore, for recharge you will definitely need a special converter, the output of which will produce the required voltage. All power sources are divided into two large groups: pulse and transformer. Let's consider each of them separately.
Reworking a Chinese-made power supply
excellent for creating a power supply for 12- volt screwdriver with your own hands. But since the tools use less voltage, you need to lower it first.
To achieve the goal, you need to replace the original resistor R10 with an adjustable resistor, with which you can achieve the desired voltage. This is done in several stages:
- the permanent resistor is removed;
- in its place a pre-prepared adjustable resistor is inserted, on which a resistance of 2300 Ohms will be set;
- so far the voltage is still 24 V;
- Using the resistor settings, you need to achieve the required voltage at the contacts.
After all the manipulations, you need to check that the output voltage is the required value (12 V, 14 V, etc.), and also that the current exceeds 9 A.
Computer power supplies are distinguished by durability, advanced overload protection and many other advantages. They may not be very convenient due to their size, but a long wire will help solve this problem.
Procedure for connecting a computer power supply to a screwdriver:
- disassemble the block;
- remove the power-on protection by disconnecting the green wire from the board;
- this wire must be connected to the black connector on the device;
- separate all wires except yellow and black;
- these two wires are soldered to the extension cable;
- the second end of the cable is directly connected to the screwdriver;
- All open contacts are isolated if possible.
Thus, from a computer device you will get a power supply for a 14 volt .
From a ballpoint pen
To make a drilling device from a ballpoint pen, no electrical elements are needed, and no skills in working with power tools are required.
You will need a ballpoint pen with an automatic mechanism, hot-melt adhesive, a stick with jumpers at the end that rotates the drill, and a drill of the required size. The main load falls on the body, so you need to choose samples made of metal or thick plastic.
Build process
The ballpoint pen is completely disassembled. A drill is inserted into the lower part of the body, from which the rod usually comes out. The shank is fixed into the hole on the stick. To ensure that the entire working structure of the tool becomes a single mechanism, the parts are fixed to the inner walls of the body with hot-melt adhesive. The drilling process will be performed through mechanical action on the stick, which serves as the handle of the device.