Quality of the material: (What is your assessment of the article?)
So, you have decided to drill a well on the site, but you don’t know where to start: what depth to drill for drinking water, in what place to drill, what diameter of the well to choose and why this particular one, which company to choose and whether a subsoil use license is needed. This material will help you collect all your thoughts into a single whole, understand what needs to be done on your site and figure out how to properly drill a well for water and not get problems in the future.
Let's start with licensing. As of mid-2021, a private person does not need a license for an artesian well if he uses the water for personal purposes.
Well types
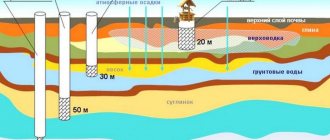
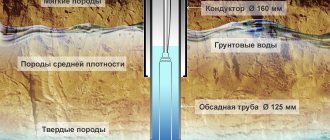
Before starting drilling work, you should study the composition of the soil on the site in order to at least roughly imagine your future well.
Depending on the characteristics of the aquifer, three types of wells are distinguished:
- Abyssinian well;
- filter well;
- artesian well.
The Abyssinian well (or needle well) can be installed almost everywhere. They break it where the aquifer lies relatively close to the surface and is confined to sand.
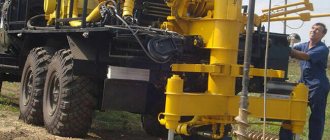
To drill it, they use driving technology, which is not suitable for constructing other types of wells. All work can usually be completed within one business day.
This diagram allows you to study the design features of various wells in order to better understand their drilling technology and choose the appropriate method (click to enlarge)
But the flow rate of such wells is small. To provide the house and site with enough water, sometimes it makes sense to make two such wells on the site. The compact dimensions of the equipment make it possible to install such a well directly in the basement without any problems.
Filter wells, which are also called “sand” wells, are created on soils where the aquifer lies relatively shallow - up to 35 meters.
These are usually sandy soils that lend themselves well to drilling. The depth of the filter well usually varies between 20-30 meters.
This diagram clearly shows the structure of a filter well. A filter must be installed at the bottom of the water to prevent sand and silt from entering the water.
In a good situation, the work will take two to three days. The filter well needs good maintenance, since the constant presence of sand and silt particles in the water can cause siltation or sandiness.
The typical lifespan of such a well can be 10-20 years. The period may be longer or shorter depending on the quality of well drilling and its further maintenance.
Artesian wells, also known as limestone wells, are the most reliable, since the aquifer is confined to bedrock deposits. Numerous cracks in the rock contain water.
Such a well is usually not at risk of silting, and the flow rate can reach approximately 100 cubic meters per hour. But the depth to which drilling is to be carried out usually turns out to be more than respectable - from 20 to 120 meters.
- A well with a depth of 10 - 15 m can be drilled without the involvement of drillers and equipment, using simple drilling tools.
- Sedimentary, non-cohesive and plastic rocks can be drilled manually without any problems. The first includes sands of different sizes, crushed stone, gruss, gravel, the second - loams with sandy loams.
- Mechanization of manual drilling can significantly increase the pace of drilling operations. Motors and lifting devices will speed up the process.
- To drill soils that differ in physical and mechanical properties, different projectiles and technologies will be required. Most often, several drilling methods are used in combination to construct one excavation.
Of course, drilling such wells is more difficult, and the work will take much more time and materials. A professional team can complete the work in 5-10 days. But if we drill a well on the site with our own hands, it may take several weeks, or even a month or two.
But the effort is worth it, because artesian wells can last for half a century, or even more, without problems. And the flow rate of such a well makes it possible to supply water not only to one house, but also to a small village. Only manual drilling methods are not suitable for constructing such a mine.
The physical and mechanical properties of soils are also of great importance when choosing a drilling method.
During the work, you may need to go through a variety of layers, for example:
- wet sand, which can be drilled relatively easily by almost any method;
- water-saturated sand, which can only be removed from the trunk using a bailer;
- coarse rocks (gravel and pebble deposits with sand and clay aggregates), which are drilled with a bailer or a glass, depending on the aggregate;
- quicksand, which is fine sand supersaturated with water; it can only be scooped out with a bailer;
- loam, i.e. sand with abundant inclusions of clay, plastic soil that can be easily drilled with an auger or core glass;
- clay, plastic rock, which can be drilled with an auger or glass.
How do you find out what soils lie beneath the surface and at what depth is the aquifer? Of course, you can order geological soil surveys, but this procedure is not free of charge.
Almost everyone chooses a simpler and cheaper option - asking neighbors who have already drilled a well or built a well. The water level in your future water source will be approximately the same depth.
Drilling a new well a short distance from an existing structure may not follow exactly the same scenario, but it will most likely be very similar.
When is it more profitable to carry out drilling operations? Seasonal features
The seasonal peak in demand for drilling operations is summer and the first month of autumn. Indeed, the conditions are ideal, the soil is hard and it is possible to build a source of any type, regardless of depth.
In spring and late autumn, demand is minimal, there are no queues. This is due to the large amount of precipitation and the specifics of the technology. In winter there is a greater chance of saving money: but in the cold it is better to just drill and postpone construction until it warms up.
In the off-season, you can drill artesian wells: in spring or autumn, work is carried out to excavate deep sources for sand and limestone. You can drill:
- If there is a good road to the site.
- When the site is not landscaped.
In early spring, it is impossible to carry out work without damaging the area.
From surface sources in the off-season, it makes sense to equip an igloo or an Abyssinian well. The casing pipe is installed during drilling, being at the same time a drill - shedding of the walls does not slow down the work. Usually, slaughtering is carried out manually: in wet soil, passage is easier and faster.
In late autumn you can choose a short period without precipitation
Flaws:
- Severe damage to the area occurs.
- The extracted wet soil is difficult to dispose of; during rains, the dirt is spread throughout the entire area.
- High risk of errors in determining depth, difficulties with equipment installation.
The best conditions when you can drill any well are summer and autumn. The groundwater level is the lowest. The soil is compacted, making it easy to transport the equipment even off-road. After completion of the work, only dry soil from the trunk will remain on the site, which can be easily removed.
During the summer months, all types of water intakes are installed
Advantages:
- It is easier to choose a time without precipitation to organize work.
- There is no risk of collapse or flooding of the trunk by high water.
- It is possible to carry out work as a complex: drilling with simultaneous construction.
- Ideal conditions for all types of sources: surface and deep.
Among the shortcomings, it is worth noting the heavy workload of drilling crews. It is better to order summer drilling in advance: 4 – 5 months before the planned procedure. It is also better to agree on the cost in advance and make an advance payment. Increased demand stimulates seasonal price increases. Equipment should be purchased in advance: during the peak construction season, prices for materials for arrangement also increase.
The winter period is ideal for drilling deep artesian wells. Advantages:
- Clean area after work.
- The lawn is not damaged.
- The integrity of the soil is not compromised.
- Drilling will cost less - there is a seasonal decline in demand.
- Minimal risk of errors in determining depth.
Arrangement in winter: minimum dirt and undamaged soil
The disadvantage of winter drilling is an uncomfortable working temperature for craftsmen and restrictions on equipment installation: it is impossible to install a pipeline and connect pumps at temperatures below -5°. There is a way out: assemble the pumping group in an isolated room or basement, or postpone the piping until it warms up.
In winter, not only heavy equipment works: you can make a sand well without unnecessary dirt and at a favorable price. In the video: how a compact installation works on a landscaped site in winter.
Drilling is a job for specialists. You need to choose the type of source and season for work not on your own, but after a complete analysis of all the source data. Experts will tell you which type of water intake will cost less, when it is faster and more profitable to carry out
Basic methods of drilling wells under water
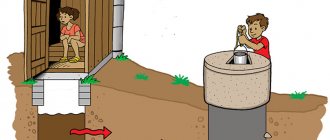
Drilling a well with your own hands is quite possible and affordable if you have the necessary hydrogeological information. Having chosen a method for drilling a water well, you should correctly determine the location for its installation. There should be no sewerage, drainage pits, or other communications nearby that could pollute the water. It is also necessary to take into account the distance from the housing where water is planned to be supplied.
There are quite a lot of types of drilling manually, using various mechanisms, devices, and complex equipment: from simple driving to hydraulic drilling.
Impact drilling is the most inexpensive and easiest way to provide an area with drinking water
Methods for drilling water wells vary depending on the technology used to destroy the rock. There is drilling:
- percussion;
- rotational;
- mixed type.
Auger drilling
This method is used for constructing sand wells. Typically, auger drilling of water wells is carried out in relatively soft, loose or frozen soil. An auger is a pipe wrapped in metal tape. By rotating, the screw-shaped device deepens, bringing the selected soil to the surface. Often with this technology, a casing pipe is lowered behind the screw screw, which clogs the walls and prevents the earth from crumbling. This method has a number of advantages:
- good speed;
- no need for rinsing;
- The walls of the well are compacted.
If auger drilling is carried out in an area with soft or loose soil, then the bit blades should be positioned at an angle of 30 to 60 degrees relative to the bottom. If wells are drilled using this method on denser sediments, which are based on gravel and pebbles, then the blades should be at an angle of 90 degrees relative to the bottom. It is necessary to determine the angle when carrying out work depending on the hardness of the soil with which you are supposed to work.
Of all the methods of self-drilling, auger can be considered the least effective
The depth of auger drilling of a well is carried out to the size of one rod, which is then raised upward and expanded with an additional rod. After this, drilling can continue. The diameter of the auger well ranges from 6 to 80 cm.
Rotary drilling method
Rotary drilling refers to rotational methods: a rotor located on the surface drives a bit lowered into the well. The bit is additionally weighted (“loaded”) with pipes to increase the degree of soil grinding.
Using this technology, it is possible to destroy rock of almost any hardness. This is an expensive method, used for artesian wells.
When rotary drilling, flushing is mandatory. This process quickly removes waste material while leaving the hole clean, allowing casing to be inserted without obstruction.
There are two types of flushing: direct and reverse. Direct flushing is carried out with a clay solution, which quickly removes waste rocks and strengthens the walls, since clay prevents clogging of the formation. Backflushing with water is used to clear slag from the annulus.
The rotary method of drilling wells is one of the types of rotational technology
Advantages of rotary drilling:
- the power of the equipment used, which allows breaking rocks of any hardness;
- durability of the drilled well (wall strength);
- the ability to drill in a limited area due to the small size of the drilling rig.
The disadvantages of this technology include the difficulty of working at sub-zero temperatures and low drilling speed.
Helpful advice! If the rotary method is used at the site, it should be taken into account that backflushing contributes to a more complete opening of the aquifer and an increase in well production.
Manual drilling of a well under water
Drilling a well manually only for an unprepared person will seem an extremely difficult process, requiring great physical effort. With certain knowledge and preparation, making a drill for a well with your own hands is realistic and feasible. Depending on the groundwater conditions, you can use several methods of drilling wells yourself.
Specialists are usually invited to carry out drilling work, but if desired, you can do it yourself
Impact method
Using this method, the simplest needle well is installed - the Abyssinian well. This method is actively used by home craftsmen when drilling a well for water in their dacha. The design of the “drilling rig” is a barrel consisting of pipe sections and a tip that cuts the soil layers. The hammer is a weighty woman, which is raised and lowered with the help of ropes: when tensioned, a kind of hammer rises to the top of the structure, and when loosened, it falls onto the headstock - a device of clamps located symmetrically. After the trunk enters the ground, it is extended with a new section, the headstock is attached to the new part, and driving continues until the tip enters 2/3 of the formation into the aquifer.
The trunk-pipe serves as a hole for water to escape to the surface.
Important! The Abyssinian well raises the uppermost aquifer, which contains many impurities. Water from such a well can only be used for technical purposes. It is suitable for drinking only after deep cleaning.
The advantage of this well is that it can be drilled in a basement or other suitable room. This creates ease of use. The price is also attractive; drilling a water well in this way is inexpensive.
Impact drilling can be used on any type of soil
Cable-percussion drilling
The most commonly used method. This method involves breaking the soil by lowering a heavy drilling tool from a two-meter height. The design used for this type of drilling consists of the following elements:
- tripod, which is placed above the drilling site;
- block with winch and cable;
- driving glass, rod;
- bailers (for passing through loose layers of soil).
The glass is a piece of steel pipe, beveled inward, with a strong lower cutting edge. There is an anvil on top of the driving glass. It is struck by a barbell. Lowering and raising of the driving glass is carried out using a winch. The rock that falls into the glass is held in it due to friction. In order to penetrate the soil as deeply as possible, a striking rod is used: it is thrown onto an anvil. After filling the glass with soil, it is lifted up and then cleaned. The operation is repeated until the required depth is reached.
Drilling a well on loose soils is done using a bailer. The latter is a steel pipe, at the lower end of which a retention drip is installed. After the bailer hits the soil, the valve opens, causing soil to enter the pipe. When the structure is lifted, the valve closes. After being removed to the surface, the bailer is cleaned and the steps are repeated again.
Cable-impact equipment for well drilling
Helpful advice! When performing cable percussion drilling, it is necessary to carefully monitor the verticality of the well. At the slightest deviation, installation of casing pipes may become impossible. To prevent problems, do not use a glass less than 2 m high.
The auger method described above is also effectively used for self-drilling. There is no point in further explaining how to drill a well with your own hands using an auger - the basic principle remains the same.
Advantages of manual drilling:
- financially economical way;
- repair and maintenance of a hand drill is easy;
- the equipment is not bulky, so there is no need to use heavy equipment;
- the method is applicable in hard-to-reach places;
- effective and does not require much time.
The main disadvantages of manual drilling include lowering to a shallow depth (up to 10 m), where layers mainly pass through, the water of which requires purification, and the inability to crush hard rocks.
Shock-rope scheme with a bailer and a punching bit
Which well should you choose?
In our company you can order two main types of wells:
- On the sand. They drill down to water-bearing sand. The quality of the water received is not always impeccable, and the supply does not exceed 1.5 cubic meters per hour. However, for owners of dachas or small cottages, a sand well is quite enough: they are more economical, since the layers of aquiferous sand lie at shallow depths and are drilled within 1-2 days.
- On limestone. On average, such a well produces 3-4 cubic meters of artesian water per hour: this amount is enough to cook food, bathe, do household work, water the garden and even fill swimming pools. This water is of excellent quality and is almost always suitable for drinking with additional filtration. However, limestone lies at a much greater depth than sand, and therefore the cost and equipment of such a well is higher, and the drilling time is longer.
Preparing the site and equipment
Before starting work you need to select:
- location and type of well;
- drilling method;
- casing diameter;
- pump equipment;
- tools for performing work.
The best place to start is by interviewing your closest neighbors who have already built a well. From them you can find out the approximate depth of water, soil features, etc. It doesn't hurt to ask if they have any drilling tools left that you can borrow.
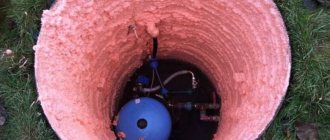
A submersible pump is selected based on the size of the casing pipe, the flow rate of the well, the need for water and other indicators; this point needs to be thought through before the start of drilling, so that the structure is not too narrow for the equipment
The type of well will become obvious after such a conversation. Most likely, this will be the “on the sand” option. The location is determined by sanitary standards. It is necessary to make a water source closer to the house and as far as possible from the cesspool, septic tank, livestock buildings, etc. An Abyssinian well is sometimes even placed in the basement of a house.
The diameter of the casing pipe and pumping equipment must be selected simultaneously. Submersible pumps are considered the most efficient. The difference between the diameter of the device and the walls of the casing pipe should be at least 5-10 mm.
Drilling Tools and Methods
To select soil from a shaft intended for constructing a well, use an auger drill or bailer. The drill is rotated and the bailer is thrown from top to bottom. Sometimes these methods are alternated in order to pass through rocks of different composition and properties.
Cohesive soils, which include loams and sandy loams, are drilled with an auger or a hollow pipe - a glass; non-cohesive soils - sand, gravel, pebbles - are drilled with a bailer, because They cannot be removed with a screw.
The auger drill is rotated, deepening it by about half a meter, then removed to the surface, freed from the soil and lowered into the shaft again. The bailer is thrown down onto the face several times so that its internal space is filled with soil, removed, cleaned, and then percussion-rope drilling continues.
With a bailer you can also carry out so-called hydrodrilling. The principle of operation is the same, but a stream of water under pressure is supplied to the face. It erodes the soil, and the bailer forms a cylindrical shaft for the casing pipe to be installed simultaneously with drilling. The mixture of water and soil is pumped out by a pump.
An auger drill is used to create filter wells by extending rods. This is an effective tool for passing through different layers of soil
Water can also be used for auger drilling when difficult areas have to be navigated. Water is poured into the mine, the soil becomes softer, easier to drill and extract. When hydrodrilling, there is a danger of introducing contaminants into the well. This point must be taken into account when the time comes to flush and rock the structure.
Different types of drills are used, for example:
- coil, especially effective on clay soils;
- spoon drill, suitable for both sand and clay;
- drill bit, useful for hard layers.
You can buy a ready-made drill, garden or fishing, the main thing is that it is strong enough and matches the size of the casing pipe. Industrial products usually allow you to make holes of 40-50 mm.
If this is not enough, you can make the tool yourself. To do this, parts of the steel disk are welded at a suitable angle to the steel rod. The edges of the disc should be sharpened. A spoon tool is made from a rolled steel sheet or a piece of pipe.
It is not difficult to make a bailer for drilling; a piece of metal pipe with a pointed edge will do. A hinged or ball valve is made for light soils or quicksand
There are different types of bailers: with a valve in the form of a ball, with a pressure valve and without a valve at all. The latter are appropriate on dense layers.
The soil is packed inside the “glass” and does not fall out of it, so the valve is not needed here; the sharp edge at the bottom is more relevant.
The size of the bailer should be moderate so that it hits the ground hard enough when falling, but so that it is not too difficult to get out
Narrow slits are made along such a tool. It is convenient to insert a rod into them to free the cavity from viscous contents.
Tripod, winch, drill rods
Most often, a tripod is used for independent drilling work. Such a structure can be purchased or made from metal beams, wooden beams, etc.
It must be large enough for two people to move freely under it, and strong enough to support the load of equipment loaded with broken rock.
A tripod with a block and a winch can significantly facilitate drilling work. With the help of such a device it is convenient to lift the tool to the surface
At the top point of the tripod, a block is placed through which a cable attached to a winch is passed. With the help of such equipment, it will be much easier to remove equipment from the mine to free it from the ground. It is better to use a winch with an electric motor.
Drill rods are attached to the drill and gradually increased. Use elements with a locking or threaded connection. It must be reliable so that the rods do not break when removing soil to the surface.
A tripod is also needed for the auger; you will also need a guide structure made of casing pipes so that the tool moves strictly vertically. To extend the rods and disassemble the drill string to remove the drill bit, you will also need a tripod or metal frame.
It is better to carry out the work with two or three people; drilling a well alone is more difficult. To speed up the auger drilling process, some use an electric drill with a power of 1 kW or more.
An interesting option could be the use of a small-sized drilling rig. Such a device is expensive, but you can rent it if you wish. On our website we have detailed instructions for making a drilling rig with your own hands.
Stages of work on creating a well with your own hands
First you need to dig a hole. Its dimensions should be 150 by 150 cm. To prevent the recess from crumbling, its walls are lined with plywood, boards, or pieces of chipboard are used. There is another option. It is necessary to drill a trunk with a diameter of 15x20 cm and a depth of 1 meter, using a regular drill. This is done in order to ensure the stability of the pipe in a vertical position.
The next step is to install a metal tripod over the recess, which is often called a tower. It should be in a straight position. A winch is secured at the junction of the tripod. A drill column with one and a half meter rods is located on a tripod.
The latter are fastened into one pipe using a thread, and then they are fixed with a clamp. This design is used for lowering and lifting equipment when drilling a well.
The pump that will pump water to the surface must be decided in advance. The choice of pumping equipment allows you to solve the problem with the diameter of the future well and core pipe. Pumping equipment must pass freely into the pipe. Therefore, the difference between the diameter of the pumping equipment and the internal diameter of the pipe should be at least 5 mm.
Drilling principle
Lowering and subsequent raising of equipment - this is the process of drilling a well. The bar rotates and at the same time it is hit from above. Working together, this job is much easier to complete. One person turns the gas wrench, the second strikes the bar from above, breaking through the rock.
Using a winch can significantly simplify the drilling process. Using it, lowering and raising drilling equipment is noticeably easier. When drilling, the rod should be marked. The marks are necessary for orientation. The markings clearly show when it is time to pull out the rod and clean the drill. Experts recommend performing this procedure every half meter.
Not everyone knows how to drill water wells. To facilitate the task of overcoming various layers of soil, it is recommended to use different types of drills:
- Spiral drill - it is designed for clay soils.
- Drill bit - it is used to loosen hard rocks.
- Spoon drill - it is used for sandy soil.
- Bailer - it helps to raise the soil to the surface.
Sandy soil is easiest to overcome if you use a spoon drill when drilling. During drilling, water should be added to facilitate this task. If the soil is hard, then it is best to use a drill bit. There are several types of such drills:
Regardless of the type used, its main purpose is to provide assistance in loosening hard rock. Quicksand sands are overcome using the impact method.
If the site is dominated by clay soil, then when drilling it is necessary to use a coil, a bailer and a drill-spoon. For clay soils, good drilling tools are coil augers and twist augers. They have a design that looks like a spiral.
At the base of the drill, the size varies from 45 to 85 mm. The blade can have dimensions from 250 to 290 mm. To break through pebble layers containing gravel, a bailer and a bit with casing pipes are used alternately.
In some cases, it is necessary to drill with the obligatory pouring of water into the hole. This procedure will help make the task of drilling a well easier. Sometimes, to create wells on a site, the option of drilling it using a pump is used.
If the rock delivered to the surface of the earth becomes wet, this indicates the proximity of an aquifer. It remains only to go deeper a short distance to reach the aquifer. In this case, drilling will be easy, but you cannot stop until the waterproof layer is discovered.
Impeccable quality guarantee
Our company will perform professional drilling and construction of wells of any depth. We work as quickly as possible (most often turnkey drilling does not exceed three days). The cost of our services is very affordable, and the quality of work is impeccable. We provide a warranty on the equipment used, in particular pumps. Working with us is profitable, because we not only know our business, but also have been working in the field of drilling water wells for more than 15 years. We will help you create an autonomous water supply on your site quickly and at the best price!
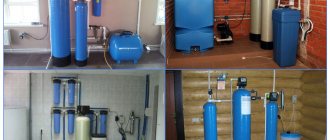
How to equip a broken well
Punching/drilling a well is not enough. We still need to raise the water, but that’s a completely different story. Read how to get water from a well to your house here. If you want to make the water supply constant, with normal pressure, so that you can connect household appliances, you will need a pumping station.
For seasonal water supply at the dacha, you can get by with a more modest set:
- vibration pump;
- check valve, which is installed in front of the pump;
- water container;
- watering hose;
- taps, etc.
Please note that the check valve is installed in front of the pump, and not at the end of the hose immersed in the well. It’s just that this same hose won’t break when it freezes. Another advantage of such a device is that it is easier to dismantle for the winter.
Another piece of advice: the well needs to be covered with something. In permanent residences, a caisson is made - a concrete or plastic bunker that is located below the freezing depth. All equipment is placed in it. When using water only periodically, a caisson is too expensive. But something needs to be done to close the well. Firstly, some living creatures may fall into it, which will not make you happy. Secondly, “good” neighbors may drop something. A more budget-friendly solution is to build a well-type house. An even cheaper option is to dig a pit, cover it with a board, and make a board cover. Key point: the whole thing must be locked.
Construction of a water well from A to Z: video
Below are examples of videos that clearly display many stages of well piping:
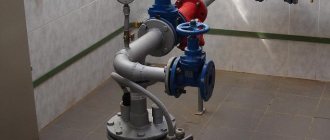
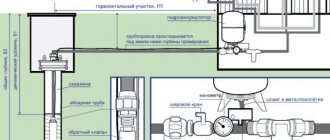
- Borehole drilling, independent arrangement of a well caisson under water, installation of a deep-well pump in a well, installation and connection of a hydraulic accumulator, automation in the caisson:
- Drilling, constructing a caisson well with your own hands, assembling a pumping station for a submersible electric pump:
- Installation of a steel coffer chamber, installation of a hydraulic accumulator and automation for a submersible electric pump:
- Installation and connection of the pumping station to the well in a caisson chamber made of concrete rings:
When piping a well, they focus on the physical parameters of the source: depth, flow rate, static level, water quality. Based on the listed factors, choose the type of pump (surface or submersible), and then the placement option (caisson, house) and connection (via a head or adapter). The complexity of the filtration system depends on the quality of the water; usually artesian sources require the use of expensive purification systems for removing metal oxides and hydrogen sulfide.
Abyssinian borehole
Unlike traditional underground channels, the Abyssinian well has a small diameter (no more than 50 mm) and water is pumped out of it by a surface pump, not a submersible one. There is an opinion that, due to the vacuum created, such a well does not silt up, and over time its flow rate only increases due to the forced erosion of soil capillaries. In reality, such statements have no serious basis.
Before making an Abyssinian well, prepare the required number of casing pipes 2-2.5 m long. Since a depth below 15 m is not expected, it is enough to have on hand 6-7 ready-made sections Ø50 mm plus the first section with a steel cone at the end - a needle. It will play the role of a drilling tool.
Finished needle with mesh
The technology looks like this:
- Make the first section of the casing - the so-called needle. Weld a metal cone to its end, and make holes on the sides and place a mesh, as described in the previous section.
- Dig a small leader hole, insert a needle into it and start driving, keeping it vertical. To do this, you can use the same tripod with a suspended weight or another device.
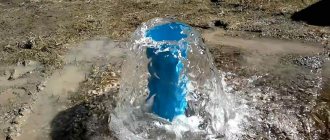
- As you dive, weld new sections and continue hammering the casing. As you approach the calculated depth, check the appearance of water using a weight on a string.
- After passing through the aquifer, lower a polymer pipeline connected to a hand column into the well. Fill it with water and pump the source for 30-60 minutes until clean water comes out. Then proceed with the installation of an autonomous water supply system.
Construction of an Abyssinian well
Advice. When you order the production of a steel cone, keep in mind that its “skirt” should be 3-5 mm wider than the casing pipe, so that when driving it does not tear off the mesh against the walls of the shaft. To make work easier, make the end of the needle as sharp as possible.
The Abyssinian well has one significant drawback: before drilling it, you need to know for sure that there is groundwater in a given place. Otherwise, you risk burying all the pipes in the ground, since it is not always possible to remove them back. The advantages of the source are ease of implementation and minimal consumption of materials. If you wish, you can drill a similar well right in your house, as a team of workers demonstrates in the video:
Well inside the house
Drilling indoors
Of considerable interest is the well, which is located directly in the house:
- The indoor water supply system involves a water lifting installation with a pressure tank and a periodic pump; it will satisfy the most ambitious demands. In addition, installation located in the center of the house (in the basement) is economical and does not require large expenditures of materials.
- A water tank can be installed in the attic
- Installation in the basement or a pressure tank in the attic (in an insulated extension) will ensure complete automation of the water supply to your country house
- A well in the basement of a house is drilled during the laying of the foundation, at the construction stage, when there is no ceiling yet
- It is also possible to make a well in the basement if the first floor is covered and a temporary opening is left above the well
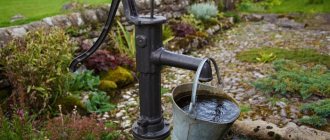
- Nowadays, hand piston pumps are sometimes still used. In this case, there should be a tank in the attic from which water under pressure will flow into the washbasin or shower
How to avoid mistakes when drilling
The lack of experience among self-taught drillers is most often visible in the following:
- The drill is lowered too deep, causing the casing to cross the aquifer. Solution: lift the casing pipe or insert another shorter one into it, after which the previously installed pipe must be removed.
- The casing pipe did not reach the required depth, which caused the soil below to collapse and the well's productivity immediately dropped. Solution: you need to remove the soil with a bailer, then immerse the pipe to the required depth.
- The pump was mounted too low, causing the well to become clogged with sand. Solution: the pump must be removed and, using a bailer, selected sand, installed correctly. The correct position is determined as follows: the operating pump is lowered gradually until sand is found in the water it pumps out. After which the pump is raised slightly until it begins to pump clean water. As a rule, the correct position of the pump is 1-2 meters from the bottom.
Timely cleaning is necessary for wells of all types. Signs that a water structure needs service can be: the presence of air pockets in the flow, jerks in the water outlet, the presence of various impurities in the water (sand, silt).
If you miss the moment of cleaning, the productivity of the well may no longer be restored. To restore normal operation, purify with a water or air compressor. The most radical cleaning methods are using electricity or acid. However, these methods are quite risky and are best left to specialists.
Thus, a DIY home well requires the same attention to care and maintenance as deep artesian structures. Drilling a water source yourself is not difficult, but you need to be careful during the work and call a couple of friends for help.
How we are working?
Our company works exclusively within the framework of the concluded contract. You can contact us through the website or by phone: managers will send specialists to your site who will carry out an initial analysis and calculation of the cost and depth of the well, which is carried out using cadastral information and statistics accumulated over 15 years, and will also help you choose the optimal price ratio -quality". After clarifying all the nuances of our work, we are ready to start drilling. For discussion, you can choose any method convenient for you:
- in the office;
- at your home.
- At the upcoming drilling site
After this, the arrival time of our team is agreed upon. You are required to prepare the site for their arrival and meet the workers. If necessary, we are ready to help with preparations.
Well operation
Unfortunately, well water is not always suitable for drinking. Therefore, after drilling, you should check the quality of the water by sending it to the laboratory of the sanitary and epidemiological station.
The well requires regular cleaning. If air rushes begin to occur when drawing water, then the formation of air pockets, sand impurities, etc. is possible. If the well is not cleaned in time, it may no longer be repairable.
Important to know: The compressor should be purged regularly. It is better to use the services of special organizations.