Here you will learn:
- Types of wells for private water supply
- Advantages and disadvantages of sand and artesian wells
- Options for arranging water supply from a well
- What does the water supply system from a well to a house consist of?
- Principles of drawing up a diagram and laying a water pipeline
- Installation of water supply from a source under the house
- Installation and connection of the pump
- Underground pipeline
- Connecting the receiver
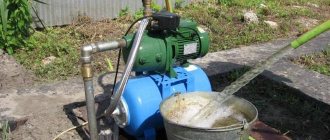
Autonomous water supply is used in private homes in the absence of a centralized system. The ideal solution is to bring water into the house from a well, which will allow you to enjoy comfort while remaining independent from utilities. Let's look at how to introduce water into a house from a well, and connection diagrams.
Source device: choose the best one
To supply water year-round to your country house, sand or artesian wells are most often used. Let’s take a closer look at which one is best suited for your site.
A sand well can provide clean running water to a small house and its surrounding area, based on an average consumption of no more than 1.5 cubic meters. m/hour. It is ideal for a summer house or small cottage.
It is drilled to a depth of 10 to 50 meters, which is enough in most cases. The liquid in such a well is usually clean, but nevertheless, the installation of filters is mandatory, as it may contain various impurities. The productivity is quite modest, no more than 5 cubic meters per hour, and its service life is usually within 10 years.
If you plan to live in your home all year round and have water supply from a well, then an artesian will be the ideal choice.
It is drilled to a depth of more than 100 meters. The main advantage is considered to be a huge supply of clean water. It is capable of delivering up to 10 cubic meters/hour. Usually this is enough for uninterrupted water supply to a large house with a plot in which 4–6 people live. With proper care, it can last at least fifty years.
Principles of drawing up a diagram and laying a water pipeline
First, they draw up a water supply plan, which indicates how to supply and bring water from the well into the house. The diagram includes boilers, consumers, collectors, pumps and filters for the well. The drawing indicates the location of these structures and components, indicates the direction of the pipeline and the location of the pipes.
The general scheme of the water supply system in the house and on the land includes the following elements and parameters:
- Well;
- Pumping station or pump;
- Hydraulic accumulator;
- Water purification system for supply to the premises;
- Stop valve;
- Tee for water distribution;
- Location of pipes inside the house and on the site.
Pipes in the house are laid using two methods. The sequential method is optimal for a small house with an area of up to 100 square meters or a summer house for seasonal use. In this case, water enters the house from the well through the main pipeline. A tee is installed at each mixer or tap, which brings water to the consumer.
The collector method of laying and distributing a pipeline is much more expensive, but more convenient and efficient. It requires the use of a larger number of pipes, since a pipe is routed to each tap separately. This liner is suitable for spacious cottages and for those who plan to live in a country house all year round.
If you are just planning to build a country house and have not yet decided on a project, you will find dozens of ready-made options in the MariSrub catalog. For you - two-story and one-story houses with a balcony and a terrace, cozy compact dachas with or without an attic, spacious cottages with a garage, veranda and other outbuildings. Choose the project you like, and the architect will make the necessary changes. In addition, you can order custom design!
How to bring water into the house
The principle of water supply is relatively simple and involves the presence of a small caisson - a reservoir located above the source, which contains equipment for controlling the well pump. If the winters in your region are not cold, a hydraulic accumulator is installed in the caisson.
The caisson can be made of plastic, metal or brick. Afterwards, a trench is dug from it to a depth of 15–20 cm below the freezing point of the soil. A pipeline is laid at the bottom through which water will be supplied. An electrical cable must also be laid in the trench, from which the submersible pump will subsequently be powered.
Winter option. If winters in your region are very cold, you need to insulate the water supply to your home.
The water treatment system is calculated for each site individually, depending on the analysis of water from the well. In this case, filters should be installed immediately before the entrance to the storage tank. Actually, this is exactly what the water supply scheme for a private house from a well with a hydraulic accumulator looks like.
Options for arranging water supply from a well
Method No. 1 – connection with an automated pumping station. If there is a shallow well on the site, and if its water level allows, you can install a hand pump or pumping station. The operating principle of this system is that water is pumped into a hydropneumatic tank using a submersible pump; its capacity can range from 100 to 500 liters.
When working with a shallow sand well, one of the best options is to install an automated water supply system that ensures an uninterrupted supply of water to the house.
The storage tank itself has a rubber membrane and a relay that regulate the water pressure inside the tank. If the tank is full, the pump is turned off, at the moment when water begins to be consumed, the relay sends a signal to the pump to turn on and it begins pumping water from the well.
This means that such a pump can operate both directly, supplying water to the system, and after the pressure in the system drops to a certain level, in order to replenish the “reserve” in the hydropneumatic tank.
The receiver itself (hydraulic tank) must be placed in any most convenient place in the house to connect the pipeline, usually a utility room. A trench is dug from the caisson to the point where the pipe enters the house, and a water pipe and an electrical power cable for the pump are placed at the bottom.
If possible, it is recommended to buy an electric heating cable, which, in addition to powering the pump, will also warm up the pipe in winter, thereby protecting it from freezing.
Method No. 2 – with the installation of a deep-well pump. During this method of water supply, the task of the deep pump is to pump water from the well into a storage tank, which is located at the highest point of the house. As a rule, a place is allocated for arranging a storage tank in the attic or second floor of the house.
If you decide to place the tank in the attic, you need to insulate its walls, which will prevent the water in it from freezing in the winter. Due to the location of the tank at a high point, a water tower effect is created, during which, due to the height difference between the hydraulic tank and the connection points, pressure arises, in this case 1 m of water column equals 0.1 atmosphere.
The tank, as a rule, is made of food-grade plastic or stainless steel. Volume from 500 – 1500 liters. Depending on the volume of the container, the amount of water depends: this is important, since during a power outage it will flow into the tap by gravity. Installing a limit float switch will ensure that the pump automatically turns on when the water level in the tank drops.
Deep pumps are used when the distance to the water level in the well is more than 9 meters. When choosing a pump, it is necessary to take into account the productivity of the well. Despite the fact that only the rate of accumulation of the water storage tank will depend on the power of the device, during purchase it is better to be guided by the mark of the maximum water consumption in the house.
The deep pump, along with a pipe and an electric cable, is lowered into the well, suspended with a winch on a galvanized cable; the winch must also be installed inside the caisson. In order to maintain the required level of pressure inside the system and to prevent water from being pumped back into the well, a check valve is installed above the pump. After all elements of the system are installed, you only need to check the internal wiring to the connection points, and then connect the equipment to the control panel.
Installation of water supply from a source under the house
It is possible to make a well inside a house, but due to some difficulties associated with the rather large dimensions of a conventional drilling rig. It follows from this that the mine will have to be drilled using a MGDU, which can be disassembled and carried inside.
You can do it even simpler: drill a well in advance, even at the stage of building the box, namely during the construction of the foundation. In such a situation, a conventional drilling rig will help you, and you will not need to overpay for drilling with the help of a MGBU, the services of which are usually more expensive.
Let us remember that the main purpose of a well in a house is to save money, since if the source is located in a warm basement, then there is no need to install a caisson, dig a trench, lay a water supply system and its thermal insulation. According to the most conservative estimates, installing a well under a house can save at least 30 thousand rubles.
Difficulties may arise during maintenance of the mine and the water supply itself. The fact is that it is unlikely that there will be much space in your basement for pumping equipment, filters and a hydraulic accumulator, and this imposes its own limitations.
Series connection of water intake points
This method is known as the tee method. When installing a serial connection, all points, such as a sink, shower, washbasin, are connected to the system in series, that is, one after another on one pipe. This method significantly reduces the cost of water supply, since much less consumables are required. A significant disadvantage of a series connection is the possibility of reducing the pressure in the system, which will be greater the further the drainage point is from the pump.
Parallel connection of water intake points
A parallel, or collector, connection is a method of installing a home water supply system in which a separate line is drawn for each water intake point. This system makes it possible to provide the same pressure for all consumers, but the cost also increases significantly.
Water supply to a private house from a well: system diagram for a private house
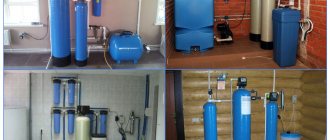
Convenience in suburban areas is provided by a non-centralized water source. In theory, the technology for arranging the system is quite simple and involves forming a well, installing a caisson, installing a pipeline and a storage tank. By combining all these elements together and connecting automatic equipment, you can supply water to a country house and provide comfortable conditions for people to live there permanently. Each of the listed stages of construction has its own nuances and subtleties, which should be familiarized with before starting work.
Diagram of the installation and installation of water supply for a private house from a well
The use of a well is accompanied by certain features that distinguish this system from a well:
- Water is taken from several horizons. For these purposes, perched water, as well as artesian and sand levels can be used.
- The mouth is reliably sealed, because the hole of the well is much smaller in size than a well shaft.
- Since water is drawn from a house through a well from a great depth, there is a need to install volatile equipment, as well as a backup generator in case of power outages.
The system will also require the installation of a caisson. This element is placed at the mouth. It is a pit, the depth of which is 1.5-2.5 m. The caisson is used to place equipment and insert a line under pressure, which is laid below the level of winter freezing of the soil.
Well design diagram and principle of its operation
What factors to consider when developing a water well installation plan?
Before starting work on organizing a water supply system fed from a well, it is imperative to draw up a preliminary diagram. This will allow you to indicate the direction in which construction will go, divide this process into stages, and study in detail the nuances and difficulties of implementing each of them. Purification equipment will help improve water quality. In most cases, installing fine and coarse filters will be sufficient for a summer cottage.
Note! If we are talking about purchasing special equipment for removing iron or softening water, then this will require laboratory analysis of a sample from a well and the help of specialists. Otherwise, the purchase may turn out to be a waste of money.
If you work on developing a water supply system in a private house yourself, you need to take into account the basic parameters of the site and the system:
- the depth of the aquifer in the soil;
- zone where groundwater is located;
The depth of the well depends on the level of groundwater
- markings and indicators of materials used for construction;
- dimensional parameters of structures and system elements;
- dimensions and nature of placement of the caisson;
- the point where the well will be formed;
- underground source characteristics;
- operating conditions at the site;
- Residents' water consumption patterns.
The maximum working life, which is typical for artesian wells, is up to 50 years. In this case, there is practically no need to filter the liquid, since the water does not contain impurities that can damage the pumping equipment. The pipeline layout is selected taking into account the volume of daily water consumption and the flow rate of the source. This is necessary so that during peak hours residents can use the system without restrictions.
1. Production column, 2. Annular space, 3. Filter part of the column, 4. “Verkhovodka”, 5. Aquifers, 6. Aquifer layers (dense clays), 7. Cement filling, 8. Stuffing box device, 9. Blind steel column (conductor)
The possibility of placement both outside and inside the building distinguishes a well from a well. The source may go underground or to the ground floor. As a result, the maintenance system is significantly simplified, and it is also possible to reduce the cost of laying a water supply system. Home communications have an extremely simple structure. The system assumes the presence of a well, inside of which or on its surface a pumping station is installed that transports water to points of consumption.
Helpful advice! If the house is used for temporary residence, it is necessary to organize a winter water supply on the site, where the internal circuits will be emptied when the heating is not in use.
Advantages and disadvantages of a typical water supply scheme for a private house from a well
In order to avoid difficulties during the further operation of the water supply system, it is necessary to foresee in advance options for solving problems characteristic of these communications.
Typical water supply system using a well, a pumping station and an automatic water supply system
Uninterrupted operation of the system every time the tap is opened is possible only if a stable water pressure is maintained in the pipes. To do this, the pumping equipment must operate constantly, as a result of which the unit quickly wears out. For this reason, you should buy high-quality stations that are designed for high loads.
There is a possibility that if there is a power outage, the water supply will stop. In this case, you need to provide an alternative solution to the problem or a way to create an additional supply of liquid.
Operating the pump is accompanied by other difficulties. The unit must be powerful enough to provide water to several consumers at once. In addition, the equipment needs to be placed somewhere, so you will have to allocate space for its installation.
When installing a deep well pump, it is necessary to take into account factors affecting the design pressure
Taking into account the above, to bring water into the house from a well, you will need the following:
- Source of water.
- Surface or deep-well pump with centrifugal action.
- Caisson for pipeline insertion.
- A check valve that prevents water from flowing back when the pump is turned off.
- An expansion tank in the form of a hydraulic accumulator equipped with internal membranes.
- Filtration equipment to maintain water quality.
- Automatic system for monitoring the presence of water in pumping equipment.
If the construction budget is limited, you can use a storage tank, which is located at the highest point of the house. An attic or attic space is suitable for these purposes. But the best option would be a pumping station in combination with a hydraulic accumulator.
Water purification system connection diagram
Helpful advice! For difficult operating conditions, it is better to choose a two-stage scheme. It will ensure uninterrupted operation of the system if the well is located far from a residential building, its depth exceeds 50 m, or the productivity does not cover the demands of residents during peak hours.
Features of a water supply tower scheme in a private house from a well
Tower water supply in a private house involves placing a storage tank in the attic. It is here that the pump delivers water to meet consumer demands during peak hours. According to this scheme, water moves through the system to points of consumption by gravity.
For tower water supply, an expansion tank is a mandatory element. It can have a simple design or be additionally equipped with a float-type switch.
Scheme of a tower water supply system in a private house from a well
The operating principle of the switch is as follows:
- When the storage tank is full, the pump turns off.
- As residents use water, the liquid level in the reservoir decreases.
- When the water level reaches a certain point, the float is activated and starts the pump to replenish the spent reserves.
This option for arranging communications is considered the most budget-friendly, easy to maintain and reliable. Eliminates the possibility of water hammer.
The scheme also has disadvantages:
- to install the tank, you will need to take up free space in the attic, which could be used for other needs;
- the pressure in the internal water supply systems will be unstable, so the pressure in the taps may disappear;
- the load on the supporting structures of the building increases;
- the system needs insulation.
Connection diagram of the storage tank to the well and other communication nodes
Diagram of a water well in a private house with a pump and two-stage supply
The most convenient option to use is a system using a pumping station. On sale you can find many devices designed for arranging an autonomous water supply for a country house using centrifugal submersible units or vibration devices.
Related article:
Plastic caisson for a well: how to choose and install it yourself
How to independently select and install a suitable tank. Purpose of the caisson. Prices and characteristics of the most popular models.
Schemes of such communications, in addition to standard elements, include:
- dry running sensor;
- relay;
- hydraulic accumulator
The main component of the system is a station equipped with a pump that is installed on the surface.
Water supply diagram using a well pump
This arrangement is very convenient because it offers an effective solution to the problem when the pressure in the pressure pipeline decreases. When the tap is opened, a drop in indicators in the system is detected by a relay. It is triggered, starting the pumping of fluid into the accumulator. When the reservoir is filled, the internal membrane stretches and the pump turns off.
After performing the above steps, the pressure in the hot and cold water supply pipe system automatically equalizes. If the pumping station does not have a sufficient level of power to provide all consumers with liquid during peak hours, it is recommended to use a two-stage water supply scheme in a private house with additional equipment.
Note! High performance of a pumping station is not always an advantage. This indicator should not exceed the debit of the water source. Otherwise, a “dry running” effect appears and equipment parts will be subject to severe wear.
In a two-stage system, the reservoir is installed immediately after the pump. The volume of this container varies between 500-1000 liters. The tank is equipped with a float-type switch. You will also need additional pumping equipment to pump liquid into the system. It is connected to a storage tank. Next in line is the installation of a hydraulic accumulator and pipelines to the points of consumption.
Well pump design diagram
Do-it-yourself plumbing according to the diagram
Let's look at the water supply system step by step using the collector connection method as an example:
- A shut-off valve is installed after the storage tank, followed by a tee.
- In the tee, the water flow is divided into two directions - for the filtration system and for other needs that do not need purified liquid (watering the garden, washing a car, washing machine).
- Water is supplied to a deep filter.
- Then a tee is installed, from which the cold and hot water line is supplied. It goes into the heater and is then distributed.
Connecting the hydraulic accumulator and setting up the automation
The hydraulic accumulator is responsible for maintaining constant fluid pressure in the system and also protects the pump from damage. When laying a water supply system in a private house with your own hands from a well, a scheme that includes this element is most often used.
This device plays the role of a storage tank, which operates due to automation. The automation kit is connected using a special bushing equipped with five outputs.
Rules for laying pipes in the house
When installing a home water supply from a well, you should approach the choice of the diameter of the water pipes with the utmost responsibility, because the overall throughput and noise level depend on it.
To calculate the size, you should start from the approximate length of each individual line; the calculation is carried out from the accumulator to the water intake point:
- for a line less than ten meters long, the use of pipes Ф16-20 mm is allowed,
- for a route about thirty m long - Ф25 mm,
- more than forty-five meters long and not less than 32 mm.
Important: choose the diameter of the collector pipe correctly. If the system is small, it will not work correctly and will not be able to provide the necessary pressure for comfortable use by all consumers.
The water supply from the collector should be calculated taking into account the fact that about 5 liters flow through a regular tap in one minute. Knowing this indicator, you should calculate the amount of water consumed simultaneously from all points at peak moments; based on this indicator, the diameter of the collector is selected:
- 25 mm at a consumption of 30 l/min,
- 32 mm at a consumption of 50 l/min,
- 38 mm at a consumption of 75 l/min.
Automation for water supply wells
Downhole automation is conventionally divided into three generations:
First generation.
The simplest automation. Consists of a hydraulic accumulator, pressure switch and dry running relay (optional).
Second generation.
Control unit and electronic sensors. A hydraulic accumulator is not required.
Third generation.
Programmable systems allow you to control the pump up to adjusting the voltage supply to the motor.
Read more about automation systems for borehole pumps in our article automation for pumping equipment.
The Zagorod company installs first generation automation. It is simple, but inexpensive and reliable. The devices are mounted through a five-pin fitting (five-pin). The following is connected to the connector terminals:
- Pump.
- Internal water supply pipe.
- Pressure gauge.
- Hydraulic accumulator.
- Pressure switch.
Fig. 13. Scheme of water supply from a well with a hydraulic accumulator
Question! Is it possible to do without a hydraulic accumulator in a water supply system?
Yes, you can. To do this, it is necessary to install the appropriate automation (unlike well pumps, well pumps do not have built-in automation). However, comfortable conditions - with a standard of 20-30 starts - can only be achieved by using a hydraulic accumulator. Without a hydraulic tank, the pump will turn on every time the tap is opened, and the automation will not protect against water hammer.
The pressure switch turns the pump on or off when the pressure changes. At the bottom of the relay there is a metal membrane. When the taps are closed, the pressure increases, the membrane bends upward and moves the spring to a given range. When displaced, the circuit opens and the pump turns off. When the tap is opened and the pressure drops, the membrane returns to its original position. The spring opens and closes the circuit. The pump turns on. If there is water in the hydraulic tank, it enters the pipes and compensates for the pressure drop. The pump does not turn on, its working life is saved.
Do-it-yourself connection of a pressure switch in a water supply system from a well
Fig. 16. Electrical diagram for connecting the pump automation
Draining water from a well for the winter
To drain water for the winter, a drain valve is installed in a caisson. If an adapter is installed, an automatic drain valve is installed on the pipe in the well. Important: when using a surface pump (pumping station), the drain valve is not used.
Fig. 17. Operating principle of the drain valve
Watering tap
You can also remove the watering tap. When piping through an adapter, the tap is removed from the house. If a caisson is installed, then the output is made from the caisson. In summer, the tap is used for watering, in winter - for setting up a skating rink or slide on the playground.
Fig. 18. Removing the watering tap from the caisson
Fig. 19. Removing the watering tap from the house
Choosing pipes for water supply
- Products made of copper are considered to be the best, as they do not rust, have high strength and a long service life. The main disadvantage of copper products is their high cost.
- Metal-plastic products have also gained great popularity. This is due to the fact that such pipes are made of corrosion-resistant aluminum, coated on both sides with a thin polyethylene film. This multi-layer system makes it possible to guarantee high corrosion protection and tear resistance. In addition, the internal polyethylene coating is more resistant to deposits than metal products.
- Polypropylene is characterized by maximum durability and ease of installation. Also, one of the advantages of such products is their low cost and equipment. For example, the price of a simple soldering iron, with which you can lay water pipes throughout the house, rarely exceeds 800–1000 rubles.
Practical tips for installing piping around the house
For year-round operation of a water supply system from a well, you should use the following tips:
- The ideal home plumbing is done in such a way as to prevent pipes from passing through the walls of the premises. But, since the lining leads to a significant increase in the cost of the system, the pipeline is laid inside the walls, but using a protective metal cup, which protects them from deformation caused by shrinkage of the building.
- It is necessary to ensure a minimum gap of at least 20–25 mm between parallel pipes and building structures. This will greatly simplify future repairs. If you do not want to leave the wiring in plain sight, you should hide it in pre-prepared grooves, insulating them at the same time.
- If the water supply system is equipped with drain taps, they should be installed at the lowest points of the system so that water can flow through the drain tap by gravity.
- The easiest method for attaching pipes to walls is using plastic crabs. The distance between them should not exceed two meters with a pipe diameter of 16–20 mm; with a larger size, the distance between the fasteners should be smaller. A well-organized and executed water supply system has the following features:
- Has a minimum number of welded joints. This makes it possible to significantly increase the reliability of the units, while a less powerful and therefore cheaper pump can be used to pump water.
- All joints are made in full accordance with the installation diagram for this particular type of pipeline (series or parallel connection).
- Shut-off valves are installed in all important sections of the water supply system.
- Keep a minimum number of unreliable hose connections - it is advisable to connect even the flush tank on the toilet with a plastic tube rather than a hose.
What does the water supply system from a well to a house consist of?
Before you install a well in your home, you should find out what is needed for this.
An autonomous water supply system is a set of means that ensures the lifting of water from a well, its transportation, accumulation, creation of the necessary pressure parameters, as well as control and coordination of the operation of all elements of the system.
Modern technical and material capabilities make it possible to create a completely autonomous and automatically controlled water supply system, so we will consider just this configuration option.
So, the borehole water supply includes:
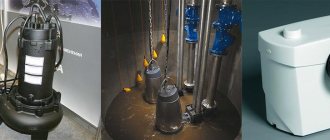
- Deep well pump. Most wells have a depth greater than 8 meters, so it is necessary to use a submersible unit;
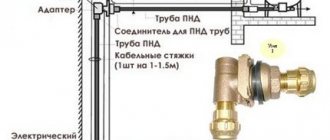
- Nipple with double-sided external thread, check valve and coupling for connecting the pump outlet to the riser pipe;
- Water rise pipe. Here it is important to choose a product that can withstand pressure according to the depth of the well; it is better to use metal-plastic or polymer models; we recommend pipes made of low-density polyethylene (HDPE);
- Pump motor power supply cable and sealed lead-in (moisture-proof terminal block);
- Fitting for transition from a vertical pipe to a horizontal one. This may be an elbow or a tee, depending on the characteristics of the pipe routing;
- Well head. This product is a sealed cover with screw clamps with an outlet for pipe and cable, as well as fasteners for a safety cable;
- A horizontal pipe for transporting water from a source to a house. Here it is also better to use a HDPE pipe of the same diameter;
- A set of fittings for connecting the receiver: rotary couplings, corner filter, nipple. Depending on the specific configuration of the pipes, this set may vary;
- Hydraulic accumulator tank (receiver) 200 liters. It is better to use plastic products with a membrane, equipped with a pressure gauge and pressure switch;
- Magnetic starter, the terminals of which close/open the pump power circuit. The starter is controlled using the operational current from the receiver pressure switch. Installed for starting powerful pumps with high starting currents;
- Pump control station, allowing manual start and restart of the device;
- Water level sensor in the well and an emergency pump shutdown relay when the water level drops below the permissible level.
A high-quality submersible pump can maintain a pressure of 65 meters with a power of only 250 W.
Important! The submersible pump and automatic control elements must be of the highest quality, so we do not recommend saving money or buying products from dubious manufacturers.
Pipeline installation indoors
- The installation of the pipeline should begin after approval of a detailed plan for its passage through the building and the surrounding area. During its development, you can easily identify difficult areas and carefully work them out in advance, because it is easier to solve difficulties at the development stage than to lay a new trench. In addition, a detailed drawing will make it possible to draw up a more specific estimate, which also contributes to significant savings and reduction of unforeseen expenses.
- When laying a pipeline inside walls in grooves, remember that the cold water pipe must be below the hot water pipe. This prevents condensation from entering and prevents heating.
- Installation of a water supply system begins with laying a cold water line, starting with connecting the pipe to the inlet into the house. After this, it is connected to the hydraulic accumulator, then through a tee it goes to the water treatment system and then to consumers.
- The pipe from the coarse filter is led to the bathroom, where it is connected to the toilet cistern. There it is connected to the system through a tee and an additional shut-off valve, then the water is distributed sequentially among all users. Also with shut-off valves at each drainage point.
- The installation of a hot water supply system is carried out in exactly the same way; the only difference is the presence of a larger number of points for attaching the pipe to the walls to prevent sagging.
- After laying the lines and securely fastening them to the walls, you can begin to install plumbing equipment: sink, shower, washbasin.
- After installing all the equipment, it is highly advisable to perform a pressure test of the entire system and check the operation of the drain.
Drilling a water well
Types of drilling depend on the depth of the aquifer and budget:
Manual drilling
Allows you to drill a well up to 10 m deep. To perform work at shallow depths, you will need a drill and casing pipes. To reach greater depths, a drilling rig, winches and rods are used. The rods are connected to each other (usually using threads), and the latter must be equipped with an additional drill.
Manual drilling of a water well
Tip: when making a drill on the lower rod, you need to take into account that the cutting mechanism must cut into the soil clockwise.
If the drill works worse with increasing depth, you can soften the soil by supplying water.
Based on the condition of the soil being removed, the presence of water can be determined. However, we are not interested in wet soil indicating that an aquifer has been reached. You need to break down to the waterproof layer. It is he who is able to provide the need for sufficient water.
The manual drilling process is clearly shown in the video
Percussion-rope well drilling
Percussion-rope well drilling As the name suggests, drilling is performed using a driving nozzle.
Operating principle: the glass is lowered down on a cable, absorbing the rock; after filling it, you need to remove it and knock out the earth. Next, the glass is lowered into the well again.
This heavy tool can be lowered by hand on a rope. But the efforts are not commensurate with the possible savings. And to get to the water you need to work quite a long time.
Drilling rig for a well A more technologically advanced way would be to construct a derrick. A drilling derrick is essentially an ordinary tripod made of steel.
Many forum users advise not to move the pipe, but to use a wooden beam or log (even the trunks of young trees). The tripod is equipped with a winch, and more advanced users install a motor.
Tip: the height of the tower should be commensurate with the dimensions of the driving glass. The larger the glass, the greater the height required for its effective use. Ideally, the height of the tower should exceed the length of the glass by 1.5 m.
The mechanized method of driving a well is shown in the video
The Strong Hydro SBU 60 drilling rig is used.
Rotary percussion drilling of wells
Rotary impact drilling The only difference between this method and the previous one is that instead of a driving glass, a special tool is used. Allowing you to select a rock not by hitting it, but by screwing it into the soil.
Hydrodynamic well drilling
Hydrodynamic drilling of a well is carried out by combining a drill and a pump, so that water washes out the well. Users have different attitudes towards this method. But everyone agrees on one thing: drilling in this way is dirty, the desired shape of the well is difficult to maintain, and drilling is effective only in loose rocks. As a result, this method is used less frequently than others.
Material prepared for the website www.moydomik.net
Video of hydraulic drilling of a well
Performed using a homemade installation from a drill with a pump
Water well casing
After the well is drilled, and more often directly during the work, a casing pipe (plastic or metal) is lowered into the well. It adheres tightly to the surface of the soil and does not allow it to crumble.
Pumping the well after drilling
This is also a mandatory step. It involves pumping out a certain amount of cubic meters from a well. water (depending on the soil and the condition of the aquifer) using a pump. When clean water comes out of the well, the process can be considered complete.
Advice: before you start pumping, think about where the water pumped from the well will be drained.
Scheme of water supply to a house from a well
Typical scheme of autonomous water supply to a house from a well
Operation of water supply
- After checking the functionality of all components, it is necessary to perform several test runs of your pumping station. Moreover, it should be turned on with minimal load.
- Do not forget that at first, when drawing water from a home well, it may be quite cloudy, and it must be given several hours to clear.
- It is necessary to adjust the pump capacity so that it matches the calculated capacity of the aquifer.
- When operating the pumping station, try to avoid short-term switching on in order to extend the life of the pump.
- Annual scheduled inspection and check of the technical part (filters, tanks, pump and the caisson itself).